


-20-
Model G0701 (Mfd. Since 9/17)
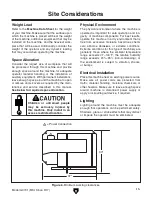
5. Open the upper wheel cover.
6. Rotate the upper wheel by hand several
times (at least three) and watch how the
blade rides on the wheel crown. See
Figure
15 for an illustration of this concept.
— If the blade rides in the center of the
upper wheel and is centered on the peak
of the wheel crown, then the bandsaw is
already properly center-tracked and no
further tracking adjustments are needed at
this time.
— If the blade does NOT ride in the center
of the upper wheel and is not centered on
the peak of the wheel crown, then continue
with this procedure.
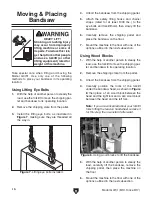
7. Loosen the blade tracking lock lever so that
the blade tracking knob can rotate (see
Figure 16).
Blade Centered
on Peak of Crown
Blade
Centered
on
Wheel
CENTER TRACKING
Wheel
Figure 15. Blade center tracking profiles.
Figure 16. Blade tracking knob and lock lever.
Blade Tracking Knob
& Lock Lever
Note: When the tracking knob is rotated, the
lower portion of the upper wheel will tilt out or
in, which affects the way the blade tracks.
8. Spin the upper wheel with one hand and
slowly adjust the tracking knob with the other
until the blade rides in the center of the wheel
tire without wandering.
9. Tighten the lock lever to secure the setting,
then spin the upper wheel again to confirm
the tracking. If necessary, repeat
Steps 6–8
until you are satisfied with the blade tracking.
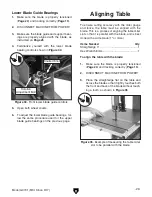
10. Re-adjust the blade guide bearings toward
the blade (refer to
Page 28).
11. Close and secure the upper wheel cover
before beginning operation.
Adjusting Positive
Stop
After using the table at a tilt of other than 0°, the
positive stop allows the table to be quickly and
accurately returned to the horizontal position in
relation to the blade. This is important for accurate
cutting results.
To correctly set the positive stop:
1. Correctly set the blade tension and use the
guide post elevation control to move the
guide post all the way up.
2. DISCONNECT MACHINE FROM POWER!