background image

Model G0449/G0450 (Mfd. Since 8/13)

-63-

READ ELECTRICAL SAFETY 

ON PAGE 52!

G0450 Sanding Drum Motor

Figure 91. G0450 240V sanding drum motor 

wiring.

240V

480V

To Electrical Box 

(additional conversions required for 440V operation) 

W6 

W2 

U2  U6 

V6 

V2 

Wt 

Rd 

Bk 

U1 U5 

L3 

L2 

L1 

V5 

V1 

W1  W5 

U2 

V2 

Wt 

Rd 

U1 

U5 

V1 

V5 

W1 

W5 

Gn 

Gn 

Bk 

W6 

W2 

V6 

U6 

L2 

L1 

L3 

The motor wiring shown here is 
current at the time of printing, but it 
may not match your machine. 
Always use the wiring diagram 
inside the motor junction box.

(additional conversions required for 480V operation)

MOTOR 

MOTOR 

Figure 92. G0450 480V sanding drum motor 

wiring.

G0450 240V 3-Phase 

Page 60 or 

G0450 480V 3-Phase 

Page 62

Содержание G0449

Страница 1: ...ACTURED SINCE 8 13 COPYRIGHT JUNE 2005 BY GRIZZLY INDUSTRIAL INC REVISED SEPTEMBER 2014 BL WARNING NO PORTION OF THIS MANUAL MAY BE REPRODUCED IN ANY SHAPE OR FORM WITHOUT THE WRITTEN APPROVAL OF GRIZ...

Страница 2: ...g grinding tool integrity and the usage of personal protective equipment The manufacturer will not be held liable for injury or property damage from negligence improper training machine modifications...

Страница 3: ...er 28 Paper Replacement 29 SECTION 5 ACCESSORIES 30 SECTION 6 MAINTENANCE 31 Schedule 31 Cleaning 31 Lubrication 31 SECTION 7 SERVICE 33 Troubleshooting 33 Gauge Blocks 36 V Belt Service 36 Bearing Re...

Страница 4: ...nder is used to remove surface material from stock using a looping abrasive belt which is required when preparing a workpiece After the workpiece is placed on the conveyor it moves forward and is pres...

Страница 5: ...int Length x Width 45 1 2 x 28 1 2 in Shipping Dimensions Type Wood Slat Crate Content Machine Weight 1406 lbs Length x Width x Height 58 x 63 x 45 in Must Ship Upright Yes Electrical Power Requiremen...

Страница 6: ...Rubber Body Steel Paint Powder Coated Other Related Information Floor To Table Height 29 33 in Sanding Belt Tension Spring Loaded No Of Pressure Rollers 5 Pressure Roller Type Rubber Pressure Roller S...

Страница 7: ...ing Dimensions Type Wood Slat Crate Content Machine Weight 1382 lbs Length x Width x Height 55 x 60 x 45 in Must Ship Upright Yes Electrical Power Requirement 240V or 480V 3 Phase 60 Hz Prewired Volta...

Страница 8: ...Rubber Body Steel Paint Powder Coated Other Related Information Floor To Table Height 29 33 in Sanding Belt Tension Spring Loaded No Of Pressure Rollers 5 Pressure Roller Type Rubber Pressure Roller S...

Страница 9: ...ob Left Side H Micro Adjust Lock Left Side I Top Cover J Top Cover Handle K Rear Drum L Front Drum Identification M Gas Strut N Pressure Roller O Dust Port P Emergency Stop Bar Q Micro Adjust Knob Rig...

Страница 10: ...proof DANGEROUS ENVIRONMENTS Do not use machinery in areas that are wet cluttered or have poor lighting Operating machinery in these areas greatly increases the risk of accidents and injury MENTAL ALE...

Страница 11: ...reduce accidental contact with moving parts or flying debris Make sure they are properly installed undamaged and working correctly FORCING MACHINERY Do not force machine It will do the job safer and...

Страница 12: ...with the power disconnected and after all moving parts have come to a complete stop MAINTENANCE AND ADJUSTMENTS Never attempt to adjust conveyor belt tracking when the sanding drums are engaged Perfo...

Страница 13: ...eets the specified circuit requirements For your own safety and protection of property consult an electrician if you are unsure about wiring practices or electrical codes in your area Note Circuit req...

Страница 14: ...This installation must be performed by an electrician in accordance with all applicable electrical codes and ordinances Serious injury could occur if you connect the machine to power before completin...

Страница 15: ...nce but always use the drawings in the junction box cover as they will reflect any changes to the machine since this manual was printed 3 Remov the control panel cover and familiarize yourself with Fi...

Страница 16: ...heavy items The following are needed to complete the setup process but are not included with your machine Description Qty Safety Glasses 1 Forklift 1 Lifting Straps w Safety Hooks min 2000 lb capacit...

Страница 17: ...y replace them or for the sake of expediency replacements can be obtained at your local hardware store 68 501 2 Floor Load Refer to the Machine Data Sheet for the weight and footprint specifications o...

Страница 18: ...knobs and hinges Hinges Lock Knobs Figure 9 Gas strut installed right side shown Bracket Jam Nut Gas Strut 4 Close the top cover remove the knobs secur ing the pulley cover and open the cover 5 Pull...

Страница 19: ...ersonalinjurymayoccur if safe moving meth ods are not followed To be safe get assistance and use power equip ment when moving the crate and removing the machine from the crate Figure 13 Lifting the sa...

Страница 20: ...Bolting to Concrete Floors Lag shield anchors with 3 8 lag bolts or anchor studs Figure 14 are two popular methods for anchoring an object to a concrete floor We sug gest you research the many options...

Страница 21: ...strain relief connect the cord to the terminals shown in Figure 17 or 18 and reinstall the junction box cover To connect the sander to the power source 1 Remove cover from the power connection juncti...

Страница 22: ...it runs properly and is ready for regular operation The test run consists of verifying the following 1 The motors power up and run correctly 2 the motors turn the correct direction machine is not wire...

Страница 23: ...power terminal block If using a phase con verter for 240V 3 phase operation ONLY swap the L1 and L3 wires see Figure 21 to correct the conveyor belt rotation The wild wire is connected to the L2 termi...

Страница 24: ...ection 1 V Belt Tension Page 36 Perform after the first 16 hours 2 Conveyor Tensioning Tracking Page 40 3 Drum Adjustments Page 41 4 Pressure Roller Height Page 46 11 Press the CONVEYOR START button t...

Страница 25: ...oving parts at all times to reduce this risk To reduce the risk of serious injury when using this machine read and understand this entire manual before beginning any operations Basic Controls Refer to...

Страница 26: ...sure an even cut This is repeated to yield the desired result The operator rotates the table height handwheel to control the cutting depth If the handwheel is rotated 3 4 turn approximately 1 64 of th...

Страница 27: ...taples dirt rocks and other foreign objects are often embed ded in wood While sanding these objects can become dislodged and tear the sanding belts Always visually inspect your workpiece for these ite...

Страница 28: ...tact with the sanding drums This is the correct height to begin sanding the workpiece Figure 25 Table height handwheel Variable Speed The variable speed knob allows you to increase the feed rate from...

Страница 29: ...l energize and capacitor or motor damage will occur Amp load is directly affected by many factors such as feed rate depth of cut wood type sandpaper grit and workpiece width G0449 Maximum Amp Load 47A...

Страница 30: ...w or crown place the high point up prevents the workpiece from rocking and take very light passes Feed the workpiece at an angle to maximize stock removal and sandpaper effectiveness but feed the work...

Страница 31: ...e spring clip then install the clip onto the right tension wheel 10 Remove the spring tension tool from the ends of the sanding drum to tension the paper and repeat Steps 2 10 for the other drum 138 1...

Страница 32: ...h sanding G2789 150 Grit Use for finish sanding Figure 33 Half mask respirator with disposable cartridge filters H2499 Small Half Mask Respirator H3631 Medium Half Mask Respirator H3632 Large Half Mas...

Страница 33: ...f of the internal components especially the motor Cleaning Moving parts such as chains should be lubricated periodically with a light machine oil Motor bear ings need no lubrication Pillow Bearing Mus...

Страница 34: ...ld be cleaned with mineral spirits and painted with lithium grease every six months Then move the table up or down to spread the grease thoroughly over the threads Do not overlubricate Figure 40 Worm...

Страница 35: ...on Thermal Protection Circuit Breaker to a higher amperage setting 6 Ensure circuit size is suitable for this machine replace weak breaker 7 Test for power on all legs and contactor operation Replace...

Страница 36: ...m pillow bearings 2 Replace drum pillow bearings Grinding screeching or rubbing noise when sanding drums are powered up 1 Drum bearings lack sufficient grease 2 Drum bearings worn 1 Grease the pillow...

Страница 37: ...Table elevation controls are stiff and hard to adjust 1 Table lock is engaged 2 Table lift screws dirty or loaded with sawdust 3 Chain idler roller sprocket lock nuts have been tightened against roll...

Страница 38: ...e board to remove any portions with slight snipe from jointing Then cut the 2x4 into two even pieces to make two 36 long wood gauge blocks Note Save one of the 6 pieces for making a small gauge block...

Страница 39: ...l number Pulley Alignment Pulley alignment is another important factor in power transmission and belt life The pulleys should be parallel to each other and in the same plane coplaner for optimum perfo...

Страница 40: ...46 Pillow bearing mounting nuts washers and set screws Grease Fitting and Cap Mounting Nuts Washers Set Screws NOTICE Do not hammer on the bearing or housing as you WILL damage these precision parts...

Страница 41: ...no obstructions prevent bearing lubrication Figure 50 Key bearing parts Bearing Grease Port Hub Set Screw Bearing Race Guide Pin 9 Insert the new bearing into the bearing hous ing so the set screws a...

Страница 42: ...ging gap Loose hair and clothing could get caught in machinery and cause serious personal inju ry Keep loose clothing rolled up and long hair tied up and away from machinery To tension the conveyor 1...

Страница 43: ...n veyor tracks in the opposite direction Note Tracking changes may take up to three min utes before they are noticeable 4 When the conveyor is near the middle of the rollers or table loosen the adjust...

Страница 44: ...drums for best results 5 At both ends of the rear drum measure the distance between the edge of the rear drum and the rear upper frame as shown in Figure 54 The difference between these two mea sureme...

Страница 45: ...g Rear Drum Height Adjusting Drums Parallel to Conveyor Belt on Page 44 14 Tighten the front drum pillow bearing lock nuts Figure 57 Example of small gauge block positioned between front and rear drum...

Страница 46: ...e other Front View CORRECT INCORRECT B A B A B A A B Within 0 002 side to side Sanding Drum Sanding Drum Conveyor Belt Conveyor Belt Figure 58 Drum parallel to conveyor belt 3 Place the gauge blocks r...

Страница 47: ...smaller number fine grit larger number 11 Tighten the front pillow bearing lock nuts 12 Check to make sure that when you tightened the nuts the front drum did not move horizon tally and that the front...

Страница 48: ...ch before the workpiece will slip or kick out causing a hazard to the operator If this happens you have raised the pressure rollers too high for them to function as intended the pressure rollers MUST...

Страница 49: ...st each scoop in this manner until the sanding drums do not scrape the scoops then close the pulley cover and reinstall the handwheel Figure 65 Scale pointer screw Tools Needed Qty Hex Wrench 4 5mm 1e...

Страница 50: ...onveyor are parallel within 0 002 from one side to the other If they are not within this range then additional fine adjustments should be made at the drum pillow bearings To adjust the table lift scre...

Страница 51: ...ting all the bolts screws washers etc back into the holes from which they came This simple habit will take slight ly longer when disassembling the machine but it will save you a lot of time and reduce...

Страница 52: ...he side of the machine 10 Remove the rear conveyor end guards 4 but ton head screws The drum sander should now look similar to Figure 71 Figure 72 Chain removed from table by removing the master link...

Страница 53: ...the drum sander cabinet as shown in Figure 75 Note When removing the table be careful with the ball thrust bearings located under the table elevation shafts part 378 in the breakdown drawing as they...

Страница 54: ...es disconnected or connected during any wiring task to ensure tight connections 4 WIRE COMPONENT DAMAGE Damaged wires or components increase the risk of serious personal injury fire or machine damage...

Страница 55: ...1 COM 3 NO 2 NC EMERGENCY STOP BAR LIMIT SWITCH Bk Bk Bk Gn Gn Rd Wt Wt Wt ELECTRICAL BOX G0449 240V see Pages 56 57 G0450 240V see Pages 59 60 G0450 480V see Pages 61 62 FEED MOTOR G0449 see Page 58...

Страница 56: ...junction box Hot Hot Grd L1 L2 Grd Grd Hot Hot DISCONNECT SWITCH as recommended 1 PHASE 240 VAC Figure 79 G0450 power junction box DISCONNECT SWITCH as recommended 3 PHASE 240 480 VAC Hot Hot Hot Hot...

Страница 57: ...ehind Conveyor STOP Switch Drum STOP Switch Emergency STOP Switch Drum START Switch Amp Meter To Electrical Box A 14 13 14 13 21 22 21 22 21 22 6 7 6 4 5 5 8 9 8 Rd Rd Rd Rd Rd Rd Rd Rd Rd A Bk Bk Fig...

Страница 58: ...56 Model G0449 G0450 Mfd Since 8 13 READ ELECTRICAL SAFETY ON PAGE 52 G0449 Electrical Box 240V Figure 82 G0449 electrical box...

Страница 59: ...CU 50 220V Coil TECO RHU 80K3 L1 Wt Wt Rd Wt Wt Wt Wt Wt L1 2T1 6T3 14NO 4T2 1L1 5L3 13NO 3L2 A1 A2 TEST RCA TRIP IND 97 NO 98 NO 95 NC 96 NC 2T1 4T2 6T3 O R OFF RESET A 3 2 2 3 2 5 3 TECO CU 11 220V...

Страница 60: ...250VAC Gn To Electrical Box Bk 2 Bk 6 Wt Bk Rd Figure 83 G0449 sanding drum motor wiring and start capacitors Figure 84 G0449 sanding drum motor run capacitors Figure 85 G0449 feed motor wiring Figur...

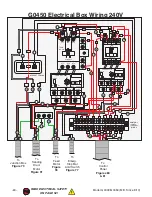
Страница 61: ...Model G0449 G0450 Mfd Since 8 13 59 READ ELECTRICAL SAFETY ON PAGE 52 G0450 Electrical Box 240V Figure 89 G0450 240V 3 phase electrical box wiring...

Страница 62: ...k Wt Wt L3 2T1 6T3 14NO 4T2 1L1 5L3 13NO 3L2 A1 A2 TEST RCA TRIP IND 97 NO 98 NO 95 NC 96 NC 2T1 4T2 6T3 O R OFF RESET A 1 4 2 TECO CU 11 220V Coil TECO RHU 10K1 9 9 1 Bk Rd Rd Rd Wt 2 Rd Bk Wt Rd Gn...

Страница 63: ...Model G0449 G0450 Mfd Since 8 13 61 READ ELECTRICAL SAFETY ON PAGE 52 G0450 Electrical Box 480V Figure 90 G0450 480V 3 phase electrical box wiring...

Страница 64: ...T1 6T3 14NO 4T2 1L1 5L3 13NO 3L2 A1 A2 TEST RCA TRIP IND 97 NO 98 NO 95 NC 96 NC 2T1 4T2 6T3 O R OFF RESET A 0 75 1 TECO CU 11 220V Coil TECO RHU 10K1 9 9 1 Bk Rd Rd Wt 2 Rd Bk Wt Rd Gn 2 1 8 8 Rd 2T1...

Страница 65: ...U6 V6 V2 Wt Rd Bk U1 U5 L3 L2 L1 V5 V1 W1 W5 U2 V2 Wt Rd U1 U5 V1 V5 W1 W5 Gn Gn Bk W6 W2 V6 U6 L2 L1 L3 The motor wiring shown here is current at the time of printing but it may not match your machi...

Страница 66: ...quired for 480V operation 8 2 5 1 9 7 4 6 3 4 9 8 5 2 3 1 6 7 The motor wiring shown here is current at the time of printing but it may not match your machine Always use the wiring diagram inside the...

Страница 67: ...349 350 350 1 351 352 355 356 356 357 357 358 358 358 358 359 359 360 361 364 365 368 367 366 369 577 370 371 372 373 374 375 376 377 378 379 380 380 1 380 2 380 3 381 381 1 381 2 382 382 382 382 383...

Страница 68: ...DWHEEL 313 P0449313 HEX BOLT M10 1 5 X 45 374 P0449374 HANDWHEEL SLEEVE 314 P0449314 FLAT WASHER 10MM 375 P0449375 SET SCREW M6 1 X 10 315 P0449315 HEX NUT M10 1 5 376 P0449376 HEX NUT M6 1 316 P04493...

Страница 69: ...SCREW M6 1 X 6 571 P0449571 BUTTON HD CAP SCR M6 1 X 10 523 P0449523 WRENCH 12 X 14MM OPEN ENDS 573 P0449573 TERMINAL BAR 1P 524 P0449524 HEX WRENCH 4MM 574 P0449574 GROUND TERMINAL BAR 1P 524 1 P0449...

Страница 70: ...413 413 414 414 415 416 417 419 420 421 422 424 425 423 425 1 425 2 426 426 427 427 428 429 430 431 432 433 434 436 437 438 438 1 438 2 438 3 438 4 438 5 438 6 438 7 438 8 438 9 438 10 438 11 439 439...

Страница 71: ...6 P0449406 INFEED ROLLER SUPPORT BRACKET LH 441 P0449441 KEY 5 X 5 X 55 407 P0449407 POINTER 442 P0449442 HEX NUT M8 1 25 408 P0449408 PHLP HD SCR M5 8 X 10 443 P0449443 MOTOR SHAFT SLEEVE 409 P044940...

Страница 72: ...H 496 P0449496 SANDING DRUM PULLEY 482 2 P0449482 2 SANDPAPER TENSIONING WHEEL RH 497 P0449497 SET SCREW M8 1 25 X 15 483 P0449483 EXT RETAINING RING 34MM 498 P0449498 HOLD DOWN ROLLER 484 P0449484 SA...

Страница 73: ...EL GEAR A 25T 617 P0449617 CAP SCREW 1 4 20 X 5 8 604 P0449604 BEVEL GEAR B 25T 618 P0449618 DRIVE SHAFT BRACKET 605 P0449605 STEP BOLT 5 16 18 619 P0449619 FLAT WASHER 5 16 606 P0449606 MOUNTING BRAC...

Страница 74: ...L2 T 5 L3 V 4 T2 U 2 T1 W 6 T3 A1 FEED MOTOR CONTACTOR 440V Coil 440V Coil 741V2 741V2 742V2 742A 743V2 743A 744V2 744A 745V2 745AV2 746 746 765 765 749 753 755 755A 756 759V2 760V2 761V2 762V2 763V2...

Страница 75: ...TE 743AV2 P0450743AV2 OL RELAY TECO RHU 80K2 G0450 480V 759V2 P0449759V2 ANALOG AMP METER 100 5A V2 11 13 744V2 P0449744V2 CONTACTOR TECO CU 11 220V G0449 G0450 240V 760V2 P0449760V2 START BUTTON GBF...

Страница 76: ...220V LABEL 811 P0449811 DON T CHANGE SPEEDS LABEL 802 P0449802 FEED ONLY ONE LABEL 812 P0449812 HAND WARNING LABEL 803 P0449803 HAND PINCH IN BELT LABEL 813 P0449813 GRIZZLY GREEN TOUCH UP PAINT 804 P...

Страница 77: ...metalworker ____ 0 2 Years ____ 2 8 Years ____ 8 20 Years ____20 Years 6 How many of your machines or tools are Grizzly ____ 0 2 ____ 3 5 ____ 6 9 ____10 7 Do you think your machine represents a good...

Страница 78: ...LINE FOLD ALONG DOTTED LINE GRIZZLY INDUSTRIAL INC P O BOX 2069 BELLINGHAM WA 98227 2069 Place Stamp Here Name_______________________________ Street_______________________________ City______________S...

Страница 79: ...he State of Washington County of Whatcom We shall in no event be liable for death injuries to persons or property or for incidental contingent special or consequential damages arising from the use of...

Страница 80: ......

Отзывы: