Page 3
OPERATION - START UP
The device will initially start up in warm-up mode which lasts for about two minutes. Immediately after
applying power the LCD will display the software version number and begin a two minute countdown.
During the warm-up mode the alarm relays will be set to off, the LED will flash red, all communications are
disabled, the key pad is disabled and the analog output will be set to it's minimum value.
OPERATION - NORMAL MODE
In normal operation the sensor will measure the CO level in the duct air and output a proportional value
on the analog output which is scaled to the default range of 0-300 ppm. The CO reading will also be
displayed on the LCD and updated in the communication value. If alarm relays are installed, the present
CO reading is compared to the setpoints and appropriate action is taken if an alarm condition exists. The
status LED on the front cover will be green to indicate normal operation.
OPERATION - ALARM MODE
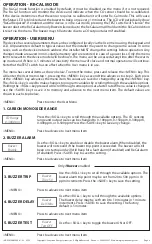
The CO reading is compared to pre-set setpoints for alarms and if they are exceeded the device enters
Alarm mode. The alarm reset back to Normal mode can be configured via the menu as either Automatic
Reset or Manual Reset.
Automatic Alarm Reset (Default)
Two optional relays are used to indicate alarm conditions. The trip point, hysteresis and delay time of
each relay can be programmed via the menu. For example, Relay 1 defaults to a 50 ppm trip point, 10
ppm hysteresis and 2 minute delay time. Relay 2 defaults to a 150 ppm trip point, 20 ppm hysteresis and
2 minute delay time All of these values can be changed via the menu. In the example for Relay 1, a timer
is started when the CO level exceeds 50 ppm (the trip level). If the level drops below 50 ppm before 2
minutes (the delay time) has expired then the relay is not activated. If the CO level exceeds 50 ppm for
2 minutes then the relay is activated. The relay will remain activated until the CO level drops below 40
ppm (trip level – hysteresis). This relay can be used to signal a “low alarm”. Relay 2 operates in the same
manner and has independently programmable trip point, hysteresis and delay time. This relay can be used
to signal a “high alarm”. The LCD will indicate the Alarm mode details and the LED will flash red.
Manual Alarm Reset
In this case, the alarm relays will activate the same way as described above but will not automatically reset
to Normal Mode when the CO level drops below the trip level - hysteresis value. In order to reset the relay
alarms to Normal Mode the user must also press the TEST switch on the front cover (or activate the remote
TEST input). If the CO level is below the alarm level AND the TEST switch is pressed, then the relay alarms
will return to the Normal Mode.
The Manual Reset also applies to the buzzer alarm. If the buzzer alarm is active, pressing the TEST switch
will "silence" the buzzer. If the buzzer alarm was active but the CO level has been reduced below the trip
point, then the TEST switch must be pressed to reset the buzzer alarm to the Normal Mode.
OPERATION - TEST MODE
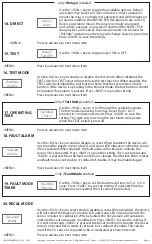
The Test mode function is disabled by default, it must be enabled via the menu to operate. To initiate the
Test function during normal operation, either press and hold the TEST switch for 1 second or activate it
remotely by shorting the TEST + to TEST – (COM). This will cause the Status LED to blink red, the analog
output to go to 100% and both relays to activate. The buzzer will also beep once every 15 seconds if
enabled and the LCD will indicate the Test mode and the remaining time. The Test function will continue for
5 minutes (default) and then the device will reset to normal operation. The Test function can be cancelled
by pressing the TEST switch a second time. Test mode cannot be activated if the device is in Fault, Alarm or
Re-Cal modes of operation, only in Normal mode. The Test function is useful to verify the output and alarm
relay operation and the Test time can be programmed via the menu.
OPERATION - FAULT MODE
The Fault mode function is disabled by default, it must be enabled via the menu to operate. The Fault
function will monitor the CO sensor lifetime and indicate when the CO sensor should be replaced. If the
device determines that the sensor has reached the end of it's useful life and that replacement is necessary
it will enter Fault mode. This will cause the Status LED to blink red and the buzzer to beep once every 10
minutes. The LCD will periodically show "Sensor Fault". The Fault mode can be disabled via the menu or
enabled at any time. If enabled, and the device is in Fault mode, pressing the TEST switch will "silence" the
buzzer due to the Fault alarm only. Buzzer silence due to the Fault alarm will hold until the Fault condition
is reset via the menu. The buzzer may still activate due to a CO setpoint alarm if enabled.
IN-GE-CMD5B5XXX-01-02 03/19
Copyright © Greystone Energy Systems, Inc. All Rights Reserved Phone: +1 506 853 3057 Web: www.greystoneenergy.com


