background image

12

Model MSCF Modular Small Cabinet Fan

®

Hot Water and Chilled Water

1.  Piping should be in accordance with accepted 

industry standards. Pipework should be supported 
independently of the coils. Water pipes are copper 
with sweat connections. USE WET TOWEL TO 
AVOID BURNING COIL CONNECTION GROMMETS. 
When installing coupling, do not apply undue 
stress to the connection extending through the 
unit. Use a back-up pipe wrench to avoid breaking 
the weld between coil connection and header.

2.  Connect the water supply to the bottom 

connection on the air-leaving side and the water 
return to the top connection on the air-entering 
side. The extra bottom connection can be used for 
an auxiliary manual drain connection, and the extra 
top connection may be used for an automatic air 
vent, or the extra connections can be capped. To 
ensure proper venting, an external air vent in the 
piping is recommended. Connecting the supply 
and/or return in any other manner will result in very 
poor performance. CAP UNUSED CONNECTIONS.

3.  The air vent at the uppermost point should be 

temporarily opened during system start-up to 
release all of the air from the coil. To maintain heat 
transfer capacity, periodically vent any air in coil. 
Vent to be located behind connections side access 
door.

4.  Water coils are not normally recommended for 

use with entering air temperatures below 40°F. 
No control system can be depended on to be 
100% safe against freeze-up with water coils. 
Glycol solutions or brines are the only safe media 
for operation of water coils with low entering air 
conditions.

5.  Pipe sizes for the system must be selected on the 

basis of the head (pressure) available from the 
circulation pump. Piping should be in accordance 
with accepted industry standards.

6.  For chilled water coils, the condensate drain 

pipe should be sized adequately to ensure the 
condensate drains properly. See Drain Pan Traps 
section and related drawing.

Direct Expansion (DX) Coils

1.  Piping should be in accordance with accepted 

industry standards. Pipework should be supported 
independently of the coils. Undue stress should not 
be applied at the connection to coil headers.

2.  The condensate drain pipe should be sized 

adequately to ensure the condensate drains 
properly. See Drain Pan Traps and related drawing.

Start-Up of Coil Module

WARNING

Continuous water circulation through the coil at all 
times is highly recommended.

WARNING

Standard unit insulation of 1.5 lbs. density has an 
insulation R-value of 3.7.
For applications where the unit discharge 
temperatures are below 55°F and the unit is installed 
in a warm, humid environment, additional insulation 
may need to be applied to the exterior of the unit to 
prevent condensation.

3.  When connecting suction and liquid connections, 

make sure the coil is free from all foreign material. 
Make sure all joints are tight and free of leakage. 

4.  Greenheck does not supply compressor or 

condensing units, for further instruction on DX coil 

installation and operation contact your compressor 
and/or condenser manufacturer.

DXI coils have dual connections and should be used 
with two compressors.

Steam Coils

Application Recommendations

Satisfactory operation and 
service life are best 
ensured when coils 
are installed with 
proper piping, 
trap and support 
arrangement. 
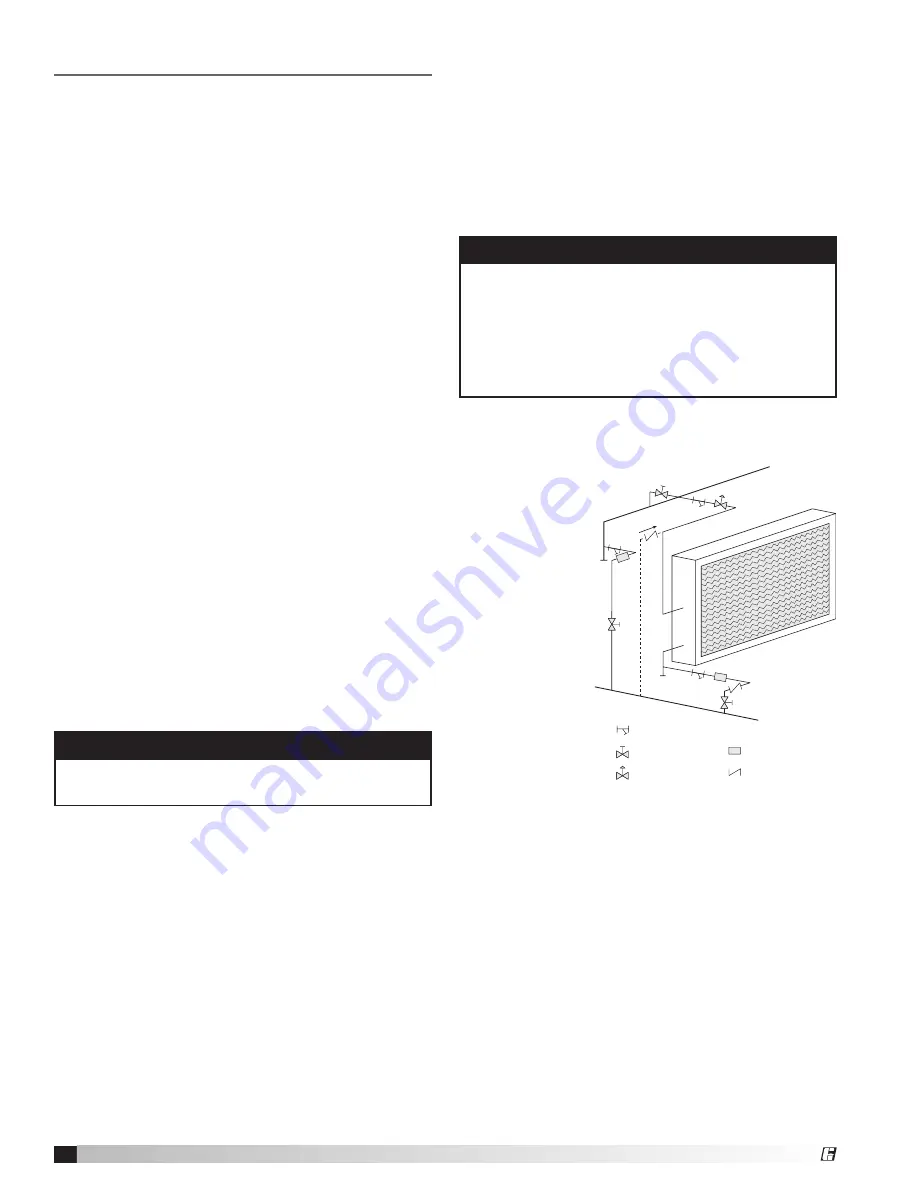
The following 
notes and 
drawing are 
recommended 
for the coil unit 
installation and 
operation.

General

1.  Provide 

separate 
supports and 
hangers for the 
unit and the piping.

2.  Be certain that adequate piping flexibility is 

provided. Stresses resulting from expansion of 
closely coupled piping and coil arrangement can 
cause serious damage.

3.  Standard steam coils are pitched in the casings 

when installed for horizontal airflow. The casing 
must be level after the unit is installed for proper 
condensate drainage. If condensate is not 
removed, the coil will suffer from water hammering 
and will have a shortened life. On vertical airflow 
applications, the coils must be pitched when 
installed.

4.  Do not reduce pipe size at the coil return 

connection. Carry return connection size through 
the dirt pocket, making the reduction at the branch 
leading to the trap.

Steam Coil Piping

Steam Main

Return Main

Strainer

Gate Valve

Control Valve 

Modulating Two-Position

Check Valve

Vacuum Breaker

Float & Thermostat Trap

Содержание MSCF-BI

Страница 1: ...ation and Maintenance Manual Please read and save these instructions Read carefully before attempting to assemble install operate or maintain the product described Protect yourself and others by obser...

Страница 2: ...are accounted for by referencing the bill of lading to ensure all items were received Inspect each crate for shipping damage before accepting delivery Notify the carrier if any damage is noticed The c...

Страница 3: ...Electric Heater 15 Maintenance Fan 16 Coil 16 Drain Pan 16 Reference Start Up Documentation 17 Maintenance Log 18 19 Warranty Backcover Unit Layout 1 Fan and Cabinet Section 2 Cooling Section Chilled...

Страница 4: ...3 0 inch 3 8 16 Spinlock Nut Two required per assembly 3 8 16 Spinlock Nut Two required per assembly HANGING ASSEMBLY BASE ASSEMBLY Mounting Instructions Greenheck s Modular Small Cabinet Fan MSCF sho...

Страница 5: ...4 Row HW Steam 15 6 75 18 5 18 5 6 75 6 75 18 5 6 75 9 5 18 5 19 38 2 5 3 5 43 20 6 75 18 5 18 5 6 75 6 75 18 5 6 75 9 5 18 5 19 38 2 5 3 5 43 25 6 75 21 18 5 6 75 6 75 21 6 75 9 5 18 5 23 38 2 5 3 5...

Страница 6: ...ertical Quantity Face Area Sloped Quantity Face Area 15 9x18 2 1 8 12x12 1 2 5 12x24 1 20 12x12 1 2 5 16x16 1 3 4 12x24 1 16x20 1 25 14x18 2 3 0 16x20 2 3 8 30 16x16 1 3 4 12x24 1 5 3 16x20 1 24x24 1...

Страница 7: ...15 50 9 38 3 188 1 375 4 0 26 0 85 8 6 62 12 75 9 38 3 188 1 375 4 0 26 0 All dimensions are in inches NOTE With airflow from left to right the fluid enters the coil from the bottom connection Inlet...

Страница 8: ...2 50 24 5 21 0 10 12 14 1 38 1 63 65 6 7 50 24 5 26 0 10 12 14 1 38 1 63 85 8 6 62 24 5 26 0 10 12 14 1 38 1 63 All dimensions are in inches Unit Size Face Area A B C L M N P 4 Row 6 Row 8 Row All Al...

Страница 9: ...should be capped off cap Unit Size Face Area A B C D E F G 4 Row 6 8 Row 4 Row 6 Row 8 Row 30 3 2 38 24 5 18 5 9 25 11 0 7 88 8 50 8 5 7 00 12 0 45 4 5 50 24 5 18 5 9 25 11 0 7 88 8 50 8 5 7 00 12 5 5...

Страница 10: ...rage and Fan RPM All access doors must be installed Measure and record the input voltage and motor amperage s To measure the fan RPM the blower door will need to be removed Minimize measurement time b...

Страница 11: ...ductwork Repair Elbows or other obstructions may restrict fan outlet Correct or improve ductwork Belt slippage Adjust belt tension Unit running backwards Correct as shown in System Start Up section S...

Страница 12: ...independently of the coils Undue stress should not be applied at the connection to coil headers 2 The condensate drain pipe should be sized adequately to ensure the condensate drains properly See Drai...

Страница 13: ...are recommended for low pressure steam On high pressure systems bucket traps are normally recommended The thermostatic traps should be used only for air venting 3 Bucket traps are recommended for use...

Страница 14: ...he requirements and practices described below are based on the National Electric Code NEC and The Space Heating Standard of the Underwriters Laboratories Inc UL Although UL requirements are uniform th...

Страница 15: ...with the thermostat set to 70 F the heater will be off with a temperature sensing above 70 F As the temperature varies the steps turn on and off to hold the setpoint discharge temperature The colder...

Страница 16: ...n air Occasionally oil and dust may accumulate on the wheel causing imbalance When this occurs the wheel and housing should be cleaned to assure smooth and safe operation Inspect fan impeller and hous...

Страница 17: ...rated enough to prevent freeze up NOTE Carefully read instructions for mixing antifreeze solution used Some products will have a higher freezing point in their natural state than when mixed with water...

Страница 18: ...___________________________ _________________________________________________ _________________________________________________ Date___________________ Time______________ AM PM Notes _________________...

Страница 19: ...___________________________ _________________________________________________ _________________________________________________ Date___________________ Time______________ AM PM Notes _________________...

Страница 20: ...or installation costs As a result of our commitment to continuous improvement Greenheck reserves the right to change specifications without notice Phone 715 359 6171 Fax 715 355 2399 E mail gfcinfo g...

Отзывы: