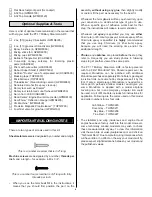
holes. Note: 4-40 Blind nuts have been installed in the wing
for all of the cabane mounting bolts. All of the blind nuts are
glued into the wing and have a small wood plate backing
them up. It is possible that a blind nut could have a bit of glue
in the threads. In most cases the installation of the bolt
should free the glue. If not, run a 4-40 tap through the
threads to clear the glue.
❏ ❏
4. Mount the bottom wing cabane brackets in each
of the holes in the right wing panel with a 4-40 x 1/2" [13mm]
socket head cap screw and a #4 lock washer. Do not fully
tighten the bracket to the wing yet.
❏ ❏
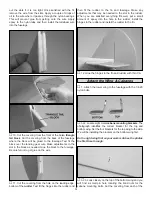
5. Position the “N” strut to the bracket. Located on
the strut is a piece of masking tape with an arrow that
indicates the top, front of the strut.
❏ ❏
6. Attach the strut to the bracket as shown with a
4-40 x 1/2" [13mm] phillips head screw, a #4 washer and a
4-40 nylon lock nut.
❏
7. If you have not been doing the bracket installation on
both the right and left wing, go back and repeat steps 3-6 for
the left wing panel.
❏
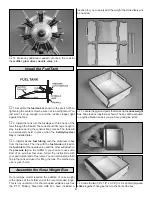
8. Locate the pin holes and cut the covering from the
blind nuts in the bottom of the top wing. Four are located in
the center of the wing and two are located at each end of
the wing.
❏
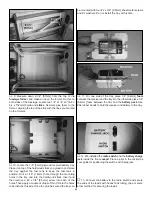
9. Install the center cabanes with 4-40 x 1/2" [13mm]
socket head cap screws and #4 lock washers. Be sure you
mount the cabanes as shown with the arrows pointed
towards the wing leading edge.
14


