❏ ❏
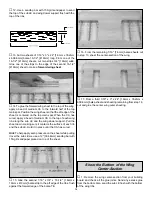
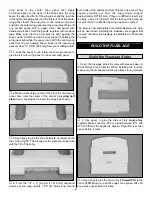
1. Select two 1/16" x 1/4" x 30" [1.6mm x 6.4mm x
762mm] balsa strips for the stab/elevator outer frame. Wet
one side of the first strip by dipping your finger in water, then
running it along the one side of the strip. Take care not to
wet both sides. Using medium CA, secure the dry side of the
strip to the middle of the stab center, working toward the edge.
Note: Water accelerates CA much like commercial
accelerators, so be careful not to get anything wet that
should not be.
Hint: Another way to wet the strips is by holding them in the
air and spraying with a spray bottle. Do not spray the strips
while sitting on a flat surface, or both sides will get wet.
❏ ❏
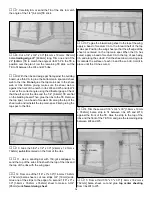
2. Slowly wrap the two glued strips from the stab
center all the way around to the center of the TE of the
elevator, securing it to the end of the elevator LE and stab
TE edge with thin CA. Take care to stay tight against the
bending jigs. Do not glue the strip to the bending jigs.
❏ ❏
3. Wet one side of the next strip. Turn it over and lay a
bead of medium CA down the center of the strip. Glue the
strip onto the previously installed strip.
Note: If you work quickly, the previous strip will still be wet
on the outside. This will accelerate the CA, securing the
strips to one another immediately. If you crack the strip,
don’t worry. Just hold it in place until the CA cures and then,
seal it with thin CA if necessary.
❏ ❏
4. Apply 5 strips to make a lamination 1/4" x 5/16"
[6.4mm x 7.9mm].
❏
5. Return to step 1 and repeat the lamination process on
the other side of the stabilizer and elevator.
6. Proceed to
“Finish the Stabilizer and Elevator.”
❏ ❏
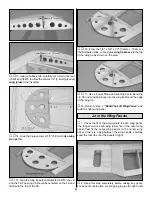
1. Select ten of the 1/16" x 1/4" x 30" [1.6mm x 6.4mm
x 762mm] balsa strips and wet them thoroughly with warm
water. Allow the strips to set a few minutes so they can
become more pliable.
❏ ❏
2. Stack five of the strips together. Starting at the
middle of the stabilizer center, carefully bend the strips
around the bending jigs, holding the strips in place with
T-pins. Do not use any glue.
❏ ❏
3. Trim the strips approximately 1" [25.4mm] past the
elevator root.
❏
4. Return to step 2 and position the second five strips on
the other side of the stabilizer.
❏
5. Allow the wood to dry thoroughly, a couple of hours.
This is a good time to skip ahead to
“Build the Fin and
Rudder.”
Aliphatic Resin Lamination Method
CA Lamination Method
9
Содержание Old Timer
Страница 6: ...6 DIE PATTERNS...
Страница 7: ...7 DIE PATTERNS...
Страница 44: ...TWO VIEW DRAWING Use copies of this page to plan your trim scheme...
Страница 45: ...B C...
Страница 46: ...D A...


