❏
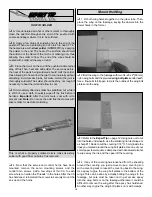
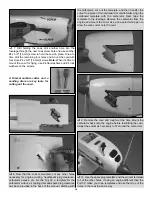
8. Insert 2-56 blind nuts into each of the four holes in the
wheel pants, drawing them down tight with a 2-56 x 3/8"
[9.5 mm] screw and two washers. Remove the screws, then
glue each blind nut into the pant with two or three drops of
medium CA.
❏
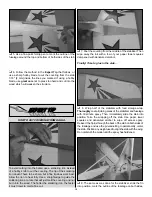
9. Mount the wheels and pants to the landing gear with
the hardware shown. Be certain to use threadlocker on all the
screws. Use three or four 5mm washers to center the wheels.
If using a gas engine, the model will probably require tail weight
to get it to balance. If using a glow engine, the model will
probably require nose weight to get it to balance. To minimize
any additional nose or tail weight that may be required, mount
the receiver battery in the aft location for gas engines and in one
of the forward locations for glow engines. You could go ahead
and mount the battery and receiver now, or do a quick C.G.
check first to find out where the battery should be mounted. If
you would like to do a quick C.G. check go to page 25.
❏
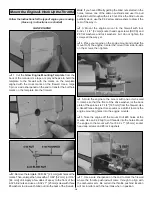
1. Use R/C foam and the supplied Velcro strips to mount
the receiver battery. To position the battery as far forward as
possible, mount it to the optional plywood battery tray, and
then securely glue the tray to the balsa rails on both sides of
the fuselage below the fuel tank. (Depending on their size and
configuration, not all batteries will be able to be mounted to
the tray.) If not using the battery tray, mount the battery on the
servo tray next to the throttle servo or to the receiver/battery
tray under the cockpit.
OPTIONAL FORWARD BATTERY
MOUNTING LOCATION
MOUNTING RAIL
S
BATTERY
TRAY
Finish Radio Installation
5 mm WHEEL COLLAR,
3 mm
S
CREW
WA
S
HER
S
A
S
S
PACER
S
MOUNTING
S
TRAP
S
2-56x3/8"
S
CREW,
#2 WA
S
HER,
2-56 BLIND NUT
22
Содержание Giant Super Sportster
Страница 32: ......


