GREAT PLANES FlyLite Скачать руководство пользователя страница 2

2

TABLE OF CONTENTS

INTRODUCTION

  . . . . . . . . . . . . . . . . . . . . . . . . . . . . . . . .2

AMA

. . . . . . . . . . . . . . . . . . . . . . . . . . . . . . . . . . . . . . . . . .2

SAFETY PRECAUTIONS

  . . . . . . . . . . . . . . . . . . . . . . . . .2

ADDITIONAL ITEMS REQUIRED

. . . . . . . . . . . . . . . . . . .3


Spare Prop-Saver O-Rings  . . . . . . . . . . . . . . . . . . . . .3


Motor, ESC and Radio Gear  . . . . . . . . . . . . . . . . . . . .3


Batteries and Charging Equipment  . . . . . . . . . . . . . . .3


Assembly Tools  . . . . . . . . . . . . . . . . . . . . . . . . . . . . . .4


Glue For Repairs  . . . . . . . . . . . . . . . . . . . . . . . . . . . . .4

ORDERING REPLACEMENT PARTS

. . . . . . . . . . . . . . . .5

KIT INSPECTION

. . . . . . . . . . . . . . . . . . . . . . . . . . . . . . . .5

ASSEMBLY

  . . . . . . . . . . . . . . . . . . . . . . . . . . . . . . . . . . . .6


Prepare the Fuselage  . . . . . . . . . . . . . . . . . . . . . . . . .6


Mount the Motor . . . . . . . . . . . . . . . . . . . . . . . . . . . . . .6


Mount the Servos. . . . . . . . . . . . . . . . . . . . . . . . . . . . .9


Mount the Horizontal and Vertical Stabilizer  . . . . . . .10

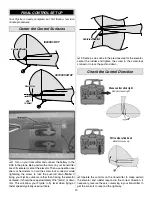
FINAL CONTROL SET UP

  . . . . . . . . . . . . . . . . . . . . . . .13


Center the Control Surfaces. . . . . . . . . . . . . . . . . . . .13


Check the Control Direction . . . . . . . . . . . . . . . . . . . .13


Check the Control Throws  . . . . . . . . . . . . . . . . . . . . .14

GET THE MODEL READY TO FLY

  . . . . . . . . . . . . . . . . .15


Prepare the Wing . . . . . . . . . . . . . . . . . . . . . . . . . . . .15


Balance the Model (C.G.). . . . . . . . . . . . . . . . . . . . . .16

PREFLIGHT

. . . . . . . . . . . . . . . . . . . . . . . . . . . . . . . . . . .18

FLYING

. . . . . . . . . . . . . . . . . . . . . . . . . . . . . . . . . . . . . . .19


Find a Suitable Flying Site . . . . . . . . . . . . . . . . . . . . .19


Get Ready to Fly  . . . . . . . . . . . . . . . . . . . . . . . . . . . .19

 Takeoff 

 . . . . . . . . . . . . . . . . . . . . . . . . . . . . . . . . . . . .19


Flying . . . . . . . . . . . . . . . . . . . . . . . . . . . . . . . . . . . . .20


Landing  . . . . . . . . . . . . . . . . . . . . . . . . . . . . . . . . . . .22

INTRODUCTION

Thank you for purchasing the Great Planes 

ElectriFly

 FlyLite 

ARF. The original concept for the FlyLite was to develop a 
slow-fl ying indoor trainer for beginners or pilots with little R/C 
experience. This goal was achieved, but then we found out 
how much fun it was to fl y the FlyLite outdoors too! Outdoors 
in calm conditions, beginners will have all the space they need 
to detect what the FlyLite is doing, process the information, 
then make the necessary control inputs. Experienced pilots 
will fi nd ways to challenge themselves by fl ying low, high, 
close, far and fi guring out what aerobatic tricks they can get 
the FlyLite to do. And if thermals are present the FlyLite can 
easily achieve twenty-minute (or longer) fl ights!

For the latest technical updates or manual corrections to the 
FlyLite visit the Great Planes web site at 

www.greatplanes

.

com

. Open the “Airplanes” link, then select “FlyLite ARF”. If 

there is new technical information or changes to this model 
a “tech notice” box will appear in the upper left corner of 
the page.

AMA

If you are not already a member 
of the AMA, please join! The AMA 
is the governing body of model 
aviation and membership provides 
liability insurance coverage, 
protects modelers’ rights and 
interests and is required to fl y  at 
most R/C sites. The AMA has two 
classes of membership available; 
open membership or their Park Pilot Program, which this 
aircraft qualifi es for. The Park Pilot Program is for people 
fl ying electric aircraft and gliders under two pounds and 
which fl y  slower  than  60mph.  This  will  enable  you  to  enjoy 
most AMA benefi ts and organize clubs and fl ying sites in 
more congested areas.

ACADEMY OF MODEL AERONAUTICS

5151 East Memorial Drive

Muncie, IN 47302-9252

Tele. (800) 435-9262

Fax (765) 741-0057

Or via the Internet at:

http://www.modelaircraft.org

http://www.modelaircraft.org/parkfl yer.aspx

IMPORTANT!!!

Two of the most important things you can do to preserve the 
radio controlled aircraft hobby are to avoid fl ying near full-
scale aircraft and avoid fl ying near or over groups of people.

PROTECT YOUR MODEL, YOURSELF 

& OTHERS… FOLLOW THESE 

IMPORTANT SAFETY PRECAUTIONS

1. Your FlyLite should not be considered a toy, but rather a 
sophisticated, working model that functions very much like 
a full-size airplane. Because of its performance capabilities, 
the FlyLite, if not assembled and operated correctly, could 
possibly cause injury to yourself or spectators and damage 
to property.

2. You must assemble the model according to the instructions. 
Do not alter or modify the model, as doing so may result in 
an unsafe or unfl yable model. In a few cases the instructions 
may differ slightly from the photos. In those instances the 
written instructions should be considered as correct.

3. You must use an R/C radio system that is in good condition, 
a correctly sized motor, and other components as specifi ed 
in this instruction manual. All components must be correctly 
installed so that the model operates correctly on the ground 
and in the air. You must check the operation of the model and 
all components before every fl ight.

®

Содержание FlyLite

Страница 1: ...y If the buyer is not prepared to accept the liability associated with the use of this product the buyer is advised to return this kit immediately in new and unused condition to the place of purchase...

Страница 2: ...please join The AMA is the governing body of model aviation and membership provides liability insurance coverage protects modelers rights and interests and is required to y at most R C sites The AMA h...

Страница 3: ...his system includes the R617FS receiver so if the smaller R6004FF receiver is preferred it will have to be purchased separately The 6EX has six model memory so even if it seems as though this system i...

Страница 4: ...ply a light mist of CA accelerator causing the CA to harden within seconds If you want to assemble a repair kit following are some recommended items UFO Thin foam safe CA HOTR1040 Great Planes Pro CA...

Страница 5: ...s 6 8x6 Power Flow Propeller 2 KIT INSPECTION Before starting to build inspect the parts to make sure they are of acceptable quality If any parts are missing or are not of acceptable quality or if you...

Страница 6: ...ow it away Set the hatch aside 3 Lightly squeeze the main landing gear wire together and t it all the way up into the fuselage with the bent in sweep in the wire facing forward 4 Apply the rougher hoo...

Страница 7: ...may require a little nagling by holding the fuselage vertically or using a toothpick or something similar to coax the wires out through the hole 3 Remove the tape from the ESC wires and connect the m...

Страница 8: ...turning the correct direction swap any two motor ESC wires with each other Con rm that the motor is now turning in the correct direction by advancing the throttle stick again 7 If your 0 Phillips scr...

Страница 9: ...drill or a hobby knife to carefully enlarge the holes just enough to t the micro screw lock connector Thread a 2mm x 4mm Phillips machine screw into each screw lock connector Use this photo for the n...

Страница 10: ...you do strip out the balsa the glue you added will hold the screws Hint If the servo arm is in the way of one of the screws turn on your radio and use the transmitter to rotate the servo arm to accom...

Страница 11: ...a 90 pushrod connector over the wire so it won t come off The connectors can also be installed removed after the plane is together but it s easier to do it now 5 Guide the pushrod wire up through the...

Страница 12: ...ge until it is snug and secure Note The n is held into position with built in magnets which also lock in the stab so no glue is required This is what the rudder pushrod tail wheel assembly looks like...

Страница 13: ...yLite outdoors rather than having the elevator centered it should have approximately 3 16 5mm of down trim This will allow your FlyLite to y level when ying at faster speeds typically used outdoors Ce...

Страница 14: ...y Place a ruler to the trailing edge of the elevator at the widest part from front to back 3 Use your transmitter to move the elevator up and measure the distance it moved from center This is your up...

Страница 15: ...ssively in large indoor sites where higher throttle settings may be used more often do not use the rubber band protectors Instead the formed wing center doubler and ber reinforced tape must be added t...

Страница 16: ...ng the C G lines in following steps Balance the Model C G Another critical factor in determining how a plane ies and again your ability to control it is the center of gravity C G or the balance point...

Страница 17: ...ightedge and a ne point felt tip pen to draw the C G range lines on the bottom of the wing connecting the sets of marks 5 If you still need to add the ber reinforced tape to the bottom of the wing for...

Страница 18: ...plane simply place segments of weight over the nose or on the tail to see how much is required Typically 1 4 oz to 1 2 oz 7g to 14g may be required on the nose while much less if any weight will be r...

Страница 19: ...ay use four rubber bands Always turn on the transmitter rst then connect the battery and install the hatch Do not arm the motor until you are actually ready to takeoff Always always always before each...

Страница 20: ...able to nd equilibrium with your FlyLite where it cruises slowly without climbing or descending Crossover If you re a beginner it might be best to start with a crossover pattern to avoid turning the p...

Страница 21: ...s when the plane is heading directly toward you Having the ability to y these different patterns and control the model in all orientations requires a little practice and dedication it s almost like ho...

Страница 22: ...nose down attitude 4 Level the wings applying elevator as necessary to control the descent If necessary apply throttle to stretch the approach to reach the landing zone Or apply throttle and go around...

Страница 23: ...ing 12 3 15 5 oz ft 38 47 g dm Length 31 5 in 800mm Great Planes PT 19 Parkflier EP ARF 41 5 GPMA1149 ALSO AVAILABLE FROM GREAT PLANES The Escapade is destined to become the plane you can t put down t...

Страница 24: ...ANCE RANGE 2 1 8 54mm from wing leading edge 2 7 8 73mm from wing leading edge Fold along this line Align with wing leading edge BALANCE RANGE 2 1 8 54mm from wing leading edge 2 7 8 73mm from wing le...

Отзывы: