


34
screw into the hole and back it out. Apply a couple drops of
thin CA to the hole and allow the glue the harden. Install the
mount to the wing and apply the adhesive foam pad (included
with the pipe mount) to the mount.
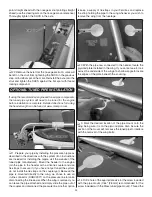
❏
5. Use the tie strap included with the pipe mount to secure
the pipe. Be sure the strap is drawn tightly around the pipe.
❏
6. Be sure to install tie straps around the coupler after you
have tuned the system, if you have not done so already.
FINISH THE MODEL
❏
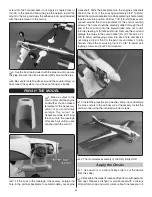
1. Make a cutout in the
cowl to fi t around the engine
and muffl er. You can make a
template for the necessary
cutout, or you could slowly
enlarge the cutout as
necessary while test fi tting
the cowl onto the fuselage
after each cut until you are
satisfi ed with the cowl fi t.
❏
2. Fit the cowl to the fuselage. If necessary, enlarge the
hole in the spinner backplate to accommodate your engine
crankshaft. Slide the backplate onto the engine crankshaft.
Position the front of the cowl approximately 3/32" [2.4mm]
behind the spinner backplate also while centering it. Temporarily
tape the cowl into position. Drill four 1/16" [1.6mm] holes evenly
spaced around the cowl perimeter for the cowl mounting
screws. The holes should be carefully drilled through the aft
end of the cowl and into the fi rewall (take care not to drill
into the steering or throttle pushrods). Remove the cowl and
enlarge the holes in the cowl to 5/64" [2mm]. Thread a #2 x
3/8" [9.5mm] self-tapping screw into each hole and back it
out. Apply a drop of thin CA to each hole and allow it to fully
harden. Install the cowl using four #2 x 3/8" [9.5mm] self-
tapping screws and four #2 fl at washers.
❏
3. Install the propeller, prop washer, and prop nut. Enlarge
the prop cutouts in the spinner cone if necessary. Install the
spinner cone using the included spinner screws.
❏
4. That completes assembly of the Dirty Birdy ARF!
Apply the Decals
❏
1. Use scissors or a sharp hobby knife to cut the decals
from the sheet.
❏
2. Be certain the model is clean and free from oily fi ngerprints
and dust. Prepare a dishpan or small bucket with a mixture
of liquid dish soap and warm water—about one teaspoon of
Содержание DIRTY BIRDY .60 ARF
Страница 21: ...Carefully remove this insert in order to use your full size templates on the reverse side...
Страница 23: ...D TEMPLATE G PUSHROD TEMPLATE This model belongs to Name Address City State Zip Phone Number AMA Number...
Страница 24: ...Carefully remove this insert in order to use your full size templates on the reverse side...
Страница 44: ...GPMA1975 Mnl Entire Contents 2011 Hobbico Inc All rights reserved...


