Grace Industries, Inc.
3
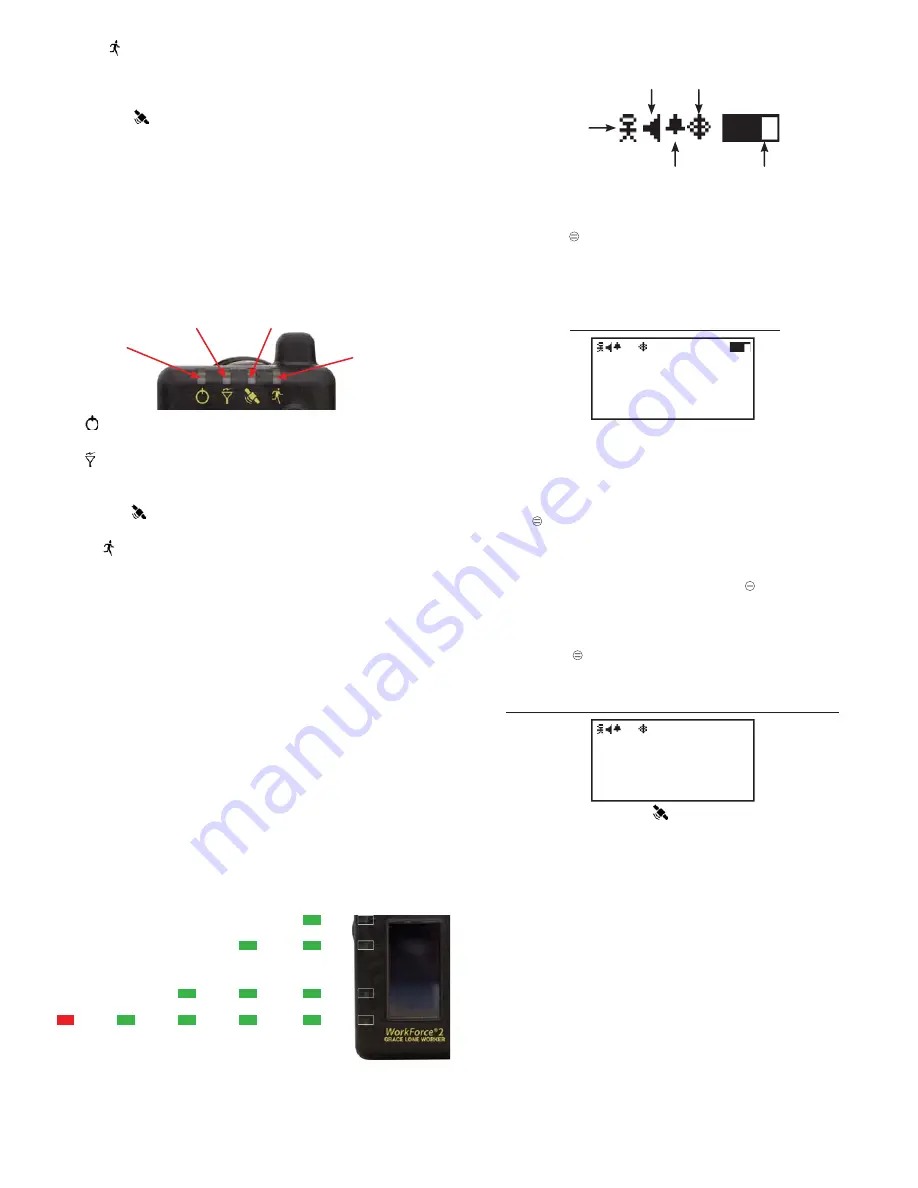
WorkForce® Display Icons
Motion Icon
Sound Icon
Alarm Icon
GPS Icon
Battery Level
Menu Pages
Pressing MENU button brings up menu pages in the following order:
Page 1 - Send Message (canned text messages)
Page 2 - Latitude / Longitude Display
Page 3 - Setup Mode
Page 1 - Send Message
Send Message:
Group: 0 User: 120
Unknown
P=+1, Down=-1,
=+5, #=-5
The
Send Message function may be used to send one of 80 user-
programmed, canned text messages
. These messages are programmed
into the WorkForce® through the HID WorkForce® Confi guration Tool via
the USB cable.
To send a message
, proceed to the
Send Message
page by pressing
the MENU button. Next, cycle through the messages stored on the
WorkForce® by pressing the UP
, Down
, Star
, or Pound # buttons
until you fi nd the desired message you wish to send.
and
cycle the
message count by one,
and # cycle the count by fi ve.
Once the desired
message is displayed, press and hold the Select button for 3 seconds
to transmit the message
and a
Message Sent
acknowledgment will be
displayed on the screen. Other messages can be selected and sent by
repeating this process.
Pressing MENU will navigate away from the Send Message page.
Resetting the device will return the WorkForce® to the home page.
Page 2 - Latitude / Longitude Display
LAT: 41.313266
LON: 80.339424
UTC: 03/24 15:49:32
* only on
GPS models *
Press the
/
buttons to cycle through four Latitude / Longitude
display formats:
Degrees
LAT: 41.313266 N
LON: 80.339424 W
Degrees Minutes Seconds (DD mm ss.ss)
LAT: 41 18’47.677” N
LON: 80 20’22.366” W
Degrees Minutes (DD mm.mmmm)
LAT: 41 18.7969’ N
LON: 80 20.3736’ W
Raw Data
LAT: 00E2F0E6
LON: FE46AE73
Press the
/# buttons to view Quality of Fix Screen, Time to First Fix and
additional GPS information screens.
EVACUATE
•
Running Man LED Flashes Red when receiving an EVACUATE signal
from another Grace device or equipment.
•
EVACUATE message is displayed on screen.
SATELLITE-GPS
(available on GPS models)
•
Slow blinking Green LED when GPS signal is acquired.
•
Slow blinking Red/Green LED when NO GPS signal is detected.
•
GPS Status icon is inverted on the home screen when NO GPS signal
is detected.
LOW BATTERY
•
Power LED blinks Red when battery charge is below 25%.
•
Double chirp sound every fi ve (5) minutes if audio is enabled.
•
Plug icon displayed on the home screen.
•
NO power-on tones.
WorkForce®2 Top LED Indicators
Power
Radio
Satellite-GPS (Only on GPS models)
EVACUATE
POWER
When WorkForce® is ON, Power LED blinks Green approximately
once per second. LED blinks Red when battery level is below 25%.
RADIO
Flashes Red when transmitting radio signals. Flashes Green
when receiving radio signal from other GRACE devices or equipment.
Alternating Green/Red fl ashing when WorkForce® is Out of Range.
SATELLITE-GPS
For GPS Equipped devices, the Satellite LED displays
status of GPS fi x. LED blinks Green when a GPS fi x is acquired.
EVACUATE
Displays EVACUATION status of the WorkForce®. Flashes Red
when receiving an EVACUATE signal.
System Status (Side) LED Indicators
The System Status LEDs perform several functions. Four (4) Red/Green LEDs
are numbered 1 through 4 and arranged along the left side of the device
beginning with #1 at the upper left and #4 at the lower left.
Alarm Monitoring (AM)
: If AM is enabled, Red LEDs will fl ash in an
alternating pattern when an Alarm signal is received from a GRACE Man-
Down device.
System Fault Detected
: If a System Fault is detected, the LEDs will indicate
the detected fault. (Please see Troubleshooting chart/diagram on Page 5
for detailed information).
Battery Power Level
: When either side button is pressed, System Status
LEDs will display the remaining battery power level.
(See diagram below).
Battery Charging Status
: When charging the WorkForce®, the System
Status LEDs will indicate the current battery power level.
•
Battery fully charged:
All 4 LEDs will blink Green.
•
Partially charged:
While charging, these LEDs will indicate the current
Battery Power Level.
Battery Power Level
1
2
3
4
2
3
4
3
4
4
4
< 10%
Battery
Power
10-25%
Battery
Power
26-50%
Battery
Power
51-75%
Battery
Power
76-100%
Battery
Power
1
2
3
4


