background image

HOME FITNESS | Remise en forme à domicile

TRAMPOLINE

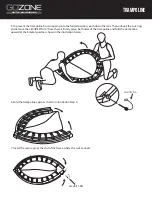
TO UNFOLD AND FOLD THE TRAMPOLINE YOU WILL NEED 2 PEOPLE

Opening the trampoline requires the application of some pressure. It is strongly suggested that you use 2 people for 

this part of the process, with one individual on one side of the trampoline and the second on the other side of the 

trampoline.

HOW TO OPEN THE FOLDING TRAMPOLINE

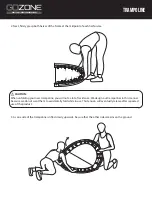
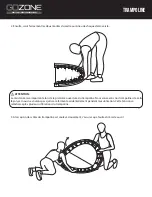
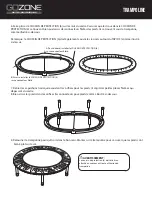
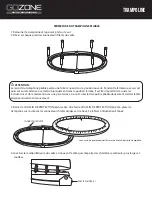
1. Lay the trampoline on the floor and remove the secure pin illustrated in the first picture below.

     Then open the rails as shown in the pictures to the right.

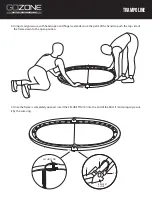
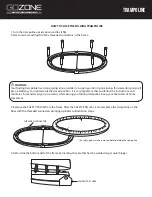
Note: Check that all the springs are attached before continuing to assemble the trampoline. If any spring is 

not attached or damaged, follow this process:

Find the open end of the SPRING (10) 

and hook this end into the hole on the

RAIL (1,2,3,4). Refer to illustration A.

Swing the SPRING (10) to face inside of 

the trampoline. Refer illustration B.

Slide the metal loop on the MAT (5) 

into the spring hook as shown in 

illustration C. 

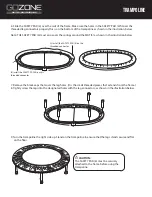
SECURITY PIN

Содержание GZE-2028

Страница 1: ...HOME FITNESS Remise en forme domicile TRAMPOLINE...

Страница 2: ...poline at all times including during usage and assembly activities PROPER USAGE Wear clothing appropriate for exercising do not wear clothing that could become caught in your folding trampoline Be car...

Страница 3: ...du trampoline pliable y compris lors de son utilisation et de son assemblage UTILISATION CORRECTE Porter des v tements appropri s pour l exercice Ne pas porter de v tements qui pourraient rester coinc...

Страница 4: ...d clearance is recommended for the use of all outdoor trampolines Lateral clearance is also of great importance Please place your folding trampoline away from walls structures fences play areas furnit...

Страница 5: ...dessus de tout trampoline utilis l ext rieur L espace libre sur les c t s est galement tr s important Installer le trampoline pliable loign des murs structures barri res zones de jeu meubles autres q...

Страница 6: ...UCT PARTS LIST LISTE DES PI CES PART No PI CE IMAGE ITEM ARTICLE QUANTITY QUANTIT 1 2 3 4 5 6 7 8 9 10 RAIL A B C D MAT TAPIS SAFETY PAD COUSSIN DE PROTECTION LEG PIED LEG CAP CAPUCHON POUR PIED SECUR...

Страница 7: ...Lay the trampoline on the floor and remove the secure pin illustrated in the first picture below Then open the rails as shown in the pictures to the right Note Check that all the springs are attached...

Страница 8: ...a premi re image ci dessous Ensuite ouvrir les rails comme illustr sur les images droite Remarque v rifier que tous les ressorts sont attach s avant de continuer assembler le trampoline Si un ressort...

Страница 9: ...unfolding your new trampoline you will note a lot of resistance We design our trampolines in this manner because we do not want them to accidentally fold while in use This tension will eventually rele...

Страница 10: ...era importante lors de la premi re ouverture du trampoline Nous concevons nos trampolines de cette fa on car nous ne voulons pas qu ils se referment accidentellement pendant leur utilisation Cette ten...

Страница 11: ...nds open and fingers extended use the palm of the hands to push the top side of the frame down to the open position 5 Once the frame is completely opened insert the SECURE PIN 10 into the end of the R...

Страница 12: ...doigts tendus utiliser la paume des mains pour pousser vers le bas le c t sup rieur du cadre pour qu il soit en position ouverte 5 Une fois le cadre compl tement ouvert ins rer la tige de s curit 10 d...

Страница 13: ...ation below 7 Remove the black caps that cover the leg holes It is the small threaded pieces that extends from the frame 8 Tightly screw the legs into the designated holes with the leg connectors as s...

Страница 14: ...les capuchons noirs qui recouvrent les orifices pour les pieds Il s agit des petites pi ces filet es qui d passent du cadre 8 Bien visser les pieds dans les orifices les connecteurs pour pieds comme...

Страница 15: ...ed position It is very important that you follow the instructions and maintain a firm and steady grip Go slowly while closing you folding trampoline Keep your head clear of frame movement 3 Remove the...

Страница 16: ...mportant de suivre les instructions et de le maintenir avec une prise ferme et s re Fermer le trampoline pliable doucement Garder la t te loign e du cadre en mouvement 3 Retirer le COUSSIN DE PROTECTI...

Страница 17: ...k the wire ring and remove the SECURE PIN 10 from the rail Firmly grasp both sides of the trampoline and fold the trampoline upward at the bracket guide as shows in the illustration below 6 Fold the t...

Страница 18: ...que et retirer la TIGE DE S CURIT 10 du rail Tenir fermement les deux c t s du trampoline et plier le trampoline vers le haut au niveau du guide du support comme illustr ci dessous 6 Replier nouveau l...

Страница 19: ...orth You can add your own variations to this movement such as raising your arms out to the sides or to the front Jumping Jacks With your feet together in the center of the mat jump and land with your...

Страница 20: ...possible de varier ce mouvement en levant les bras sur les c t s ou vers l avant Sautillements sur Place avec l vation de Bras Les pieds joints au centre du tapis sauter et retomber les pieds cart s d...

Страница 21: ...nce Big Bounce Hands Triceps Biceps Movement 3 Jog in Place 4 Knee Raises Hands and Shoulder Movement 5 Jumping Jacks 6 Upright Row 7 Jog in Place 8 Front Back jumps Lateral and Forward Shoulder Raise...

Страница 22: ...nd rebond mouvements des mains triceps biceps 3 Faire du jogging sur place 4 Levers des genoux mouvement des mains et des paules 5 Sautillements sur place avec l vation de bras 6 Traction en position...

Отзывы: