background image

26

VCR Operation (Continued)

VHS Hi-Fi Stereo System/
MTS Broadcast

The DVD+VCR is equipped with a VHS Hi-Fi audio
sound system for recording and playback. The informa-
tion below gives a brief description of Hi-Fi audio and
how to record and play tapes in Hi-Fi audio mode.

Playback with Hi-Fi Stereo Audio Sound

A stereo TV with AUDIO/VIDEO input jacks or a stereo
audio system is required for true stereo playback. To
experience the full and rich stereo sound available with
Hi-Fi recorded tapes, we recommend the connection of
this unit to a home stereo audio system.

11

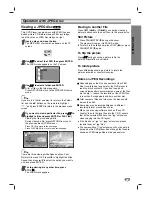
Set AUDIO MODE to HI-FI in the SETUP menu .

2

2

Set AUDIO OUTPUT to STEREO.

STEREO:

The left channel sound (L) is heard from the left

speaker and the right channel sound (R) is heard from the
right speaker.

LEFT:

The left channel sound (L) is heard from both

speakers.

RIGHT:

The right channel sound (R) is heard from both

speakers.

3

3

Press MENU.

4

4

Insert a cassette and press PLAY ( 

B

).

Adjust the volume on your stereo system.

MTS (Multi-Channel TV Sound)

The DVD+VCR will decode MTS stereo and bilingual
(SAP) off-the-air broadcast sound signals. It also
decodes stereo TV sound from local cable companies,
as long as they operate on assigned cable frequencies
and use the EIA-recommended MTS stereo/bilingual TV
sound system.

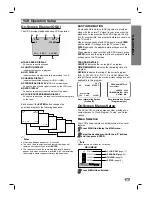
Multichannel TV Sound Indicator (MTS)

MTS information is shown on screen when 

ENTER

is

pressed.

One or both of the indicators will light, depending on the
MTS broadcast.

If only STEREO appears on the TV screen:

The DVD+VCR can record in stereo onto the VHS Hi-Fi audio
tracks when the BROADCAST TYPE option is set to STEREO.
The DVD+VCR will also record mono audio onto the mono
audio track.

If only SAP appears on the TV screen:

Set the BROADCAST TYPE option to SAP.

If STEREO/SAP appears on the TV screen:

Use the BROADCAST TYPE option to select the desired
Recording mode (STEREO or SAP).

SAP (Second Audio Program) Recording

Some stations transmit a Second Audio Program, which
is used for a second language or additional information.
When the station broadcasts a Second Audio Program,
follow the procedure below to record the SAP.

11

Insert a video cassette with the record safety
tab intact.

2

2

Set BROADCAST TYPE to SAP in the SETUP
menu. 

Do this only if SAP appears on the TV screen or you know
the program will use SAP.

3

3

Press MENU.

4

4

Select the desired recording speed (SP or SLP)
with the SP/SLP button.

5

5

Select the desired channel. SAP should appear
on the TV screen.

6

6

Press REC (

z

z

) once

You are now recording the program you see and hear on the
TV.

77

Press STOP (

x

x

) to stop recording.

STEREO

Lights when a stereo broadcast is
being received.

SAP

Lights when a SAP BILINGUAL
broadcast is being received.

TV screen

CH  4

STEREO/SAP

Содержание DV1130Q

Страница 1: ...DV1130Q User s Guide VIDEO L AUDIO R P O W E R D V 11 3 0 COPY CH DVD VCR EJECT VCR REC REW PLAY FF STOP PAUSE TV VCR EJECT DVD Hi Fi...

Страница 2: ...duct generates uses and can radiate radio frequency energy and if not installed and used in accordance with the instruction manual may cause harmful interference to radio communications However there...

Страница 3: ...one wider than the other A grounding type plug has two blades and a third grounding prong The wide blade or the third prong are pro vided for your safety If the provided plug does not fit into your ou...

Страница 4: ...to another TITLE 28 Moving to another CHAPTER 28 Slow Motion 28 Still Picture and Frame by Frame Playback 29 Search 29 Random 29 Repeat 29 Repeat A B 29 Time Search 29 3D Surround 29 Zoom 29 Marker Se...

Страница 5: ...re playing back such discs adjust the volume grad ually and keep the volume level low To enjoy DTS Digital SurroundTM playback an external 5 1 channel Digital SurroundTM decoder system must be connect...

Страница 6: ...ts case Do not expose the disc to direct sunlight or sources of heat or leave it in a parked car exposed to direct sun light as there may be a considerable temperature increase inside the car Cleaning...

Страница 7: ...udio system TV monitor another VCR COPY Copies a DVD in the DVD deck to a VHS tape in the VCR deck TV VCR Switches between your TV tuner and the DVD VCR tuner DVD VCR Switches control between the DVD...

Страница 8: ...hen the DVD VCR is recording a tape Lights when the current time is PM AM is not displayed Lights when TV mode is active see page 23 Lights when a disc is loaded in the DVD deck and flashes when no di...

Страница 9: ...epeats playback between two points Selects recording speed SEARCH Displays MARK SEARCH menu EJECT Opens and closes the disc tray Ejects the tape in the VCR deck TV VCR Switches between your TV tuner a...

Страница 10: ...Left Right Connects to a TV with video and audio inputs AUDIO OUT Left Right DVD OUT Connects to a TV amplifier receiver or stereo system AC Power Cord Plugs into a power source S VIDEO OUT DVD OUT Co...

Страница 11: ...to a 300 ohm to 75 ohm Antenna Adapter not supplied and slip the Adapter onto the ANT IN jack The Adapter does not screw on to the DVD VCR it just slips over the jack Without Cable Box If your cable...

Страница 12: ...2 Use CH v V on the front panel or CH v V on the remote control to change the RF output channel CH 03 or CH 04 3 Turn the DVD VCR off and then on 4 Set the TV to channel 3 or 4 depending on the RF ou...

Страница 13: ...is a high definition or digital ready television you may take advantage of the DVD VCR s progressive scan output for the highest video resolution possible If your TV does not accept the Progressive S...

Страница 14: ...el Sound A digital multi channel connection provides the best sound quality For this you need a multi channel Audio Video receiver that supports one or more of the audio formats supported by your DVD...

Страница 15: ...n on the TV screen When viewing a channel with XDS signals press ENTER and the station ID will appear on the TV screen Press ENTER again and the program details will appear on the TV screen When viewi...

Страница 16: ...cting the audio output signals from the AUDIO OUT terminals L ch and R ch and RF OUT This display setting should normally be left in the stereo posi tion so that when a stereo tape is played the stere...

Страница 17: ...zone the VCR sets the clock using the first Coordinated Universal Time informa tion it finds in a broadcast signal 6 6 Press MENU when finished 7 7 Turn off the DVD VCR and the auto clock set feature...

Страница 18: ...ion prohibited or not available otes Some discs may not provide all the features in the example below If no button is pressed for 10 seconds the on screen display disappears OFF A B CHAPT TITLE Option...

Страница 19: ...ne clarity If you are using the COMPONENT PROGRESSIVE SCAN VIDEO OUT jacks but are connecting the DVD VCR to a standard analog television set Progressive Scan to Off If you are using the Component Vid...

Страница 20: ...The Dynamic Range Control DRC Vocal and Auto Play settings can also be changed Use v V to select the desired option and then press ENTER repeatedly to select On or Off Dynamic Range Control DRC With t...

Страница 21: ...ble playback will stop You must enter the 4 digit password or change the rating level in order to play the disc 5 5 Press ENTER to confirm your rating selection then press SETUP to exit the menu Count...

Страница 22: ...effects playback notes Horizontal lines noise bars will appear on the TV screen This is normal The audio is automatically muted during special effects so there is no sound during search During high s...

Страница 23: ...ess PAUSE STEP X to put the unit in Pause mode Select the desired channel on the DVD VCR then press PAUSE STEP X again to resume recording Timer Recording The DVD VCR can be programmed to record up to...

Страница 24: ...ines what channel you view through your DVD VCR ip If you are finished programming and you want to set the DVD VCR to record the programs you have entered MAKE SURE YOU HAVE INSERTED A TAPE INTO THE D...

Страница 25: ...goes to normal Recording mode Dubbing and Editing You can easily edit or dub camcorder VCR recordings to the DVD VCR via the front rear panel audio video jacks These direct A V jacks provide better pi...

Страница 26: ...ingual TV sound system Multichannel TV Sound Indicator MTS MTS information is shown on screen when ENTER is pressed One or both of the indicators will light depending on the MTS broadcast If only STER...

Страница 27: ...t Timer Recording Play or Fast Forward modes the DVD VCR automatically starts rewinding the tape at the end of the tape The cassette will stop at the beginning of the tape and be ejected and the DVD V...

Страница 28: ...DVD VCR The Region Code for this DVD VCR is 1 one Do not keep a fixed image displayed on the screen for a long time Screen Saver The screen saver picture appears when you leave the DVD VCR in Stop mo...

Страница 29: ...ce press A B again Time Search The Time Search function allows you to start playing at any chosen time on the disc 1 Press DISPLAY during playback The on screen dis play appears on the screen The Time...

Страница 30: ...de sequence MODE1 MODE2 MODE3 MODE1 If you turn off the power the video mode will return to initial default state MODE1 Detailed Description of each Video Mode MODE1 The source material of the DVD vid...

Страница 31: ...is limit ed as follows 1 Sampling Frequency only at 44 1kHz 2 Bit rate within 32 320kbps 3 CD R physical format should be ISO 9660 4 If you record MP3 files using the software which cannot create a FI...

Страница 32: ...e press PLAY N Random 1 Press RANDOM during playback or when playback is stopped The unit automatically begins Random Playback and RANDOM or RAND appears on the display window and menu screen 2 To ret...

Страница 33: ...Still Picture 1 Press PAUSE STEP during slide show The player will now go into PAUSE mode 2 To return to the slide show press PLAY N or press PAUSE STEP again To flip the picture Press 3 3 4 4 during...

Страница 34: ...tor disappears in the display window ote The programmed tracks files are cleared when the power is turned off or the disc is removed Repeat Programmed Tracks All Off 1 To repeat the track currently pl...

Страница 35: ...38 39 40 41 42 43 DAYTRON 01 08 EMERSON 01 09 16 17 18 19 FISHER 28 29 FUNAI 46 47 GENERAL ELECTRIC 03 10 11 13 37 44 GRADIENTE 01 56 57 63 67 HITACHI 09 14 15 43 JC PENNEY 01 08 10 27 35 JVC 20 21 6...

Страница 36: ...on Plug the power cord securely into the wall outlet Insert a disc or tape Check that the disc or tape indicator is lit on the front panel display Select the appropriate video input on the TV so the p...

Страница 37: ...n page 16 for details Turn camcorder on and operate properly Press INPUT to select LINE input channel LINE1 or LINE2 Set clock to correct time See Setting the Clock on page 17 Reprogram Timer See Time...

Страница 38: ...orean 7579 Kurdish 7585 Laothian 7679 Latin 7665 Latvian Lettish 7686 Language Code Lingala 7678 Lithuanian 7684 Macedonian 7775 Malagasy 7771 Malay 7783 Malayalam 7776 Maltese 7784 Maori 7773 Marathi...

Страница 39: ...t KY Cayman Islands KZ Kazakhstan LA Laos LB Lebanon Code Country LC Saint Lucia LI Liechtenstein LK Sri Lanka LR Liberia LS Lesotho LT Lithuania LU Luxembourg LV Latvia LY Libya MA Morocco MC Monaco...

Страница 40: ...RCA jack L R x 1 RF OUT Channel 3 or 4 VCR Specifications Head system Four head helical scan azimuth system Timer 12 hour display type with AM PM Tape speed SP 33 35 mm sec LP 16 67 mm sec SLP 11 12 m...

Страница 41: ...ational use has the same warranty coverage as stated in this warranty What are the Exceptions This warranty does not cover 1 Normal maintenance service such as video head cleaning 2 Damage from misuse...

Отзывы: