GMC-I Messtechnik GmbH
23
Note
The “
RISO
” or “
COIL
” switch position may only be used for
short-circuited coil detection. However, if interference
voltage is inadvertently applied with the switch in this
position, it appears at the display.
If an interference voltage of
50 V is present, the short-
circuited coil measurement is disabled. The “Caution
High-Voltage” symbol continues to appear at the display.
If a voltage of greater than 1000 V is present, an acoustic
signal is generated as well.
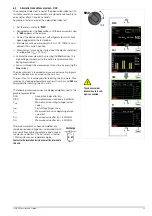
Caution: High-Voltage!
Do not touch the conductive ends of the test probes
as long as
measurement is active and the
Stop
softkey is displayed.
A voltage of up to 1200 V is present at the multimeter’s two
enabled output sockets, and as a pulsed voltage at the two
output sockets of the
COIL TEST ADAPTER
(identified with motor
symbol).
Multimeter:
You may otherwise be exposed to a current of
2.5 mA (limited in the measuring instrument), and although
this is not life endangering, the resulting electrical shock is
quite discernible.
COIL TEST ADAPTER
:
Power pulse currents of greater than
500 A can flow from the output sockets.
The device under test can become charged:
Wait until voltage at
the device under test has been discharged after each mea-
surement (message: „Discharge ...“). Touching the device
under test may otherwise be life endangering!
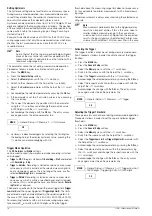
Measured Value Displays
Graphic
Graphic representation is used as a standard feature for the mea-
surement view. If the instrument is in the list view, you can switch
to the graphic display by pressing the
Graphic
softkey.
Horizontal axis:
Coil L1, L2, L3 ...
Vertical axis:
Discharging time in μs
The currently measured discharging time for the coil selected with
the scroll key is digitally displayed in microseconds to the right of
the bar graph. As of the second measurement, deviation from the
smallest to the largest measured value is additionally displayed as
a percentage.
➭
You can delete each measurement in order to repeat it by se-
lecting the desired axis position for coil L1, L2 or L3 with the
or
scroll key and pressing the
Delete
softkey.
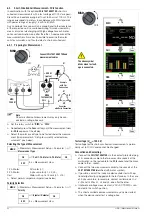
List
You can switch to the list view anytime by pressing the
List
soft-
key. In this case, deviation from the previous value, as well as date
and time of the measurement, are listed along with the respective
measured values. The final comparison of all measurements
appears in the table’s header.
➭
You can delete each measurement in order to repeat it by se-
lecting the desired table row for coil L1, L2 or L3 with the
or
scroll key and pressing the
Delete
softkey.
6.3.2
Conducting the Short-Circuited Coil Measurement
➭
Contact the desired coil (e.g. U–V) in order to test for absence
of voltage.
Attention!
!
Do not establish contact manually – use a self-retaining
contacting method instead, for example with the help of
alligator clips. Poor contact may result in sparking and if
the contacting element slips off of the device under test,
the inspector is exposed to life-threatening danger!
➭
Activating the Short-Circuited Coil Measurement
Activate the measurement by pressing the
Start
softkey. The
high-voltage symbol next to the battery level display blinks
during measurement.
➭
Measurement is stable as soon as a bar graph appears along
with the associated discharging time specified in microsec-
onds to the right of the bar graph and deviation to the previ-
ous measurement is displayed as a percentage for the
respective coil L.
➭
End measurement by pressing the
Stop
softkey.
➭
Before removing the contacting element, allows the coil to dis-
charge via the multimeter (see chapter 6.3.3).
➭
Measurement for motors with three or more coils: Connect the
next coil (e.g. V–W) and repeat the measurement procedure
described above. The next coil is automatically incremented in
the measurement display and activated.
Automatic Evaluation of Measurement Results
Automatic evaluation of measurement results begins when the
second measurement is started. The respective measurement
view (graph or list view) shows maximum deviation to the previous
measurement as a percentage. This permits direct comparison of
the first and all subsequent measurements. Due to the fact that
the third measurement is then compared with the results of both
previous measurements, you automatically get a final comparison
of all three measurements.
The list view permits a final comparison of all measured motor
coils (star or delta connection).
Permissible asymmetry depends on motor type:
A motor with squirrel-cage rotor demonstrates only minimal
asymmetry (typically 1%). If deviation is greater than 10%, the de-
vice under test is faulty (e.g. short-circuited coil).
If any of the measured values is 0, there’s a short-circuit. If no dis-
charging takes place, the measured coil is interrupted.
In order to start a new measurement series, delete the recorded
measurement for each coil as described under “Measured Value
Displays” or reselect the
Coil
function with the
Func
softkey (or by
turning the rotary switch).
In the case of permanent-field motors, short-circuited coil mea-
surement is not dependent on rotor position. This also applies to
squirrel cage motors with large inductances which result in more
frequently occurring remanence. In this case, the bipolar setting
must be selected for the short-circuited coil measurement. First of
all, measurement must be performed at each coil with positive
polarity. Afterwards, each coil is measured once again with re-
versed polarity. The connections between the coil adapter’s ter-
minals and the motor coil are reversed to this end. The instrument
generates a mean value based on both measurement results
which, to a great extent, is independent of rotor position.
Graphic Representation
List View


