background image

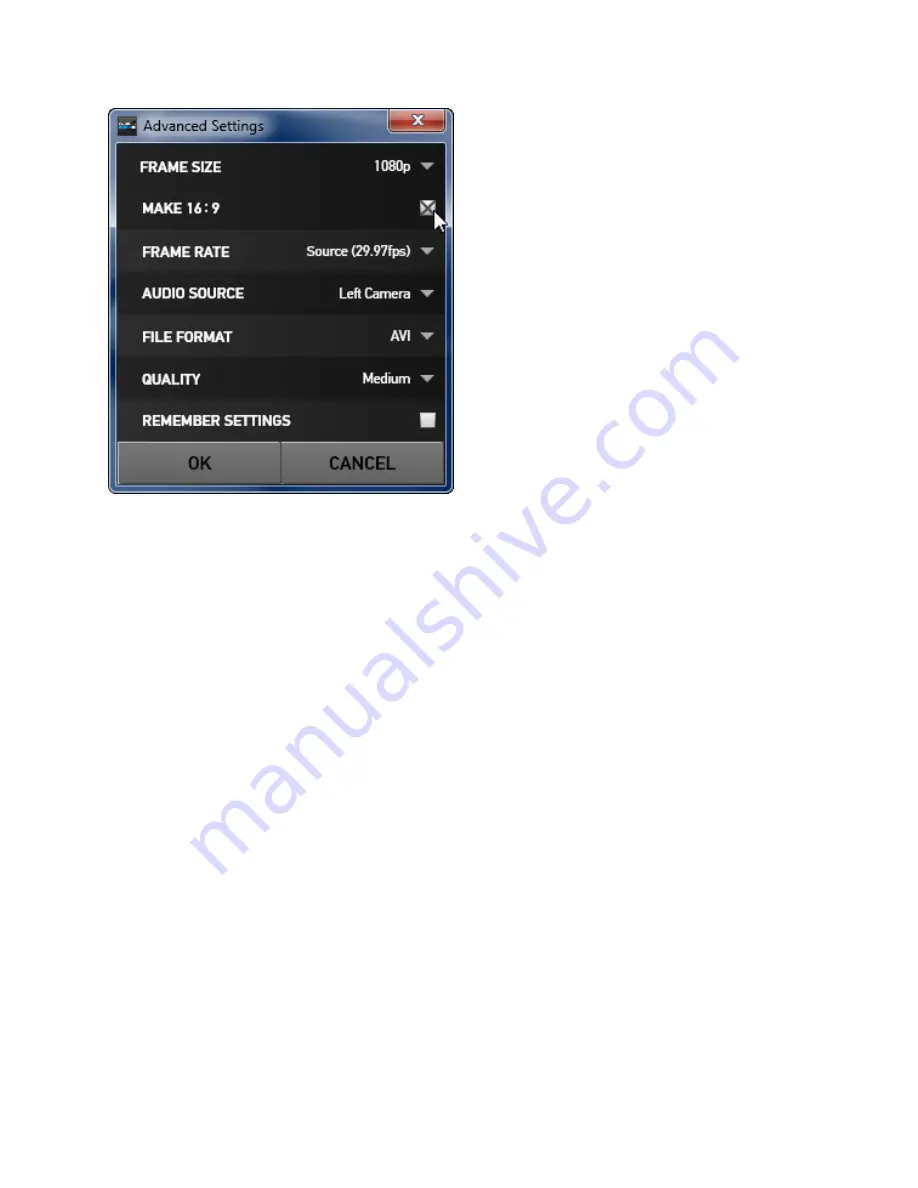
Frame Size

:  Use  this setting  to  convert  your 

GoPro  clip  to  a  different  frame  size  than  you 
recorded  originally.  The  frame  size  you 
recorded  will  be  designated  by   the  word 
“Source”.  Choosing  any  other  frame  size  will 
cause your clip to be scaled to the new  frame 
size when you convert it.

Make 16:9

: This check  box will  appear  when 

you  select  a  new   frame  size  of  1080p   or 
smaller,  and  the  source  video  is 4:3,  to  give 
you the option to scale  the  frame  size to fill  a 
16:9 frame.

Frame  Rate

:  Use  this  option  to  change  the 

clip

ʼ

s frame rate during conversion. A common 

use of  this option  might  be to  take a  clip  that 
is  recorded  at  59.94  frames per  second  and 
designate a  new  frame  rate of 29.97  (or  even 
lower)  frames  per  second  to  create  smooth 
slow motion.

Audio  Source

:  (Windows  only)  When  you 

create a 3D clip  from a pair of clips, you can choose to use the audio from  the left camera or the 
right camera using this option. For a standard 2D clip, the default setting is “left”.

File Format

: GoPro CineForm  files can be wrapped as “AVI” files, which are used on Windows 

computers, or “MOV” files which would typically be used on a Mac.

Quality

:  The  GoPro  CineForm  file  can  be  created  using  the  quality  level  you  choose.  The 

default  is “Medium” which  will  be a  very  high quality video  file. You  can  choose “High” quality, 
which may  or may  not end up  creating a clear visual  quality difference. If you know you need to 
make significant changes to color in a clip, the extra quality  might be beneficial, but it will create 
a larger file and may take longer to process when you choose to convert. 

Even the “Low” quality  setting is a relatively  high quality  video file and many users may  be quite 
satisfied with it, and the smaller files will take up less space on your hard drive. 

If you wish  to  process more  than one clip in  your  Import List  with the same settings,  check  the 

Remember Settings

” box before closing the Advanced Settings window.

H.

When you

ʼ

ve  completed  your  conversion settings for  your  clip, you  can  specify  a  name  for 

the converted file in the “

File Name

” text field. By  default, the directory  where your  clips are 

stored  will  be  the  destination  directory, but you can choose a different destination using the 

Change Directory

” button below the File name text field.

I.

When you

ʼ

ve prepared a clip  for conversion, click “

Add Clip to Conversion List

” to add it to 

the queue.

GOPRO CINEFORM STUDIO


PAGE 9 

Содержание CineForm Studio

Страница 1: ...GoPro CineForm Studio Manual GoPro HERO and their respective logos are trademarks of Woodman Labs Inc in the United States and other countries Copyright 2011 Woodman Labs Inc All rights reserved...

Страница 2: ...TABLE OF CONTENTS INSTALLATION 3 OVERVIEW WORKING INSIDE THE STUDIO 3 STEP 1 IMPORT CONVERT 7 STEP 2 EDIT 11...

Страница 3: ...Pro CineForm files and keeping them in that state while you use your favorite video editing program to cut them together while you make color and framing and 3D alignment changes in GoPro CineForm Stu...

Страница 4: ...this folder on a drive with enough free space Second open the SD card that is now available on your computer via the camera or card reader and locate the DCIM folder Click and drag the complete conte...

Страница 5: ...ust alignment and you can simply edit them like any other video file Inside GoPro s CineForm Studio you can make color framing or 3D alignment or viewing adjustments to your GoPro CineForm files and t...

Страница 6: ...e in Studio to export an MPEG4 file for upload to the World Wide Web or playback on a computer You can take your clips through GoPro CineForm Studio to perfect their color and or 3D settings and expor...

Страница 7: ...pair If you choose to work with all the files in your project folder simply dragging the folder and dropping it on the Import pane will import all the GoPro media in the folder and will automatically...

Страница 8: ...g the playback slider moving the playhead forward and backward in time manually Below the player window on the right the full frame button will show your video full frame on your computer display hidi...

Страница 9: ...d typically be used on a Mac Quality The GoPro CineForm file can be created using the quality level you choose The default is Medium which will be a very high quality video file You can choose High qu...

Страница 10: ...vealed with the triangle on the right to give you an overview of the settings you ve created for the clip selected in the Conversion List panel If you wish to make a change to the settings of a partic...

Страница 11: ...s MP4 files for easy playback in other devices or uploading to a web video site The Edit Workspace A The Import Converted Clips List works exactly like the Import New Files List works in Step 1 You ca...

Страница 12: ...ges creating the 3D effect LINE INTERLEAVED takes the two eyes and outputs each one on every other horizontal line This is for use with certain polarized passive 3D displays and polarized glasses ONIO...

Страница 13: ...e colors in the shot I You can change the composition of your shot using the Framing Controls Zoom Horizontal and Vertical positioning slider controls can be helpful if you would like to crop out some...

Страница 14: ...i n g a c t i v e t o m a k e adjustments in other areas Working with 3D Inside GoPro CineForm Studio When you re working with 3D clips you are actually working with two slightly offset 2D clips whic...

Страница 15: ...s is the content the viewer will sense is at the screen face You can adjust what is at that screen plane through adjustment of the 3D Convergence Controls Horizontal slider By moving the slider to the...

Отзывы: