background image

11

After unit is set and ducted, verify ESP with a 1" inclined
manometer with pitot tubes or a Magnahelic gauge and
confirm CFM to blower curves in the specification sheets.
All units have three speed blower motors. If low speed is not
utilized, the speed tap can be changed to medium or high
speed.   Never run CFM below 350 CFM per ton, evaporator
freezing or poor unit performance is possible.

ADJUSTING SPEED TAP FOR INDOOR BLOWER

MOTOR

PSC Motor

Adjust the CFM for the unit by changing the speed tap of
the indoor blower motor at the EBTDR “com” connection
with one of the speed taps on “M1” or “M2”. (Black-High
Speed, Blue-Medium Speed, Red-Low Speed.)

X-13 Motor

The blower motor speed for the X-13 motor is controlled by
three 24V low voltage leads: green, yellow, and white.  The
green lead sets the speed for fan-only mode. The yellow
lead sets the speed for cooling and heat pump heating
mode (if applicable).  The white lead sets the speed for
electric heat mode (emergency heat and second stage
heat, if applicable).

The leads are factory connected as follows: Green to T1,
Yellow to T2, and White to T3. T1 is the low speed setting
and is dedicated to fan-only mode.  T2 and T3 are medium
speed settings. T4 and T5 are high speed settings.  To
adjust the blower speed, move the yellow and/or white wires
to T4 and T5. 

NOTE: 

If more than one lead is energized at

the same time, the motor will use the higher speed setting.

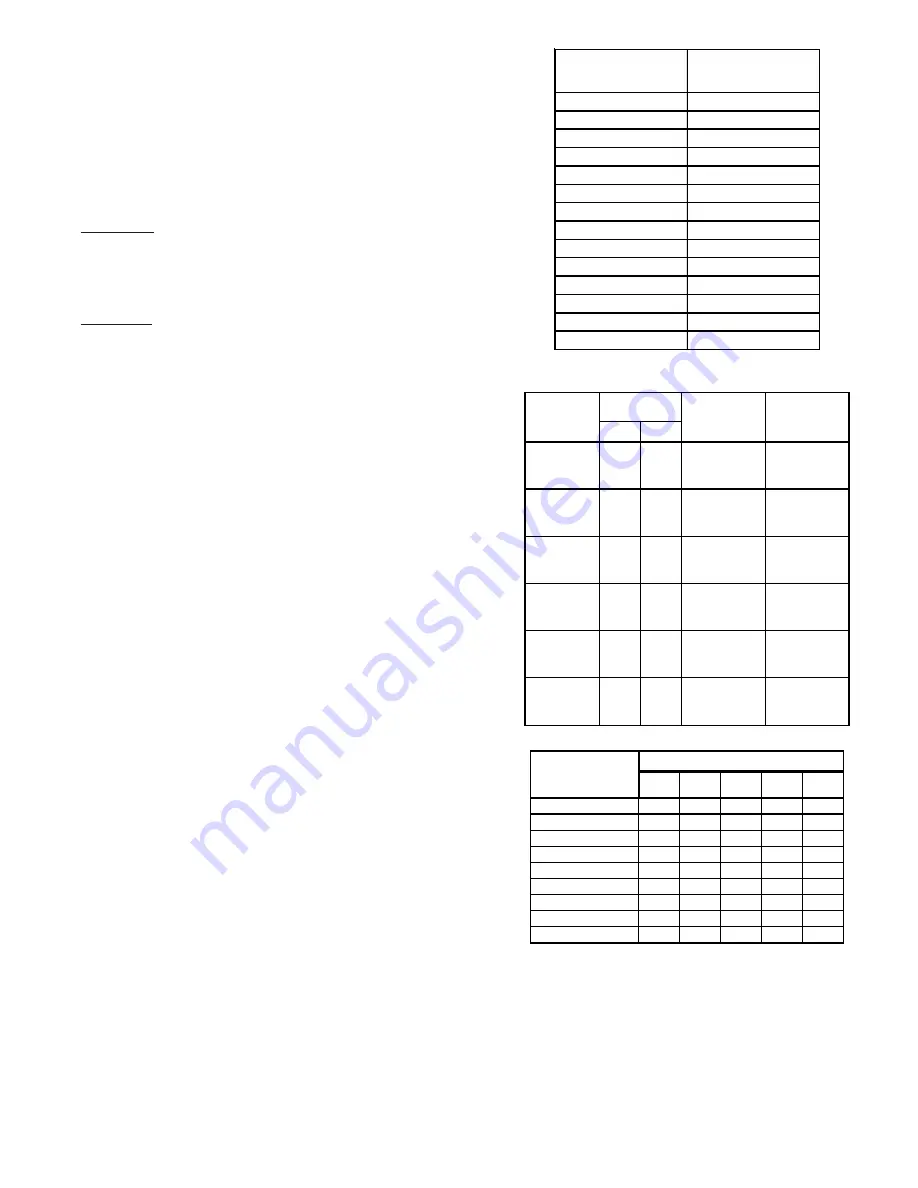
CHECKING CHARGE

After completing airflow measurements and adjustments, the
unit’s refrigerant charge must be checked.  The design charge
(per table on page 7) is based on 400 CFM per ton at minimum
ESP per AHRI test conditions (generally between .15 - .25
ESP).  When air quantity or ESP is different than above,
charge must be adjusted to the proper amount.  All package
units should be charged to the superheat method at the
compressor suction line (these are fixed orifice devices).

For charging in the warmer months, 10

º

F superheat at the

compressor is required at conditions: 95

º

F outdoor ambient

(dry bulb temperature), 80

º

F dry bulb / 67

º

F wet bulb indoor

ambient, approximately 50% humidity.  This superheat varies
when conditions vary from the conditions described.

A superheat charge chart is available for other operating
conditions.  Use it to provide the correct superheat at the
conditions the unit is being charged at.

After superheat is adjusted it is recommended to check unit
sub-cooling at the condenser coil liquid line out.  In most
operating conditions 10 - 15

º

F of sub-cooling is adequate.

Suction Pressure

Saturated Suction 

Temperature (°F)

50

26

53

28

55

30

58

32

61

34

63

36

66

38

69

40

72

42

75

44

78

46

81

48

84

50

87

52

TABLE  5

Suction Pressure Temperature (R-22)

DB

WB

63

301 - 332

73 - 83

115

75

67

306 - 335

77 - 78

71

311 - 342

82 - 92

63

268 - 299

72 - 82

105

75

67

273 - 304

77 - 87

71

278 - 309

80 - 90

63

233 - 264

67 - 77

95

75

67

238 - 269

72 - 82

71

243 - 274

77 - 87

63

198 - 229

62 - 72

85

75

67

203 - 234

67 - 77

71

208 - 239

71 - 81

63

172 - 203

57 - 67

75

75

67

175 - 206

61 - 71

71

180 - 211

66 - 76

63

144 - 175

52 - 62

65

75

67

149 - 180

56 - 66

71

155 - 186

60 - 70

INDOOR 

TEMP. °F

LIQUID 

PRESSURE 

PSIG

SUCTION 

PRESSURE 

PSIG

OUTDOOR 

TEMP. °F

TABLE  6  -  

Operating Pressures

65

70

75

80

85

100

-

-

-

10

10

95

-

-

10

10

10

90

-

-

12

15

18

85

-

10

13

17

20

80

-

10

15

21

26

75

10

13

17

25

29

70

10

17

20

28

32

65

13

19

26

32

35

60

17

25

30

33

37

Ambient Condenser 

Inlet Temp (°F 

Drybulb)

Return Air Temp. (°F Drybulb)

TABLE 7  -  

System Superheat

SUPERHEAT CAN BE DETERMINED AS FOLLOWS:

1.

Read suction pressure.  Determine Saturated Suction
Temperature from tables or pressure gauge saturated
temperature scale (R-22).

2.

Read suction line temperature.

3.

Use the following formula:

SUPERHEAT = SUCTION LINE TEMP - SAT. SUCTION TEMP

Содержание GPC 13 SEER H Series

Страница 1: ...o system charging and start up Prior to installation thoroughly familiarize yourself with this Installation Manual Observe all safety warnings During installation or repair caution is to be observed I...

Страница 2: ...PTING TO INSTALL OR REPAIR THIS UNIT WITHOUT SUCH BACKGROUND MAY RESULT IN PRODUCT DAMAGE PERSONAL INJURY OR DEATH AT A MINIMUM INTRODUCTION Checking Product Received Upon receiving the unit inspect i...

Страница 3: ...heat pumps are designed for OUTDOOR USE ONLY This series is available in cooling Capacities of 3 and 5 nominal tons of cooling Op tional field installed heat kits are available in 5 8 10 15 and 20 KW...

Страница 4: ...application minimizes exposed wiring Close to the wall application assures free unobstructed air to the other two sides In more confined application spaces such as corners provide a minimum 10 cleara...

Страница 5: ...the collars and flanges with a proper waterproof sealant See Figure 3 It is strongly encouraged to use appropriately sized ducts based upon the CFM for your application unit s CFM If duct sizing thro...

Страница 6: ...GE DISCONNECT SWITCH LOW VOLTAGE CONNECTORS R COMMON HEAT FAN COOL W Y G THERMOSTAT SUBBASE Y G R W FOR INTERNAL WIRING SEE WIRING LABEL ATTACHED TO UNIT HIGH VOLTAGE POWER WIRING 24 VOLT CONTROL WIRI...

Страница 7: ...now be operating Allow the unit to run 10 minutes make sure cool air is being supplied by the unit 7 Turn the temperature setting to the highest position stopping the unit The indoor blower will cont...

Страница 8: ...is recommended to serve as an indication that the unit will operate normally COMPONENTS 1 Contactor This control is activated closed by the room thermostat for both heating and cooling The contactor...

Страница 9: ...refrigerant circuit external to the compressor This is accomplished with a reversing valve Thus the hot discharge vapor from the compressor is directed to the indoor coil evaporator on the cooling cy...

Страница 10: ...inal DF2 on defrost board and turn on power AIR FLOW MEASUREMENT AND ADJUSTMENT After reviewing section on DUCTING proceed with airflow measurements and adjustments Unit s blower curves in Specificati...

Страница 11: ...e adjusted to the proper amount All package units should be charged to the superheat method at the compressor suction line these are fixed orifice devices For charging in the warmer months 10 F superh...

Страница 12: ...he Heating Cycle Inadequate Air Volume Through Indoor Coil When a heat pump is in the heating cycle the indoor coil is functioning as a condenser The return air filter must always be clean and suffici...

Страница 13: ...k tighten all connections b Compressor stuck grounded or open winding open internal overload b Wait at least 2 hours for overload to reset If still open replace the compressor c Low voltage connection...

Страница 14: ...BTD R EM FC GND LVJB PLF RCCF SA TR BLOWER INTERLOCK RELAY CONTACTOR CRANKCASE HEATER CONDENSER MOTOR COMPRESSOR ELECTRONIC BLOWER TIME DELAY RELAY EVAPORATOR MOTOR FAN CAPACITOR EQUIPMENT GROUND LOW...

Страница 15: ...OVER CURRENT PROTECTION COMPONENT LEGEND C CM COMP EM GND LVJB PLF RCCF SA TR CONTACTOR CONDENSER MOTOR COMPRESSOR EVAPORATOR MOTOR EQUIPMENT GROUND LOW VOLTAGE JUNCTION BOX FEMALE PLUG CONNECTOR RUN...

Страница 16: ...LOWER INTERLOCK RELAY CONTACTOR CRANKCASE HEATER CONDENSER MOTOR COMPRESSOR DEFROST CONTROL DEFROST THERMOSTAT ELECTRONIC BLOWER TIME DELAY RELAY EVAPORATOR MOTOR FAN CAPACITOR EQUIPMENT GROUND HIGH V...

Страница 17: ...ROTECTION COMPONENT LEGEND C CM COMP DC DFT EM GND HVDR LPS LVDR LVJB PLF RVC RCCF SA TR CONTACTOR CONDENSER MOTOR COMPRESSOR DEFROST CONTROL DEFROST THERMOSTAT EVAPORATOR MOTOR EQUIPMENT GROUND HIGH...

Страница 18: ...18 THIS PAGE LEFT BLANK INTENTIONALLY...

Страница 19: ...19 THIS PAGE LEFT BLANK INTENTIONALLY...

Страница 20: ...ificantly reduce the most frequent causes of product failure They are simple to service and forgiving to operate We use quality materials and components Finally every unit is run tested before it leav...

Отзывы: