background image


29 

Technical data 

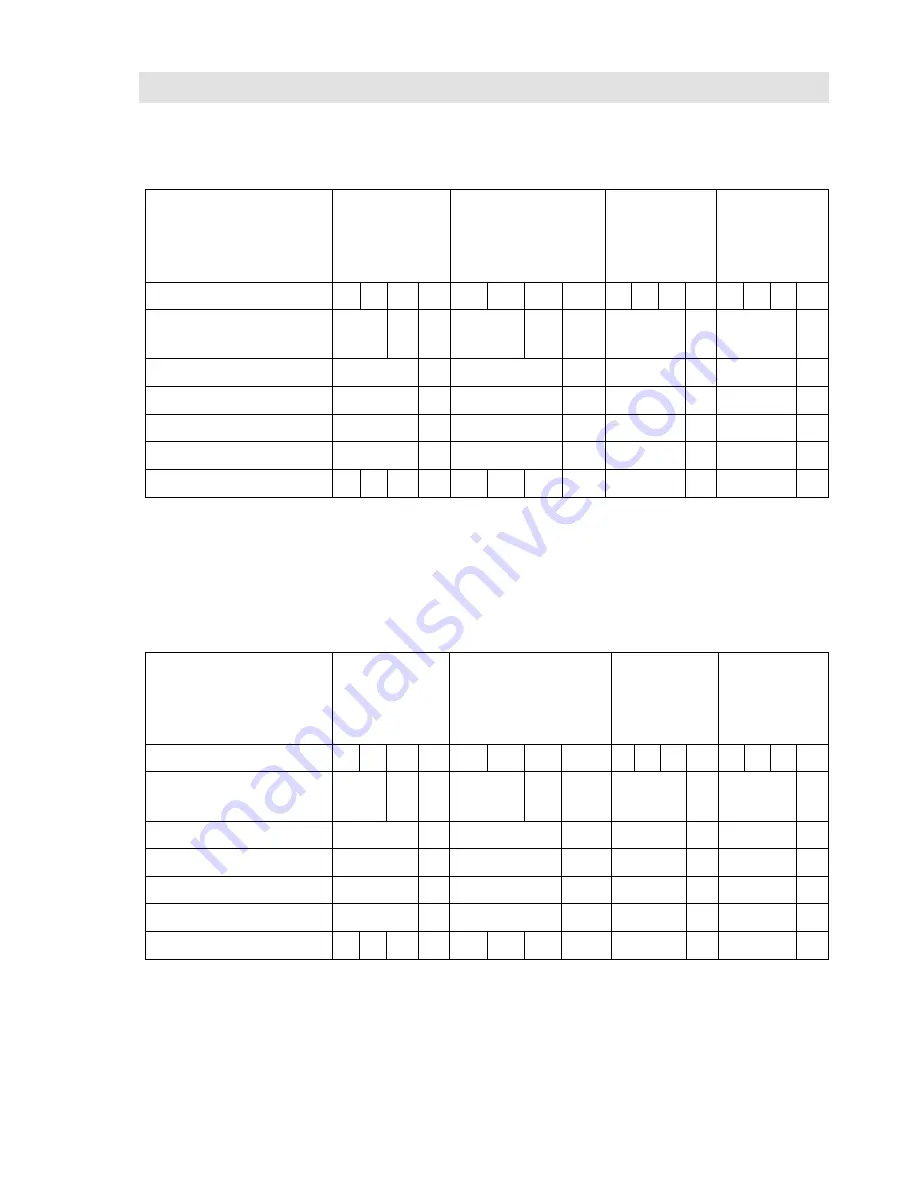
Dimensions and weights 

BW 31 


Flanges to  

EN PN40* 

Flanges to ASME 

Class 150/Class 300 

Screwed 

sockets, 

 socket-weld 

ends 

Butt-weld 

ends via 

transition 

pieces 

Nominal size DN 

15  20  25  40  15  20  25  40  15  20  25  40  15  20  25  40 

Overall length [mm] 

150  160 200 

150 

160  216/ 

230** 

95 

130 

200 


Height without ESD*** [mm] 

128 

188 

128 

188 

128 

188 

128 

188 

Height with ESD*** [mm] 

187 

248 

187 

248 

187 

248 

187 

248 

Space required for servicing 

110 

70 

110 

70 

110 

70 

110 

70 

Width of cover flange[mm] 

85 

115 

85 

115 

85 

115 

85 

115 

Weight [kg] 

4.4 5.3  5.7  12  4.4  5.3  5.7  12 

2.4 

8.0 

2.9 

8.5 


* DN40: PN25 
** Class 300: 230 mm 
*** External setting device 


BW 31A 


Flanges to  

EN PN40* 

Flanges to ASME 

Class 150/Class 300 

Screwed 

sockets, 

socket-weld 

ends 

Butt-weld 

ends via 

transition 

pieces 

Nominal size DN 

15  20  25  40  15  20  25  40  15  20  25  40  15  20  25  40 

Overall length [mm] 

150  160 200 

150 

160  216/ 

230*** 

95 

130 

200 

250 

Height without ESD*** [mm] 

128 

188 

128 

188 

128 

188 

128 

188 

Height with ESD*** [mm] 

150 

235 

150 

235 

150 

235 

150 

235 

Space required for servicing 

110 

70 

110 

70 

110 

70 

110 

70 

Width of cover flange[mm] 

85 

115 

85 

115 

85 

115 

85 

115 

Weight [kg] 

4.4 5.3  5.7  12  4.4  5.3  5.7  12 

2.4 

8.0 

2.9 

8.5 


* DN40: PN25 
** Class 300: 230 mm 
*** External setting device 


Содержание BW 31

Страница 1: ...Return Temperature Control Valve BW 31 BW 31A Original Installation Instructions 819026 01 ...

Страница 2: ...onnecting the equipment 9 Adjusting the closing temperature 10 Adjusting the closing temperature via external setting device 10 Adjusting the closing temperating without external setting device 12 After operation 17 Removing external dirt deposits 17 Purging equipment 17 Maintaining equipment 19 Servicing equipment 19 Troubleshooting 26 Putting equipment out of operation 27 Removing harmful substa...

Страница 3: ...erator The installation operating manual is part of the equipment Please hand over this installation operating manual when selling the equipment or passing it on Text layout Certain text elements of this installation operating manual feature a specific typographic design You can easily distinguish the following text elements Standard text Cross reference Listing Sub items in listings Steps for act...

Страница 4: ...ger of cuts to hands Always wear industrial gloves when servicing the equipment If the support of the equipment during installation is insufficient the equipment might fall down thereby causing bruises or injuries Make sure the equipment is safely held in place during installation and cannot fall down Wear protective safety footwear Risk of property damage or malfunctions Malfunctions will occur i...

Страница 5: ...against dangerous situations that could lead to minor or moderate injuries Information on environmental and property damage Attention This note warns against situations that may lead to environmental and or property damage Description Scope of supply and equipment specification Scope of supply Our equipment is delivered packed and ready for assembly Equipment specification The equipment consists o...

Страница 6: ...tor 7 Socket head bolts 8 Name plate with flow direction arrow 9 Body 10 Gaskets 2 for DN40 An external setting device is available as optional extra This external setting device allows you to change the closing temperature during operation without having to remove the cover There are different external setting devices depending on the equipment type ...

Страница 7: ...cket weld ends Flanges Screwed sockets Name plate The following items are indicated on the name plate Type designation Nominal size Nominal pressure Differential pressure Temperature Flow arrow The name plate is pointed on one side This serves as an additional indication of the flow direction In addition you will find the following indications on the body or cover Material specification Factory se...

Страница 8: ...e fluid temperature falls the orifice opens More fluid can flow through As the fluid temperature rises the orifice of the Thermovit regulator closes Less fluid can flow through The orifice always remains slightly open thereby allowing a small flowrate bleed flow to pass through The Thermovit regulator is therefore always surrounded by fluid and can react instantaneously if the temperature changes ...

Страница 9: ...f shipping damage When supplied by the factory the connections are sealed off with sealing plugs Remove sealing plugs before mounting the equipment Keep the sealing plugs for further use DANGER Personnel working on pipes are exposed to safety risks and may suffer severe injuries burns poisoning or even loss of life Make sure that no hot or hazardous fluid is in the equipment or the pipes Make sure...

Страница 10: ...ipment features a factory set closing temperature in accordance with the design data Attention Risk of malfunctions or damage due to incorrect setting of Thermovit regulator Make sure that only qualified personnel change the closing temperature setting Do not adjust a closing temperature that is below the factory set closing temperature Note that closing temperatures below the factory setting may ...

Страница 11: ...possible Factory setting for BW 31A with external setting device Nominal size Closing temperature C Set value X mm Lift Y mm DN15 90 27 0 4 6 DN20 DN25 70 27 6 4 0 DN40 70 48 4 6 6 These factory settings are calculated for ambient temperatures of 18 21 C To change the settings proceed as follows WARNING Injuries such as burns or poisoning may occur if fluid escapes through the external setting dev...

Страница 12: ...re the adjustment stem against turning when tightening the locknut To secure the adjustment stem 14 against turning fasten locknut 15 hand tight while securing the adjustment stem with a screwdriver To check the setting measure the return temperature of the fluid downstream of the equipment Repeat the setting procedure if the return temperature does not meet the set value Adjusting the closing tem...

Страница 13: ...hat is below the factory set closing temperature Ascertaining set value The set value depends on the type of equipment and the desired closing temperature Refer to the following tables for the required set value Ascertaining the set value for BW 31 The number of plate pairs used in the Thermovit regulator depends on the required closing temperature Closing temperature Number of plate pairs DN15 20...

Страница 14: ...8 55 1 120 30 2 32 7 55 5 125 30 6 33 0 55 8 130 30 9 33 3 56 2 135 31 2 33 6 54 5 140 31 5 34 0 54 8 145 30 4 34 3 55 0 150 30 7 34 6 55 3 155 31 0 34 9 55 5 160 31 2 35 1 55 7 The set value is based on ambient temperatures of 18 21 C If the ambient temperature is higher or lower use the following table to adjust the set value Ambient temperature C Correction value mm DN15 DN20 DN25 DN40 9 12 0 7...

Страница 15: ...7 59 0 270 34 1 36 9 59 2 280 34 2 37 0 59 3 The set value is based on ambient temperatures of 18 21 C If the ambient temperature is higher or lower use the following table to adjust the set value Ambient temperature C Correction value mm DN15 DN20 DN25 DN40 9 12 0 6 0 75 1 2 12 15 0 4 0 5 0 8 15 18 0 2 0 25 0 4 18 21 0 21 24 0 2 0 25 0 4 24 27 0 4 0 5 0 8 27 30 0 6 0 75 1 2 Changing set value Att...

Страница 16: ...nut The closing temperature is reduced To increase the set value loosen the adjustment nut The closing temperature is increased Use Loctite 222 to lock and seal the Thermag nut against inadvertent misadjustment Attach cover to the equipment as described on page 18 To check the setting measure the return temperature of the fluid downstream of the equipment Repeat the setting procedure if the return...

Страница 17: ...move any dirt particles or fluid residues inside the equipment When fixing the cover onto the equipment body the gasket will be compressed As a result the gasket can no longer seal properly if the cover is taken off again It is therefore essential that you always insert a new gasket whenever you remove and re attach the cover Attention Malfunctions due to dirt deposits on Thermovit regulator Remov...

Страница 18: ...taching the cover Make sure that the cover is not tilted or skewed when refitted Fix cover to equipment body Fasten screws nuts and bolts with the following tightening torque DN15 to DN25 35 Nm DN40 45 Nm Purging pipes Attention Equipment may be damaged by unsuitable cleaning fluid Rinse the pipe with the same fluid that is used during normal operation Make sure that the cleaning fluid does not co...

Страница 19: ...rvicing the equipment Fasten the Thermovit regulator with the following tightening torque DN15 to DN25 90 Nm DN40 140 Nm Attach cover to the equipment as described on page 18 Maintaining equipment The equipment is maintenance free Servicing equipment You may exchange the following component parts in case of wear or damage Thermovit regulator Gasket between cover and body External setting device if...

Страница 20: ...ignation DN Temperature range C Qty Stock code 6 Thermovit regulator complete 15 20 90 1 184726 60 130 1 031884 20 25 20 90 1 184560 40 115 1 004339 40 20 65 1 184544 50 110 1 004342 10 Gasket 15 20 25 20 560493 40 20 375699 one piece required two pieces required ...

Страница 21: ...nation DN Temperature range C Qty Stock code 6 Thermovit regulator complete 15 60 120 1 377776 120 270 1 184807 20 25 30 120 1 184880 100 280 1 184731 40 30 80 1 184857 100 270 1 184808 10 Gasket 15 20 25 20 560493 40 20 375699 one piece required two pieces required ...

Страница 22: ... 1 031896 20 25 20 90 1 036933 40 115 1 004340 40 20 75 1 038972 50 110 1 004343 10 Gasket 15 20 25 20 560493 40 20 375699 17 External setting device 15 20 120 1 184899 40 140 1 184990 20 25 20 110 1 184753 40 140 1 184754 40 20 100 1 184756 50 130 1 184757 18 Gasket for external setting device 15 20 25 1 014934 40 1 014935 one piece required two pieces required ...

Страница 23: ...complete 15 60 160 1 184631 90 270 1 004010 20 25 30 170 1 184937 70 270 1 004022 40 25 85 1 184661 70 270 1 004025 10 Gasket 15 20 25 20 560493 40 20 375699 17 External setting device 15 1 184902 20 25 1 004013 40 1 004027 18 Gasket for external setting device 15 20 25 1 014934 40 1 014935 one piece required two pieces required ...

Страница 24: ...t in the body Attach cover to the equipment as described on page 18 Exchanging external setting device To exchange the external setting device proceed as follows Attention Equipment may be damaged if screwdriver is applied to the scale Using a screwdriver may cause damage to the scale of equipment type BW 31 Make sure that the screwdriver does not touch the scale when applying it to the external s...

Страница 25: ...correctly aligned Put the external setting device with the forked ajdustment piece 13 over the square nut 4 through the bore of the cover 2 step 1 Attention Equipment may be damaged if screwdriver is applied to the scale Using a screwdriver may cause damage to the scale of equipment type BW 31 Make sure that the screwdriver does not touch the scale when applying it to the external setting device F...

Страница 26: ...xceeds the adjusted closing temperature The leak passage is too high The design data for sizing the equipment was wrong Change the settings of the installation or mount correctly sized equipment The intended flowrate or the service temperature are not reached The design data for sizing the equipment was wrong The settings of the installation differ from the design data If faults occur that are not...

Страница 27: ...onal protective equipment PPE and clothing Attention Environmental damage may be caused by poisonous fluid residues Before disposing of the equipment make sure that it is clean and free of fluid residues For the disposal of all materials observe the pertinent legal regulations concerning waste disposal Remove all residues from the equipment For the disposal of all residues observe the pertinent le...

Страница 28: ...sure that they are in good working condition Use the equipment only for its intended purpose and the service conditions for which it was specified Disposing of equipment Attention Environmental damage may be caused by poisonous fluid residues Before disposing of the equipment make sure that it is clean and free of fluid residues For the disposal of all materials observe the pertinent legal regulat...

Страница 29: ... 115 85 115 Weight kg 4 4 5 3 5 7 12 4 4 5 3 5 7 12 2 4 8 0 2 9 8 5 DN40 PN25 Class 300 230 mm External setting device BW 31A Flanges to EN PN40 Flanges to ASME Class 150 Class 300 Screwed sockets socket weld ends Butt weld ends via transition pieces Nominal size DN 15 20 25 40 15 20 25 40 15 20 25 40 15 20 25 40 Overall length mm 150 160 200 150 160 216 230 95 130 200 250 Height without ESD mm 12...

Страница 30: ... 200 300 350 400 Pressure temperature ratings for DN 40 Max differential pressure delta PMX 6 bar End connection Flanges to EN PN25 Service pressure barg 25 0 23 2 20 8 17 2 14 8 Inlet temperature C 10 20 100 200 300 400 End connection Flanges to ASME Class 150 Service pressure barg 19 6 17 7 13 8 10 2 8 4 6 5 Inlet temperature C 29 38 100 200 300 350 400 Closing temperatures Adjustable closing te...

Страница 31: ...turer To download the current Declaration of Conformity or Declaration by Manufacturer go to www gestra com documents or contact GESTRA AG Münchener Straße 77 28215 Bremen Germany Telefon 49 421 3503 0 Telefax 49 421 3503 393 E Mail info de gestra com Web www gestra de This declaration is no longer valid if modifications are made to the equipment without consultation with us ...

Страница 32: ... the world GESTRA AG Münchener Straße 77 28215 Bremen Germany Telefon 49 421 3503 0 Telefax 49 421 3503 393 E Mail info de gestra com Web www gestra de 819026 01 07 2017 kx_mm 808784 01 GESTRA AG Bremen Printed in Germany ...

Отзывы: