


22
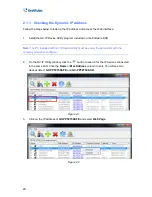
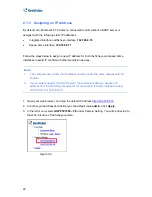
2.1.2 Assigning an IP Address
By default, GV-Panoramic PTZ Camera, connected to LAN without a DHCP server, is
assigned with the following static IP addresses.
•
Integrated interface and fisheye interface:
192.168.0.10
•
Speed dome interface:
192.168.0.11
Follow the steps below to assign a new IP address for both the fisheye and speed dome
interfaces to avoid IP conflict with other GeoVision devices.
Note:
1. The computer used to set the IP address must be under the same network with the
camera.
2. If your router supports the DHCP server, the camera will obtain a dynamic IP
address from the DHCP server each time it connects to the LAN, instead of using
192.168.0.10 or 192.168.0.11.
1. Open your web browser, and type the default IP address
http://192.168.0.10
2. In both Login and Password fields, type the default value
admin
. Click
Apply
.
3. In the left menu, select
GV-PPTZ7300 – FE
under Camera Setting. You will be directed to
the Web interface of the fisheye camera.
Figure 2-4
Содержание GV-PPTZ7300
Страница 70: ...58 4 1 1 Video Settings Figure 4 2A ...
Страница 71: ...Administrator Mode 59 4 Figure 4 2B ...


