PTZ Control Panel
115
5
5.3 Auto Pan Settings
The camera can pan up to 355° endlessly to survey the horizontal view between 2
user-defined positions. You can configure up to 8 sets of Auto Pan mode.
Setting Up an Auto Pan
1. Set up the vertical position of your camera first. The vertical direction set during or after
the horizontal movement settings will not be effective.
2. Set up the start position of the Auto Pan.
A. Use the Pan/Tilt Control keys and zoom in / out keys on the PTZ control panel to
move to a start position.
B. Click
Option
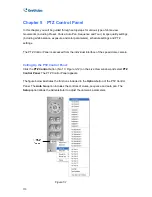
(Figure 5-1) on the PTZ Control Panel, click
Auto Set
and select
Set
Auto Pan 1 Start Position
.
3. Set up the end position of the Auto Pan.
A. Use the Pan/Tilt Control keys and zoom in / out keys on the PTZ control panel to
move to an end position.
B. Click
Option
(Figure 5-1) on the PTZ Control Panel, click
Auto Set
and select
Set
Auto Pan 1 Stop Position
.
4. To create another Auto Pan mode, repeat Steps 1 to 4 using a different Auto Pan number.
To configure the Pan speed and the duration of dome view staying at the two positions, see
5.12 PTZ Settings- Other
in this manual.
Note:
The zoom ratio of an Auto Pan’s Start Point will persist throughout the whole path.
Starting and Stopping an Auto Pan
To start the camera on an Auto Pan mode, click
Option
(Figure 5-1) on the PTZ Control Panel,
click
Auto
and select an
Auto Pan
number which has been previously set. An enabled Auto
Pan will repeat until it is stopped by clicking a Pan/Tilt Control key, home key, zoom button or
focus button on the PTZ Control Panel.
Содержание GV-PPTZ7300
Страница 70: ...58 4 1 1 Video Settings Figure 4 2A ...
Страница 71: ...Administrator Mode 59 4 Figure 4 2B ...


