9
Power
Press power button to turn on/off the monitor.
Input Source/ Exit
Press this button to show "Input Source" and then press to
switch the input sources. When using the OSD menu, press this
button to return to previous page.
Menu/Select
Press this button to launch OSD panel. When using OSD menu,
press this button to select and enter the next page.
Increase Volume/
Next
Press this button to show "Volume bar". Press and hold this button
to increase the volume continuously. In the OSD menu, press this
button to move down or to the right.
Decrease Volume/
Previous
Press this button to show "Volume bar". Press and hold this
button to decrease the volume continuously. In the OSD menu,
press this button to move up or to the left.
+
Reset
Press both "Exit" and "Decrease Volume/Down" at the same time
and OSD will be reset as the factory settings.
Section 2 OSD Menu Description
When turning on monitor at the first time, the "Language Select" menu appears on the
right top. Please press " Menu/Select " button to choose a language, then the
"Language Select" menu won't appear next time.
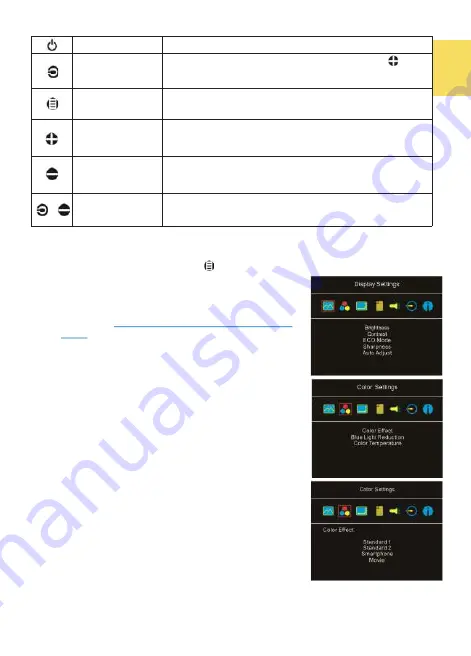
1. Display Settings
In the Fig. shown right, enter "Display Settings" to adjust
"Brightness", "Contrast", "Sharpness", etc.
1)
ECO Mode:
The maximum brightness is at 50 in ECO
Mode
.
2)
Auto Adjust: Launch "Auto Contrast Adjust" and "Auto
Brightness Adjust" to adjust brightness and contrast
automatically to ensure the highest quality when
displaying moving images.
2.
Color Settings
1)
Color Effect: If the PC image output format is RGB
Limited, it is recommended to select "Standard 1"; if it
is RGB Full format, it is recommended to select
"Standard 2". Select "Phone" mode to make the colors
more vivid; select "Movie" mode to display the dark
scene more clearly.
2)
Blue Light Reduction: Select "On" to reduces the
screen's blue light automatically.
3)
Color Temperature: Select "Cool" to increase the blue
color of the image; Select "Warm" to increase the red
color of the image. Select "User" to adjust the RGB
color settings manually.
3.
Aspect Ratio
1)
Aspect ratio: When select "16:9 Full Screen", the
monitor displays a 16:9 image in full screen. When
select 4:3, the monitor displays a 4:3 image with left
-
right side black borders to fill the 16:9 screen. When
select "Original", the monitor displays the image in its original size.
2)
Overscan:
Only available when HDMI video signal input (e.g., 1080P/720P).
Ena-
bling this function allows you to calibrate the display area.
Содержание On-Lap M505T/I
Страница 1: ...User Manual On Lap M505T I Monitor...
Страница 7: ...1 Chapter 1 Parts of On Lap Product Accessories Section 1 Parts Description Connect USB Touch Cable...
Страница 22: ...IV...
Страница 23: ...V VCCI B...
Страница 24: ...16...
Страница 25: ...17 I T I I...
Страница 26: ...I 18 A B C...
Страница 27: ...1 I 2 3 PC OS M505T I Apple MacBook Pro Air iPad Pro M505T I 19...
Страница 28: ...I 1 I 2 I 20 3...
Страница 29: ...21 1 I 2 1 2...
Страница 30: ...1 2 3 22 1 2 3 4 1 I 2 3 1 2...
Страница 31: ...23 1 2 3...
Страница 32: ...24...
Страница 33: ...25...
Страница 34: ...26 I...
Страница 35: ...27 I I...
Страница 36: ...28 I I I I I I I...
Страница 37: ...R53848 RoHS I 29...
Страница 38: ...30...
Страница 40: ......


