34
6.1 Machine Connection Setup
The LaserPro E200 can communicate with a computer through a Wi-Fi, USB Port or LAN Port connection
interface. Please see below steps for each connection method.
6.1.1 Wi-Fi Connectivity
Setting on E200 by Wi-Fi connectivity, please download the small app - E200 Connection Wizard from GCC
download area
https://www.gccworld.com/download.php?sid=other
1) Connect E200 with your computer by the USB cable.
2) Power on the turn on the machine.
NOTE: E200 has been designed to automatically switch from 100-240VAC.
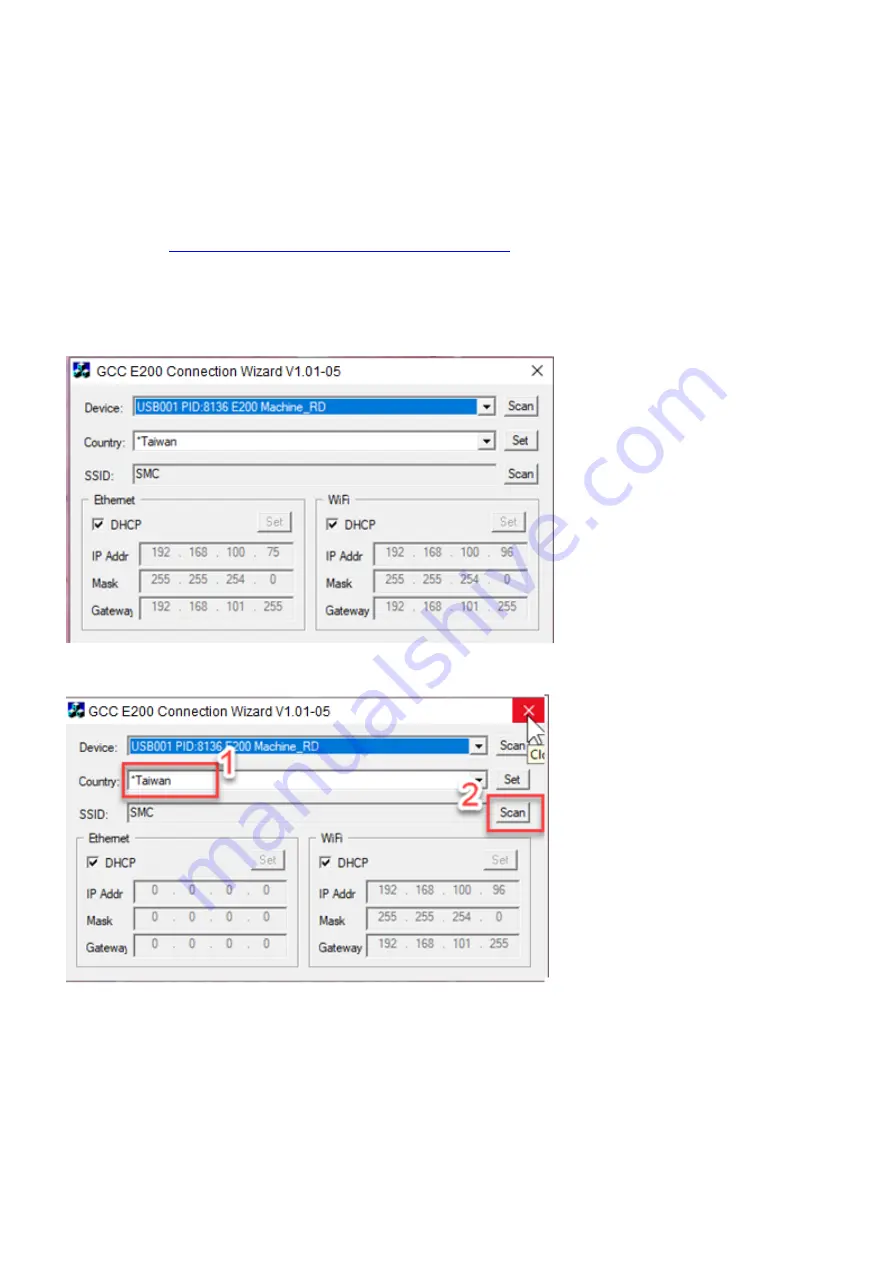
3) Open GCC E200 Connection Wizard
and click “Scan”, Device “E200” will be de detected automatically
4) Select your country
and then press “SSID- Scan” to set up available domain.
Содержание LaserPro E200 Series
Страница 13: ...12 Chapter 2 Unpacking Unloading Unpacking...
Страница 19: ...18 3 3 Right Profile View 3 4 Left Profile View...
Страница 20: ...19 3 5 Rear View...
Страница 21: ...20 3 6 Water Chiller Front View...
Страница 22: ...21 3 7 Water Chiller Right View 3 8 Water Chiller Left View 3 9 Water Chiller Rear View...
Страница 23: ...22 Chapter 4 Machine Setup Water Chiller Setup E200 Desktop Laser Engraver Setup...
Страница 31: ...30 2 Click Next 3 Clip Launch SmartJOB and clip Finish...
Страница 36: ...35 5 Choose the WiFi connection 6 WiFi Setting is complete...
Страница 70: ...69 7 4 E200 Touch Panel Operation 7 4 1 Navigation Chart of E200 Touch Panel...
Страница 81: ...80 Chapter 8 Optional Items Fume Extraction System Air Compressor Rotary Attachment...
Страница 99: ...Chapter 10 Appendix GCC LaserPro E200 Specification Sheet...


