background image

CHAPTER 8: Upgrading Your Notebook

76

Replacing the hard drive kit

Tools

Required

You need a small

Phillips screwdriver to

replace the hard drive

kit.

If you would like more hard drive capacity, you 
can replace your original drive with a 
higher-capacity drive.

To replace the hard drive kit:


1

Create a 

Drivers and Applications Recovery


disc. For more information, see “Creating 
Drivers and Applications Recovery discs” in 
the online

 User Guide

.

2

Print the “Recovering Your System” chapter 
from the online

 User Guide 

for use in 

Step 20

.

3

Back up any data you want to transfer to 
the new hard drive. For more information, 
see “Backing up files” in the online

 User 

Guide

.

4

Follow the guidelines under 

“Preventing 

static electricity discharge” on page 70

.

5

Turn off your notebook.

6

Disconnect the AC adapter, modem cable, 
and network cable.

7

Disconnect all peripheral devices 
connected to the notebook and remove 
any PC cards.

8

Turn your notebook over so the bottom is 
facing up, then remove the battery. For 
more information, see 

“Changing 

batteries” on page 49

.

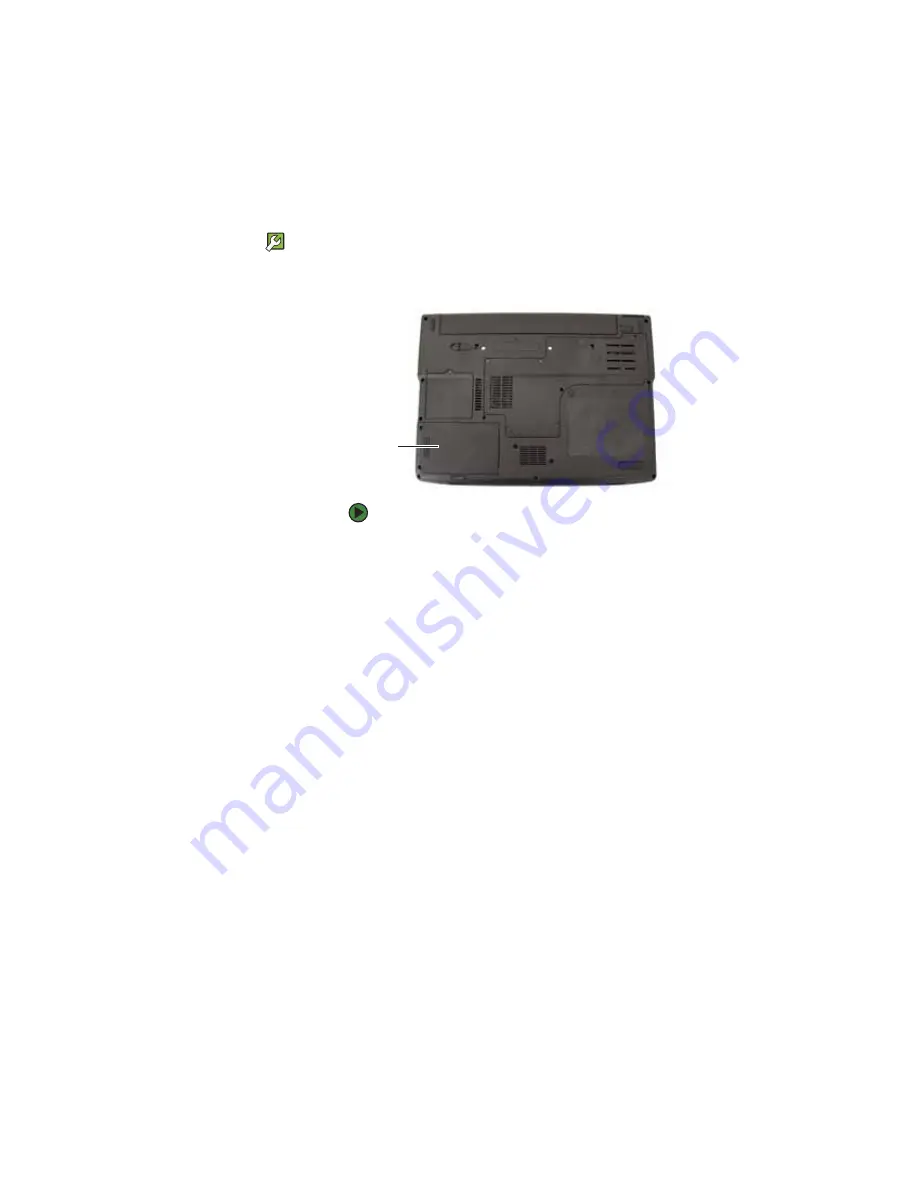
Hard

drive bay

Содержание MX6960

Страница 1: ... REFERENCEGUIDE Version12 Front fm Page a Wednesday September 27 2006 3 37 PM ...

Страница 2: ......

Страница 3: ...Chapter 3 Using Your Gateway Notebook 13 Connecting the AC adapter 14 Protecting from power source problems 15 Connecting the dial up modem 16 Connecting to a cable or DSL modem or to a network 17 Starting your notebook 18 Waking up your notebook 18 Turning off your notebook 19 Restarting rebooting your notebook 19 Using the status indicators 20 Using the keyboard 21 Key types 21 System key combin...

Страница 4: ...player 39 Viewing the display on a projector or monitor 40 Viewing the display on a television 42 Ordering accessories 44 Chapter 5 Managing Power 47 Monitoring the battery charge 48 Recharging the battery 48 Changing batteries 49 Replacing the battery 49 Recalibrating the battery 50 Extending battery life 51 Conserving battery power 51 Using alternate power sources 51 Changing power modes 52 Chan...

Страница 5: ...book screen 68 Cleaning CDs or DVDs 68 Chapter 8 Upgrading Your Notebook 69 Preventing static electricity discharge 70 Adding or replacing memory modules 71 Replacing the hard drive kit 76 Chapter 9 Troubleshooting 81 Safety guidelines 82 First steps 82 Troubleshooting 83 Audio 83 Battery 83 CD drives 83 Device installation 83 Display 84 DVD drives 86 File management 88 Hard drive 88 Internet 89 K...

Страница 6: ... 111 Video 112 Telephone support 113 Before calling Gateway Customer Care 113 Telephone numbers 114 Self help 115 Tutoring 115 Training 116 Appendix A Safety Regulatory and Legal Information 117 Important safety information 118 Regulatory compliance statements 120 Wireless guidance 120 Canada 126 Japan 129 Laser safety statement 129 EPA ENERGY STAR 129 Environmental information 130 Notices 131 Ind...

Страница 7: ...CHAPTER 1 1 Aboutthisreference About this guide Accessing the online User Guide Gateway contact information Microsoft Certificate of Authenticity For more information ...

Страница 8: ... guide the online User Guide has been included on your hard drive The User Guide is an in depth easy to read manual that includes information on the following topics Help and technical support Using and customizingWindowsand other software Controlling audio and video settings Using the Internet Protecting your files Playing and recording media Networking Maintenance and troubleshooting To access t...

Страница 9: ...ation The label on the bottom of your notebook contains information that identifies your notebook model and its features Gateway Customer Care will need this information if you call for assistance Microsoft Certificate of Authenticity The Microsoft Certificate of Authenticity label found on the bottom of your notebook includes the product key code for your operating system Online Support Tech Supp...

Страница 10: ... information For more information about your notebook visit Gateway sSupportpageatwww gateway comor the Web address shown on your notebook s label The Support page also has links to additional Gateway documentation and detailed specifications ...

Страница 11: ...CHAPTER 2 5 CheckingOutYourNotebook Front Left Right Back Bottom Keyboard area ...

Страница 12: ... are not plugged in Battery charge indicator LED blue battery is fully charged LED purple battery is charging LED blinking red battery charge is very low LED solid red battery is malfunctioning Power indicator LED on notebook is on LED blinking notebook is in Standby mode LED off notebook is off Microphone jack Plug a microphone into this jack Headphone jack Plug amplified speakers or headphones i...

Страница 13: ...If the air vents are blocked the notebook may become hot enough to harm your skin Caution Do not block or insert objects into these slots If these slots are blocked your notebook may overheat resulting in unexpected shutdown or permanent damage to the notebook Caution Provide adequate space around your notebook so air vents are not obstructed Do not use the notebook on a bed sofa rug or other simi...

Страница 14: ...to this 4 pin IEEE 1394 port Memory card reader Insert a memory card from a digital camera MP3 player PDA or cellular telephone into the memory card reader For more information see Using the memory card reader on page 35 The memory card reader supports Memory Stick Memory Stick Pro Mini Secure Digital MultiMediaCard RS MultiMediaCard and Secure Digital cards Ethernet jack Plug an Ethernet network ...

Страница 15: ...ort Component Icon Description Power connector Plug the AC adapter cable into this connector Monitor port Plug an analog VGA monitor or projector into thisport For moreinformation see Viewingthe display on a projector or monitor on page 40 ...

Страница 16: ...or more information see Changing batteries on page 49 Battery latch Slide to release the battery For more information see Changing batteries on page 49 Memory bay Install a memory module into this bay For more information see Adding or replacing memory modules on page 71 Customer Care label Includes the Customer Care contact information For more information see Gateway contact information on page ...

Страница 17: ... see Changing notebook power settings on page 53 Keyboard Provides all the features of a full sized computer keyboard For more information see Using the keyboard on page 21 Status indicators Inform you when a drive is in use or when a button has been pressed that affects how the keyboard is used For more information see Using the status indicators on page 20 Touchpad Provides all the functionality...

Страница 18: ...CHAPTER 2 Checking Out Your Notebook 12 ...

Страница 19: ... dial up modem Connecting to a cable or DSL modem or to a network Starting your notebook Turning off your notebook Restarting rebooting your notebook Using the status indicators Using the keyboard Using the EZ Pad touchpad Adjusting the volume Turning your wireless radio on or off ...

Страница 20: ...nal cord or your notebook may be damaged Important If the battery is not fully charged before you use your notebook on battery power for the first time the battery life may be much shorter than you expect If the battery life seems short even after beingcharged for three hours the batterymay needtobe recalibrated For information on recalibrating the battery see Recalibrating the battery on page 50 ...

Страница 21: ...ff your notebook and leave your notebook connected to AC power until the battery charge indicator turns blue Protecting from power source problems Warning High voltages can enter your notebook through both the power cord and the modem connection To protect your notebook and avoid electrical shock use a surge protector If you have a telephone modem use a surge protector that has a modem jack If you...

Страница 22: ... has a built in 56K modem that you can use to connect to a standard telephone line To connect the modem 1 Insertoneendofthemodem cableinto the modem jack on the right side of your notebook 2 Insert the other end of the modem cable into a telephone wall jack The modem will not work with digital or PBX telephone lines 3 Start your notebook then start your communications program ...

Страница 23: ...hat you can use to connect to a cable or DSL modem or to a wired Ethernet network To connect to a cable or DSL modem or to a wired Ethernet network 1 Insert one end of the network cable into the network jack on the right side of your notebook 2 Insert the other end of the network cable into a cable modem DSL modem or Ethernet network jack ...

Страница 24: ...n page 53 To start your notebook 1 Slide the latch on the front of your notebook then lift the LCD panel 2 Press the power button located above the keyboard 3 If you are starting your notebook for the first time follow the on screen instructions to set up your notebook Waking up your notebook Tips Tricks For more information about Standby mode see Changing notebook power settings on page 53 When y...

Страница 25: ...wer cord and remove the battery for more than 10 seconds If your notebook does not respond to keyboard touchpad or mouse input you may have to close programs that are not responding If closing unresponsive programs does not restore your notebook to normal operation you may have to restart reboot your notebook To close unresponsive programs and restart your notebook 1 Press CTRL ALT DEL The Windows...

Страница 26: ...ed below the touchpad Indicator Icon Description Wireless network optional LED on wireless IEEE 802 11 radio is turned on LED off wireless IEEE 802 11 radio is turned off Caps lock LED on caps lock is turned on LED off caps lock is turned off Num lock LED on numerickeypadis turned on LEDoff numerickeypadis turned off Disc drive LED on drive is in use LED off drive is not in use Hard drive LED blin...

Страница 27: ... operations and the Num Lock keys for the numeric keypad Key types The keyboard has several different types of keys Some keys perform specific actions when pressed aloneand other actions whenpressed in combination with another key Function keys System keys Navigation keys FN key Windows key Numeric keypad Application key Arrow keys Key type Icon Description Function keys Press these keys labeled F...

Страница 28: ...rm a specific action Windows key Press this key to open the Windows Start menu This key can also be used in combination with other keys to open utilities like F Search utility R Run utility and E Explorer utility Application key Press this key for quick access to shortcut menus and help assistants in Windows Arrow keys Press these keys to move the cursor up down right or left Navigation keys Press...

Страница 29: ...rned off while traveling in an airplane IEEE 802 11g IEEE 802 11b and IEEE 802 11a communication devices are examples of devices that provide wireless communication Enter Standby mode Press the power button to leave Standby mode For more information see Changing notebook power settings on page 53 Toggle the notebook display in the following order The LCD An external monitor or projector a monitor ...

Страница 30: ...ess above the normal brightest setting Use this featurein bright lighting situations such as outside in bright sunlight Press a second time to decrease the brightness below the normal lowest brightness setting Use this feature in dim lighting situations Press a third time to return the display to the normal brightness setting Important Using this feature will affect battery performance Play or pau...

Страница 31: ...y combination again to restore the sound For more information see Adjusting thevolume on page 28 Increase volume Formoreinformation see Adjusting the volume on page 28 Decrease volume For more information see Adjusting the volume on page 28 Press and hold FN then press this system key To ...

Страница 32: ...buttons You can change this feature to allow tapping on the touchpad to simulate clicking the leftbutton For more information see Changing the mouse or touchpad settings in the online User Guide The EZ Pad consists of a touchpad two buttons and a scroll zone When you move your finger on the touchpad the pointer arrow on the screen moves in the same direction You can use the scroll zone to scroll t...

Страница 33: ...he screen Position the pointer over the object Quickly press andreleasethe left button once This action is called clicking Start a program or open a file or folder Position the pointer over the object Press the left buttontwicein rapid succession This action is called double clicking Access a shortcut menu or find more information about an object on the screen Position the pointer over the object ...

Страница 34: ...lume level using hardware controls If you are using external speakers turn the knob on the front of the speakers OR Use the mute and volume control buttons onthekeyboard Formoreinformation see System key combinations on page 23 Move an object on the screen Position the pointer over the object Press the left button and hold it down then use the touchpad to move drag the object to the appropriate pa...

Страница 35: ...icted or eliminated Airports hospitals and oxygen or flammable gas laden atmospheres are limited examples where use of wireless devices may be restricted or eliminated When in environments where you are uncertain of the sanction to use wireless devices ask the applicable authority for authorization prior to using or turning on the wireless device Your Gateway notebook may have a factory installed ...

Страница 36: ...ut using your notebook ona wireless network see Wireless Networking in the online User Guide Tips Tricks For more information about using Bluetooth click Start All Programs My Bluetooth Places When the My Bluetooth Places window opens click Help then click Bluetooth Help Topics ...

Страница 37: ...es Using the CD or DVD drive Using the memory card reader Adding and removing a PC Card Installing a printer or other peripheral device Viewing the display on a projector or monitor Viewing the display on a television Ordering accessories ...

Страница 38: ...If your drive has this logo This is your drive type Use your drive for CD drive Installing programs playing audio CDs and accessingdata You cannot use this drive to create CDs or DVDs or play DVDs DVD drive Installing programs playing audio CDs playing DVDs and accessingdata You cannot use this drive to create CDs or DVDs Combination DVD CD RW drive Installing programs playing audio CDs playing DV...

Страница 39: ...and recording video and data to DVD R DVD R DVD RW DVD RW or double layer DVD R or DVD R discs Note To use the double layer capability of the double layer recordable DVD drive the blank DVDsyoupurchase must state Double Layer DualLayer or DL Using other types of blank media will result in less capacity If your drive has this logo This is your drive type Use your drive for ROM R RW ...

Страница 40: ...onal code of the disc The regional code for the disc is on the disc disc documentation or packaging Important When you place a single sided disc in the tray make sure that the label side is facing up If the disc has two playable sides place the disc so the name of the side you want to play is facing up Tips Tricks For information about cleaning a CD or DVD see Cleaning CDs or DVDs on page 68 To in...

Страница 41: ...l cards require the use of an adapter that is available with the media The memory card reader supports Memory Stick Memory Stick Pro MultiMediaCard Secure Digital xD Picture Card Mini Secure Digital and RS MultiMediaCard Inserting a memory card To insert a memory card Insert the memory card into the memory card slot with the label facing up and the arrow on the label pointing towards the notebook ...

Страница 42: ...emory card Pull the memory card out of the notebook Adding and removing a PC Card Your notebook has a PC Card slot also known as a PCMCIA card slot This slot accepts one Type II card You do not need to restart your notebook when changing most cards because your notebook supports hot swapping Hot swapping means that you can insert a PC Card while your notebook is running If your PC Card does not wo...

Страница 43: ...rd is flush with the side of your notebook To remove a PCCard Important If the remove hardware icon does not appear on the taskbar click the show hidden icons button 1 Click the remove hardware icon in the taskbar the PC Card name then click Stop OR Turn off your notebook 2 Release the eject button by pressing the PC Card eject button once ...

Страница 44: ...ick the arrow Your notebook has one or more of the following ports IEEE 1394 also known as Firewire or i Link Universal Serial Bus USB and S Video digital video You use these ports to connect peripheral devices such as printers scanners and digital cameras to your notebook IEEE 1394 and USB ports support plug and play and hot swapping which means that your notebook will usually recognize such a de...

Страница 45: ...r notebook 1 Connect one end of the USB cable to your device 2 Connect the other end of the cable to a USB port on your notebook Connecting an IEEE 1394 video camera or MP3 player Important For more information about using the IEEE 1394 port on your device see your device s documentation Tips Tricks For the location of the IEEE 1394 port on your notebook see Right on page 8 Tips Tricks For more in...

Страница 46: ...or to your monitor VGA port Your notebook supports simultaneous LCD and external display Simultaneous display lets you control the presentation from your notebook and at the same time face your audience To use a projector or external monitor 1 Turn off your notebook 2 Plug the projector or monitor cable into the VGA port on your notebook 3 Turn on your notebook 4 Plug the projector s or monitor s ...

Страница 47: ...n a projector or monitor 41 6 Click the Settings tab 7 Right click the second monitor icon labeled 2 then click Attached 8 Click Apply 9 Adjust properties such as Screen Resolution or Color Quality if necessary 10 Click OK ...

Страница 48: ...location of the S Video out jack on your notebook see Left on page 7 Tips Tricks If you are traveling internationally you may need to change the videostandard For example many televisions in Asia use PAL instead of NTSC The S Video out jack on your notebook lets you view your notebook display on a television screen using a standard S Video cable To view your notebook display on a television 1 With...

Страница 49: ...sion 43 8 Click Advanced The ATI Properties dialog box opens 9 Click the CATALYST Control Center tab 10 Click the ATI CATALYST Control Center button 11 Click Advanced then click Next Use the wizard to adjust the television properties ...

Страница 50: ...nt to increase your internal storage space try replacing your existing hard drive with a larger drive Memory Large programs such as multimedia games or graphics programs use a lot of memory If your programs are running more slowly than you think they should try adding more memory See Adding or replacing memory modules on page 71 for more information Printers You can attach almost any type of print...

Страница 51: ...es are more expensive but they print much faster than inkjet printers Laser printers are better than inkjet printers when you are printing large documents USB flash drive Use a USB flash drive for storing files or transferring files to another computer ...

Страница 52: ...CHAPTER 4 Using Drives and Accessories 46 ...

Страница 53: ...CHAPTER 5 47 ManagingPower Monitoring the battery charge Recharging the battery Recalibrating the battery Extending battery life Changing notebook power settings ...

Страница 54: ...nto AC power balanced with optimized battery life when on battery power Closely monitor the battery charge When the battery charge gets low change the battery or connect to AC power immediately to prevent losing any unsaved work To monitor the battery charge Double click the power cord icon or battery icon in the taskbar The Power Meter dialog box opens Look at the battery charge status indicator ...

Страница 55: ... If your notebook is on and is connected directly to AC power go to Step 2 OR If your notebook is on and is not plugged into an AC outlet save your work and turn off the notebook 2 Close the LCD panel 3 Turn your notebook over so the bottom is facing up 4 Slide the battery lock to the unlocked position Caution If your notebook is connected to AC power you can change the battery while the notebook ...

Страница 56: ...t but the battery charge is not low you may need to recalibrate your battery You should also recalibrate the battery periodically to maintain the accuracy of the battery gauge To recalibrate the battery 1 Connect the AC adapter then turn on your notebook 2 As soon as it starts and you see a startup screen press F2 The BIOS Setup utility opens 3 Open the Advanced menu 4 Highlight Battery Auto Learn...

Страница 57: ...y are not being used Modify the power management settings for maximum power savings Close the LCD panel to turn off the display whileyouarenot usingyournotebook The display stays off until you open the panel again Use Hibernate mode for maximum power savings while your notebook is not in use Use the CD or DVD drive only when necessary This drive uses a large amount of power Recharge the battery of...

Страница 58: ... where devices such as the display and drives turn off Hibernate also called save to disk writes all current memory RAM information to the hard drive then turns your notebook completely off The next time you turn on your notebook it reads the memory information from the hard drive and opens the programs and documents that were open when you activated Hibernate mode Using power saving modes Always ...

Страница 59: ...x then click the arrow Powerschemes groupsofpowersettings letyou change power saving options such as when the display or hard drive is automatically turned off You can select one of the defined power schemes or create a custom power scheme The processor installed in your notebook may use Intel SpeedStep technology to conserve battery power A SpeedStep equipped processor can change its operating sp...

Страница 60: ... power scheme 1 Click Start then click Control Panel The Control Panel window opens If your Control Panel is in Category View click Performance and Maintenance 2 Click Double click the Power Options icon The Power Options Properties dialog box opens 3 Click the arrow button to open the Power Schemes list then click the power scheme you want OR Set the timers then click Save As and type a name for ...

Страница 61: ...earch box then click the arrow Alarms can alert you when the battery charge is low To change the alarm options 1 Click Start then click Control Panel The Control Panel window opens If your Control Panel is in Category View click Performance and Maintenance 2 Click Double click the Power Options icon The Power Options Properties dialog box opens 3 Click the Alarms tab 4 Adjust the alarm settings th...

Страница 62: ...utton and Standby system key You can also select which power saving mode is activated when you close the LCD panel To change advanced power management settings 1 Click Start then click Control Panel The Control Panel window opens If your Control Panel is in Category View click Performance and Maintenance 2 Click Double click the Power Options icon The Power Options Properties dialog box opens 3 Cl...

Страница 63: ...o the hard drive then turns your notebook completely off The next time you turn on your notebook it reads the memory information from the hard drive and opens the programs and documents that were open when you activated Hibernate mode To activate Hibernate mode 1 Click Start then click Control Panel The Control Panel window opens If your Control Panel is in Category View click Performance and Main...

Страница 64: ...de As an automatic power savings mode Open the Power Options Properties dialog box then click the Power Schemes tab Click the arrow button to open a System hibernates list then click the time you want to use OR Open the Power Options Properties dialog box then click the Advanced tab Hibernate is now an option in the Power buttons lists As a manually selected power savings mode Click Start then cli...

Страница 65: ...CHAPTER 6 59 TravelingwithYourNotebook Packing your notebook Traveling by air Dial up modem Radio frequency wireless connections Files Security Power Additional tips ...

Страница 66: ...ing around in overhead bins and car trunks Traveling by air Do not check your notebook as luggage Charge the battery in case airport security asks you to start your notebook Have your notebook hand inspected or sent through the X ray scanner but never carry it through the metal detector Turn off you notebook for takeoff and landing Turn off all wireless devices while in the aircraft Dial up modem ...

Страница 67: ... the local radio approval authorities prior to your trip for any restrictions on the use of a wireless device in the destination country If your notebook came equipped with an internal embedded wireless device see Safety Regulatory and Legal Information on page 117 for general wireless regulatory guidelines Wireless communication can interfere with equipment on commercial aircraft Current aviation...

Страница 68: ...k so you can attach a cable lock and leave your notebook in your hotel room while you are away Always keep your notebook with you while waiting in airports train stations or bus terminals Be ready to claim your notebook as soon as it passes through the X ray machine in security checkpoints Write down your notebook model number and serial number located on the bottom of your notebook in case of the...

Страница 69: ...ty Review the information in Protecting your notebook in the online User Guide Power Take your AC power adapter to recharge the battery If you are traveling internationally take power plug adapters Take a portable surge protector to protect your notebook from power surges To get the best performance from your notebook avoid using the battery whenever possible monitor the battery charge and use the...

Страница 70: ...etworks If your notebook has been exposed to cold temperatures allow it to warm to room temperature before turning it on Carry proof of ownership or a merchandise passport when traveling internationally Consult your insurance company and credit card company to learn about emergency travel assistance if your notebook is lost or damaged Take your recovery discs see Drivers and applications recovery ...

Страница 71: ...CHAPTER 7 65 MaintainingYourNotebook Caring for your notebook Cleaning your notebook Cleaning CDs or DVDs ...

Страница 72: ...rittle and easy to break in cold temperatures and can melt or warp in high temperatures Damage due to either extreme is not covered by your warranty As a general rule your notebook is safest at temperatures that are comfortable for you Keep all liquids away from your notebook When spilled onto notebook components almost any liquid can result in expensive repairs that are not covered under a standa...

Страница 73: ...nd network cable from the wall outlets Tips Tricks You may want to occasionally open the memory bay door and remove dust and lint usinganaerosolcanof air Always turn off your notebook and other peripherals before cleaning any components Also remove the battery before cleaning any components Use a damp lint free cloth to clean your notebook and other parts of your system Do not use household abrasi...

Страница 74: ... again Ifthekeyboard does not work after it dries you may need to replace it A replacement keyboard may not be covered by your warranty Cleaning the notebook screen Caution A notebook LCD screen is made of specially coated glass and can be scratched or damaged by abrasive or ammonia based glass cleaners Use a soft cloth and water to clean the LCD screen Squirt a little water on the cloth never dir...

Страница 75: ...CHAPTER 8 69 UpgradingYourNotebook Preventing static electricity discharge Adding or replacing memory modules Replacing the hard drive kit ...

Страница 76: ...nsitive to static electricity also known as electrostatic discharge ESD Before installing or replacing components follow these guidelines Avoid static causing surfaces such as carpeted floors plastic and packing foam Remove components from their antistatic bags only when you are ready to use them Do not lay components on the outside of antistatic bags because only the inside of the bags provide el...

Страница 77: ...The modules are available in various capacities and any module can be placed in any slot To add or replace memory modules 1 Follow the guidelines under Preventing static electricity discharge on page 70 2 Turn off your notebook 3 Disconnect the AC adapter modem cable and network cable 4 Disconnect all peripheral devices connected to the notebook and remove any PC cards 5 Turn your notebook over so...

Страница 78: ...pgrading Your Notebook 72 Tips Tricks The screw hole is marked with a K 6 Remove the keyboard screw 7 Loosen the six memory bay cover screws these screws cannot be removed Screw Screw Screw Screw Screw Screw Screw ...

Страница 79: ...g or replacing memory modules 73 8 Use the thumb notch to lift the memory bay cover then remove it Be careful not to break off the tabs located on the end of the cover opposite of the thumb notch Thumb notch ...

Страница 80: ...CHAPTER 8 Upgrading Your Notebook 74 9 If you are removing a module gently press outward on the clip at each end of the memory module until the module tilts upward Clip Clip ...

Страница 81: ...n If the module does not fit make sure that the notch in the module lines up with the tab in the memory bay 12 Replace the memory bay cover then tighten the cover screws Tips Tricks The screw hole is marked with a K 13 Replace the keyboard screw 14 Insert the battery then turn your notebook over 15 Connect the power adapter modem cable and network cable then turn on your notebook 16 Reconnect all ...

Страница 82: ... User Guide 2 Print the Recovering Your System chapter from the online User Guide for use in Step 20 3 Back up any data you want to transfer to the new hard drive For more information see Backing up files in the online User Guide 4 Follow the guidelines under Preventing static electricity discharge on page 70 5 Turn off your notebook 6 Disconnect the AC adapter modem cable and network cable 7 Disc...

Страница 83: ...ethe hard drivebay cover thenremove it The hard drive is attached to the back of the cover 11 If your new hard drive already includes the hard drive cover go to Step 16 OR If you need to move the hard drive cover from your old hard drive to your new hard drive go to Step 12 Screw Screw ...

Страница 84: ... new drive label side up onto the cover so the screw holes line up 15 Replace the screws that secure the cover to the drive 16 Slide the new hard drive kit into your notebook then replace the cover screws 17 Insert the battery then turn your notebook over 18 Connect the power adapter modem cable and network cable 19 Turn on your notebook Screw Screw Screw Screw ...

Страница 85: ...hard drive kit 79 20 For instructions on installing Windows your drivers and your applications see the Recovering Your System chapter you printed in Step 2 21 Reconnect all peripheral devices and replace any PC cards ...

Страница 86: ...CHAPTER 8 Upgrading Your Notebook 80 ...

Страница 87: ...CHAPTER 9 81 Troubleshooting Safety guidelines First steps Troubleshooting Telephone support ...

Страница 88: ...ereyouremovethememorybayorhard drive bay cover make sure that you replace the cover reinstall any screws then replace the battery before you start your notebook First steps Help and Support For more information about troubleshooting click Start then click Help and Support Type the keyword troubleshooting in the Search box then click the arrow If you have problems with your notebook try these thing...

Страница 89: ...nline help Troubleshooting Audio Audiotroubleshootingiscoveredunder Sound on page 111 Battery Battery troubleshooting is covered under Power on page 107 CD drives CD drive troubleshooting is covered under DVD drives on page 86 Device installation Help and Support For more information about IRQs click Start then click Help and Support Type the keyword IRQs in the Search box then click the arrow You...

Страница 90: ...list for a resource conflict A resource conflict appears as a black exclamation point in a yellow circle 2 Remove the device you are trying to install then determine which one of the existing devices or ports you can disable 3 Right click the device or port you want to disable then click Disable The device or port is disabled Display The screen is too dark Tips Tricks For more information about ad...

Страница 91: ...ion is normal and inherent in the TFT technology used in active matrix LCD screens Gateway s inspection standards keep these to a minimum If you feel these pixels are unacceptably numerous or dense on your display contact Gateway Customer Care to identify whether a repair or replacement is justified based on the number of pixels affected The display is blank Tips Tricks For more information about ...

Страница 92: ...not beable toplay these CDs on your notebook Your notebook may be experiencing some temporary memory problems Shut down and restart your notebook Clean the disc For more information see Cleaning CDs or DVDs on page 68 An audio CD does not produce sound Make sure that the CD label is facing up then try again Some music CDs have copy protection software You may not beable toplay these CDs on your no...

Страница 93: ... a DVD drive For more information see Identifying drive types on page 32 Shut down and restart your notebook Clean the DVD For more information see Cleaning CDs or DVDs on page 68 Make sure that the disc s regional code and your DVD drive s regional code match Make sure that a DVD player program has been installed on your notebook A DVD does not produce sound on a television Audio is not transmitt...

Страница 94: ...instructions on deleting unnecessary files see Deleting unnecessary files in the online User Guide Caution All deleted files will be lost when you empty the Recycle Bin Help and Support For more information about file management click Start then click Help and Support Type the keyword file management in the Search box then click the arrow Empty the Recycle Bin by right clicking the Recycle Bin ico...

Страница 95: ...pport For more information about troubleshooting Internet connections click Start then click Help and Support Type the keyword troubleshooting connections in the Search box then click the arrow You cannot connect to the Internet If you are using a dial up modem make sure that the modem cable is plugged into the modem jack and not the Ethernet network jack OR If you are using a cable or DSL modem m...

Страница 96: ...of users accessing those computers The complexity of graphics and multimedia on Web pages Having multiple Web browsers open performing multiple downloads and having multiple programs open on your notebook People are sending you e mail messages but you have not received any mail Click the receive button in your e mail program Make sure that your account with your Internet service provider ISP is se...

Страница 97: ...s For more information about using your keyboard see Using the keyboard on page 21 You are pressing a letter key and a number appears on the screen The numeric keypad is turned on Media Center To view Media Center troubleshooting informationthat is not covered inthis section go to the Gateway support Web Site at www gateway com The Media Center video display looks bad on your TV Many factors such ...

Страница 98: ...nection used You can connect the Media Center computer video output to a TV However the connection type has an affect on the video quality The Media Center has two video outputs VGA If your TV includes a VGA port connect the VGA cable from the Media Center computer s VGA monitor port to the TV s VGA In port for the best quality Many TVs do not have a VGA port S Video If your TV does not have a VGA...

Страница 99: ...with the Media Center computer the computer uses a screen resolution of 1024 768 for computer monitors and 800 600 for the Gateway 42inch Plasma TV Many TVs cannot display this high of a resolution and may shift scramble or scroll the picture For a better picture on a TV display you may need to lower the Media Center screen resolution to 800 600 or 640 480 Size of display device Small computer mon...

Страница 100: ... quality display especially when viewing and using the Media Center computer functions Progressive scan video displays a video frame with one pass of sequential scan lines A progressive scan TV displays the entire picture drawn sequentially from top to bottom without the odd even interlacing This results in a fuller sharper picture and better display quality for viewing and using the Media Center ...

Страница 101: ...ording burning software such as Power2Go and with the Media Center itself You want to know whether you can play recorded videos on other computers Yes you can A DVR MS file recorded to DVD can be replayed on another Media Centercomputeror ona non MediaCenter computer that has a DVD player and DVD decoder software such as PowerDVD The non Media Center computer must also have Windows XP with Service...

Страница 102: ...ams then restart your notebook Memory card reader Drive letter for the memory card slot does not appear in the My Computer window Reboot your notebook Modem cable or DSL Tips Tricks For the location of your network jack see Right on page 8 The modem does not connect Make sure that the modem cable is plugged into the Ethernet network jack and not the modem jack See the documentation that came with ...

Страница 103: ...Contact your telephone service to get the correct code to temporarily disable the service Also make sure that the modem dialing properties are set appropriately To check the dialing properties 1 Click Start then click Control Panel The Control Panel window opens If your Control Panel is in Category View click Printers and Other Hardware 2 Click Double click the Phone and Modem Options icon then cl...

Страница 104: ...ure You can also call your telephone service and have the telephone line checked for noise or low line levels Try another telephone line either a different telephone number in your house or a telephone line at a different location If you can connect on this line call your telephone service to fix the original line Try connecting with the modem at a lower connection speed If reducing the connect sp...

Страница 105: ...on page 8 The modem is not recognized by your notebook Make sure that the line connected to the modem is working and plugged into the appropriate port on your notebook If the modem shares the telephone line with another device make sure that the telephone line is not in use for example someone is on the telephone or another modem is in use Use the modem cable that came with your notebook Some tele...

Страница 106: ... is noisy when it dials and connects When your modem tries to connect to another modem it begins handshaking Handshaking is a digital getting acquainted conversation between the two modems that establishes connection speeds and communication protocols You may hear unusual handshaking sounds when the modems first connect If the handshaking sounds are too loud you can turn down the modem volume To t...

Страница 107: ...use works erratically Clean the mouse Some mouse pad patterns confuse optical mice Try the mouse on a different surface Networks wired Help and Support For more information about network troubleshooting click Start then click Help and Support Type the keyword network troubleshooting in the Search box then click the arrow You cannot see the other computers on your wired Ethernet network Make sure t...

Страница 108: ...n between 0 and 254 The first N should be the same for all computers on your network and the second N should be different for all computers on your network Your wired Ethernet network is running slower than you expect If your Ethernet network is running slower than you expect check the speed of each Ethernet component For best results all Ethernet components should be standard Ethernet 10 Mbps Fas...

Страница 109: ...om the domain and your computer account disabled Contact your company computer department or network administrator for more information If your notebook is a member of a domain at your workplace you may not be able to connect your notebook to your home network workgroup to access shared files or printers on your home network You may however be able to access the Internet through your home network ...

Страница 110: ...e distance between your wireless network devices by radio interference and by interference from natural obstructions such as walls ceilings floors and doors If your wireless network is running slower than you expect you should check your network signal strength If you find the signal strength is low try moving to a new location to increase the signal strength To check the signal strength 1 Click S...

Страница 111: ...ailable networks are listed in the Windows XP Wireless Networking utility Ifthenetwork you are attemptingto access does not broadcast its SSID you need to request the SSID from the administrator and add that network s information into the wireless utility You may want to try entering ANY as the SSID which will make the computer try to auto detect the network Your wireless network is listed as a pr...

Страница 112: ... see Naming your computers and workgroup in the online User Guide Ifyournotebookwaspreviouslyconnected directly to your cable or DSL modem and your ISP requires you to use a static IP address your notebook is not set up to use a DHCP server Modify the network properties so your notebook is set up for using a DHCP server Caution If your notebook was a member of a domain before you join a workgroup ...

Страница 113: ...alled a PC Card and now your notebook is having problems Make sure that you have correctly installed required software for thePC Card Formore information see your PC Card s documentation Make sure that the PC Card you installed is not causing a system resource conflict For moreinformationonresourceconflicts see Device installation on page 83 Pointing device See Touchpad on page 111 Power Your note...

Страница 114: ...y on page 50 Check the power management settings For more information about using power management settings see Changing notebook power settings on page 53 Make sure that the battery is installed correctly Make sure that the battery is fully recharged For more information see Recharging the battery on page 48 Make sure that the battery is calibrated correctly Let the battery return to room tempera...

Страница 115: ... the printer you want to print to is not the default printer make sure that you have selected it in the printer setup To set a default printer 1 Click Start then click Control Panel The Control Panel window opens If your Control Panel is in Category View click Printers and Other Hardware 2 Click Double click thePrintersand Faxes icon The Printers and Faxes window opens 3 Right click the name of th...

Страница 116: ...3 Right click the name of the printer you want to use If the menu shows a check mark next to Use Printer Offline click Use Printer Offline to clear the check mark Wait until files have been printed before sending additional files to the printer If you print large files or many files at one time you may want to add additional memory to the printer See the printer documentation for instructions for ...

Страница 117: ...ned up For instructions on how to adjust the volume control in Windows see Adjusting the volume in the online User Guide Make sure that Mute controls are turned off Status indicators The status indicators are not functioning Make sure the status indicators are turned on Press FN F1 to toggle the indicators Touchpad Touchpad is not working Make sure the touchpad is turned on For more information se...

Страница 118: ...ke sure that the monitor is turned on and that the video cable is connected correctly TV out is not working Make sure that you have activated TV out For more information see Viewing the display on a television on page 42 Make sure that the television is turned on and that the S Video cable is connected correctly Televisions in different countries use different standards Ifyouaretraveling you may n...

Страница 119: ...keyboard or mouse does not appear to work make sure that all cables are plugged in securely If you have recently installed hardware or software make sure thatyou have installed it according to the instructions provided with it If you did not purchase the hardware or software from Gateway see the manufacturer s documentation and technical support resources If you have how to questions about using a...

Страница 120: ...em and your telephone keypad to find answers to common problems 800 846 2118 Resource Service description How to reach Answers by Gateway Get tutorial assistance for hardware and software issues Thisis a fee based service www gateway com answers Gateway Customer Care Talk to a Gateway Customer Care representative about a non tutorial technical support question See Beforecalling Gateway Customer Ca...

Страница 121: ...tional product information and online documentation for Gateway supplied hardware can be found in our Web site s Documentation Library This user guide The software publisher s Web site Tutoring Answers by GatewaySM is a fee based telephone service that provides answers to all of your How do I questions on Gateway computers For more information go to www gateway com answers America Online Get suppo...

Страница 122: ...s are available on CD Select from several easy to use learning libraries www gateway com training Online Training from Learn With Gateway More than 450 online courses are available from Learn With Gateway All you have to do is go online and log in You select the subject matter and the learning format self pacedtutorials or virtual classrooms all from the comfort of your notebook www learnwithgatew...

Страница 123: ...APPENDIX A 117 Safety Regulatory andLegalInformation Important safety information Regulatory compliance statements Environmental information Notices ...

Страница 124: ...and in the documentation are followed Setting up your system Read and follow all instructions marked on the notebook and in the documentation before you operate your notebook Retain all safety and operating instructions for future use Do not use this notebook near water or a heat source such as a radiator Set up the notebook on a stable work surface The notebook should be operated only from thetyp...

Страница 125: ...a or cable system is electrically grounded to provide some protection against voltage surges and buildup of static charges Care during use Do not walk on the power cord or allow anything to rest on it Do not spill anything on the notebook The best way to avoid spills is to avoid eating and drinking near your notebook Some notebooks have a replaceable CMOS battery on the system board There is a dan...

Страница 126: ...ning Radio frequency wireless communication can interfere with equipment on commercial aircraft Current aviation regulations require wireless devices to be turned off while traveling in an airplane 802 11b also known as wireless Ethernet or Wifi and Bluetooth communication devices are examples of devices that provide wireless communication Low power Radio transmitting type devices radio frequency ...

Страница 127: ...by the Radio Approval Marks on the system rating label If the country you willbeusing the wireless device in is not listed please contact your local Radio Approval agency for requirements Wireless devices are closely regulated and use may not be allowed The power output of the wireless device or devices that may be embedded in your notebook is well below the RF exposure limits as known at this tim...

Страница 128: ...are not user serviceable Do not modify them in any way Modification to a wirelessdevice will void the authorization to use it Contact Gateway for service Caution The transmitting device embedded in this notebook may not be used with any antenna other than the one provided with the notebook Federal Communications Commission FCC Intentional emitter per FCC Part 15 Low power Radiotransmittertypedevic...

Страница 129: ... harmful interference and 2 this device must accept any interferencereceived including interferencethatmaycauseundesiredoperation of the device Unintentional emitter per FCC Part 15 This device has beentested and found to comply with the limits for a Class B digital device pursuant to Part 15 of the FCC rules These limits are designed to provide reasonable protection against harmful interference i...

Страница 130: ...tebook Caution Recycle or dispose of the used notebook properly according to federal state and local laws Responsible party Gateway Companies Inc 610 Gateway Drive North Sioux City SD 57049 605 232 2000 Fax 605 232 2023 Product MA3 MA7 This device complies with Part 15 of the FCC Rules Operation of this product is subject to the following two conditions 1 this device may not cause harmful interfer...

Страница 131: ...a telephone line may result in the devices not ringing in response to an incoming call In most areas the sum of RENs should not exceed five 5 0 To be certain of the number of devices that may be connected to a line as determined by the total RENs contact the local telephone company If this device causes harm to the telephone network the telephone company will notify you in advance that temporary d...

Страница 132: ...machine or suchbusiness otherentity orindividual Refer to your fax communication software documentation for details on how to comply with the fax branding requirement Canada Industry Canada IC Intentional emitter per RSS 210 Caution To prevent radio interference to licensed service or co channel Mobile Satellite systems this device is intended to be operated indoors and away from windows to provid...

Страница 133: ...edded in your notebook is wellbelow the RF exposure limits as set by Industry Canada Operation of this device is subject to the followingtwoconditions 1 Thisdevicemaynot cause harmful interference and 2 this device must accept any interferencereceived including interferencethatmaycauseundesiredoperation of the device Unintentional emitter per ICES 003 This digital apparatus does not exceed the Cla...

Страница 134: ... or equipment malfunctions may give the telecommunications company cause to request the user to disconnect the equipment Warning To avoid electrical shock or equipment malfunction do not attempt to make electrical ground connections by yourself Contact the appropriate inspectionauthority or an electrician as appropriate Users should make sure for their own protection that the electrical ground con...

Страница 135: ...pped with CD and DVD drives comply with the appropriate safety standards including IEC 825 The laser devices in these components are classified as Class 1 Laser Products under a US Department of Health and Human Services DHHS Radiation Performance Standard Should the unit ever need servicing contact an authorized service location EPA ENERGY STAR As an ENERGY STAR Partner Gateway has determined tha...

Страница 136: ...al garbage collection The Crossed Out Waste Bin label affixed to this product is your reminder to dispose of your end of life product properly Substances such as glass plastics and certain chemical compounds are highly recoverable recyclable and reusable Youcandoyourpartfor the environment by following these simple steps When your electrical or electronic equipment is no longer useful to you take ...

Страница 137: ...needed to produce electrical and electronic equipment minimize the use of landfills for the disposal of end of life products and generally improve our quality of life by ensuring that potentially hazardous substances are not released into the environment and are disposed of properly Notices Copyright 2006 Gateway Inc All Rights Reserved 7565 Irvine Center Drive Irvine CA 92618 USA All Rights Reser...

Страница 138: ...any defect or omission in this manual even if advised of the possibility of such damages In the interest of continued product development Gateway reserves the right to make improvements in this manual and the products it describes at any time without notices or obligation Trademark Acknowledgments Gateway and the Black and White Spot Design are trademarks or registered trademarks of Gateway Inc in...

Страница 139: ...yright protection technology that is protected by U S patents and other intellectual property rights Use of this copyright protection technology must be authorized by Macrovision Corporation and is intended for home and other limited viewing uses only unless otherwise authorized by Macrovision Corporation Reverse engineering or disassembly is prohibited ...

Страница 140: ...APPENDIX A Safety Regulatory and Legal Information 134 ...

Страница 141: ... 48 charge status 48 charging 14 48 conserving power 51 icons 48 installing main 49 latch 10 locating 10 managing power 51 monitoring charge 48 purchasing 44 recalibrating 50 recharging 14 48 release latch 10 replacing 49 battery alarm options 55 bays battery 49 hard drive 10 memory 10 71 BIOS Setup utility 50 Bluetooth 24 61 brightness adjusting 24 25 system keys 24 25 C cable lock 7 cable modem ...

Страница 142: ...modem 8 17 dial up modem 8 16 digital camera 8 digital video camera 8 38 DSL modem 8 17 Ethernet 8 17 external audio 6 external diskette drive 8 39 external speakers 6 Firewire 8 38 flash drive 8 39 headphone 6 i Link 8 38 IEEE 1394 8 38 keyboard 8 microphone 6 modem dial up 8 16 monitor VGA 9 40 mouse 8 network 8 17 power 9 14 printer 8 projector 40 scanner 8 speaker 6 S Video TV out 7 S Video ou...

Страница 143: ...e See DVD drive E electrostatic discharge ESD 70 EmPower power adapter 51 Ethernet connecting 17 jack 8 17 external monitor 9 23 EZ Pad touchpad See touchpad F fan 7 faxes troubleshooting 99 files opening 27 transferring 62 troubleshooting 88 Firewire port 8 38 Fn key 22 23 folders opening 27 function keys 21 G Gateway model number 3 serial number 3 Support 4 H hard drive bay 10 indicator 20 insta...

Страница 144: ...ghtness 25 LCD CRT 23 navigation 22 numeric keypad 22 power status 23 Standby 23 Status 23 system 22 system key combinations 23 toggle display 23 Windows 22 L labels Microsoft Certificate of Authenticity 3 model number 3 serial number 3 laser printer 44 latch battery 10 LCD panel release 6 LCD panel cleaning 68 release latch 6 switching display 23 troubleshooting 84 LCD CRT system key 23 line prot...

Страница 145: ... 101 103 network jack 8 17 networking turning off wireless network 29 turning on wireless network 29 NTSC PAL jack 42 Num Lock status indicator 20 system key 22 numeric keypad status indicator 20 using 22 O opening files 27 folders 27 LCD panel 6 notebook 6 programs 27 shortcut menu 27 P password 62 107 PC Card adding 36 eject button 36 inserting 36 installing 36 removing 36 slot 36 troubleshootin...

Страница 146: ...pproval authorities 61 radio frequency wireless connections 61 RAM See memory rebooting notebook 19 recalibrating battery 50 recharging battery 48 replacing See installing resetting notebook 19 restarting notebook 19 right clicking 27 S safety caring for notebook 66 general precautions 118 guidelines for troubleshooting 82 static electricity 70 scanner installing 38 USB port 8 screen cleaning 68 r...

Страница 147: ...rt 4 Technical Support 114 tips before contacting 113 tutorial service 114 telephone acoustic handset coupler 60 line protector 60 line tester 60 telephone support 113 television playing DVD on 42 TV out jack 42 viewing display on 42 television S Video out jack 7 touchpad buttons 26 clicking 27 double clicking 27 dragging screen objects 28 locating 11 moving pointer 26 27 moving screen objects 28 ...

Страница 148: ...tebook 19 wireless network 23 29 turning on notebook 18 wireless network 23 29 tutoring fee based 115 TV out S Video out jack 7 U upgrading 69 USB port 8 38 V VGA port 9 40 video monitor port 9 projector port 9 S Video out jack 7 troubleshooting 112 VGA port 9 video camera connecting 39 volume adjusting 25 28 adjusting modem 100 controls 28 muting 25 28 system keys 25 troubleshooting 111 W waking ...

Страница 149: ......

Страница 150: ...MAN OASIS USER GDE R0 11 06 ...

Отзывы: