background image

22     The Gateway 2000 Solo Multimedia Notebook

Memory

The system already has a minimum of 8MB of RAM on board. This memory capacity
can be upgraded by installing memory modules in the unit’s expandable memory
sockets, located on the underside of the unit. These sockets will accept 4, 8, or
16MB modules, but remember: If you upgrade the memory, the same type and
size module must be used in EACH socket! 
For instance, if you wish to install a
4MB module in one of the sockets, you MUST install an identical module in the
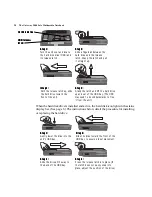
other socket. Memory modules are installed in the memory sockets as shown below:

Step 1:

Step 1:

Step 1:

Step 1:

Step 1:
Enter the Main Setup Menu ,
set the power switch to ON/
OFF, and exit saving changes.
(See page 25 and 26.)

Step 2:

Step 2:

Step 2:

Step 2:

Step 2:
Press the Power button to
turn the unit off, close the lid,
disconnect the AC power, and
remove the battery.

Step 3:

Step 3:

Step 3:

Step 3:

Step 3:
Turn the unit over and lift away
the expansion memory access
panel.

Step 4:

Step 4:

Step 4:

Step 4:

Step 4:
Insert two memory modules,
one into each socket. They
must be identical. Close the
unit. (Feel free to re-enter the
Main Setup Menu and change
the power switch back.)

Memory access

Memory access

Memory access

Memory access

Memory access
panel:

panel:

panel:

panel:

panel:

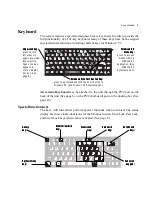
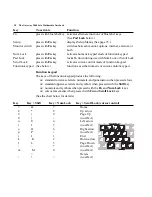
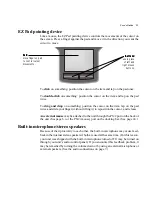
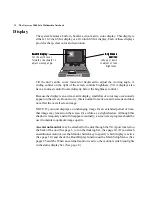
Содержание 2000 Solo

Страница 1: ...USER S GUIDE...

Страница 2: ...hrough normal use Do this twice for best results The AC adapter The AC power cord 4 The Windows 95 logo appears on the screen Windows for Workgroups users must type win at the C prompt and press Enter...

Страница 3: ...13 Battery power 13 Bridge battery 15 Starting Stopping and Restarting 15 Standby mode 16 Suspend mode 16 Rebooting 16 Modular Option Bay 17 CD ROM Drive 18 Floppy Disk Drive 18 External Floppy Drive...

Страница 4: ...The Gateway 2000 SOLO Multimedia Notebook User s Guide...

Страница 5: ...ype anbefalt av apparatfabrikanten Brukte batterier kasseres i henhold til fabrikantens instruksjoner Legal notices Gateway 2000 Solo Multimedia Notebook User s Guide Copyright 1995 Gateway 2000 610 G...

Страница 6: ...voltages that can cause serious personal injury or death Return defective AC adapters to Gateway 2000 The AC adapter is intended for use with a computer Both must meet EN 60950 ACHTUNG Netzkabel stets...

Страница 7: ...6 colors Mouse Pointer EZ Pad integrated pointer PS 2 type connector for external mouse CPU Intel P54CLM 75 or P54CLM 90 low power Pentium Processor Cache 16K in CPU 256K pipelined burst synchronous e...

Страница 8: ...pack 14 4DC 2700mAh lithium battery batteries can be hot swapped without rebooting Recharges in or out of system Conforms to APM 1 1 Permanent internal NiMH battery maintains system memory for about...

Страница 9: ...ct the docking bar here See page 23 VGA port VGA port VGA port VGA port VGA port connect any standard monitor here See page 12 AC AC AC AC AC connector connector connector connector connector connect...

Страница 10: ...tton reset button reset button reset button reset button flip it down to reveal flush PCMCIA slots and reset button See pages 21 and 16 Volume control Volume control Volume control Volume control Volu...

Страница 11: ...e is accessed IR port IR port IR port IR port IR port lit when IR port is enabled Monitor switch Monitor switch Monitor switch Monitor switch Monitor switch lit when external monitor port is active St...

Страница 12: ...ey key key key Scroll Lock Scroll Lock Scroll Lock Scroll Lock Scroll Lock key key key key key Fn function Fn function Fn function Fn function Fn function key key key key key Function Function Functio...

Страница 13: ...l mode of function keypad Function keypad See below functions as either numeric or cursor control keypad Function keypad The keys of the function keypad produce the following standard lowercase letter...

Страница 14: ...to the unit through the PS 2 port on the back of the unit See page 6 or the PS 2 mouse port on the docking bar See page 24 Built in microphone stereo speakers Because of their proximity to each other...

Страница 15: ...xtended period of time that image may remain on the screen for a while as a slight shadow Although this shadow is temporary and will disappear eventually a screen saver program should be used to maint...

Страница 16: ...We recommend that you completely charge and discharge the battery twice as soon as possible as this improves the accuracy of the unit s battery power gauge and optimizes the battery s life and perfor...

Страница 17: ...e unit Simply remove the battery from the unit s case as shown below and connect it directly to the AC adapter AC connector AC connector AC connector AC connector AC connector Step 1 Step 1 Step 1 Ste...

Страница 18: ...hut down the system be sure to save all work before pressing the power button Power button Power button Power button Power button Power button press once to turn the unit on Step 2 Step 2 Step 2 Step...

Страница 19: ...off but it is actually using a very small amount of power to save your work for up to three weeks Of course work should still be saved to the hard drive as often as possible because the Suspend save...

Страница 20: ...ch between drives remove the installed drive or bay cover from the unit s modular bay as shown below and replace it with a different drive The system is upside down at this point so the drive being in...

Страница 21: ...stalled it must be rebooted When the floppy disk drive is installed and active the floppy disk drive icon lights in the status display bar See page 8 Open button Open button Open button Open button Op...

Страница 22: ...r icons Hard Disk Drive The system s hard disk drive HDD may be removed from the unit for replacement or for switching between different hard drives The instructions on the following page detail the p...

Страница 23: ...e HDD release HDD release HDD release HDD release latch latch latch latch latch Step 4 Step 4 Step 4 Step 4 Step 4 Grasp the latch and lift the hard drive up and out of the HDD bay The HDD may need to...

Страница 24: ...CMCIA slot Because the system supports hot swapping one card can usually be exchanged for another by simple removal and replacement Step 1 Step 1 Step 1 Step 1 Step 1 Flip open the PCMCIA door on the...

Страница 25: ...odules are installed in the memory sockets as shown below Step 1 Step 1 Step 1 Step 1 Step 1 Enter the Main Setup Menu set the power switch to ON OFF and exit saving changes See page 25 and 26 Step 2...

Страница 26: ...ar or port replicator duplicates many of the connectors and ports found on the back of the unit as well as a line out jack for audio a game port and an extra PS 2 port Peripheral devices such as an ex...

Страница 27: ...1 Step 1 Step 1 Close the port cover and slide the small panel in front of the docking bar port to the right Step 2 Step 2 Step 2 Step 2 Step 2 Align the docking bar s connec tor with the unit s port...

Страница 28: ...d port assignments power management keyboard setup and other functions See pages 26 29 Exit the Setup Menus by pressing the Esc key The highlighted box on any of the Setup Menus indicates which option...

Страница 29: ...ress Spacebar to toggle between ON OFF system reboots or shuts off completely when switch is pressed SUSPEND RESUME system enters suspend mode or resumes from suspend mode when switch is pressed After...

Страница 30: ...s After setting options the screen automatically returns to the Main Setup Menu Option To Change Serial Port select press Spacebar to toggle between COM1 COM2 COM3 COM4 or DISABLED IR Port select pres...

Страница 31: ...hange Maximum Battery Life see screen select press Enter Good Battery Life see screen select press Enter Good Performance see screen select press Enter Maximum Performance see screen select press Ente...

Страница 32: ...r DISABLED Keyboard Setup Menu This menu allows you to control the unit s keyboard Access this menu from the Main Setup Menu See page 25 The following chart details the process for setting the Keyboar...

Страница 33: ...ed properly See page 19 Has it recently been subjected to an excessive amount of static electricity or physical shock Reinstall system files from the Gateway 2000 Solo System CD Is the unit attempting...

Страница 34: ...tomer Support The screen says Non system disk or disk error reading drive A You have a non bootable disk in drive A the floppy disk drive Remove it and press any key The screen says Bad command or fil...

Страница 35: ...23 K Keyboard 4 6 8 9 16 23 24 25 29 KeyboardSetupMenu 29 L Lineinput 7 Line out 7 23 24 M Main Setup Menu 12 22 25 26 27 28 29 Memory 4 7 22 Menu 9 10 12 13 22 25 26 27 28 29 Microphone 7 8 11 Misce...

Страница 36: ...or your particular needs In most cases we will need your Customer ID number and order number so please have these available when you call Customer Service 800 846 2000 Fax 605 232 2445 Technical Suppo...

Страница 37: ...SYSMAN017AAUS 8 95...

Отзывы: