- 28 -
Remote Control
Remote Control
Remote Control
Remote Control and Menu System
and Menu System
and Menu System
and Menu System....
The NiTRO
400 series and NiTRO-X
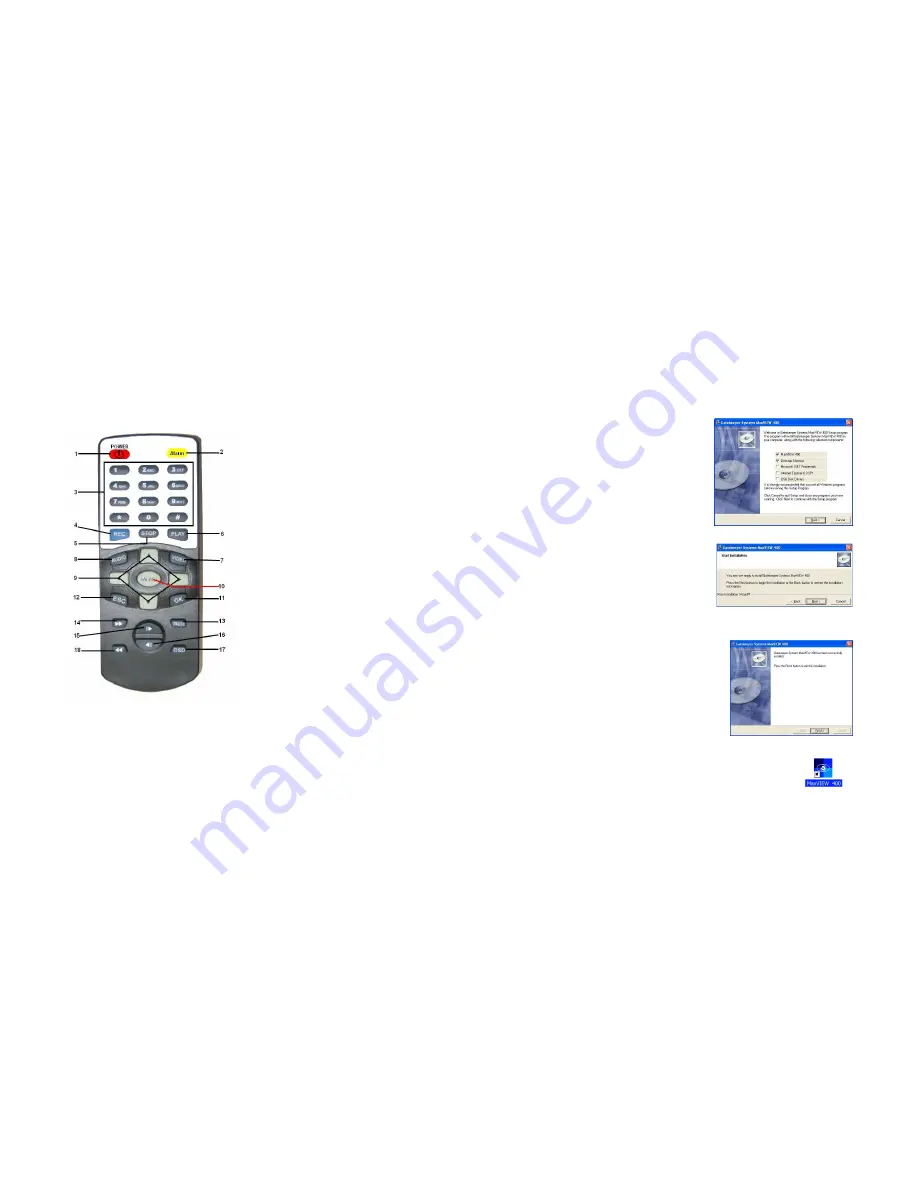
400 series use a common remote control and are
easily configured and utilized by use of a familiar remote control keys. Currently the Alarm and
OSD keys do not function as they are reserved for future use.
Key Definition.
1.
1.
1.
1.
Power. Pressing the Power button
will disable the DVR from auto
recording when the vehicle is
started.
2.
Alarm (Currently Not Active)
3.
Input Keys
4.
Manual Record Key
5.
Stop Playback Key
6.
Local Playback Key
7.
Video Toggle Key
8.
Audio Toggle Key
9.
Direction Navigational Keys
10.
Menu. Press to enter menus; sub-
menus and to make selections from
available options. Can also be used
as an OK key in some menus
11.
OK Key (Use for confirmation)
12.
ESC Key (Escape from current
menu)
13.
Pause Key.
14.
Fast Forward. Up to 8X
15.
Next. Access’ The Next Video File
16.
Previous. Access’ the previous Video
File.
17.
OSD. (Currently Not Active)
18.
Slow. Local Playback can be slowed
to ¼ speed.
Figure 8: Remote Control Definition
The NiTRO
400 series and NiTRO-X
400 series have been designed to be user intuitive
with options being available in nine separate menus, to access the main menu screen press
the Menu key once. To navigate through the nine menu options use the navigation keys, (9),
to highlight an option and then press the Menu key again or OK. This will bring up the relevant
menu. Some menu options are currently not available and are reserved for future use. Only
those options which are active and supported will be covered.
- 41 -
Instal
Instal
Instal
Installation.
lation.
lation.
lation.
To begin installation, unzip the setup files from the ZIP package downloaded previously,
(Please make a note of where the zipped files are being extracted to).
Navigate to the folder where you have unzipped
the files to. Double click on the SETUP.EXE file.
Software that needs to be installed on your PC
will automatically be checked off, press Next to
proceed.
Once all is correct, click Next.
Figure 19 : Software Check....
The next window will ask for the destination of the
files. It is recommended that the default location,
(C:\Program Files\Gatekeeper
Systems\MaxVIEW 400), is accepted, Click Next.
The next screen will give information on current
settings, once reviewed and confirmed, press the
Next button to Start Installation.
Figure 20 : Begin Installation.
A progress window will appear displaying
information in regards to the setup.
Installation Complete:
Once installation is complete you will see a window,
Figure 21, stating that MaxVIEW
400 has been
successfully installed.
Press Finish to complete installation. You may be
required to restart your computer.
Figure 21 : Installation Complete.
Once installation is complete you will see the MaxVIEW
400 icon on your
desktop. Use this to access the video files on your SD Card or in a dedicated
directory.


