background image

Garmin G2000 Pilot’s Guide for the Cessna T240

190-01263-01  Rev. A

24

SyStem Overview

Sy

Stem

O

ver

view

FL

iGH

t

iNS

tr

Ume

N

tS

ei

S

AUD

iO P

AN

eL

& CNS

FL

iGH

t

m

ANA

G

eme

N

t

HAZA

rD

Av

O

iD

ANC

e

AFCS

ADD

iti

ONAL

Fe

At

Ure

S

APP

eND

iC

eS

iND

eX

Sy

Stem

O

ver

view

FL

iGH

t

iNS

tr

Ume

N

tS

ei

S

 A

UD

iO & CNS

FL

iGH

t

m

ANA

G

eme

N

t

HAZA

rD

Av

O

iD

ANC

e

AFCS

ADD

iti

ONAL

Fe

At

Ure

S

APP

eND

iC

eS

iND

eX

S

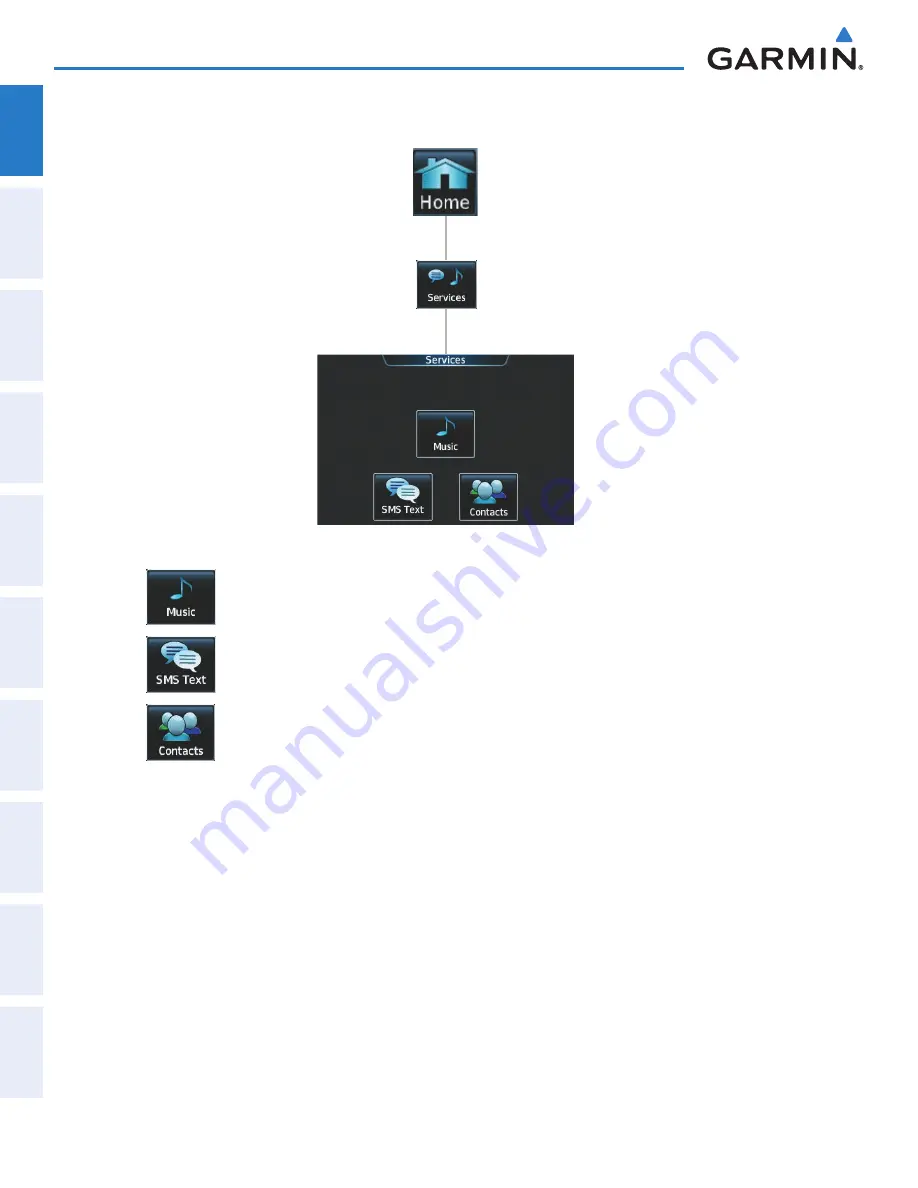
erviceS

 S

creen

Shows the Music Screen on the Touchscreen Controller.  Provides controls for using 
SiriusXM Radio service.

Shows the SMS Text Messaging Screen on the Touchscreen Controller.  Provides controls 
for viewing, sending, and managing text messages.

Shows the Contacts Screen on the Touchscreen Controller.  Stores and edits contact 
information.

This manual downloaded from http://www.manualowl.com

Содержание G2000

Страница 1: ...pe Ltd Liberty House Bulls Copse Road Houndsdown Business Park Southampton SO40 9RB U K p 44 0870 8501241 f 44 0870 8501251 Garmin Corporation No 68 Jangshu 2nd Road Shijr Taipei County Taiwan p 886 0...

Страница 2: ...This manual downloaded from http www manualowl com...

Страница 3: ...IEW FLIGHT INSTRUMENTS ENGINE INDICATION SYSTEM AUDIO CNS FLIGHT MANAGEMENT HAZARD AVOIDANCE AUTOMATIC FLIGHT CONTROL SYSTEM ADDITIONAL FEATURES APPENDICES INDEX This manual downloaded from http www m...

Страница 4: ...emark of Becker Flugfunkwerk GmbH SiriusXM Weather and SiriusXM Satellite Radio are provided by SiriusXM Satellite Radio Inc aopa membership publications inc and its related organizations hereinafter...

Страница 5: ...THIS WARRANTY GIVES YOU SPECIFIC LEGAL RIGHTS WHICH MAY VARY FROM STATE TO STATE IN NO EVENT SHALL GARMIN BE LIABLE FOR ANY INCIDENTAL SPECIAL INDIRECT OR CONSEQUENTIAL DAMAGES WHETHER RESULTING FROM...

Страница 6: ...ensure that the information remains current Pilots using any outdated database do so entirely at their own risk WARNING Do not use basemap land and water data information for primary navigation Basema...

Страница 7: ...netic field operating the system within the following areas could result in loss of reliable attitude and heading indications North of 72 North latitude at all longitudes South of 70 South latitude at...

Страница 8: ...defects or reproductive harm This notice is being provided in accordance with California s Proposition 65 If you have any questions or would like additional information please refer to our web site at...

Страница 9: ...al release 190 01263 00 B 04 04 12 i I 6 Included additional GDU 2 00 parameters and updated CAS annunciations 190 01263 01 A 5 10 13 i I 6 Added Split Mode PFD operation Added Garmin Connext Weather...

Страница 10: ...Garmin G2000 Pilot s Guide for the Cessna T240 190 01263 01 Rev A vi Revision Information Blank Page This manual downloaded from http www manualowl com...

Страница 11: ...ight Data 97 Temperature Displays 97 Wind Data 98 Vertical Navigation VNV Indications 99 2 4 PFD Annunciations and Alerting Functions 100 System Alerting 100 Marker Beacon Annunciations 101 Traffic An...

Страница 12: ...ation 244 Adding Waypoints to an Existing Flight Plan 249 Adding Airways to a Flight Plan 253 Adding Procedures to a Stored Flight Plan 256 Flight Plan Storage 263 Flight Plan Editing 265 Along Track...

Страница 13: ...66 Engaging the Autopilot 466 Control Wheel Steering 467 Disengaging the Autopilot 467 7 6 Example Procedures 468 Departure 469 Intercepting a VOR Radial 471 Flying a Flight Plan FMS Course 472 Descen...

Страница 14: ...ciations 554 System Messages and Aircraft Message Advisories 556 Voice Alerts 571 AFCS Status Annunciations 572 Terrain Alerts and Annunciations 573 GDL 69 69A Data Link Receiver Annunciations 575 Dat...

Страница 15: ...an RS 232 digital interface GMA 36 The Remote Audio Unit integrates navigation communication radio NAV COM digital audio intercom and marker beacon audio This unit communicates with both IAUs using an...

Страница 16: ...ommunicates with the 2 GIA through an RS 232 connection GTS 800 The GTS 800 Traffic Advisory System TAS uses active interrogations of Mode S and Mode C transponders to provide traffic information to t...

Страница 17: ...rvo GTA 82 Pitch Trim GEA 71 Engine Airframe I F GRS 77 1 Attitude Heading GRS 77 2 Attitude Heading GMU 44 1 Magnetometer GMU 44 2 Magnetometer GIA 63W 1 Integrated Avionics Unit VHF COM GPS SBAS VOR...

Страница 18: ...e PFD the AHRS initializes and displays AHRS ALIGN Keep Wings Level The PFD should display valid attitude and heading fields typically within the first minute of power up The AHRS can align itself bot...

Страница 19: ...aGement HaZarD avoiDance aFcS aDDitional FeatureS appenDiceS inDeX SyStem overview FliGHt inStrumentS eiS auDio cnS FliGHt manaGement HaZarD avoiDance aFcS aDDitional FeatureS appenDiceS inDeX Figure...

Страница 20: ...eration and minimize the workload and the time required to access sophisticated functionality Controls are located on the PFD bezel the PFD Controller the Touchscreen Controller and the AFCS Controlle...

Страница 21: ...ay off The next type of softkey selects among several options indicated by the softkey label changing with the exception of the Map Range keys to reflect the name of the chosen option The last type of...

Страница 22: ...IS AUDIO PANEL CNS FLIGHT MANAGEMENT HAZARD AVOIDANCE AFCS ADDITIONAL FEATURES APPENDICES INDEX SYSTEM OVERVIEW FLIGHT INSTRUMENTS EIS AUDIO CNS FLIGHT MANAGEMENT HAZARD AVOIDANCE AFCS ADDITIONAL FEAT...

Страница 23: ...IO PANEL CNS FLIGHT MANAGEMENT HAZARD AVOIDANCE AFCS ADDITIONAL FEATURES APPENDICES INDEX SYSTEM OVERVIEW FLIGHT INSTRUMENTS EIS AUDIO CNS FLIGHT MANAGEMENT HAZARD AVOIDANCE AFCS ADDITIONAL FEATURES A...

Страница 24: ...the annunciator is gray Topo Adds or removes the display of map topography on the Inset Navigation Map The softkey annunciator is green when topography is on When topography is off the annunciator is...

Страница 25: ...tings softkeys Attitude Overlays Displays the softkeys for enabling or disabling Synthetic Vision Technology SVT features Pathways Displays Pathway Boxes on the PFD Synthetic Terrain Enables synthetic...

Страница 26: ...on softkeys AHRS Settings Displays the AHRS selection softkeys AHRS 1 Selects the number 1 AHRS The softkey annunciator is green when selected AHRS 2 Selects the number 2 AHRS The softkey annunciator...

Страница 27: ...racter for highlighted cursor location Scrolling When a list of information is too long for the window box a scroll bar appears indicating more items are available to view With cursor enabled turn lar...

Страница 28: ...t the top of the Touchscreen Controller screen refer to the Audio and CNS Section for detailed information about NAV COM tuning Figure 1 11 GTC 570 Touchscreen Controller 8 6 2 3 1 4 5 9 7 1 CNS Bar D...

Страница 29: ...me Screen before performing each procedure if the appropriate screen is already displayed Direct To Button Touched Home Screen Touch to Return to Home Screen Direct To Screen Figure 1 12 Touchscreen C...

Страница 30: ...e Home Screen Displays Notifications screen on Touchscreen Controller with System Messages Tab selected Flashes when a new system message or aircraft advisory message is issued Returns to the previous...

Страница 31: ...confirm the system detected the button touch When releasing the finger make sure it released within the boundary of the button otherwise the input is considered invalid If enabled an error sound indic...

Страница 32: ...also be performed by touching the Up or Down scroll buttons If additional scrolling is required to view all information in the window each touch of the scroll button display one page of information So...

Страница 33: ...Enabled Off or Disabled Figure 1 19 Touchscreen Controller Annunciator Buttons Datafield Buttons can be modified based on information the pilot can enter or change and often contain light blue text T...

Страница 34: ...Pane When one of these buttons is touched the selected Display Pane shows the associated display and the button border on the Touchscreen Controller is highlighted in light blue to indicate the map as...

Страница 35: ...Screen provides access to the various aircraft checklists Accesses Services Menu Screen on Touchscreen Controller Includes SiriusXM Satellite Radio controls optional SMS text messaging services and co...

Страница 36: ...NT HAZARD AVOIDANCE AFCS ADDITIONAL FEATURES APPENDICES INDEX Weather Selection Screen Shows SiriusXM Weather Pane in the Selected Display Pane Touch button again to access SiriusXM Weather Settings S...

Страница 37: ...NT HAZARD AVOIDANCE AFCS ADDITIONAL FEATURES APPENDICES INDEX Aircraft Systems Screen Accesses environmental controls air conditioning defogger fan speed etc Controls Annunciator system test Shows add...

Страница 38: ...GHT MANAGEMENT HAZARD AVOIDANCE AFCS ADDITIONAL FEATURES APPENDICES INDEX Services Screen Shows the Music Screen on the Touchscreen Controller Provides controls for using SiriusXM Radio service Shows...

Страница 39: ...nd fuel statistics Used to set barometric minimums values and to perform destination temperature compensation Accesses trip statistics and settings Provides controllers for system timer functions Used...

Страница 40: ...crew profiles Avionics Settings Avionics Database Status SiriusXM information and Connext registration information Setup Screen Provides controls for changing system avionics settings such as time for...

Страница 41: ...int info Screen Accesses airport information including frequencies weather procedures charts runways and AOPA Airport Directory data Shows information for a selected intersection including bearing dis...

Страница 42: ...ing and distance information Displays a list of the nearest VORs with bearing distance and frequency information Displays a list of the nearest NDBs with bearing distance and frequency information Dis...

Страница 43: ...increments Push the Small Right Knob momentarily to change the selected COM radio source COM 1 or COM 2 for tuning Push and hold the Small Right Knob for 1 5 seconds to transfer the selected Standby...

Страница 44: ...e with a Display Pane MFD in Half Mode with Two Display Panes Light Blue Title Bar Indicates Selected Display Pane Selected on Touchscreen Controller Figure 1 22 Display Pane Control Normal Operations...

Страница 45: ...Pane Some Display Panes are only available in Half Mode such as the ENGINE SYSTEMS or GPS STATUS display When these displays are selected they are automatically shown in Half Mode and the Full or Half...

Страница 46: ...iers When the cursor is on a field awaiting entry of a waypoint identifier touching the Find Button accesses four different lists of waypoint identifiers for quick selection Recent Nearest Flight Plan...

Страница 47: ...r and the data field will be highlighted in light blue 2 Begin entering data by turning the Small Right Knob to select a character for the first placeholder Turning the knob to the right cycles throug...

Страница 48: ...ntation such as heading airspeed altitude vertical speed on the Primary Flight Display PFD in either Full Mode or Split Mode In Full Mode the PFD occupies the entire display portion of the GDU 1400W I...

Страница 49: ...onary Mode is discussed in the EIS Section The Inset Map appears on the right side of the display The PFD Split Mode Display Pane is not available in Reversionary Mode If a PFD or MFD fails the approp...

Страница 50: ...information note Aggressive maneuvering while AHRS is not operating normally may degrade AHRS accuracy In addition to using internal sensors the GRS 77 AHRS uses GPS information magnetic field data a...

Страница 51: ...the aircraft is airborne the heading output on the PFD does become invalid as indicated by a red X Air Data Input Failure Failure of the air data input has no affect on the AHRS output while AHRS is...

Страница 52: ...rently in view are shown at their respective positions on a sky view diagram The sky view is always in a north up orientation with the outer circle representing the horizon the inner circle representi...

Страница 53: ...DIFF NAV and SBAS indicates ACTIVE GPS Satellite Signal Strengths The GPS 1 and GPS 2 Status Display can be helpful in troubleshooting weak or missing signal levels due to poor satellite coverage or...

Страница 54: ...approach does not become active as indicated by the messages Approach is not active and RAIM not available from FAF to MAP If RAIM is not available when crossing the FAF the missed approach procedure...

Страница 55: ...nd responsible LRUs Upon G2000 power up certain instruments remain invalid as equipment begins to initialize All windows should be operational within one minute of power up If any window is not operat...

Страница 56: ...able GPS CDI range COM transceiver channel spacing Stability Protection ESP Nearest Airport Runway Surface Nearest Airport Minimum Length NOTE The time offset is used to define current local time UTC...

Страница 57: ...gradually ramps up to 2 nm beyond 30 nm from the departure airport The CDI range is set to 2 0 nautical miles during the en route phase of flight Within 30 nm of the destination airport the CDI range...

Страница 58: ...kHz Buttons Electronic Stability Protection ESP Refer to the Additional Features Section for more information on Electronic Stability Protection Enabling Disabling Electronic Stability Protection 1 Fr...

Страница 59: ...its Settings Nav Angle Magnetic Variance not pilot selectable Distance Speed not pilot selectable Altitude Vertical Speed Temperature Fuel Weight Position Format The Units Tab allows configuration of...

Страница 60: ...From the Home touch Utilities Setup Avionics Settings 2 If necessary touch the Units tab 3 Scroll if necessary and touch button corresponding to the units to be changed current units selection displa...

Страница 61: ...Avionics Settings 2 If necessary touch the Alerts Tab 3 Touch the Baro Transition Alert Enable Button Button annunciator is green when alert is enabled gray when disabled Arrival Alert settings Setti...

Страница 62: ...with an alert message The default setting for the altitude buffer is 200 feet Setting the altitude buffer distance 1 From the Home touch Utilities Setup Avionics Settings 2 If necessary touch the Aler...

Страница 63: ...If necessary touch the MFD Fields Tab 3 Scroll as needed and touch the MFD Data Bar Field Number to be changed 1 through 8 current selection for each data bar field displayed in light blue 4 Scroll as...

Страница 64: ...s green disabled when gray Changing the location of the left and right audio for the 3D audio feature 1 From Home touch Utilities Setup Avionics Settings 2 If necessary touch the Audio Tab 3 Scroll to...

Страница 65: ...e is selected in Figure 1 34 Manual mode allows the fan speed to be adjusted manually Auto mode allows the ECS to determine proper fan speed for the selected temperature Adjusting manual fan speed 1 F...

Страница 66: ...d Viewing LRU information 1 From Home touch Utilities Setup Avionics Status 2 If necessary touch the LRU Info tab 3 Scroll as needed and touch a LRU button to display a pop up window with additional i...

Страница 67: ...nformation about SiriusXM Weather products or the Additional Features Section for information about SiriusXM Satellite Radio Viewing XM Information From Home touch Utilities Setup SiriusXM Info Sirius...

Страница 68: ...n the subscription are displayed as available 4 If activating SiriusXM Satellite Radio touch Home Services Music to display the Music Screen Then scroll in the channel list and verify the channels in...

Страница 69: ...mum ground speeds Timer The generic timer can be set to count up or down from a specified time HH MM SS When the countdown on the timer reaches zero the digits begin to count up from zero If the timer...

Страница 70: ...power up or from the time the aircraft lifts off the timer can also be reset to zero Setting the flight timer starting criterion 1 From Home touch Utilities Trip Stats 2 Touch the Flight Time Start At...

Страница 71: ...h the Reset Button Odometer The Odometer presents a total distance traveled since the last reset Setting the odometer automatic reset criterion 1 From Home touch Utilities Trip Stats 2 Touch the Odome...

Страница 72: ...of the option selected for automatic reset 5 Touch the Accept Button Manually resetting the Odometer 1 From Home touch Utilities Trip Stats 2 Scroll to display the Avg Ground Speed buttons 3 Touch th...

Страница 73: ...Traffic Chart Terrain and Avionics Settings The crew profile contains distinct selections for each display pane location The Crew Profile Screen provides additional capabilities for managing crew pro...

Страница 74: ...s the name of the copied profile in the list Renaming an existing crew profile 1 From Home touch Utilities Crew Profile 2 Scroll if necessary and touch the button for the crew profile to be renamed 3...

Страница 75: ...sert an SD card to store a crew profile into the top card slot in the MFD 2 From Home touch Utilities Crew Profile 3 Scroll if necessary and touch the button for the crew profile to be exported from t...

Страница 76: ...PFDs and the MFD data card slots use Secure Digital SD cards and are located on the top right portion of the display bezels Each display bezel is equipped with two SD card slots SD cards are used for...

Страница 77: ...ht instruments navigation communication terrain traffic and weather information are also presented on the PFD and explained in other sections of this Pilot s Guide The following flight instruments and...

Страница 78: ...rue Airspeed 5 Horizontal Situation Indicator HSI 6 Timer 7 ISA Temperature Deviation 8 Outside Air Temperature OAT 9 Softkeys 10 System Time 11 Selected Heading Bug 12 Turn Rate Indicator 13 Navigati...

Страница 79: ...eference 2 Traffic Annunciation 3 Selected Heading 4 Wind Data 5 DME Information Window 6 Inset Map 7 Bearing Information Windows 8 Alerts Window 9 Barometric Minimum Descent Altitude 10 Selected Cour...

Страница 80: ...Indicator Indicated Airspeed Airspeed Trend Vector True Airspeed Vspeed References Speed Ranges A color coded white green yellow and red speed range strip is located on the moving tape The colors den...

Страница 81: ...eed flags on off 1 From the Home Screen touch Speed Bugs 2 To turn the Vspeed on or off touch the On Button 3 To set or change a Vspeed value touch the Data Field for the Vspeed enter a value in the k...

Страница 82: ...up to 80 Minor pitch marks are shown for intervening 5 increments up to 25 below and 45 above the horizon line Between 20 below to 20 above the horizon line minor pitch marks occur every 2 5 When Syn...

Страница 83: ...g at the approximate altitude to be reached in 6 seconds at the current vertical speed The trend vector is not shown if altitude remains constant or if data needed for calculation is not available due...

Страница 84: ...the aircraft may not re establish on the descent path in time to meet the vertical constraint Selecting the altimeter barometric pressure setting Turn the BARO Knob to select the desired setting Sele...

Страница 85: ...o Transition Alert Data Field Enter the desired altitude on the keypad and touch Enter Figure 2 12 Baro Transition Alert Vertical Speed Indicator VSI The Vertical Speed Indicator VSI displays the airc...

Страница 86: ...the Glideslope Indicator like a glideslope needle on a conventional indicator If a localizer frequency is tuned and there is no glideslope NO GS is displayed in place of the diamond The glidepath is a...

Страница 87: ...rotates with the course pointer and is displayed when the active NAVAID is received Figure 2 16 Horizontal Situation Indicator 360 HSI 1 10 11 14 12 16 3 4 2 8 9 7 5 1 Turn Rate Indicator 2 Selected...

Страница 88: ...ng a GPS course Selected Heading Selected Course Figure 2 17 Heading and Course Indications Magnetic Current Heading Heading Bug Navigation angles track heading course bearing are corrected to the com...

Страница 89: ...A magenta Turn Rate Trend Vector shows the current turn rate The end of the trend vector gives the heading predicted in 6 seconds based on the present turn rate A standard rate turn is shown on the i...

Страница 90: ...nstallation is optional Figure 2 21 HSI with Bearing and Distance Information Bearing 1 Pointer Bearing 2 Pointer Bearing Source 2 Bearing Source 1 Distance to Bearing Source Station Identifier Freque...

Страница 91: ...urces 1 Select the PFD Settings Softkey 2 Select a Bearing Softkey to display the desired bearing pointer and information window with a NAV source 3 Select the Bearing Softkey again to change the bear...

Страница 92: ...Figure 2 22 Course Deviation Indicator Crosstrack Error Navigation Source Scale CDI Flight Phase The CDI can display two sources of navigation FMS or VOR LOC Color indicates the current navigation sou...

Страница 93: ...m automatically switches from FMS to LOC navigation source and changes the CDI scaling accordingly when all of the following occur A localizer or ILS approach has been loaded into the active flight pl...

Страница 94: ...e aircraft symbol The current GPS CDI scale setting is displayed on the GTC Avionics Settings Screen and the full scale deflection setting may also be changed on this screen If the selected scaling is...

Страница 95: ...he departure airport or the leg after the last departure waypoint has been activated or a direct to waypoint is activated If after completing the departure procedure the nearest airport is more than 2...

Страница 96: ...le changes to 0 3 nm The system automatically switches back to terminal scaling under the following conditions The next leg in the missed approach procedure is not aligned with the final approach path...

Страница 97: ...ode is enabled a course line is drawn through the active to waypoint on the moving map If desired the course to from the waypoint can now be adjusted When OBS Mode is disabled the GPS flight plan retu...

Страница 98: ...oint MAP automatic approach waypoint sequencing is suspended SUSP appears on the HSI at the lower right of the aircraft symbol The OBS Softkey label changes to indicate the suspension is active as sho...

Страница 99: ...s of any of the required data including temporary loss of the GPS signal will cause SVT to be disabled until the required data is restored The SVT terrain display shows land contours colors are consis...

Страница 100: ...ive before any other SVT feature may be activated A green annunciator on the softkey label indicates the feature is activated Horizon Heading Airport Signs and Pathways softkeys are only available whe...

Страница 101: ...y The horizon heading display will cycle on or off with each press of the Horizon Heading Softkey Activating and deactivating Airport Signs 1 Press the PFD Settings Softkey 2 Press the Attitude Overla...

Страница 102: ...full scale deviation on the VDI whichever is less The altitude at which the pathway boxes are displayed is determined by the higher of either the selected altitude or the VNAV altitude programmed for...

Страница 103: ...ed altitude or the programmed altitude for the leg Climb profiles cannot be displayed due to the variables associated with aircraft performance Flight plan legs requiring a climb are indicated by path...

Страница 104: ...isplayed as a level path at the published altitude for the MAHP or the selected altitude whichever is the highest If the initial missed approach leg is a Course to Altitude CA leg the pathways boxes w...

Страница 105: ...display The FPM is always available when the Synthetic Terrain feature is in operation The FPM represents the direction of the flight path as it relates to the terrain and obstacles on the display wh...

Страница 106: ...its appearing on the zero pitch line are not visible behind either the airspeed or altitude display Horizon Heading is used for general heading awareness and is activated and deactivated by pressing t...

Страница 107: ...s appear on the display when the aircraft is approximately 15 nm from an airport and disappear at approximately 4 5 nm Airport signs are shown without the identifier until the aircraft is approximatel...

Страница 108: ...ect to the surrounding terrain All runway thresholds are depicted at their respective elevations as defined in the database In some situations where threshold elevations differ significantly crossing...

Страница 109: ...In these cases the conflict is outside the SVT field of view to the left or right of the aircraft TERRAIN Annunciation Figure 2 39 Terrain Alert Potential Impact Points Terrain Caution Obstacles are r...

Страница 110: ...sabling the field of view indication 1 From the Home Screen on the Touchscreen Controller touch Map Map Settings Map Options 2 If not already selected touch the Map Tab 3 Scroll to display the Field o...

Страница 111: ...e flight instruments the PFD also displays various supplemental information including temperatures wind data and Vertical Navigation VNV indications Temperature Displays The Outside Air Temperature OA...

Страница 112: ...nvalid or unavailable the window shows NO WIND DATA Wind data can be displayed in three different ways Figure 2 43 Wind Data No Data Option 2 Option 1 Option 3 Displaying wind data 1 Select the PFD Se...

Страница 113: ...viation Indicator Required Vertical Speed Bug Terminal Phase of Flight FMS is Selected Navigation Source Figure 2 44 Vertical Navigation Indications PFD Top of Descent Message Criteria VNV Indication...

Страница 114: ...Softkey annunciation CAUTION This level of alert indicates the existence of abnormal conditions on the aircraft that may require pilot intervention The system displays a caution alert in the CAS Windo...

Страница 115: ...ation Map Page and various other MFD page maps Refer to the Hazard Avoidance Section and the Appendix for more details about the Traffic Information Service TIS and optional Traffic Advisory Systems T...

Страница 116: ...ed the Altitude Alerter is reset The Altitude Alerter is independent of the GFC 700 AFCS but visual annunciations and alerting tones are provided only when the GFC 700 is installed The following occur...

Страница 117: ...deciSion height Alerting For altitude awareness a Minimum Descent Altitude MDA or Decision Height DH based on barometric or temperature compensated altitude can be set When active the altitude setting...

Страница 118: ...h Utilities Minimums Minimums 2 Touch Baro or Temp Comp OFF is selected by default If Temp Comp is selected touch Temp at Dest Use the keypad to enter desired temperature and touch Enter 3 Use the key...

Страница 119: ...of HSI Integrity OK GPS integrity has been restored to within normal limits annunciation displayed for 5 seconds DR Lower left of aircraft symbol DeadReckoning Systemisusingprojectedpositionrathertha...

Страница 120: ...following information is removed from the PFD and corresponding softkeys are disabled when the aircraft experiences unusual attitudes Traffic Annunciations AFCS Annunciations Flight Director Command B...

Страница 121: ...ersionary Mode SVT will take up to 30 seconds to be displayed The standard non SVT PFD display will be shown in the interim SVT Unusual Attitudes During extreme pitch attitudes the display shows eithe...

Страница 122: ...T240 190 01263 01 Rev A 108 Flight Instruments SYSTEM OVERVIEW FLIGHT INSTRUMENTS EIS AUDIO PANEL CNS FLIGHT MANAGEMENT HAZARD AVOIDANCE AFCS ADDITIONAL FEATURES APPENDICES INDEX Blank Page This manu...

Страница 123: ...for information about Reversionary Mode Instrument types include dial gauges horizontal and vertical bar indicators digital readouts slide bars and bar graphs Green bands indicate normal ranges of op...

Страница 124: ...SYSTEM OVERVIEW FLIGHT INSTRUMENTS EIS AUDIO PANEL CNS FLIGHT MANAGEMENT HAZARD AVOIDANCE AFCS ADDITIONAL FEATURES APPENDICES INDEX Figure 3 2 EIS Display with Engine Systems Pane EIS Display EIS Disp...

Страница 125: ...es outside the acceptable operating range Figure 3 5 EIS Display Reversionary Mode Figure 3 4 EIS Display Normal Mode 1 2 3 4 6 7 8 9 10 11 12 13 14 15 16 5 1 Manifold Pressure 5 Oil Temperature 9 Tac...

Страница 126: ...e TachOMETER GauGE The Tachometer RPM Gauge measures the propeller speed from zero to 3000 revolutions per minute RPM Figure 3 7 Tachometer Gauge cRuISE POWER DISPlay The Cruise Power CRU PWR Display...

Страница 127: ...ature CHT Gauge displays the temperature of the hottest cylinder in degrees Fahrenheit A number inside the gauge pointer indicates the corresponding cylinder number for which CHT is currently displaye...

Страница 128: ...e see Section 3 2 for details Figure 3 11 Turbo Inlet Temperature Gauges Oil Pressure and Temperature Gauges The Oil Pressure Gauge indicates engine oil pressure in pounds per square inch PSI The Oil...

Страница 129: ...er corresponding to the fuel tank selector position Figure 3 14 Fuel Display Selected Fuel Tank Indicator Engine Tachometer Time The Engine Hours Display shows the engine tachometer time to the neares...

Страница 130: ...ter and remains displayed momentarily after a nger is removed The Pulse Oximeter Display is available in Normal Mode but not in Reversionary Mode Figure 3 17 Pulse Oximeter Display aNTI IcE FluID QuaN...

Страница 131: ...bles Lean Assist Shows Fuel Calculator on GDU Shows System Tests Screen on GDU Shows Environmental Control System ECS settings on GDU Shows Engine Systems Display on MFD System Tests The System Tests...

Страница 132: ...OXY OUTLET PSI Oxygen outlet pressure in psi Gauge ranges are dependent on type of oxygen outlet pressure system installed high or low 4 Fuel Calculations Group GAL REM GAL USED ENDUR RANGE NM The fu...

Страница 133: ...lations Screen From home touch aircraft Systems Fuel calc adjusting the Totalizer Based Fuel Remaining 1 From home touch aircraft Systems Fuel calc 2 Touch the Gal Rem Button 3 Enter the fuel quantity...

Страница 134: ...ce between each peak TIT and the current temperature An indicator below the readout shows whether each TIT is operating LEAN or RICH of peak TIT Enabling Disabling lean assist Mode 1 From home touch a...

Страница 135: ...cription of the Audio and CNS system interconnection The Touchscreen Controller provides primary tuning of the communication transceivers and microphone and receiver audio selection The Audio Controll...

Страница 136: ...uMentS eiS Audio cnS FligHt MAnAgeMent HAZArd AvoidAnce AFcS AdditionAl FeAtureS AppendiceS indeX pFd coM nAv diSplAy And controlS Figure 4 1 COM NAV Window Active NAV Window and Active COM Frequency...

Страница 137: ...urce and frequency 4 ENT Key Confirms a selection and moves the cursor to the next data field 5 CLR Key Cancels entries or removes menus 6 PFD Knob Large PFD Knob moves the cursor from field to field...

Страница 138: ...1 frequencies 3 Audio Radios Button Displays removes the Audio Radios Screen The Audio Radios Screen is used to control the Communication Navigation Surveillance CNS and Audio settings for the pilot c...

Страница 139: ...Standby Screen The COM2 Standby Screen is used to enter and transfer COM2 frequencies 10 MON Button Controls which receivers are being explicitly monitored 11 Function Label Indicates middle knob func...

Страница 140: ...her standby frequency is white Selecting a COM Radio for transmission Touch the MIC Button in the CNS Bar to switch between COM radios until the desired COM is selected Or 1 Touch the Audio Radios But...

Страница 141: ...ransmission COM2 Primary Frequency COM1 Standby Frequency COM2 Standby Frequency COM1 Active Frequency COM1 Standby Frequency COM2 Primary Frequency COM2 Standby Frequency MIC Button COM2 MIC Button C...

Страница 142: ...e COM1 STBY Button or COM2 STBY Button in the CNS Bar to display the COM1 COM2 Standby Screen 2 Use the keypad to select the frequency 3 Touch the Enter Button to accept the new frequency as the COM1...

Страница 143: ...or press the small right knob to select COM1 COM2 for tuning 3 Turn the large and small right knobs to select the frequency Large knob increases decreases MHz Small knob increases decreases kHz 4 Pres...

Страница 144: ...On the GDU Controller press the COM NAV Button to display the COM NAV Window on the PFD 2 Turn the large PFD Knob to move the cursor to the SOURCE field 3 Turn either PFD Knob to select the desired CO...

Страница 145: ...Find Frequencies Screen 2 Touch the tab for the desired type of frequency Recent Nearest Dest Flight Plan or Favorite 3 Scroll the list to find the desired frequency 4 Touch the frequency button to a...

Страница 146: ...splay the Airport Information Screen 2 If needed touch the airport button to enter find the desired airport 3 Touch the Freqs Tab to display the Airport Frequencies Screen 4 Scroll the list to find th...

Страница 147: ...d the desired airport 3 Touch the airport button to display the Waypoint Options Window 4 Touch the Airport Info Button to display the Airport Information Screen 5 Touch the Freqs Tab to display the A...

Страница 148: ...CC FSS Weather Screen 1 From Home touch the Nearest Airspace or ARTCC or FSS or Weather to display the Nearest Airspace or ARTCC or FSS or Weather Screen 2 Scroll the list to find the desired frequenc...

Страница 149: ...s selected all of the 25 kHz channel spacing frequencies are also available in the complete 3040 channel list Figure 4 13 COM Channel Spacing 25 kHz Channel Spacing 8 33 kHz Channel Spacing Changing C...

Страница 150: ...r the selected transceiver press the middle knob When Automatic Squelch is disabled COM audio reception is always on Continuous static noise is heard over the headsets and speaker if selected Pressing...

Страница 151: ...ume sliding to the left decreases volume When adjusting volume the level is displayed in place of the active frequency in the CNS Bar and remains for two seconds after the change When the Audio Radios...

Страница 152: ...cting the Active NAV Softkey again cycles back to NAV1 The three navigation modes that can be cycled through are VOR1 or LOC1 If NAV1 is selected a green single line arrow shown labeled either VOR1 or...

Страница 153: ...e Frequency ID NAV2 Standby Frequency NAV2 Button not selected NAV1 Button selected for monitoring NAV1 Active Frequency ID Selecting deselecting a navigation radio for monitoring 1 Touch the Audio Ra...

Страница 154: ...NAV1 NAV2 standby frequency or touch the XFER Button to enter the new frequency as the NAV1 NAV2 standby frequency and transfer it to the active frequency Figure 4 20 NAV Frequency Tuning Window XFER...

Страница 155: ...e desired NAV 4 Press the ENT Key or the small PFD Knob to accept the selection and move the cursor to the STBY frequency field 5 Turn the small PFD Knob one click to activate the editing cursor flash...

Страница 156: ...splay the Airport Information Screen 2 If needed touch the airport button to enter find the desired airport 3 Touch the Freqs Tab to display the Airport Frequencies Screen 4 Scroll the list to find th...

Страница 157: ...rom the VOR Info Screen 1 From Home touch Waypoint Info VOR to display the VOR Information Screen 2 If needed touch the VOR button to enter find the desired airport 3 Touch the frequency button to dis...

Страница 158: ...sired airport 3 Touch the airport button to display the Waypoint Options Window 4 Touch the Airport Info Button to display the Airport Information Screen 5 Touch the Freqs Tab to display the Airport F...

Страница 159: ...quency button to display the Load Frequency Screen 4 Touch the location button to load the frequency to NAV1 2 Active Standby or Favorites Figure 4 25 Nearest VOR FSS Weather Tuning Frequency Button L...

Страница 160: ...he knob clockwise increases volume turning the knob counterclockwise decreases volume Sliding to the right increases volume sliding to the left decreases volume The volume can also be adjusted on the...

Страница 161: ...active frequency field The frequency that was previously in the NAV1 active frequency field is transferred to standby If the current CDI navigation source is FMS and if the approach frequency is alrea...

Страница 162: ...ciations Figure 4 28 The marker tone is silenced then waits for the next marker tone The flashing MUTE Button is also removed during audio muting The audio returns when the next marker beacon signal i...

Страница 163: ...y pairing is automatic and only the VHF NAV frequency is shown The following ADF DME information is displayed on the Touchscreen Controller Active and standby ADF frequencies ADF receiver mode ADF rec...

Страница 164: ...Touch the Enter Button to enter the new frequency as the ADF standby frequency or touch the XFER Button to enter the new frequency as the ADF standby frequency and transfer it to the active frequency...

Страница 165: ...Recent Nearest Dest Flight Plan or Favorite 6 Scroll the list to find the desired frequency 7 Touch the frequency button to enter the new frequency as the ADF standby frequency Figure 4 32 Finding an...

Страница 166: ...nts to the relative bearing of the NDB station and an audible tone confirms signal reception This mode allows identification of the interrupted carrier beacon stations used in various parts of the wor...

Страница 167: ...from the selected NAV1 frequency NAV2 Pairs the DME frequency from the selected NAV2 frequency HOLD When in the HOLD position the DME frequency remains paired with the last selected NAV frequency Fig...

Страница 168: ...t squitter is the transponder 24 bit identification address The transmission is sent periodically regardless of the presence of interrogations The purpose of acquisition squitter is to enable Mode S g...

Страница 169: ...A and Mode C replies but it does permit acquisition squitter and replies to discretely addressed Mode S interrogations ADSB OUT When Standby Mode has been selected on the ground the transponder can be...

Страница 170: ...s airborne Altitude Reporting Mode may also be selected manually by selecting the Altitude Reporting Button If Altitude Mode is selected a green ALT indication and transponder code appear in the Trans...

Страница 171: ...n the first digit of the existing code 3 Turn the small right knob to enter the first digit 4 Turn the large right knob to move the cursor to the next digit 5 Turn the small right knob to enter the ne...

Страница 172: ...the factory to 1200 If a VFR code change is required contact a Garmin authorized service center for configuration IDENT Function NOTE In Standby Mode the XPDR IDENT Button is inoperative Selecting the...

Страница 173: ...stereo headset hears audio in the left ear only Speaker All of the radios can be heard over the cabin speaker Pressing the Speaker Button selects and deselects the cabin speaker Speaker audio is muted...

Страница 174: ...he passengers and aircraft radios Each of the three link arrows are selected deselected by touching the arrow Figure 4 46 Intercom Controls Pilot Volume Button Pilot Copilot Link Arrow Pilot Passenger...

Страница 175: ...er Intercom Mode In Copilot Passenger mode the Pilot Copilot and Passengers hear the aircraft audio The Copilot and Passengers also hear each other Figure 4 48 Copilot Passenger Intercom Mode Pilot Co...

Страница 176: ...ES INDEX Pilot Passenger Intercom Mode In Pilot Passenger mode the Pilot Copilot and Passengers hear the aircraft audio The Pilot and Passengers also hear each other Figure 4 50 Pilot Passenger Interc...

Страница 177: ...ot Passenger mode the Pilot Copilot and Passengers hear the aircraft audio The Passengers hear the pilot copilot and each other Figure 4 52 Pilot Passenger Copilot Passenger Intercom Mode Pilot Passen...

Страница 178: ...t copilot and the passengers independently The selected intercom volume or squelch level can be adjusted from 0 to 100 on the touchscreen controller by turning the middle knob or by sliding your finge...

Страница 179: ...Copilot Volume or Passenger Volume button to display the Pilot Copilot or Passenger Intercom Settings Screen 3 Touch the Squelch Mode Button to turn off Auto Squelch 4 Adjust the squelch by using the...

Страница 180: ...present memory block has finished playing the Recorder Play Button is displayed again Touching the Recorder Stop Button during play of a memory block stops play If a COM input signal is detected durin...

Страница 181: ...Selecting deselecting simultaneous COM mode 1 Touch the Audio Radios Button to display the Audio Radios Screen 2 Touch the Copilot Tab 3 Touch the Sync to Pilot Button to disable enable synchronizing...

Страница 182: ...erent signals for left and right channels it requires wiring for stereo intercom and stereo headsets If 3D audio is activated when mono headsets are in use the listener will still hear all audio sourc...

Страница 183: ...osition 1 From Home touch Utilities Setup Avionics Settings to display the Avionics Settings Screen 2 Touch the Audio Tab 3 Touch the Copilot 3D Audio Enable Button to enable disable 3D audio for the...

Страница 184: ...cted Sync to Pilot does not synchronize the copilot or passenger settings for MUSIC 1 or MUSIC 2 mute and Clicks Figure 4 59 Entertainment Audio Control MUSIC1 Button MUSIC1 Volume Slider MUSIC2 Butto...

Страница 185: ...Copilot Tab or the Pass Tab If necessary also touch the Sync to Pilot Button to disable synchronizing selections to the pilot 3 Scroll the list to find MUSIC1 or MUSIC2 4 Touch the Mute Settings Butto...

Страница 186: ...Key becomes stuck the COM transmitter stops transmitting after 35 seconds of continuous operation An alert appears on the Touchscreen Controller to advise the pilot of a stuck microphone The MIC Butto...

Страница 187: ...emergency mode 1 Select the PFD Settings Softkey on the PFD 2 Select the Other PFD Settings Softkey on the PFD 3 Select the COM1 121 5 Softkey on the PFD to tune COM1 to the emergency frequency Figure...

Страница 188: ...t s Guide for the Cessna T240 174 Audio and CNS SYSTEM OVERVIEW FLIGHT INSTRUMENTS EIS AUDIO CNS FLIGHT MANAGEMENT HAZARD AVOIDANCE AFCS ADDITIONAL FEATURES APPENDICES INDEX Blank Page This manual dow...

Страница 189: ...Selecting the Inset Map Settings Softkey again then selecting the Off Softkey removes the Inset Map The Navigation Map displays aviation data e g airports VORs airways airspaces geographic data e g ci...

Страница 190: ...D Location of Direct To Window Flight Plan Window Procedures Window COM NAV Window Inset Map Navigation Status Bar Navigation Mode Current Track Indicator Figure 5 2 GPS Navigation Information on the...

Страница 191: ...escription Active Leg Right Holding Pattern Direct to Left Holding Pattern Right Procedure Turn Right DME Arc Left Procedure Turn Left DME Arc Vector to Final The MFD Data Bar located at the top of th...

Страница 192: ...Avionics Settings Screen 2 Touch the MFD Fields Tab to display the MFD Data Bar Field selection list 3 If necessary scroll through the data field list to find the desired field 4 Touch the MFD Data B...

Страница 193: ...g Flight plan legs User waypoints Track vector Topography scale Topography data Obstacle data The information in this section applies any displays that show the navigation map Map Settings Sync Map se...

Страница 194: ...ion is shown in the upper left corner of the map Figure 5 5 Map Orientation North up NORTH UP aligns the top of the navigation map to north Track up TRK UP aligns the top of the navigation map to the...

Страница 195: ...here are 28 different map ranges available from 250 feet to 1000 nm Range is indicated in the upper left quadrant of the range ring shown around the aircraft icon This indicated range is the range fro...

Страница 196: ...nimum and maximum look forward times set on the Touchscreen Controller Map Setup Screen These settings determine the minimum and maximum distance to display based upon the aircraft s ground speed Wayp...

Страница 197: ...n to enable disable auto zoom 4 Touch the Auto Zoom Settings Button to display the Auto Zoom Settings Screen 5 Touch the Auto Zoom Max Look Fwd Button to display the numeric keyboard 6 Use the keypad...

Страница 198: ...present position to any location on the navigation map When the Map Pointer function is selected by pressing the Joystick the Map Pointer flashes on the map display and the Map Pointer Options Screen...

Страница 199: ...n airport the name of the airport is highlighted even if the name was not originally displayed on the map When an airport is highlighted on the map display pertinent information is available by pressi...

Страница 200: ...t information screen 3 Press the Joystick to exit the waypoint information screen and remove the Map Pointer from the Navigation Map When the Map Pointer is placed on a NAVAID the name of the NAVAID i...

Страница 201: ...t the name of the User Waypoint is highlighted even if the name was not originally displayed on the map When a User Waypoint is highlighted on the map display pertinent information is available by pre...

Страница 202: ...e floor in feet MSL When an airspace is selected on the map display additional frequency information is also available by pressing the Airspace Info Button on the Touchscreen Controller Airspace Infor...

Страница 203: ...yed or removed as described in the following procedures Topo Scale Button Land Tab Topo Data Button Topo Data Settings Button Topo Data Button Navigation Map Black Background TOPO Off Figure 5 14 Navi...

Страница 204: ...ftkey to return to the top level softkeys The topographic data range is the maximum map range on which topographic data is displayed Note Since the PFD Inset Map is much smaller than the MFD navigatio...

Страница 205: ...he lower right hand side of the map showing a scale of the terrain elevation Figure 5 16 Navigation Map Topo Scale Displaying removing the topographic scale 1 From Home touch Map Map Settings 2 Touch...

Страница 206: ...tkey is also discussed Land Symbols The following items are configured on the Land Tab on the Map Options Screen Land Symbols Text label size can be None Small Medium or Large Symbol Default Range nm...

Страница 207: ...size can be None Small Medium or Large Symbol Default Range nm Maximum Range nm Low Altitude Airways 50 75 High Altitude Airways 50 75 Class B TMA 50 250 Class C TCA 50 75 Class D 10 25 Restricted 50...

Страница 208: ...iation Tab or Land Tab if necessary 3 Scroll the list to find the desired item 4 Touch the annunciator button to display remove the symbol type from navigation maps Figure 5 17 Map Settings Screen Ind...

Страница 209: ...tion Button Range Button Figure 5 18 Map Settings Screen Land Data Setup Range Selection Button Range Button Note Since the PFD Inset Map is much smaller than the navigation maps items are removed on...

Страница 210: ...oller and on the navigation map The PFD Inset Map detail level is shown on the Inset Map and the Detail Softkey Figure 5 19 Navigation Map Map Detail Detail Indicator Map Detail Slider Figure 5 20 Ins...

Страница 211: ...ter 2 Least NEXRAD X Lightning Data X Airports X Safe Taxi X Runway Labels X TFRs X Restricted X MOA Military X User Waypoints X X Latitude Longitude Grid X X NAVAIDs does not declutter if used to def...

Страница 212: ...airway number hence the name Victor Airways since they run primarily between VORs High Altitude Airways or Jet Routes primarily serve airliners jets turboprops and turbocharged piston aircraft operati...

Страница 213: ...itude Airways Button to display remove the high altitude airways Low Altitude Airways Button Figure 5 22 Map Options Screen Airways Setup Range Selection Button Range Button High Altitude Airways Butt...

Страница 214: ...0 degrees of a turn for the 30 and 60 second time settings It is always a straight line for the 2 min 5 min 10 min and 20 min settings Figure 5 23 Navigation Map Track Vector Track Vector Displaying r...

Страница 215: ...is displayed as a white arrow pointing in the direction in which the wind is moving for wind speeds greater than or equal to 1 kt Figure 5 25 Navigation Map Wind Vector Wind Vector Note The wind vecto...

Страница 216: ...eserve fuel remains the range is indicated by a solid yellow circle Figure 5 27 Navigation Map Fuel Range Ring Range to Reserve Fuel Time to Reserve Fuel Total Endurance Range Displaying removing the...

Страница 217: ...rcraft symbol on the map represent the forward viewing area shown on the PFD Figure 5 29 PFD and Navigation Map Field of View Comparison Lines Depict PFD Field of View SVT View on the PFD Field of Vie...

Страница 218: ...The location will be shown as a light blue arc when the aircraft is actually climbing or descending Figure 5 31 Navigation Map Selected Altitude Intercept Arc Selected Altitude Intercept Arc Displayi...

Страница 219: ...or usage Figure 5 33 Navigation Map Obstacles Obstacle Data Displayed when selected by the Pointer Obstacle Displaying removing obstacles 1 From Home touch Map Map Settings 2 Touch the Land Tab if nec...

Страница 220: ...efer to the Audio and CNS section for details Waypoints can be selected by entering the ICAO identifier entering the name of the facility or by entering the city name See the System Overview section f...

Страница 221: ...that may be involved in the flight plan For airports with multiple runways information for each runway is available See the Audio and CNS Section for more information on finding and tuning frequencies...

Страница 222: ...val ASOS ATIS AWOS Center Class B Class C Clearance Control CTA Departure Gate Ground Helicopter Multicom Other Pre Taxi Radar Ramp Terminal TMA Tower TRSA Unicom May include Additional Information NA...

Страница 223: ...Abatement Procedures Approach Facility Name Frequency Frequency Parameter Charts Low Altitude Chart Number Runway Headings Length Width Obstructions Surface Notes Airport Notes Obstructions General A...

Страница 224: ...a list of airports in the selected category 6 Touch an airport selection button to display the airport information on the Touchscreen Controller 7 Touch the Waypoint Options Button then the Show on Ma...

Страница 225: ...st Airport 2 Touch a nearest airport button to display the Waypoint Options Window and highlight the airport on the MFD 3 Touch the Airport Info Button to display the Airport Information Screen 4 Touc...

Страница 226: ...unway Surface Button 4 Touch the Nearest Airport Runway Surface Button to display the surface choices 5 Touch a surface selection button to set the surface criteria Nearest Airport Runway Surface Butt...

Страница 227: ...of the currently selected intersection and surrounding area and the Intersection Information Screen on the Touchscreen Controller allows the pilot to view intersection information Figure 5 46 Intersec...

Страница 228: ...est Flight Plan or Favorites Tab to display a list of intersections in the selected category 5 Touch an intersection selection button to display the intersection information on the Touchscreen Control...

Страница 229: ...ction Figure 5 49 Nearest Intersection Screen Nearest Intersection Buttons Identifier Symbol Nearest Intersection Information Bearing Distance Viewing information for a nearest intersection 1 From Hom...

Страница 230: ...Navigation Map Showing Selected NDB Selected NDB Figure 5 51 NDB Information Screen Selected NDB Button Identifier Name Symbol NDB Latitude Longitude Bearing Distance Waypoint Options Button Direct To...

Страница 231: ...or the City Name Button to display the keypad 7 Use the keypad to enter the name 8 Touch the Enter Button to accept the entry and display the search results 9 Touch an NDB selection button to display...

Страница 232: ...pane from the aircraft position to the selected nearest NDB Note The list only includes waypoints that are within 200 nm Figure 5 52 Nearest NDB Pane Navigation Map Showing Nearest NDB Nearest NDB Fig...

Страница 233: ...he VOR Information Pane displays a map of the currently selected VOR and surrounding area and the VOR Information Screen on the Touchscreen Controller allows the pilot to view VOR information Figure 5...

Страница 234: ...nt Options Button then the Show on Map Button to display the VOR Information pane if necessary Finding and selecting a VOR by category Recent Nearest Flight Plan or Favorites 1 From Home touch Waypoin...

Страница 235: ...Nearest VOR Screen Nearest VOR Buttons Identifier Name Symbol Nearest VOR Information Bearing Distance VOR Frequency Button Tune NAV1 2 Active Standby Frequency Add to Favorites Viewing information f...

Страница 236: ...aring distance from an existing waypoint bearings from two existing waypoints or latitude and longitude Once a waypoint has been created it can be renamed deleted or moved Temporary user waypoints are...

Страница 237: ...w On Map User Waypoint Definition Location Type RAD RAD Reference Waypoints Radials from Waypoints Latitude Longitude Bearing Distance from Aircraft Selecting a user waypoint 1 From Home touch Waypoin...

Страница 238: ...Waypoint Information pane if necessary Finding and selecting a user waypoint by category Recent Nearest Flight Plan or Favorites 1 From Home touch Waypoint Info User Waypoint 2 Touch the selected user...

Страница 239: ...in the following ways Creating user waypoints from the User Waypoint Information Screen 1 From Home touch Waypoint Info Create Waypoint The current aircraft position is the default location of the ne...

Страница 240: ...the keypad d Use the keypad and the Enter Button or the Find function to select the waypoint e Touch the corresponding RAD Button to display the keypad f Use the keypad and the Enter Button to select...

Страница 241: ...utton to accept the new user waypoint Creating user waypoints from map pages 1 Press the Joystick to activate the panning function and display the Map Pointer Options Screen on the Touchscreen Control...

Страница 242: ...the Save Button to accept the new comment 8 Touch the OK Button in response to the question Are you sure you want to modify this waypoint Editing a user waypoint name 1 From Home touch Waypoint Info...

Страница 243: ...oint selection button 3 Touch the Waypoint Options Button to display the Waypoint Options Window 4 Touch the Edit Button to display the Edit User Waypoint Screen 5 Touch the Type Button to display the...

Страница 244: ...rspace Class B Airspace Restricted Area Class C Airspace Alert Area ADIZ Warning Area TFR The Nearest Airspace Screen and the Message window on the Touchscreen Controller provide additional informatio...

Страница 245: ...or off 1 From Home touch Utilities Setup Avionics Settings 2 Touch the Alerts Tab to display the list of alert settings 3 Scroll the list if necessary 4 Touch the airspace alert enable button to enabl...

Страница 246: ...e 5 71 Nearest Airspace Screen Controlling Agency Airspace Info Button Airspace Name Type Frequency Tuning Button Proximity Ahead Inside Ahead 2nm Within 2nm Time till Intercept Only if Ahead or Ahead...

Страница 247: ...lowing airspace alerts are displayed in the message window Message Comments INSIDE ARSPC Inside airspace The aircraft is inside the airspace ARSPC AHEAD Airspace ahead less than 10 minutes Special use...

Страница 248: ...the current altitude to a selected altitude at the direct to waypoint Vertical navigation is based on barometric altitudes not on GPS altitude and is used for cruise and descent phases of flight The D...

Страница 249: ...one click to activate the editing cursor flashing 4 Turn the large and small PFD knobs to select the identifier large knob moves the cursor small knob selects the character 5 Press the ENT Key or the...

Страница 250: ...ecting a waypoint as the direct to destination by facility name or city name using the GDU Controller 1 On the GDU Controller press the Button to display the Direct To Window 2 Turn the large PFD Knob...

Страница 251: ...turn to the Direct To Screen 4 Touch the Activate Button to activate the direct to Figure 5 77 Direct To Screen Flight Plan Tab Flight Plan Tab Bearing Distance to Waypoint Waypoint Selection Button S...

Страница 252: ...the active flight plan can be selected as a direct to waypoint from the Active Flight Plan Window on the PFD Also any NRST RECENT or USER waypoint can be selected as a direct to waypoint from the Acti...

Страница 253: ...tivate the direct to Selecting a nearby airport as a direct to destination 1 From Home touch Nearest Airport 2 Touch a nearest airport button to display the Waypoint Options Window and highlight the a...

Страница 254: ...e keypad to select the course 4 Touch the Enter Button to accept the course and and return to the Direct To Screen 5 Touch the Activate Button to activate the direct to using the manually selected cou...

Страница 255: ...direct to waypoint The altitude is reached at the waypoint or at the specified distance along the flight path if an offset distance has been entered All VNAV altitudes prior to the direct to destinati...

Страница 256: ...large knob moves the cursor small knob selects the character 7 Press the ENT Key or the small PFD Knob to accept the selection and move the cursor to the CRS field 8 Turn the large PFD Knob to move th...

Страница 257: ...ght plans with an approach departure or arrival the system uses the waypoint information from the current database to define the waypoints If the database is changed or updated the system automaticall...

Страница 258: ...reen on the Touchscreen Controller create modify the active flight plan Flight Plan Catalog Screen on the Touchscreen Controller create modify a stored flight plan Flight Plan Window on the PFD create...

Страница 259: ...an Info Active Flight Plan Leg Active Flight Plan Leg The active flight plan is listed on the Active Flight Plan Screen on the Touchscreen Controller and in the Flight Plan Window on the PFD It is the...

Страница 260: ...displays the Waypoint Information Window with a waypoint selection submenu allowing selection of active flight plan nearest recent or user waypoints 4 Enter the identifier facility or city name of the...

Страница 261: ...choose the waypoint 6 Repeat step numbers 4 and 5 to enter each additional flight plan waypoint Flight plans can be imported from an SD Card or exported to an SD Card Importing a Flight Plan from an...

Страница 262: ...the SD card for storing the flight plan in the top card slot on the MFD 2 From Home touch Flight Plan Flight Plan Options 3 Touch the Catalog Button to display the Flight Plan Catalog Screen 4 Touch a...

Страница 263: ...ght Plan Selected Comment Procedure Identifier Waypoint Identifier Airway Identifier Flight Plan Segment Identifier Desired Track to Waypoint Distance to Waypoint Waypoint Altitude Constraint Enroute...

Страница 264: ...w 4 Touch the Edit Button to display the Edit Stored Flight Plan Screen 5 Scroll to the end of the list if necessary to show the Add Waypoint Button 6 Touch the Add Waypoint Button to display the keyp...

Страница 265: ...int and place it in the flight plan Adding a waypoint to the active flight plan using the GDU Controller 1 Press the FPL Key 2 Select the point in the flight plan before which to add the new waypoint...

Страница 266: ...splayed on the Touchscreen Controller When the pointer highlights a map location that can be added to the active flight plan the Insert In Flight Plan Button is activated 2 Touch the Insert In Flight...

Страница 267: ...lected waypoint and the flight plan Adding an airway to the active flight plan 1 From Home touch Flight Plan 2 Scroll the list if necessary and touch a waypoint selection button to display the Waypoin...

Страница 268: ...ICES INDEX Selected Airway Entry Point Figure 5 98 Adding an Airway to the Active Flight Plan Airway Selection Button Airway Exit Point Selection Button Airway Waypoint Sequence Load Airway Button Loa...

Страница 269: ...f necessary and touch an airway exit point selection button to select the airway exit point and display the Airway Waypoint Sequence 9 Touch the Load Airway Button to insert the airway into the stored...

Страница 270: ...at an airport approach See the procedures section for more details Figure 5 101 Edit Stored Flight Plan Screen Flight Plan Options Load Arrival Button Stored Flight Plan Waypoint List Stored Flight P...

Страница 271: ...y the Departure Selection Screen 7 Touch the Departure Button to display the Select Departure Screen with a list of available departures 8 Scroll the list if necessary and touch a departure selection...

Страница 272: ...ICES INDEX Figure 5 104 Edit Stored Flight Plan Screen Departure Inserted Inserted Departure Header Departure Identifier departure airport departure runway departure transition departure end point e g...

Страница 273: ...Screen Transition Button Runway Button Airport Button Load Button Arrival Button Arrival Waypoint Sequence Remove Button Preview Button Figure 5 107 Arrival Pane Preview of the Selected Arrival Desti...

Страница 274: ...sary and touch a transition selection button to select the transition and return to theArrival Selection Screen 11 Touch the Runway Button to display the Select Runway Screen with a list of available...

Страница 275: ...Activate Button Approach Button Approach Waypoint Sequence Remove Button Load Button Preview Button SBAS Channel Button Figure 5 111 Approach Pane Preview of the Selected Approach Destination Runway P...

Страница 276: ...ach is selected If the SBAS Button is not available touch the Approach Button to display the Select Approach Screen scroll to the bottom of the list touch the Select by SBAS Channel Button to display...

Страница 277: ...ht Plan Catalog Screen Viewing information about a stored flight plan 1 From Home touch Flight Plan Flight Plan Options 2 Touch the Catalog Button to display the Flight Plan Catalog Screen The flight...

Страница 278: ...ng a stored flight plan reverses the waypoint order erases the active flight plan and replaces it with the flight plan being activated the stored flight plan is not changed Activating a stored flight...

Страница 279: ...Flight Plan Individual flight plans can be deleted from the system memory Deleting a stored flight plan 1 From Home touch Flight Plan Flight Plan Options 2 Touch the Catalog Button to display the Flig...

Страница 280: ...ress the CLR Key The Remove waypoint name window is displayed 4 With OK highlighted press the ENT Key To cancel the request press the CLR Key or highlight CANCEL and press the ENT Key Removing an enti...

Страница 281: ...the Edit Button 5 Scroll the list if necessary and touch a waypoint selection button to display the Waypoint Options Window 6 Touch the Remove Waypoint Button 7 Touch the OK Button in response to Remo...

Страница 282: ...e click to activate the editing cursor flashing 4 Turn the large and small PFD knobs to select the comment large knob moves the cursor small knob selects the character 5 Press the ENT Key or the small...

Страница 283: ...fied once entered but the altitude can be modified If the along track offset distance must be changed the existing along track offset waypoint must be deleted and a new one created with the new offset...

Страница 284: ...e identifier Using direct to loading an approach a holding pattern or editing and activating the flight plan automatically cancels Parallel Track Parallel Track is also cancelled if a course change oc...

Страница 285: ...n from the current position on will not affect an approach Parallel Track Original Track If the parallel track proposed by the offset direction and distance is not allowed by the system the activation...

Страница 286: ...o cancel the parallel track function Figure 5 121 Parallel Track Screen Cancelling Parallel Track Cancel Parallel Track Button Parallel Track Status Activating a Flight Plan Leg The system allows sele...

Страница 287: ...Flight Plan Flight Plan Options 2 Touch the Invert Button 3 Touch the Yes Button in response to Invert active flight plan The active flight plan leg is inverted To cancel the request touch the No But...

Страница 288: ...s keeps the following three waypoints visible From waypoint To waypoint and the Next waypoint To prevent one or more of these waypoints from being hidden in a collapsed airway segment the airway segme...

Страница 289: ...waypoint 1 From Home touch Flight Plan Flight Plan Options 2 Touch the Closest Point of Flight Plan Button to display the Closest Point of Flight Plan Screen 3 Touch the From waypoint button to displa...

Страница 290: ...Button to select the course direction 6 Touch the Hold Entry Course Button to display the keypad Use the keypad and the Enter Button to select the entry angle 7 Touch the Leg Length Mode Button and to...

Страница 291: ...elect the entry angle 6 Touch the Leg Length Mode Button and touch the Distance Button or the Time Button to select the length mode 7 Touch the Leg Time Button or the Leg Distance Button to display th...

Страница 292: ...h the Leg Length Mode Button and touch the Distance Button or the Time Button to select the length mode 8 Touch the Leg Time Button or the Leg Distance Button to display the keypad Use the keypad and...

Страница 293: ...ove Holding Pattern The holding pattern is removed To cancel the request touch the Cancel Button Figure 5 130 Removing a User Defined Holding Pattern Remove Hold Button Removing a user defined hold at...

Страница 294: ...ce are supported Note Making course changes greater than 90 during a descent with vertical guidance may cause excessive and rapid movement of the vertical deviation indicator and SVS Pathways The syst...

Страница 295: ...abling Disabling VNAV guidance 1 From Home touch Flight Plan VNAV 2 Touch the VNAV Enabled Button to enable disable vertical navigation Canceling vertical navigation results in vertical deviation V DE...

Страница 296: ...bypass flight plan waypoints between the current position in the flight plan and the direct to waypoint A top of descent TOD point is computed based on the default flight path angle descent begins onc...

Страница 297: ...Flight Plan Pane VNAV Direct To Active Current Vertical Navigation Profile After VNAV Direct To The vertical navigation profile can be modified by directly entering a vertical speed target VS TGT and...

Страница 298: ...navigation database The altitude is provided as a reference and is not designated to be used in determining vertical speed and deviation guidance Altitude is designated for use in giving vertical spe...

Страница 299: ...FAF When a database altitude restriction of type AT or ABOVE or AT or BELOW is activated the system uses the AT portion of the restriction to define the vertical profile An altitude constraint is inv...

Страница 300: ...in white indicating it is not usable for vertical guidance To cancel the request touch the Cancel Button Figure 5 141 Active Flight Plan Screen Deleting Altitude Constraints Manually Entered Constrain...

Страница 301: ...e choice to either Load or Load Activate is given Loading adds the approach to the end of the flight plan without immediately using it for navigation guidance This allows continued navigation via the...

Страница 302: ...to display the Select Departure Screen with a list of available departures 6 Scroll the list if necessary and touch a departure selection button to select the departure 7 If necessary touch the Transi...

Страница 303: ...Loading a departure into the active flight plan using the GDU Controller 1 Press the PROC Key The Procedures Window is displayed 2 Highlight SELECT DEPARTURE 3 Press the ENT Key or the small PFD Knob...

Страница 304: ...7 Repeat steps 4 6 as necessary Removing a Departure from the Active Flight Plan When plans change while flying IFR departures can be easily removed from the Active Flight Plan Removing a departure f...

Страница 305: ...touch the Airport Button to display the keypad and use it to select the arrival airport 4 Touch the Enter Button to accept the arrival airport 5 If necessary touch the Arrival Button to display the S...

Страница 306: ...Loading an arrival into the active flight plan using the GDU Controller 1 Press the PROC Key The Procedures Window is displayed 2 Highlight SELECT ARRIVAL 3 Press the ENT Key or the small PFD Knob The...

Страница 307: ...rocedure 7 Repeat steps 4 6 as necessary Removing an Arrival from the Active Flight Plan When plans change while flying IFR arrivals can be easily removed from the Active Flight Plan Removing an arriv...

Страница 308: ...can be flown using the GPS receiver Some procedures do not have this designation meaning the GPS receiver can be used for supplemental navigation guidance only If the GPS receiver cannot be used for...

Страница 309: ...t the SBAS channel number b Touch the Enter Button to accept the SBAS channel and return to the Approach Selection Screen with the airport and approach selected 4 If necessary touch the Transition But...

Страница 310: ...ENT Key or the small PFD Knob 5 Select an approach from the list and press the ENT Key or the small PFD Knob 6 Select a transition if required and press the ENT Key or the small PFD Knob 7 To set the...

Страница 311: ...ion Selection Button Figure 5 147 Loading an Approach into the Active Flight Plan Approach Sequence Loaded Approach Load Button Approach Selection Button Airport Button Mininums Button Approach Button...

Страница 312: ...ach selection button The Approach Selection Screen is displayed on the Touchscreen Controller for the selected approach 5 Touch the Preview Button then the Show on Map Button to show the preview of th...

Страница 313: ...149 Activating an Approach on the Touchscreen Controller and on the PFD ACTIVATE APPROACH Selected Activate Approach Button Touchscreen Controller Procedures Screen PFD Procedures Window In many case...

Страница 314: ...from the active flight plan To cancel the request touch the No Button Removing an approach from the active flight plan using the GDU Controller 1 Press the FPL Key to display the Active Flight Plan Wi...

Страница 315: ...ture compensated altitude is displayed with a snowflake icon Enabling temperature compensated altitude 1 From Home touch Flight Plan Flight Plan Options 2 Touch the Temp Compensation Button to display...

Страница 316: ...After reaching 1 426 feet a direct to is established to the published MAHP in this case LYMES If the aircraft altitude is above the specified altitude after crossing the MAP a direct to is establishe...

Страница 317: ...Calibrated Airspeed Indicated Altitude Barometric Pressure Total Air Temperature Manual Entry Button Selected Route Segment Figure 5 155 Trip Planning Pane Trip Statistics Desired Track Distance Esti...

Страница 318: ...e leg Some of the calculated trip statistics are dashed when the selected leg of the active flight plan has already been flown Desired Track DTK DTK is shown as nnn and is the desired track between th...

Страница 319: ...alculated by multiplying the time to go by the fuel flow Total range at entered fuel flow TOTAL RANGE This value is calculated by multiplying the time of fuel endurance by the ground speed Other Stati...

Страница 320: ...s trip route mode 1 From Home touch Utilities Trip Planning 2 Touch the Trip Route Button to display the Input Selection Window 3 Touch the Select Starting and EndingWaypoints Button to display the Se...

Страница 321: ...urrent The example is a flight plan from KMKC to KCOS filed using the TIFTO2 departure various Victor Airways and the DBRY1 arrival with the transition at TBE The flight plan includes an enroute altit...

Страница 322: ...ns routing to joinV4 A heading of 290 is assigned to interceptV4 The aircraft turns to heading 290 as seen in Figure 5 157 Figure 5 157 Assigned Heading of 290 4 Enter V4 into the flight plan a From H...

Страница 323: ...e entered Touch the desired waypoint selection button SLN shown in Figure 5 159 to display the Waypoint Options Window Figure 5 159 Selecting the Insertion Point c Touch the Insert Before Button shown...

Страница 324: ...OP is inserted into the flight plan as in Figure 5 162 Figure 5 162 TOP Inserted into the Flight Plan f Touch the desired waypoint selection button TOP to display the Waypoint Options Window Figure 5...

Страница 325: ...and to display the list of available exit points for V4 Scroll the list to find SLN Figure 5 165 Figure 5 165 List of Available Exits for V4 h Touch the SLN Button to select the Salina VOR SLN The se...

Страница 326: ...V4 the active leg of the flight plan a Touch the ULNAZ Button to display the Waypoint Options Window as shown in Figure 5 168 Figure 5 168 Activating V4 Leg b Touch the Activate Leg to Waypoint Button...

Страница 327: ...plan leg Note the phase of flight remained in Terminal TERM mode up to this point because a departure leg was active Since a leg after the departure is now active the current CDI flight phase is ENR E...

Страница 328: ...ADDITIONAL FEATURES APPENDICES INDEX 7 As the CDI approaches center the aircraft turns onto the active leg as seen in Figure 5 172 Figure 5 172 Turn on to Active Leg 8 At SLN Victor Airway 244 V244 is...

Страница 329: ...e active flight plan leg Figure 5 174 V244 Now Active Leg 10 At Lamar VOR LAA V263 is intercepted See Figure 5 175 Figure 5 175 WIZGE to LAA Leg Active 11 ATC grants clearance to proceed direct to the...

Страница 330: ...e 5 176 Direct To OPSHN d Touch the VNAV Altitude Button to display the keypad to select the VNAV altitude as shown in Figure 5 177 Figure 5 177 Enter VNAV Altitude e An altitude of 10 000 feet is sel...

Страница 331: ...indicating the direct to OPSHN after the offset waypoint for OPSHN The preceding offset waypoint indicates the offset distance and altitude that were previously entered The remaining waypoints in the...

Страница 332: ...proach Selection Screen with KCOS selected as the destination airport as shown in Figure 5 181 Figure 5 181 Approach Selection Screen c Touch the Approach Button A list of available approaches for the...

Страница 333: ...cted approach is displayed as in Figure 5 184 Figure 5 184 Select Transition Screen List of Available Transitions f Touch the HABUK iaf Button to select it as the transition and return to theApproach...

Страница 334: ...DANCE AFCS ADDITIONAL FEATURES APPENDICES INDEX h Touch the Enter Button to accept the minimum descent altitude and return to the Approach Selection Screen Figure 5 187 Figure 5 187 Minimums Set i Tou...

Страница 335: ...ayed altitude for calculating vertical deviation guidance perform the following a Touch the FALUR altitude button e g 8100FT b Touch the Enter Button After making the altitude designated it is display...

Страница 336: ...een as shown in Figure 5 191 b Touch the Vertical Speed Target Button to adjust the vertical speed or touch the Flight Path Angle Button to adjust the FPA Touching either button will display the keypa...

Страница 337: ...ch the selected altitude The Vertical Deviation Indicator VDI and the Required Vertical Speed Indicator RVSI are now displayed on the PFD as shown in Figure 5 194 When the aircraft is within one minut...

Страница 338: ...line with the RVSI as shown in Figure 5 195 Figure 5 195 VDI RVSI Showing Correctly Established Descent Align Actual Vertical Speed with Required Vertical Speed Keep Vertical Deviation Indicator Cente...

Страница 339: ...NDICES INDEX 18 The aircraft is approaching OPSHN The upcoming turn and next heading are annunciated at the top left of the PFD as seen in Figure 5 197 Initiate the turn and maneuver the aircraft on a...

Страница 340: ...the arrival procedure is now active Figure 5 198 Tracking the OPSHN to FSHER Leg 20 The flight continues through the arrival procedure to FSHER see Figure 5 199 At a point 31 nm from the destination...

Страница 341: ...es to LPV on the HSI indicating the current phase of flight is in Approach Mode and the approach type is LPV CDI scaling changes accordingly and is used much like a localizer when flying an ILS approa...

Страница 342: ...t is required to manually activate the approach procedure perform the following steps a From Home touch PROC b Touch the Activate Approach Button see Figure 5 200 22 After crossing CEGIX the aircraft...

Страница 343: ...ecute a missed approach Automatic waypoint sequencing is suspended past the MAP Select the SUSP Softkey on the PFD to resume automatic waypoint sequencing through the missed approach procedure A direc...

Страница 344: ...RES APPENDICES INDEX 24 The aircraft continues climbing to AT or ABOVE 9 000 feet at ADANE A holding pattern is established at the MAHP ADANE as shown in Figure 5 204 Figure 5 204 Establishing the Hol...

Страница 345: ...ition information displayed by the system through DR while there is no heading and or airspeed data available should not be used for navigation DR Mode is inherently less accurate than the standard GP...

Страница 346: ...GPS Derived Data Shown in Yellow Distance Bearing Navigation Data Bar All data except Active Leg TAS and DTK are in yellow Dead Reckoning Annunciaion Bearing Pointer Distance Current Track Indicator...

Страница 347: ...reness and provide advisory information with regard to potential hazards to flight safety associated with weather terrain and air traffic Weather Garmin GDL 69A SiriusXM Weather Subscription Optional...

Страница 348: ...udio Radio IDs must be provided to activate the weather service and entertainment subscriptions respectively These IDs are in the following locations The SiriusXM Info Screen on the Touchscreen Contro...

Страница 349: ...r to Activation Service Class of SiriusXM Weather Subscription Accessing SiriusXM Weather Products The SiriusXM Weather Pane is the principal map pane for viewing SirusXM Weather information Figure 6...

Страница 350: ...her Settings Screen View the Legends for Enabled Weather Products Dashes Indicate Weather Product Expired The map orientation of the SiriusXM Weather Pane is pilot selectable and is independent for ea...

Страница 351: ...XM Weather service broadcasts weather products at specific intervals defined in the Broadcast Rate column in Table 6 1 If for any reason a product is not broadcast within the Expiration Time intervals...

Страница 352: ...torm Cell Movement 30 12 SIGMETs 60 12 AIRMETs 60 12 Meteorological Aerodrome Reports METARs 90 12 City Forecast 90 12 Surface Analysis 60 12 Freezing Levels 120 12 Winds Aloft 90 12 County Warnings 6...

Страница 353: ...is Freezing Levels Winds Aloft County Warnings Cyclone Hurricane Warnings Icing Potential CIP and SLD PIREPs AIREPs Turbulence TFRs Table 6 2 Weather Product Display Maps Softkeys control which weathe...

Страница 354: ...uding the PFD Inset Navigation Map Selecting a data link weather source Note Available if the GSR 56 Garmin Connext Weather service is also installed 1 From Home touch Map Map Settings 2 If necessary...

Страница 355: ...e display settings for the corresponding weather products shown in Table 6 3 will result in identical settings for a comparable weather product from another service provider SiriusXM Weather Product G...

Страница 356: ...e Weather Legends Window then touch Back or Home The system displays additional information about the following weather products by panning over the product on the map with the map pointer Echo Tops S...

Страница 357: ...dual NEXRAD sites supply the network with radar images and the images from each site may arrive at the network at different rates and times Periodically the weather data provider compiles the availabl...

Страница 358: ...t USA or Canada a Touch the NEXRAD Data Coverage Button b Touch either the USA or Canada Button to select radar information from the selected region 5 When finished changing NEXRAD settings for the Na...

Страница 359: ...e to reflectivity Z NEXRAD measures the radar reflectivity ratio or the energy reflected back to the radar receiver designated by the letter Z The value of Z increases as the returned signal strength...

Страница 360: ...ing Disabling Echo Tops information 1 From Home touch Weather Weather Selection SiriusXM Weather SiriusXM Settings 2 Touch the Echo Tops Button in the Background Window Touch the Legend Button on the...

Страница 361: ...the Cloud Tops background is enabled the system disables Echo Tops data Figure 6 9 Cloud Tops Weather Product Cloud Top Selected with Map Pointer Altitude for Selected Cloud Top Enabling Disabling Clo...

Страница 362: ...eather Pane 1 From Home touch Weather Weather Selection SiriusXM Weather SiriusXM Settings 2 Touch the Lightning Button in the Overlays Window Touch the Legend Button on the SiriusXM Weather Settings...

Страница 363: ...e 6 13 Storm Cell Movement Weather Product Storm Cells Selected with Map Pointer Additional Information for Selected Storm Cell Enabling Disabling Storm Cell Movement Information SiriusXM Weather Pane...

Страница 364: ...significant weather condition occurring at a localized geographical position Figure 6 15 AIRMET and SIGMET Weather Products Convective SIGMET selected with Map Pointer Enabling Disabling AIRMET and SI...

Страница 365: ...s of mercury in Hg Temperatures are reported in Celsius Note METAR information is only displayed within the installed navigation database service area METARs METeorological Aerodrome Reports describe...

Страница 366: ...and move the map pointer with the Joystick over a METAR reporting station Touch the Legend Button on the SiriusXM Weather Settings Screen to display weather legend s for weather product s enabled on...

Страница 367: ...the installed Aviation Database service area The Surface Analysis and City Forecast weather products are available for current and forecast weather conditions Forecasts are available for intervals of...

Страница 368: ...altitude and location at which the first isotherm is found Figure 6 23 When no data is displayed for a given altitude the data for that altitude has not been received or is out of date and has been r...

Страница 369: ...ct SiriusXM Weather Pane 1 From Home touch Weather Weather Selection SiriusXM Weather SiriusXM Settings 2 Scroll as needed in the Overlays window and touch the Winds Aloft Button 3 To change the selec...

Страница 370: ...e 6 26 Winds Aloft Data with Legend Headwind and tailwind components aloft are available inside the Profile View Inset Window on the Navigation Map Pane Figure 6 27 The displayed components are relati...

Страница 371: ...essary touch the Inset Window Tab 3 Touch the Profile View Button to enable disable the profile view inset window If the winds aloft weather product icon does not appear in the inset window continue w...

Страница 372: ...ying County Warning information 1 From Home touch Weather Weather Selection SiriusXM Weather SiriusXM Settings 2 Scroll as needed in the Overlays window and touch the County Warnings Button 3 To view...

Страница 373: ...cted track information in the form of DD HH MM Figure 6 31 Cyclone Hurricane Weather Product Cyclone Enabling Disabling cyclone hurricane weather product 1 From Home touch Weather Weather Selection Si...

Страница 374: ...arge Droplet SLD icing conditions are characterized by the presence of relatively large super cooled water droplets indicative of freezing drizzle and freezing rain aloft SLD threat areas are depicted...

Страница 375: ...ulence Note The Turbulence weather product cannot be displayed at the same time as NEXRAD weather product The Turbulence weather product Figure 6 36 identifies the potential for erratic movement of hi...

Страница 376: ...ted Turbulence Altitude SiriusXM Weather Settings Screen Touch to Enable Disable Overlay Selects Turbulence Altitude 21 000 FT Currently Selected Figure 6 37 Displaying the Turbulence Weather Products...

Страница 377: ...t AIREP AIREPs are used almost exclusively by commercial airlines Figure 6 39 AIREPs and PIREPs on the SiriusXM Weather Pane Urgent PIREP Selected with Map Pointer PIREP AIREP Displaying PIREP or AIRE...

Страница 378: ...Stations orAirTraffic Control The Federal Aviation Administration FAA issues TFRs to designate areas where flight is restricted TFRs are issued to restrict flight for a variety of reasons including na...

Страница 379: ...utters TFR information from the selected Display Pane Maps other than the Navigation Map Pane use settings based on those selected on the Map Settings Screen Setting up and customizing TFR data for ma...

Страница 380: ...D AVOIDANCE AFCS ADDITIONAL FEATURES APPENDICES INDEX Select Off to remove TFR information from Navigation Maps Select the Maximum map range for system to show TFRs on Navigation Maps Touch to change...

Страница 381: ...ata request to the Garmin Connext Weather service using the Touchscreen Controller In order to receive Connext Weather data an account must first be established with Garmin Connext services Refer to S...

Страница 382: ...ble and is independent for each display pane area If desired the system can also synchronize the Connext Weather Pane orientation to the orientation of the Navigation Map Pane Selecting a map orientat...

Страница 383: ...t Weather Settings Screen on the Touchscreen Controller Figure 6 46 Connext Weather Pane with Winds Aloft Enabled Weather Product Icon Weather Product Age Touch to mange Connext Data Requests and to s...

Страница 384: ...ta is considered expired and is removed from the display The age of the expired product is replaced by dashes If more than half of the expiration time has elapsed the color of the product age changes...

Страница 385: ...15 Infrared Satellite IR SAT 60 30 Data Link Lightning DL LTNG 30 Continuous SIGMETs AIRMETs SIG AIR 60 Continuous Meteorological Aerodrome Report METARs 90 Continuous Winds Aloft WIND 60 Continuous P...

Страница 386: ...reen enabled The Map Settings Screen on the Touchscreen Controller controls the maximum map range at which the system displays a weather product on a map selecting a map range higher than this range w...

Страница 387: ...e 6 7 will result in identical settings for a comparable weather product from another service provider SiriusXM Weather Product Garmin Connext Weather Product Next generation Radar NEXRAD Radar Cloud...

Страница 388: ...her Legends Window 4 To remove the Weather Legends window touch the Back or Home Buttons The system displays additional information about the following weather products by panning over the product on...

Страница 389: ...age Area 1 From Home touch Weather Weather Selection Connext Weather Connext Settings 2 Touch the Define Coverage Button 3 To change the diameter and route width of the weather data request coverage a...

Страница 390: ...ther minutes or seconds Connext Data Requests typically take between one to four minutes to complete depending on the size of the weather request coverage area the amount weather activity present and...

Страница 391: ...EIS AUDIO CNS FLIGHT MANAGEMENT HAZARD AVOIDANCE AFCS ADDITIONAL FEATURES APPENDICES INDEX Present Position Selected 200 nm Diameter Requested Destination Selected 200 nm Diameter Requested Figure 6 5...

Страница 392: ...automatically Automatic requests remain enabled until the pilot disables them or the system power is cycled The Data Request window will indicate a countdown timer until the next automatic weather dat...

Страница 393: ...on Map 2 If necessary press the Inset Map Settings Softkey to display the PFD Inset Navigation Map 3 Press the Connext Radar Softkey to enable or disable the weather product 4 Press the Back Softkey t...

Страница 394: ...ply put certain types of weather reflect radar better than others The intensity of a radar reflection is not necessarily an indication of the weather hazard level For instance wet hail returns a stron...

Страница 395: ...lterations in radar scans Cloud Tops Cloud Tops data Figure 6 57 depicts cloud top temperatures from satellite imagery Brighter cloud top colors indicate cooler temperatures occurring at higher altitu...

Страница 396: ...on the Connext Weather Pane Lightning Strikes Displaying Connext Lightning information Connext Weather Pane 1 From Home touch Weather Weather Selection Connext Weather Connext Settings 2 Touch the Lig...

Страница 397: ...ane Turbulence AIRMET Selected with Map Pointer Enabling Disabling SIGMETs and AIRMETs Connext Weather Pane 1 From Home touch Weather Weather Selection Connext Weather Connext Settings 2 Scroll in the...

Страница 398: ...s lightning and other critical data METARs reflect hourly observations non routine updates include the code SPECI in the report METARs are shown as colored flags at airports that provide them Figure 6...

Страница 399: ...Connext Weather Pane Scroll as necessary to view the information then touch Back or Home Figure 6 65 METAR Legend Winds Aloft The Winds Aloft weather product Figure 6 66 shows the predicted wind spee...

Страница 400: ...uch to Enable Disable Winds Aloft Overlay Selected Winds Aloft Altitude Connext Weather Settings Screen Figure 6 66 Displaying Winds Aloft Forecast Winds Aloft Data Age To display the Winds Aloft lege...

Страница 401: ...to current aircraft altitude and track but not to aircraft speed Winds Aloft Product Age Wind Component Velocity and Direction Arrows Altitude Scale Distance Scale Figure 6 68 Profile View Inset Wind...

Страница 402: ...4 Touch the Profile View Settings Button 5 Touch the Profile Winds Button When enabled the system displays the winds aloft weather product inside the profile view inset window Enables Disables Profil...

Страница 403: ...enabled on the Connext Weather Pane Scroll as needed to view the legend information then touch Back or Home Figure 6 72 AIREPs PIREPs Legend Temporary Flight Restrictions TFRs NOTE Do not rely solely...

Страница 404: ...text push the Joystick to activate the map pointer and move the pointer with the Joystick until the selected TFR border is highlighted then touch view the TFR near the pointer 4 When finished push the...

Страница 405: ...s group Enabling Disabling all airspace settings including TFRs 1 From Home touch Map Map Settings 2 If necessary touch the Aviation tab 3 Touch the Airspaces button to enable disable the display of T...

Страница 406: ...ext Comm Error 8 A server error has occurred or invalid data received Connext Login Invalid There is a problem with the Garmin Connext registration Contact Garmin Connext at 1 866 739 5687 in the Unit...

Страница 407: ...nformation about the system its capabilities and limitations NOTE Information from an on board lightning detection system cannot be displayed simultaneously with data link lightning information on the...

Страница 408: ...e Stormscope Pane is the principal map pane for viewing Stormscope lightning information The Stormscope Pane map orientation is always heading up unless there is no valid heading Stormscope Mode Strik...

Страница 409: ...m on the StormscopePane Selecting a Stormscope mode for the Stormscope Pane 1 From Home touch Weather Weather Selection Stormscope Stormscope Settings 2 Touch either the Cell Button or the Strike Butt...

Страница 410: ...Stormscope Information for the Navigation Map Pane Stormscope Lightning Enabled Selecting a Stormscope mode for the Navigation Map Pane 1 From Home touch Map Map Settings 2 If necessary touch the Sens...

Страница 411: ...Navigation Map Pane 1 From Home touch Map Map Settings 2 If necessary touch the Sensor Tab 3 Scroll as needed and touch the Stormscope Lightning Settings Button 4 Touch the Map Settings Button 5 Touc...

Страница 412: ...ch the Relative Terrain Button The system shows relative terrain information in the Profile View Inset Window and on the selected Navigation Map Pane Profile View Display When the Profile View is enab...

Страница 413: ...ased on the current aircraft track or heading if track is unavailable and shows the highest known terrain or obstacles within a predetermined width from the present aircraft position to the end of the...

Страница 414: ...range is at least 4 nm or 7 5 km if configured for metric units The Profile Path rectangle may be selected on or off In addition the maximum map range to display the Profile Path is selectable Customi...

Страница 415: ...splays are the same TAWS uses more sophisticated algorithms to assess aircraft distance from terrain and obstacles and provides additional alerts Terrain SVT does not provide the following Premature D...

Страница 416: ...urate baro corrected altitude can be achieved by frequently updating the altimeter setting to the nearest reporting station along the flight path However because actual atmospheric conditions seldom m...

Страница 417: ...m Home touch Map Map Settings 2 If necessary touch the Land Tab 3 Touch the Obstacle Data Button to enable disable obstacle data The system can overlay terrain and obstacle data on the PFD Inset Navig...

Страница 418: ...be displayed when the Navigation Map range is larger than the Map Options range setting for Terrain Data and Obstacle Data Selecting the maximum navigation map range for terrain information 1 From Hom...

Страница 419: ...ne Yellow Terrain Between 100 and 1000 Below the Aircraft Altitude Terrain Legend Map Orientation Current Aircraft GPS derived GSL Altitude Red Terrain Above or Within 100 Below the Aircraft Altitude...

Страница 420: ...T Display on the MFD and on the Touchscreen Controller The Terrain SVT Alert Annunciation is shown to the upper left of the Altimeter on the PFD and on the lower left of the Terrain SVT Display on the...

Страница 421: ...oking Terrain Avoidance FLTA feature of Terrain SVT compares the aircraft s projected flight path with known terrain and obstacles in their respective databases and issues four types of alerts as eith...

Страница 422: ...87 FLTA Alert Minimum Terrain and Obstacle Clearance Values Distance From Runway NM Required Clearance FT The system automatically inhibits FLTA alerts when the aircraft is less than 200 feet above th...

Страница 423: ...rain SVT alerting 1 From Home touch Terrain SVT Terrain SVT Settings 2 Touch the Terrain Inhibit Button When the annunciator on the button is green Terrain SVT alerting is inhibited When the annunciat...

Страница 424: ...3 D GPS navigation solution along with specific vertical accuracy minimums Should the navigation solution become degraded or if the aircraft is out of the database coverage area the system generates...

Страница 425: ...altitude is derived from satellite measurements GPS altitude is then converted to the height above geodetic sea level GSL which is the height above mean sea level MSL calculated geometrically The sys...

Страница 426: ...e changes The colors and symbols in Figure 6 89 and Tables 6 16 and 6 17 represent terrain obstacles and potential impact points Figure 6 89 Terrain Altitude Color Correlation for TAWS Unlighted Obsta...

Страница 427: ...terrain display is enabled and gray when terrain is disabled When the pilot enables TAWS information on maps other than the TAWS Pane an icon indicates the feature is enabled for display A legend for...

Страница 428: ...necessary and touch a range button to select the maximum map range for the system to show obstacle information TAWS Pane The TAWS Pane shows terrain obstacle and potential impact point information in...

Страница 429: ...trols TAWS Pane TAWS Alerting Inhibited Selected The TAWS Pane also displays Runway Extensions at the next airport in the Active Flight Plan when Runway Extensions are enabled on the Map Settings Scre...

Страница 430: ...is displayed an annunciation appears in the lower left corner of the pane In addition a pop up alert appears on the Touchscreen Controller To acknowledge the pop up alert Touch the TAWS Button displa...

Страница 431: ...ll Up ObstacleAhead Pull Up Excessive Descent RateWarning EDR Pull Up Reduced RequiredTerrain Clearance Caution RTC or Caution Terrain Caution Terrain or TerrainAhead TerrainAhead ImminentTerrain Impa...

Страница 432: ...ht path is a calculated area ahead of to the sides and below the aircraft The size of the projected flight path varies based on factors including ground speed the path ahead is larger when the ground...

Страница 433: ...ed Terrain Clearance FT FLTA alerts are automatically disabled when the aircraft is less than 200 feet above the destination runway elevation while within 0 5 nm of the approach runway or the aircraft...

Страница 434: ...inhibited the system displays the TAWS INH status annunciation on the PFD and on the TAWS Pane TAWS Alerting Inhibited Annunciation PFD Figure 6 97 Inhibiting TAWS FLTA and PDA Alerting TAWS Alerting...

Страница 435: ...or has failed the system may display a LOW ALT annunciation if the following conditions are met The aircraft is on a GBAS SBAS approach The Final Approach Fix is the active waypoint The aircraft is a...

Страница 436: ...ng conditions are met Height above the terrain is less than 700 feet Distance from the departure airport is 5 nm or less Heading change from the departure heading is less than 110 degrees NCR alerts c...

Страница 437: ...ert TAWS System Fail TAWS FAIL TAWS System Failure System Test in progress TAWS TEST None System Test pass None None TAWS System Test OK Table 6 19 TAWS System Test Status Annunciations Manually testi...

Страница 438: ...able or invalid on all GDUs software mismatch among GDUs TAWS audio fault TAWS FAIL TAWS System Failure MFD Terrain or Obstacle database unavailable or invalid TAWS operating with PFD Terrain or Obsta...

Страница 439: ...n the system is in Operating Mode the traffic system interrogates the transponders of other aircraft in the vicinity while monitoring for transponder replies The system uses this information to derive...

Страница 440: ...bology A Traffic Advisory TA displayed as a yellow circle or triangle alerts the crew to a potentially hazardous intruding aircraft if the closing rate distance and vertical separation meet TA criteri...

Страница 441: ...n this is displayed as a vector line extending beyond the traffic symbol in the direction of the track Figure 6 102 Vector Line indicates intruder aircraft track Figure 6 102 Intruder Traffic with ADS...

Страница 442: ...below 400 AGL When the traffic system detects a new TA the following occur The system issues a single Traffic voice alert followed by additional voice information about the bearing relative altitude...

Страница 443: ...System 1 From Home touch Traffic Traffic Settings 2 If the traffic system is in Operating Mode Operate Button annunciator is green touch the Standby Button 2 Turn the Joystick as necessary to set the...

Страница 444: ...n Button annunciator is green while test is in progress If system test is successful the system provides the aural announcement TAS System Test Passed and the traffic system returns to the previously...

Страница 445: ...Mode Traffic MAP Pane The Traffic Map Pane shows surrounding traffic data in relation to the aircraft s current position and altitude without basemap clutter It is the principal map pane for viewing t...

Страница 446: ...owing Altitude Mode Range Buttons Unrestricted All traffic is displayed from 9900 feet above and 9900 feet below the aircraft Above Displays non threat and proximity traffic from 9000 feet above the a...

Страница 447: ...ove Level Displaying the Traffic Inset Map on the PFD FULL Mode PFD Press the Traffic Inset Softkey to show or hide the PFD Traffic Inset Map Enabling disabling traffic information on the PFD Inset Na...

Страница 448: ...ouch the Back or Home System Status The traffic mode appears in the upper right corner of the Traffic Map Pane Mode Traffic Mode Annunciation Traffic Map Pane Traffic Display Status Icon Other Maps TA...

Страница 449: ...range Annunciation is removed when traffic comes within the selected display range TA X X XX UP or DN System cannot determine bearing of Traffic Advisory Annunciation indicates distance in nm altitud...

Страница 450: ...ssna T240 190 01263 01 Rev A 436 Hazard Avoidance SYSTEM OVERVIEW FLIGHT INSTRUMENTS EIS AUDIO CNS FLIGHT MANAGEMENT HAZARD AVOIDANCE AFCS ADDITIONAL FEATURES APPENDICES INDEX Blank Page This manual d...

Страница 451: ...D GDU 1400W Multi Function Display MFD GIA 63W Integrated Avionics Units 2 GMC 720 AFCS Control Unit 1 GSA 81 AFCS Servos 2 GTA 82 Pitch Trim Adapter 1 GSM 86 Servo Mounts 2 The GFC 700 AFCS can be di...

Страница 452: ...usly on In this case PIT and ROL will be annunciated Autopilot Engagement with Flight Director On If the flight director is on the autopilot will smoothly pitch and roll the airplane to capture the FD...

Страница 453: ...ted Heading to the current heading 8 BC Key Selects deselects Backcourse Mode 9 CRS Knob Adjusts the Selected Course while in VOR LOC or OBS Mode in 1 increments on the Horizontal Situation Indicator...

Страница 454: ...t director s Command Bars with the current aircraft pitch if not in Glideslope Mode and roll if in Roll Hold Mode Upon release of the CWS Button the flight director may establish new reference points...

Страница 455: ...he FD Key again The FD Key is disabled when the autopilot is engaged Control Pressed Modes Selected Lateral Vertical FD Key Roll Hold default ROL Pitch Hold default PIT AP Key Roll Hold default ROL Pi...

Страница 456: ...eral Modes Active Armed Vertical Modes Active Mode Reference Selected Altitude Command Bars Figure 7 2 PFD AFCS Display Autopilot Status Command Bars Upon activation of the flight director Command Bar...

Страница 457: ...by the white armed mode annunciation moving to the green active mode field and flashing for 10 seconds If the information required to compute a flight director mode becomes invalid or unavailable the...

Страница 458: ...tical speed may be used to climb descend to the Selected Altitude VS Key VS nnnn fpm 2000 to 1500 fpm 100 fpm Flight Level Change Holds aircraft airspeed while aircraft is climbing descending to the S...

Страница 459: ...Mode is activated In Pitch Hold Mode the flight director maintains a constant pitch attitude the pitch reference The pitch reference is set to the aircraft pitch attitude at the moment of mode select...

Страница 460: ...utomatic transition is indicated by the green ALTS annunciation flashing for up to 10 seconds and the appearance of the white ALT annunciation The Selected Altitude is shown as the Altitude Reference...

Страница 461: ...e flight director is in Selected Altitude Capture Mode see Figure 7 6 Selected Altitude Capture Mode automatically transitions to Altitude Hold Mode when the altitude error is less than 50 feet In thi...

Страница 462: ...al Speed Mode engagement A Vertical Speed Reference Bug corresponding to the Vertical Speed Reference is shown on the indicator Changing the Vertical Speed Reference The Vertical Speed Reference shown...

Страница 463: ...tape Engine power must be adjusted to allow the autopilot to fly the aircraft at a pitch attitude corresponding to the desired flight profile climb or descent while maintaining the Airspeed Reference...

Страница 464: ...captured during a climb The Command Bars provide vertical profile guidance based on specified altitudes entered manually or loaded from the database at waypoints in the active flight plan or vertical...

Страница 465: ...cent path is intercepted If the descent is not confirmed by the time of interception Vertical Path Tracking Mode remains armed and the descent is not captured In conjunction with the TOD top of descen...

Страница 466: ...al minutes for the aircraft to re establish on the descent path If the change is made while nearing a waypoint with a VNAV Target Altitude the aircraft may not re establish on the descent path in time...

Страница 467: ...not annunciated whenever VNAV Target Altitude Capture Mode is armed VNAV Target Altitude Capture is analogous to Selected Altitude Capture Mode and is armed automatically after the VNV Key is pressed...

Страница 468: ...rrent VNAV Target Altitude while VNAV Target Altitude Capture Mode is active causes the flight director to revert to Pitch Hold Mode Vertical Path Tracking and the appropriate altitude capture mode ar...

Страница 469: ...d the aircraft will not level off at the MDA even if the MDA is set in the altitude preselect Upon reaching the glidepath the flight director transitions to Glidepath Mode and begins to capture and tr...

Страница 470: ...ency is tuned 2 Ensure that LOC is the selected navigation source use the Active Nav Softkey to cycle through navigation sources 3 Press the APR Key Or 1 Ensure that FMS is the selected navigation sou...

Страница 471: ...t in reversion to Pitch and Roll Hold modes Figure 7 19 Go Around Modes Command Bars Indicate Climb Go Around Mode Active Level Mode LVL Level LVL mode becomes active only as a function of Electronic...

Страница 472: ...zer signal for backcourse approaches BC Key BC 22 Capture 10 Track Approach FMS Captures and tracks the selected navigation source FMS VOR LOC APR Key FMS 30 Approach VOR Capture Track VAPP 22 Capture...

Страница 473: ...d Roll Hold Mode is selected by default This mode is annunciated as ROL in the AFCS Status Box The current aircraft bank angle is held subject to the bank angle conditions listed in Table 7 4 Figure 7...

Страница 474: ...chronizes the Selected Heading to the current heading The Selected Heading is adjusted using the HDG Knob Pressing the CWS Button and hand flying the aircraft does not change the Selected Heading The...

Страница 475: ...ndicator CDI shows greater than one dot when the NAV Key is pressed the selected mode is armed If the CDI is less than one dot Navigation Mode is automatically captured when the NAV Key is pressed The...

Страница 476: ...Mode Pressing the CWS Button and hand flying the aircraft does not change the Selected Course while in Navigation Mode The autopilot guides the aircraft back to the Selected Course or FMS flight plan...

Страница 477: ...Mode Selecting VOR Approach Mode 1 Ensure a valid VOR frequency is tuned 2 Ensure that VOR is the selected navigation source use the Active Nav Softkey to cycle through navigation sources if necessary...

Страница 478: ...n the CDI and the DME arc segment is the active flight plan leg It is important to note that automatic navigation of DME arcs is based on FMS Thus even if the APR key is pressed and LOC or VOR Approac...

Страница 479: ...Pressing the CWS Button and hand flying the aircraft does not reset any reference data while in Backcourse Mode The autopilot guides the aircraft back to the Selected Course when the CWS Button is re...

Страница 480: ...pitch trim servo The pitch trim servo commands the motor to reduce the average pitch servo effort When the autopilot is not engaged the pitch trim servo may be used to provide manual electric trim MET...

Страница 481: ...ion for CWS behavior in each mode Figure 7 27 CWS Annunciation Control Wheel Steering Disengaging the Autopilot The autopilot is manually disengaged by pushing the AP DISC Switch GA Switch or the AP K...

Страница 482: ...700 AFCS modes used during a flight In this scenario the aircraft departs Charles B Wheeler Downtown Airport KMKC enroute to Colorado Springs Airport KCOS After departure the aircraft climbs to 12 000...

Страница 483: ...heel or pushing the CWS Button while hand flying the aircraft to establish a new Vertical Speed Reference b Press the AP Key to engage the autopilot in a climb using Vertical Speed Mode 3 Use the HDG...

Страница 484: ...ntrol System SYSTEM OVERVIEW FLIGHT INSTRUMENTS EIS AUDIO PANEL CNS FLIGHT MANAGEMENT HAZARD AVOIDANCE AFCS ADDITIONAL FEATURES APPENDICES INDEX Figure 7 31 Departure Selected Altitude of 12 000 MSL 1...

Страница 485: ...Mode a Tune the VOR frequency b Press the Active Nav Softkey to set the navigation source to VOR c Use the CRS Knob to set the Selected Course to 255 Note that at this point the flight director is st...

Страница 486: ...ollowing the flight plan the autopilot continues to steer the aircraft under FMS guidance Figure 7 33 Transition to GPS Flight Plan 0 3 6 9 1 2 1 5 18 2 1 2 4 27 3 0 33 VOR NAV Mode GPS NAV Mode V 244...

Страница 487: ...next to the Airspeed Reference which defaults to the current aircraft airspeed Selected Altitude Capture Mode is armed automatically 2 Use the UP DNWheel or push the CWS Button while hand flying the...

Страница 488: ...or the flight director to transition from Altitude Hold to Vertical Path Tracking Mode To proceed with descent path capture if the white VPTH annunciation begins flashing do one of the following Press...

Страница 489: ...flight plan altitudes b Press the FLC Key before the plannedTOD during an altitude hold whileVPTH is armed TheAirspeed Reference defaults to the current aircraft airspeed Vertical Path Tracking and Se...

Страница 490: ...t the vertical waypoint Figure 7 36 Non path Descent HABUK VNAV Target Altitude of 10 000 MSL VNAV Target Altitude of 9 000 MSL ALT Mode Planned Descent Path Selected Altitude of 9 400 MSL ALT Mode VP...

Страница 491: ...annunciations c The navigation source automatically switches to LOC After this switch occurs the localizer signal can be captured and the flight director determine when to begin the turn to intercept...

Страница 492: ...change navigation source b Select the Runway 35R LPV approach for KCOS Load and activate the approach into the flight plan 2 Press the APR Key once clearance for approach has been received FMS Approac...

Страница 493: ...ol System SYSTEM OVERVIEW FLIGHT INSTRUMENTS EIS AUDIO PANEL CNS FLIGHT MANAGEMENT HAZARD AVOIDANCE AFCS ADDITIONAL FEATURES APPENDICES INDEX 4 GPS APR GP Mode FALUR 1 2 3 GPS NAV Mode KCOS HABUK PYNO...

Страница 494: ...he navigation source When the GA Switch is pushed the missed approach is activated 2 Start the climb to the prescribed altitude in the published Missed Approach Procedure in this case 10 000 ft Press...

Страница 495: ...light Control System SYSTEM OVERVIEW FLIGHT INSTRUMENTS EIS AUDIO PANEL CNS FLIGHT MANAGEMENT HAZARD AVOIDANCE AFCS ADDITIONAL FEATURES APPENDICES INDEX Figure 7 39 Go Around Missed Approach 3 4 1 2 K...

Страница 496: ...Aileron Mistrim Left Elevator Mistrim Down Pitch servo providing sustained force in the indicated direction Elevator Mistrim Up Pitch Trim Failure If AP engaged take control of the aircraft and diseng...

Страница 497: ...rence appears in a box above the Airspeed Indicator flashing a yellow MAXSPD annunciation Engine power should be reduced and or the pitch reference adjusted to slow the aircraft The annunciation disap...

Страница 498: ...ed UNDERSPEED PROTECT ACTIVE annunciation Figure 7 43 will appear to the right of the vertical speed indicator Figure 7 43 Underspeed Protect Active Annunciation When airspeed increases as a result of...

Страница 499: ...rectory offer detailed information for a selected airport such as available services hours of operation and lodging options The optional SiriusXM Satellite Radio entertainment audio feature of the GDL...

Страница 500: ...to caution pilots of areas on an airport surface where positional awareness confusion or runway incursions happen most often Hot Spots are defined with a magenta circle or outline around the region o...

Страница 501: ...ble or disable the display of SafeTaxi on the Navigation and Inset maps A green annunciator on the button indicates SafeTaxi is enabled Configuring SafeTaxi range 1 From the Home Screen touch Map Map...

Страница 502: ...ys SafeTaxi is available for use after the expiration date When turning on the system the MFD Power up Display indicates the expiration date and status of the database Figure 8 3 Power up Page SafeTax...

Страница 503: ...data is for SafeTaxi 3 Indicates the third issue of the SafeTaxi database for the year The SafeTaxi Effective date 3 MAY 2012 is the beginning date for the current database cycle The SafeTaxi Expires...

Страница 504: ...ey shading Note the grey shading is for illustrative purposes only and will not appear on the published chart or MFD display These off scale areas appear on the chart to convey supplemental informatio...

Страница 505: ...ay the airport information selection buttons for the selected airport Figure 8 7 Departure Tab to display a list of possible departures for the selected airport Arrival Tab to display a list of possib...

Страница 506: ...Selection 3 Touch the Airport Chart Button The Info Tab selections are displayed on the Touchscreen Controller Figure 8 7 and the Airport Diagram is displayed on the MFD Display Figure 8 10 Figure 8...

Страница 507: ...ta such as a data error or a failure of an individual chart the banner UNABLE TO DISPLAY CHART is then displayed Figure 8 12 Unable To Display Chart Banner Day Night View ChartView can be displayed on...

Страница 508: ...eshold 5 Move the slider left or right to set the desired threshold Setting the Threshold Level percentage to the same percentage shown as the Current MFD Backlight Level will cause the Day Night view...

Страница 509: ...14 days Charts are still viewable during a period that extends from the cycle expiration date to the disables date ChartView is disabled 70 days after the expiration date and is no longer available fo...

Страница 510: ...ed onto satellites Check database cycle number for effectivity System is verifying chart database when new cycle is installed for the first time After verifying chart database is found to be corrupt C...

Страница 511: ...date 25 NOV 2012 is the date that this database becomes inoperative The ChartView database is obtained directly from Jeppesen Refer to Updating Jeppesen Databases in Appendix B for instructions on re...

Страница 512: ...hin an off scale area depicted on some charts Figure 8 20 shows examples of off scale areas indicated by the grey shading Note these areas are not shaded on the published chart These off scale areas a...

Страница 513: ...heAirport Button to enter another airport 3 Touch the Info Tab to display the airport information selection buttons for the selected airport Figure 8 21 Departure Tab to display a list of possible dep...

Страница 514: ...n 3 Touch the Airport Chart Button The Info Tab selections are displayed on the Touchscreen Controller Figure 8 21 and the Airport Diagram is displayed on the MFD Display Figure 8 24 Figure 8 24 Airpo...

Страница 515: ...he data such as a data error or a failure of an individual chart the banner UNABLE TO DISPLAY CHART is then displayed Figure 8 26 Unable To Display Chart Banner Day Night View ChartView can be display...

Страница 516: ...eshold 5 Move the slider left or right to set the desired threshold Setting the Threshold Level percentage to the same percentage shown as the Current MFD Backlight Level will cause the Day Night view...

Страница 517: ...ill viewable during a period that extends from the cycle expiration date to the disables date FliteCharts is disabled 180 days after the expiration date and are no longer available for viewing upon re...

Страница 518: ...es charts are still viewable but approaching the disable date When the 180 day grace period has expired Chart data is disabled in yellow indicates that the FliteCharts database has expired and is no l...

Страница 519: ...is database is current The Disables date 25 NOV 12 is the date that this database becomes inoperative The FliteCharts database is obtained from Garmin Refer to Updating Garmin Databases in Appendix B...

Страница 520: ...Directory Info Screen as shown in Figure 8 34 Selecting the Airport Directory Info Screen 1 From the Home Screen touch Nearest Airports 2 A list of the nearest airports to the aircraft present positi...

Страница 521: ...e 8 36 Power up Page Airport Directory Database Airport Database Power up Display Definition Normal operation Airport Directory database is valid and within current cycle Airport Directory database ha...

Страница 522: ...base for the year The Airport Directory Effective date 31 MAY 2012 is the beginning date for the current database cycle The Airport Directory Expires date 26 JUL 2012 is the revision date for the next...

Страница 523: ...rmation on specific service packages visit www siriusxm com Activating SiriusXM Satellite Services The SiriusXM Weather and or SiriusXM Radio services are activated by first establishing an account wi...

Страница 524: ...but there should be no adverse effects if inadvertently selected during flight Activating SiriusXM Satellite services on the G2000 1 From the Home Screen touch Utilities Setup SiriusXM Info 2 Verify...

Страница 525: ...to Favorites Selecting Channels The Channel field on the Music Screen shows the available channels for the selected audio entertainment category The Now Playing field shows information for the current...

Страница 526: ...ategory is displayed on the Category Button and the channel list displays channels available for the selected category Favorites Channels can be saved to a list of favorites and recalled for listening...

Страница 527: ...the Home Screen touch Services Music Volume 2 The volume adjustment slider is displayed as shown in Figure 8 44 3 Touch and drag the slider to the right or left to adjust the volume Drag to the right...

Страница 528: ...nment audio when intercom audio is present This function is active when the annunciator is green Figure 8 45 Mute Settings 3 Touch the Radio Inputs Annunciator Button to allow automatic muting of ente...

Страница 529: ...act Garmin International Aviation Product Services at 1 866 739 5687 in the United States or 913 397 8200 ext 1135 Registering the system for data link services 1 From the Home Screen touch Utilities...

Страница 530: ...48 Connext Registration Display 6 Enter the access code as shown in Figure 8 49 7 Touch the Enter Button Contacts Names telephone numbers and email addresses may be entered and stored These contacts...

Страница 531: ...e entry screen is displayed Figure 8 53 Enter Name Figure 8 52 Enter New Contact Information 5 Enter the name of the new contact as the example shows in Figure 8 53 6 Touch Enter 7 Touch Telephone Num...

Страница 532: ...Address The Email Address entry screen is displayed Figure 8 57 Enter Email Address Figure 8 56 Select Email Address 11 Enter the email address of the new contact as the example shows in Figure 8 57 1...

Страница 533: ...ddress Viewing a Text Message When Received 1 Touch the flashing SMS Button as shown in Figure 8 60 The SMS Text Inbox Tab is automatically selected and the newly received text message is shown at the...

Страница 534: ...Or 1 From the Home Screen touch Services SMS Text Figure 8 63 Figure 8 64 Touch Desired Message Figure 8 63 SMS Text Services Selection 2 Touch the desired text message in the Inbox list as in Figure...

Страница 535: ...re 8 67 Message Content 5 Enter the reply text as seen in Figure 8 67 6 Touch the Enter Button The reply message is displayed as in Figure 8 68 7 Touch the Send Button The SMS Message Replied To Scree...

Страница 536: ...Text Figure 8 71 Select Options Figure 8 70 SMS Text Services Selection 2 Touch the Options Button as seen in Figure 8 71 The available options are displayed as in Figure 8 72 3 Touch the Draft New M...

Страница 537: ...e 8 75 Enter Number or Address Figure 8 74 Select Message Destination Numeric Buttons are displayed when the Phone Button is touched Alpha Buttons are displayed when the Email Button is touched 5 Ente...

Страница 538: ...to Send 10 Touch the Send Button Text Message Boxes Received text messages reside in the Inbox as Read or Unread messages The Outbox contains Sent and Unsent text messages Saved messages that are mea...

Страница 539: ...raft Tab A list of draft messages is displayed as in Figure 8 80 provided messages have been previously saved 3 Touch a message to access the Send or Delete Buttons Figure 8 80 SMS Text Drafts View Ou...

Страница 540: ...opened A reply has been sent for this text message Saved text message draft not sent System is sending text message Text message has been sent System failed to send text message Table 8 5 Text Messag...

Страница 541: ...green annunciator indicates an active selection 4 Touch the Back Button to return to the previously selected message box Marking all messages as read 1 From the Home Screen touch Services SMS Text 2...

Страница 542: ...ds of a 20 second interval the autopilot is automatically engaged with the flight director in Level Mode bringing the aircraft into level flight An aural Engaging Autopilot alert is played and the fli...

Страница 543: ...As roll attitude exceeds 45 ESP will engage and the on side Roll Limit Indicator will move to 30 as shown in Figure 8 86 The Roll Limit Indicator is now showing where ESP will disengage as roll attitu...

Страница 544: ...ed force is intended to encourage pilot input that returns the airplane to a more normal roll attitude As roll attitude decreases ESP will disengage at 30 Figure 8 87 ESP Roll Operating Range When Eng...

Страница 545: ...iliary Video Optional The G2000 system provides a control and display interface for up to two optional auxiliary video systems To display auxiliary video 1 From the Home Screen touch Aircraft Systems...

Страница 546: ...reen Controller Or Touch the pointer to increase contrast or pointer to decrease contrast Each touch increases or decreases one percent The contrast setting is displayed in the Contrast field as a per...

Страница 547: ...odic alerting automatically reset to the original timer value once the message is displayed When power is cycled all messages are retained until deleted and message timer countdown is resumed Entering...

Страница 548: ...Button as seen in Figure 8 96 9 The numeric keypad is displayed as in Figure 8 97 Enter the time value using the keypad If One Time or Periodic were selected in step 7 the time is entered in a HH MM S...

Страница 549: ...he message to be edited The Message Options Window is displayed as in Figure 8 101 3 Touch the Edit Message Button 4 Select the desired message parameter to be edited and perform the needed steps as d...

Страница 550: ...PFD Figure 8 103 Touching the MSG Button on the Touchscreen Controller opens the Messages Screen Figure 8 104 and acknowledges the message indicated by the removal of the message annunciation on the...

Страница 551: ...layed at all An SD card must be inserted into the top card slot of each display on which it is desired to view the user documents Each display can only access electronic documents on the SD Cards that...

Страница 552: ...Document Selection Figure 8 105 Electronic Document Viewer 2 Touch the Selected Document Button 3 Touch the Installed or User Tab to select the desired document source as seen in Figure 8 106 In this...

Страница 553: ...th of the selected pane 5 Touching the Rotate Page Buttons will rotate the displayed page 90 degrees to the right or left depending on button touched within the selected pane Each subsequent touch wil...

Страница 554: ...113 5 Touch to expand a topic Touch to return to the collapsed view of the topic 6 Touch the desired topic to jump to that portion of the document In this example Flight Instruments is selected and th...

Страница 555: ...ookmark Created 5 Touch OK The newly created bookmark is displayed as in Figure 8 118 Deleting document bookmarks 1 With the desired document displayed touch the Find Button Figure 8 111 to display th...

Страница 556: ...heet applications The following is a list of data parameters the system is capable of logging for the Cessna T240 aircraft Date Time GPS altitude GSL GPS altitude WGS84 datum Baro Corrected altitude f...

Страница 557: ...FEATURES APPENDICES INDEX The file containing the recorded data will appear in the format shown in Figure 8 121 This file can be imported into most computer spreadsheet applications log_130410_104506...

Страница 558: ...sts from the Supplemental Data Cards located in the bottom card slot of PFD and MFD If the SD card contains an invalid checklist file or no checklist the Power up Page messages display Checklist File...

Страница 559: ...ox as seen in Figure 8 124 The next line item is automatically selected for checking Press the small right knob on the Touchscreen Controller again to remove a check mark from an item Figure 8 124 Com...

Страница 560: ...Checklist 2 Touch the desired checklist to reset BEFORE STARTING ENGINE is selected in Figure 8 126 3 Touch the Checklist Options Button 4 Touch Reset Current Checklist as seen in Figure 8 127 Figure...

Страница 561: ...alled has subscribed to SiriusXM Ensure the SiriusXM subscription has been activated Check the circuit breakers to ensure that power is applied to the Data Link Receiver For troubleshooting purposes c...

Страница 562: ...hscreen Controller SiriusXM Weather Pane Loss of signal signal strength too low for receiver LOADING Music Screen Touchscreen Controller Acquiring channel audio or information OFF AIR Music Screen Tou...

Страница 563: ...erts and the divider line is removed Higher priority alerts are displayed toward the top of the Alerts Window Softkey Annunciation During a warning or caution alert a red WARNING or yellow CAUTION Sof...

Страница 564: ...ing red WARNING Softkey annunciation as shown in Figure A 2 Pressing the WARNING Softkey acknowledges the presence of the warning alert stops the aural chime and extinguishes the WARNING Softkey annun...

Страница 565: ...S HI Anti ice fluid pressure is high Single Chime None AIL MISTRIM LEFT Aileron mistrim present Single Chime None AIL MISTRIM RIGHT Aileron mistrim present Single Chime None AP MISCOMPARE Autopilot is...

Страница 566: ...ot servo data path has failed None OXYGEN CTRL INOP Oxygen control is inoperative None OXYGEN ON Oxygen system enabled while aircraft is on the ground None PITOT COLD Possible icing conditions are pre...

Страница 567: ...itch sensors Roll No Compare No data from one or both roll sensors Reversionary AHRS Sensor Annunciation The reversionary AHRS selection appears in the Reversionary Sensor Window as shown in Figure A...

Страница 568: ...The G2000 System Messages convey messages to the pilot regarding problems with the G2000 system When an LRU or an LRU function fails a red or yellow X is typically displayed on items associated with...

Страница 569: ...not present or is invalid for navigation use Note that AHRS uses GPS inputs during normal operation AHRS operation may be degraded if GPS signals are not present see AFM If GPS integrity is subsequent...

Страница 570: ...ot communicating with each other The system should be serviced PFD1 SERVICE PFD1 needs service Return unit for repair The PFD and or MFD self test has detected a problem The system should be serviced...

Страница 571: ...The PFD1 voltage is low The system should be serviced MFD1 VOLTAGE MFD1 has low voltage Reducing power usage The MFD voltage is low The system should be serviced PFD1 CARD1 REM PFD1 card 1 was removed...

Страница 572: ...ISMATCH Standby Navigation database mismatch The GDUs have different standby navigation database versions or regions installed Check the Avionics Status Screen to determine versions or regions Also ch...

Страница 573: ...erature is too high If problem persists the system should be serviced GIA2 COOLING GIA2 over temperature GIA1 SERVICE GIA1 needs service Return the unit for repair The GIA1 and or GIA2 self test has d...

Страница 574: ...ation If the problem persists the system should be serviced COM2 RMT XFR COM2 remote transfer key is stuck COM1 MANIFEST COM1 software mismatch communication halted The COM 1 and or COM 2 has incorrec...

Страница 575: ...been detected in glideslope receiver 1 and or receiver 2 The system should be serviced G S2 FAIL G S2 is inoperative G S1 SERVICE G S1 needs service Return unit for repair A failure has been detected...

Страница 576: ...should be serviced XPDR1 SERVICE XPDR1 needs service Return unit for repair The 1 transponder should be serviced when possible XPDR1 FAIL XPDR1 is inoperative The 1 transponder is inoperative includi...

Страница 577: ...be serviced when possible AHRS1 GPS AHRS1 not receiving any GPS information The 1 AHRS is not receiving any or any useful GPS information Check AFMS limitations The system should be serviced AHRS2 GP...

Страница 578: ...incorrect software installed The system should be serviced GRS 2 MANIFEST GRS2 software mismatch communication halted The 2 AHRS has incorrect software installed The system should be serviced GTC 570...

Страница 579: ...key name key is stuck A key is stuck on the GCU 275 bezel Attempt to free the stuck key by pressing it several times The system should be serviced if the problem persists GCU1 MANIFEST GCU1 software...

Страница 580: ...s when an aviation database update eliminates an obsolete waypoint The flight plan cannot find the specified waypoint and flags this message This can also occur with user waypoints in flight plans tha...

Страница 581: ...ppropriate NAV receiver Select the correct frequency for the approach SLCT NAV Select NAV on CDI for approach The system notifies the pilot to set the CDI to the correct NAV receiver Set the CDI to th...

Страница 582: ...tter is not currently installed TERRAIN DISABLED Terrain Awareness DB resolution too low TAWS is disabled because a terrain database of sufficient resolution 9 arc second or better is not currently in...

Страница 583: ...tion is active User entered magnetic variation is being used for system calculations DOC VIEWER MISMATCH See Document Viewer Page for detailed info The documents on the database cards do not match Ens...

Страница 584: ...the system can support The flight plan was imported with as many waypoints as possible Some waypoints not loaded Waypoints locked The flight plan on the SD card contains one or more waypoints the sys...

Страница 585: ...tem Voice Alerts Voice Alert Description Minimums minimums The aircraft has descended below the preset barometric minimum descent altitude Vertical track The aircraft is one minute from Top of Descent...

Страница 586: ...still be available Elevator Mistrim Up A condition has developed causing the pitch servo to provide a sustained force Be prepared to apply nose up control wheel force upon autopilot disconnect Elevato...

Страница 587: ...n ITI Caution Terrain Terrain Reduced Required Obstacle Clearance Caution ROC Caution Obstacle Obstacle Imminent Obstacle Impact Caution IOI Caution Obstacle Obstacle Terrain SVT System Status Annunci...

Страница 588: ...e Pull Up Pull Up or ObstacleAhead Pull Up ObstacleAhead Pull Up Imminent Obstacle ImpactWarning IOI or ObstacleAhead Pull Up ObstacleAhead Pull Up or Obstacle Obstacle Pull Up Pull Up Reduced Require...

Страница 589: ...base coverage area entered None None TAWS Available GDL 69 69A Data Link Receiver Annunciations Message Message Location Description CHECK ANTENNA SiriusXM Info Screen Touchscreen Controller Data Link...

Страница 590: ...Cessna T240 190 01263 01 Rev A SYSTEM OVERVIEW FLIGHT INSTRUMENTS EIS AUDIO CNS FLIGHT MANAGEMENT HAZARD AVOIDANCE AFCS ADDITIONAL FEATURES APPENDICES INDEX 576 Appendix A Blank Page This manual down...

Страница 591: ...onics Status Screen being displayed in yellow NOTE Garmin requests the flight crew report any observed discrepancies related to database information These discrepancies could come in the form of an in...

Страница 592: ...emove the SD card from the top card slot 7 Repeat steps 1 through 6 for the remaining display PFD1 or MFD1 8 Apply power to the system and press the right most softkey to acknowledge the Power Up disp...

Страница 593: ...on database will be available for the system to use as the active database as soon as it becomes effective The system checks the active and standby databases upon on ground only power up If the standb...

Страница 594: ...id it should not be loaded as the active database The display now starts in normal mode Do not remove power while the display is starting Figure B 6 Active Navigation Database Prompt 8 Press the right...

Страница 595: ...t of the MFD 21 Apply power to the system 22 Acknowledge the Power Up display agreement by pressing the right most softkey as indicated on the display 23 From the Home Screen on theTouchscreen Control...

Страница 596: ...us Screen the status is listed as Sync Complete Figure B 8 The synchronization status is only present when a synchronization is occurring or has occurred on the current power up An indication of Sync...

Страница 597: ...ds Each Supplemental Data Card resides in the bottom card slot of the PFD and MFD as shown in Figure B 10 These cards must not be removed except to update the databases stored on each card Figure B 10...

Страница 598: ...rport Directory databases are updated every 56 days The SafeTaxi database contains detailed airport diagrams for selected airports These diagrams aid in following ground control instructions by accura...

Страница 599: ...abases are initialized and displayed on the Power Up Display Figure B 11 A Verifying message may be seen If this message is present wait for the system to finish loading before proceeding to step 5 5...

Страница 600: ...troller Loading the Magnetic Field Variation Database update 1 With the MV DB prompt displayed as shown in Figure B 12 touch the OK Button A progress monitor is displayed as shown in Figure B 13 Figur...

Страница 601: ...IS AUDIO CNS FLIGHT MANAGEMENT HAZARD AVOIDANCE AFCS ADDITIONAL FEATURES APPENDICES INDEX 587 Appendix B Figure B 14 GRS2 Magnetic Field Variation Database Update Prompt Figure B 15 Database Mismatch...

Страница 602: ...Cessna T240 190 01263 01 Rev A SYSTEM OVERVIEW FLIGHT INSTRUMENTS EIS AUDIO CNS FLIGHT MANAGEMENT HAZARD AVOIDANCE AFCS ADDITIONAL FEATURES APPENDICES INDEX 588 Appendix B Blank Page This manual down...

Страница 603: ...ated Weather Observing System B ALT barometric altitude BARO barometric setting BATT battery BC backcourse Bearing The compass direction from the present position to a destination waypoint BFO beat fr...

Страница 604: ...V elevation ELEV elevator EMERGCY emergency EMI Electromagnetic Interference ENDUR endurance Endurance Flight endurance or total possible flight time based on available fuel on board ENG engine ENGD e...

Страница 605: ...sition Ground Track see Track GRS Garmin Reference System GS Ground speed GTC Garmin Touchscreen Controller GTX Garmin Transponder HA Hold Terminating at Altitude HDG heading Heading The direction an...

Страница 606: ...N SQ Manual Squelch MAP Missed Approach Point MASQ Master Avionics Squelch MAX maximum MAXSPD maximum speed overspeed MDA barometric minimum descent altitude MET manual electric trim METAR Meteorologi...

Страница 607: ...s SID Standard Instrument Departure SIGMET Significant Meteorological Information Sim simulator SLP SKD slip skid SMBL symbol SPD speed SPI Special Position Identification SPKR speaker SQ squelch SRVC...

Страница 608: ...rrent position and altitude to a defined target position and altitude based upon current groundspeed VFOM Vertical Figure of Merit VFR Visual Flight Rules VHF Very High Frequency VI Heading Vector to...

Страница 609: ...of Europe parts of the middle east and northern Africa The Multi functional Satellite Augmentation System MSAS covers mainly Japan and parts of northern Australia How does SBAS affect approach operati...

Страница 610: ...ine showing the title of the selected instrument procedure The original enroute portion of the flight plan remains active unless the instrument procedure is activated This may be done either when the...

Страница 611: ...it counts down to zero A flashing turn advisory Turn right left to in seconds appears on the PFD 10 seconds before the turn and flashes as it counts down to zero Turn right left to now or Next DTK HDG...

Страница 612: ...o the transition waypoint and does not take into consideration any missed approach procedures if the current approach is reactivated After flying the missed approach procedure the pilot may reactivate...

Страница 613: ...DS Item Symbol Intersection LOM compass locator at outer marker NDB non directional radio beacon VOR VOR DME VOR ILS VORTAC TACAN Basemap Item Symbol Interstate Highway State Highway US Highway Nation...

Страница 614: ...is display enabled Freezing Levels display enabled Winds Aloft display enabled County Warnings display enabled Cyclone Warnings display enabled Loss of hazard avoidance feature loss of GPS position Tu...

Страница 615: ...e Yellow obstacle is between 100 ft and 1000 ft below the aircraft altitude Gray obstacle is more than 1000 ft below aircraft altitude teRRAIN AVoIDANCe CoLoRS AND SYMBoLS 1000 ft Aircraft Altitude 10...

Страница 616: ...Cessna T240 190 01263 01 Rev A SYSTEM OVERVIEW FLIGHT INSTRUMENTS EIS AUDIO CNS FLIGHT MANAGEMENT HAZARD AVOIDANCE AFCS ADDITIONAL FEATURES APPENDICES INDEX 602 Appendix E Blank Page This manual down...

Страница 617: ...ivating 299 ILS 476 Loading 261 298 Missed 480 Removing 300 WAAS 478 Approach Mode AFCS 477 478 Approach Mode GPS VAPP LOC 463 Arrival procedure 243 259 315 317 326 Assist engine leaning 120 Attitude...

Страница 618: ...e Indication System EIS 109 120 Engine Manifold Pressure MAN IN HG 111 Entering Flight ID 154 Entertainment audio 513 Entertainment inputs 170 ENT Key 123 Environmental Control System 50 ESP 528 529 5...

Страница 619: ...eacon Annunciations 101 Measurement units changing displayed 42 45 Message advisories 556 563 565 566 Messages Screen 549 MET 572 Metric display Altimeter 69 70 MFD Data Bar fields 48 49 MFD PFD Contr...

Страница 620: ...568 569 570 Secure Digital SD card 577 Selected Altitude 64 102 450 453 469 Selected Altitude Bug 64 Selected Altitude Capture Mode ALTS 447 450 Selected Altitude Intercept Arc 204 Selected Course 46...

Страница 621: ...urn anticipation 597 Turn Rate Indicator 75 TX indicator 128 U Unable to display chart 493 501 Updating Jeppesen databases 497 User defined hold 276 277 278 279 V VDI 323 324 Vertical deviation 452 Ve...

Страница 622: ...Cessna T240 190 01263 01 Rev A I 6 Index SYSTEM OVERVIEW FLIGHT INSTRUMENTS EIS AUDIO PANEL CNS FLIGHT MANAGEMENT HAZARD AVOIDANCE AFCS ADDITIONAL FEATURES APPENDICES INDEX Blank Page This manual down...

Страница 623: ...This manual downloaded from http www manualowl com...

Страница 624: ...Ltd Liberty House Bulls Copse Road Houndsdown Business Park Southampton SO40 9RB U K p 44 0870 8501241 f 44 0870 8501251 Garmin Corporation No 68 Jangshu 2nd Road Shijr Taipei County Taiwan p 886 02...

Отзывы: