Layline Filter
: Filters the layline data based on the time interval
entered. For a smoother layline that filters out some of the
changes in the boat's heading or true wind angle, enter a
higher number. For laylines that display a higher sensitivity to
changes in the boat's heading or true wind angle, enter a
lower number.
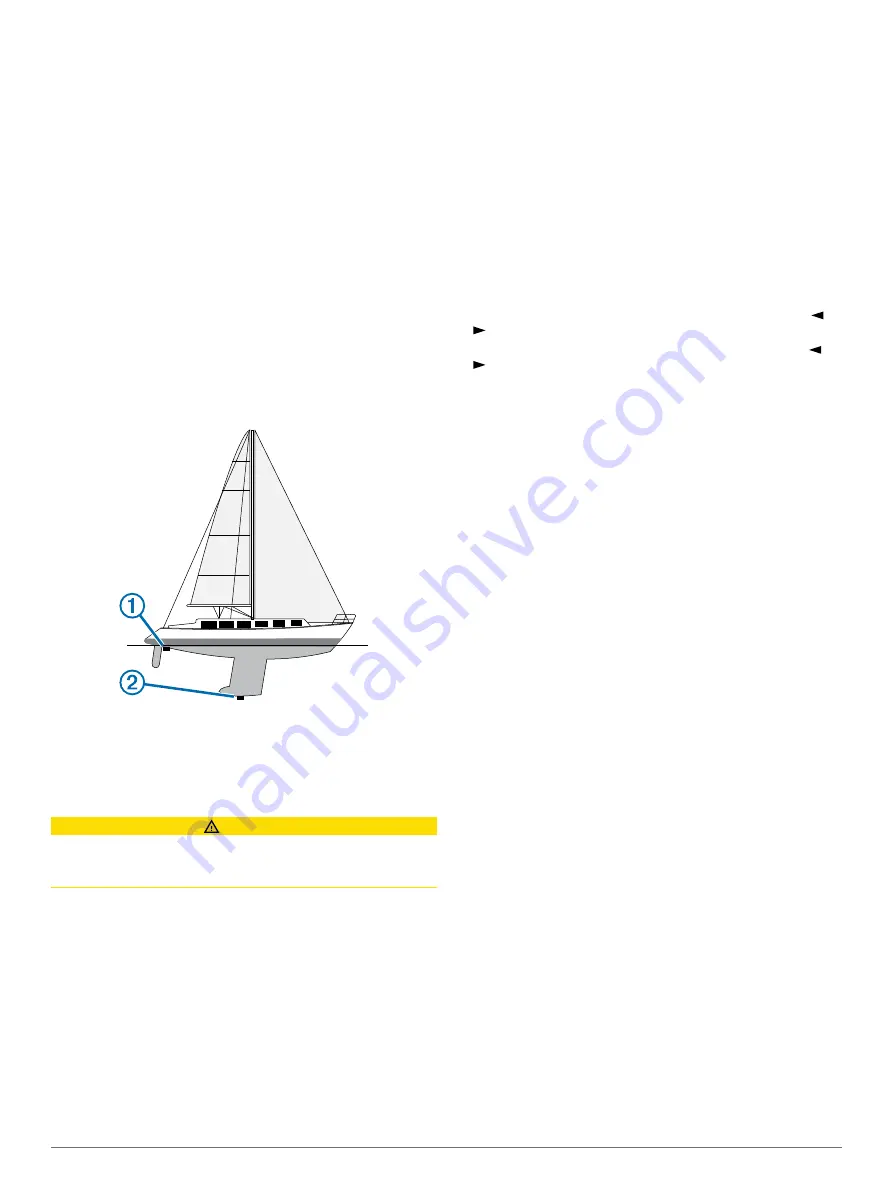
Setting the Keel Offset
You can enter a keel offset to compensate the surface reading
for the depth of a keel, making it possible to measure depth from
the bottom of the keel instead of from the transducer location.
Enter a positive number to offset for a keel. You can enter a
negative number to compensate for a large vessel that may
draw several feet of water.
1
Complete an action, based on the location of the transducer:
• If the transducer is installed at the water line
À
, measure
the distance from the transducer location to the keel of the
boat. Enter this value in steps 3 and 4 as a positive
number.
• If the transducer is installed at the bottom of the keel
Á
,
measure the distance from the transducer to the water
line. Enter this value in steps 3 and 4 as a negative
number.
2
Select
Settings
>
My Vessel
>
Depth and Anchoring
>
Keel Offset
.
3
Use the arrow keys to enter the keel offset measured in step
1.
Sailboat Autopilot Operation
CAUTION
When engaged, the autopilot controls only the rudder. You and
your crew remain responsible for the sails while the autopilot is
engaged.
In addition to heading hold, you can use the autopilot to maintain
a wind hold. You can also use the autopilot to control the rudder
while tacking and gybing.
Wind Hold
You can set the autopilot to maintain a specific bearing relative
to the current wind angle. Your device must be connected to a
NMEA 2000 or NMEA
®
0183 compatible wind sensor to perform
a wind hold or a wind-based tack or gybe.
Setting the Wind Hold Type
Before you can enable the wind hold type, you must connect a
NMEA 2000 or NMEA 0183 wind sensor to the autopilot.
For advanced autopilot configuration, see the installation
instructions included with your autopilot.
1
From the autopilot screen, select
MENU
>
Autopilot Setup
>
Wind Hold Type
.
2
Select
Apparent
or
True
.
Engaging Wind Hold
Before you can enable the wind hold type, you must connect a
NMEA 2000 or NMEA 0183 wind sensor to the autopilot.
When the autopilot is in standby mode, select
Wind Hold
.
Engaging Wind Hold from Heading Hold
Before you can enable the wind hold type, you must connect a
NMEA 2000 or NMEA 0183 wind sensor to the autopilot.
With heading hold engaged, select
MENU
>
Wind Hold
.
Adjusting the Wind Hold Angle with the Autopilot
You can adjust the wind hold angle on the autopilot when wind
hold is engaged.
• To adjust the wind hold angle in increments of 1°, select or
.
• To adjust the wind hold angle in increments of 10°, hold or
.
Tack and Gybe
You can set the autopilot to perform a tack or gybe while
heading hold or wind hold is engaged.
Tacking and Gybing from Heading Hold
1
2
Select
MENU
>
Tack/Gybe
.
3
Select a direction.
The autopilot steers your boat through a tack or gybe.
Tacking and Gybing from Wind Hold
Before you can engage wind hold, you must have a wind sensor
installed.
1
).
2
Select
MENU
>
Tack/Gybe
.
3
Select
Tack
or
Gybe
.
The autopilot steers your boat through a tack or gybe, and
information about the progress of the tack or gybe appears
on the screen.
Setting a Tack and Gybe Delay
The tack and gybe delay allows you to delay steering a tack and
gybe after you initiate the maneuver.
1
From the autopilot screen, select
MENU
>
Autopilot Setup
>
Sailing Setup
>
Tack Delay
.
2
Select the length of the delay.
3
If necessary, select
Done
.
Enabling the Gybe Inhibitor
NOTE:
The gybe inhibitor does not prevent you from manually
performing a gybe using the helm or step steering.
The gybe inhibitor prevents the autopilot from performing a
gybe.
1
From the autopilot screen, select
MENU
>
Autopilot Setup
>
Sailing Setup
>
Gybe Inhibitor
.
2
Select
Enabled
.
Sonar
When properly connected to an optional Garmin sounder
module and a transducer, your compatible chartplotter can be
used as a fishfinder. Different sonar views can help you view the
fish in the area.
The adjustments you can make to each sonar view vary
depending on the view you are in and the chartplotter model,
sounder module, and transducer you have connected.
Sonar
17
Содержание A03113
Страница 1: ...A03113 Owner s Manual...
Страница 8: ......


