13–8–606 Page 35
Improper oil filter maintenance will
cause damage to equipment. Replace
filter element every 1000 hours of op-
eration. More frequent replacement
could be required depending on oper-
ating conditions. A filter element left
in service too long may damage
equipment.
Use only the replacement element shown on the filter
tag or refer to the parts list for the part number. Use the
following procedure to replace the filter element. Do
not disturb the piping.
Air/oil under pressure will cause
severe personal injury or death. Shut
down compressor, relieve system of
all pressure, disconnect, tag and
lockout power supply to the starter
before removing valves, caps, plugs,
fittings, bolts, and filters.
Compressor, air/oil reservoir, separa-
tion chamber and all piping and tub-
ing may be at high temperature during
and after operation.
1.
Stop the unit and be sure no air pressure is in the
oil reservoir.
2.
Remove the spin–on element.
3.
Clean the gasket face of the filter body.
4.
Coat the new element gasket with clean lubricant
used in the unit.
5.
Screw the new element on the filter body and tight-
en by hand. DO NOT OVERTIGHTEN THE ELE-
MENT.
5.
Run the unit and check for leaks.
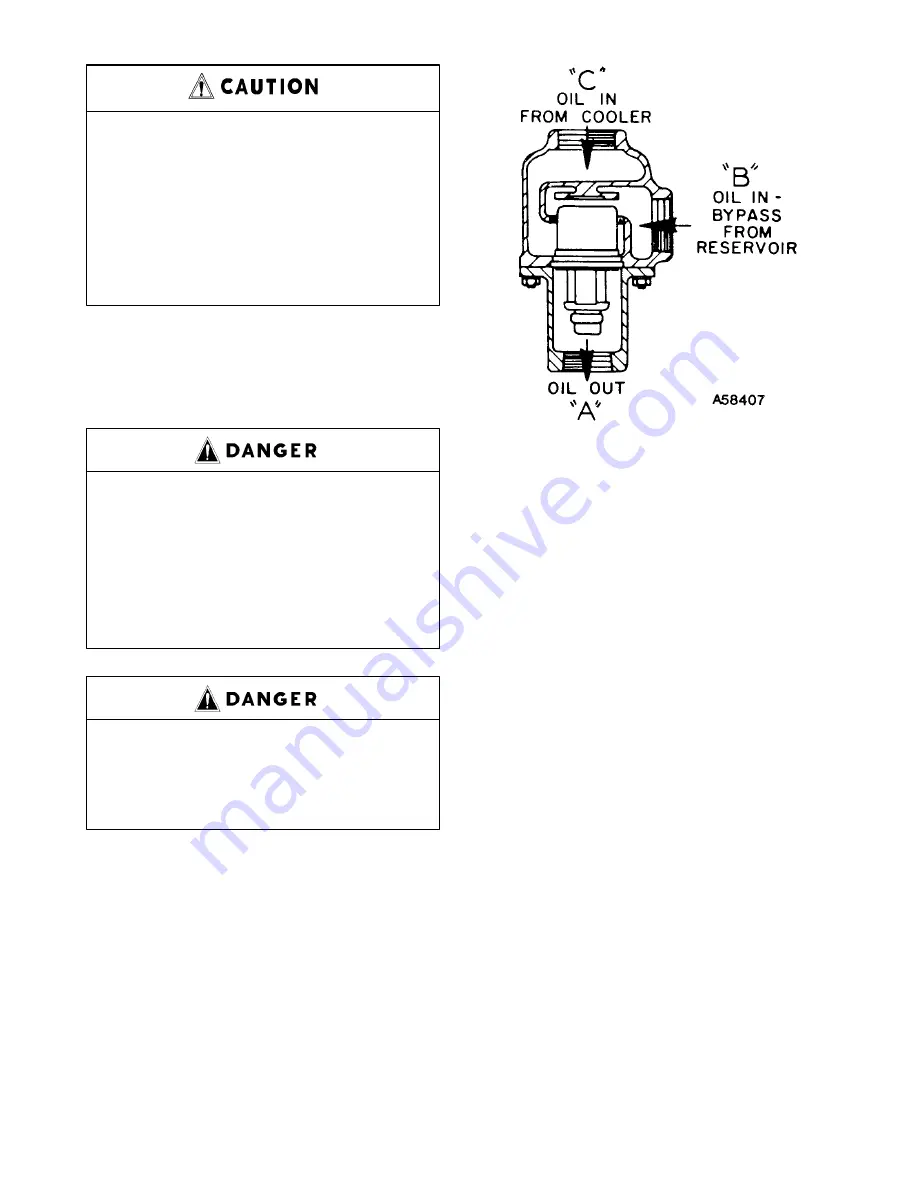
FIGURE 5–8 – THERMOSTATIC MIXING VALVE ELEMENT
COMPRESSOR OIL COOLER – RADIATOR TYPE
(FIGURE 1–5, page 3) – The oil cooler motor and fan
is mounted on the oil cooler module; air is exhausted
through the oil cooler and away from the unit. Do not
obstruct air flow to and from the oil cooler. Allow a mini-
mum of three (3) feet clearance around the cooler.
Keep both faces of cooler core clean for efficient cool-
ing of compressor oil.
THERMAL CONTROL (THERMOSTATIC MIXING)
VALVE (FIGURE 5–8) is installed in system as shown
in FIGURE 5–1, page 28. This valve is used to control
temperature of the oil in both air–cooled radiator and
water–cooled heat exchanger type oil cooler systems.
On start–up with unit cold, element is open to bypass,
allowing oil to pass directly from the reservoir to com-
pressor during warm–up. As oil warms, element gradu-
ally closes to the bypass allowing more of the oil from
the cooler to mix with oil from the bypass.
After the unit is warmed up, the mixing valve maintains
oil injection temperature into the compressor at a mini-
mum of 150
_
F (66
_
C). This system provides proper
compressor warm–up and helps prevent moisture con-
tamination of oil.
To check element, heat in oil – it should be fully ex-
tended at 150
_
F (66
_
C). If unit shuts down due to high
air discharge temperature, it may be that one or both
thermostatic mixing valve elements (FIGURE 5–1,
page 28) are stuck open. Remove mixing valve and
clean all parts thoroughly when flushing the oil system.
COMPRESSOR OIL COOLER – WATER–COOLED
HEAT EXCHANGER (FIGURE 5–1, page 28) – The
Содержание EDF-KB
Страница 14: ...13 8 606 Page 6 DECALS 206EAQ077 212EAQ077 218EAQ077 211EAQ077 207EAQ077...
Страница 15: ...13 8 606 Page 7 DECALS 216EAQ077 217EAQ077 222EAQ077 221EAQ077 208EAQ077...
Страница 34: ...13 8 606 Page 26 FIGURE 4 10 WIRING DIAGRAM FULL VOLTAGE DUAL CONTROL 208EDF546 Ref Drawing...
Страница 36: ...13 8 606 Page 28 FIGURE 5 1 FLOW DIAGRAM 204EDF797 Ref Drawing...
Страница 58: ......


