12
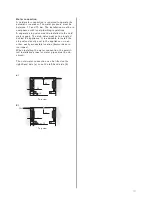
Installation niche – Dimensions
762
1219
1219
2125
457
762
457
610
1*
90°
90°
A
A
B
Installation niche for a side-by -side solution:
In a side-by-side solution, there are many ways to
combine the appliances.
The width of the installation niche is calculated from
the sum of the widths of the individual appliances.
The picture shows an example of an installation
niche with a width of 1,219 mm, for installing a
freezer (45.7 cm) on the left-hand side and a re-
frigerator (76.2 cm) on the right-hand side.
The height and depth of the installation niche cor-
respond to the specifications for the individual ap-
pliances.
It is important to comply with the dimensions in the
area set aside for electric and water connections.
For the precise dimensions, please refer to the de-
tails given for individual appliances.
350
25
59
2125
610
Y
Y
max. 10
90°
90°
A
B
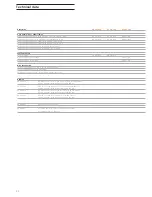
Appliance type
Y
45.7 cm
224 mm
61.0 cm
304 mm
76.2 cm
380 mm
91.4 cm
458 mm
A: Area where the electrical connection is installed
(appliance socket).
B: Area for laying the water connection line (if required).
It is very important to position the stop tap of the
water connection so that maintenance and repair work
is possible without dismantling the appliance.
Unlike conventional built-in appliances, Vario refrig-
erators stand on the floor.
This means that the installation niche is a space in
a line of kitchen units.
Installation niche for an individual appliance:
Important!
The walls and the crown of the installation niche
must be made of a solid material with a thickness
of at least 16 mm, to guarantee the secure instal-
lation of the appliance.
The side walls of the installation niche must be
completely even and flat along their entire depth.


