background image

79

SECTION 2

5. Connecting a USB Device

Preparing Necessary Items

USB device

Refers to USB standard-compliant devices. Here are typical examples
of USB devices. Prepare a USB device that meets your need.

• Digital camera
• CCD camera
• Mouse
• Printer
• Scanner
• Keyboard
• Speaker

USB cable

Used to connect a USB device to the computer. Some USB devices
come with a USB cable. For some USB devices, e.g., USB mice, the
USB cable is an integral part of them. For more information, refer to
the manual for the USB device you want to connect.

USB device driver

Some USB devices come with a CD or floppy disk that contains their
respective drivers.Use the driver provided to install the driver for the
USB device.

Manual for USB device

Ways of connection vary from USB device to USB device. So be sure
to read also the manual for the USB device used.
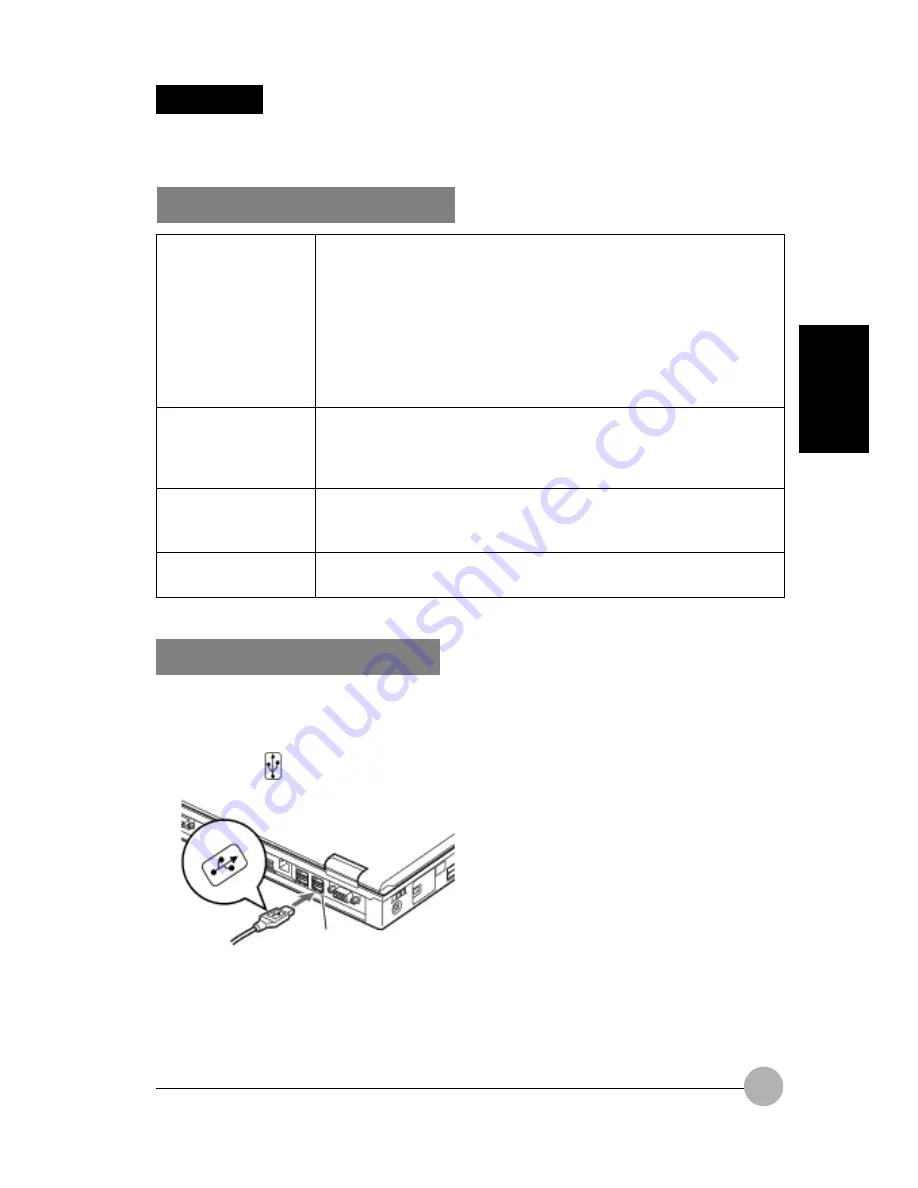
SECTION 2

Connecting a USB Device

1.

Connect a cable to the USB device you want to use.

2.

Plug the other end of the cable in the USB port on the back of your computer, with the USB

connector’s

-marked surface up.

(The illustration varies depending on the model and use conditions.)

3.

Install the device driver.
Some USB devices get ready for use only if being connected and they don’t require the installation
of a driver. For more information, refer to the manual for the USB device used.

USB port

Содержание LifeBook C-6651

Страница 1: ...er rights owners Use of this copyright protection technology must be authorized by Macrovision Corporation and is intended for home and other limited viewing uses only unless otherwise authorized by Macrovision Corporation Reverse engineering or disassembly is prohibited Apparatus Claims of U S Patent Nos 4 631 603 4 577 216 4 819 098 and 4 907 093 licensed for limited viewing uses only Dolby Manu...

Страница 2: ...al rating of all products plugged into the wall outlet does not exceed 15 amperes 11 Never push objects of any kind into this product through cabinet slots as they may touch dangerous voltage points that could result in a fire or electric shock Never spill liquid of any kind on the product 12 Do not attempt to service this product yourself as opening or removing covers may expose you to dangerous ...

Страница 3: ...ilar products must always be supervised by an adult Do not allow children access to the interior of any electrical products and do not permit them to handle any cables LIFEBOOK NOTEBOOK Caring for your LifeBook Notebook Your LifeBook notebook is a durable but sensitive electronic device Treat it with care Make a habit of transporting it in a suitable carrying case Do not attempt to service the com...

Страница 4: ...s turned on Do not check your LifeBook notebook as baggage Carry it with you Always bring your System Recovery CD that came with your LifeBook notebook when you travel If you experience system software problems while travelling you may need it to correct any problems Never put your LifeBook notebook through a metal detector Have your notebook hand inspected by security personnel You can however pu...

Страница 5: ... months without recharging it Increasing Battery Life Power your LifeBook notebook through the AC or optional auto airline adapater whenever possible If your LifeBook notebook is running on battery power all day connect it to the AC adapater overnight to recharge the battery Keep brightness to the lowest level comfortable Set the power management for maximum battery life Put your LifeBook notebook...

Страница 6: ...isk drive in extremely hot or cold locations or in locations subject to severe temperature changes Store at temperatures between 50 F 10 C and 125 F 52 C Keep the floppy disk drive out of direct sunlight and away from hating equipment Avoid storing the floppy disk drive in locations subject to shock and vibration Never use the floppy disk drive with any liquid metal or other foreign matter inside ...

Страница 7: ...he drive where it will be exposed to extreme temperatures Avoid using or storing the drive where it is damp or dusty Avoid using or storing the drive near magnets or devices that generate strong magnetic fields Avoid using or storing the drive where it will be subjected to shock or vibration Do not disassemble or dismantle the DVD CD RW D ROM drive PC CARDS Caring for your PC Cards PC Cards are du...

Страница 8: ... used on any media or part of any Product returned to Fujitsu or its service providers for Warranty Service or other repair including but not limited to the costs of recovering such programs data or other information It is solely your responsibility as the Purchaser to back up any software programs data or information stored on any storage media or any part of a Product returned for Warranty Servi...

Страница 9: ...ed below To do so would result in your modem being operated in a non compliant manner Call Attempts Retries Applications software shall be configured so that no more than 3 attempts are made to establish a connection to a given number Note if the modem can detect service tones up to 10 attempts can be made If the call sequence is unsuccessful there shall be a delay of at least 30 minutes before at...

Страница 10: ...dialing while the New Zealand standard is DTMF tone dialing There is no guarantee that Telecom lines will always continue to support pulse dialing It is strongly recommended that pulse dialing is not used Some parameters required for compliance with Telecom s Telepermit requirements are dependent on the equipment PC associated with this device The associated equipment shall be set to operate withi...

Страница 11: ...is not possible Please see below instruction for quick modem setup A If you are located in Australia 1 Go to Control panel select modem icon 2 Choose Australia in What country region are you in now 3 Select Phone system as Tone Dialing 4 Close B If you are located in New Zealand 1 Go to Control panel select modem icon 2 Choose New Zealand in What country region are you in now 3 Select Phone system...

Страница 12: ...e system as Tone Dialing 5 Click OK and Apply Note The screens and illustrations shown in this examples may slightly vary depending on the operating environment that you have installed B If you are located in New Zealand 1 Click start select Control panel select Phone and Modem Options 2 Double click New Location 3 Choose New Zealand in Country region pull down menu bar 4 Select Phone system as To...

Страница 13: ...indicates the concrete nature of the warning The example on the left is a caution for electric shock The circle and slash indicates prohibited behavior The symbol inside the circle indicates the concrete nature of the prohibition The example on the left indicates that disassembly is prohibited The indicates instructions that must be followed The symbol inside indicates the concrete nature of those...

Страница 14: ...rs but uppercase letters may be used Product names The following product names are abbreviated as follows in this manual Microsoft Windows XP operating system is written as Windows XP Microsoft Windows 98 operating system is written as Windows 98 Microsoftt Millennium Edition operating system is written as Windows Me Microsoft MS DOS operating system Version 6 2 V is written as MS DOS Microsoft Wi...

Страница 15: ...of the parts and their functions floppy disk unit handling and battery operation SECTION 2 This section explains installation of options for this computer SECTION 3 This section explains what to do when trouble occurs with this computer and when messages are displayed Read this section as the necessity arises SECTION 1 SECTION 2 SECTION 3 ...

Страница 16: ...uch Buttons 20 Starting an Application 21 Operating a Music CD 21 6 LifeBook Application Panel 22 Application Launch Disc Player Buttons 22 E Mail Notification LED 23 Configuring your Lifebook Application Panel 23 Configure your E mail Account Settings 25 Configure your E mail Account Settings 27 To configure Email button setting 31 Using the Disc Player 34 Desktop Control Panel 35 7 Power Saving ...

Страница 17: ...al Modem 62 SECTION 2 1 PC Card 64 Caution in Using PC Cards 64 PC Cards that can be Used with your Computer 65 Preparing Necessary Items 65 Installing a PC Card 65 Ejecting a PC Card 67 Preparing Necessary Items 69 2 LAN 69 Connecting a LAN Cable 69 Installing Memory 71 3 Expanding Memory 71 Preparing Necessary Items 71 4 Before Connecting Peripherals 78 Connecting a USB Device 79 Preparing Neces...

Страница 18: ... Mouse 84 Connecting a USB Mouse 84 Disabling the Flat Point 84 9 Connecting an External Display 86 Preparing Necessary Items 86 Connecting an External Display 86 SECTION 3 1 When This Happens 88 2 Glossary 92 Index ...

Страница 19: ... using this computer including the names of the parts and their functions Flat point operation methods floppy disk unit handling and battery operation SECTION SECTION SECTION SECTION SECTION SECTION SECTION SECTION SECTION SECTION 1 1 1 1 1 1 1 1 1 1 SECTION 1 ...

Страница 20: ... Functions SECTION 1 1 Latch Used to lock the LCD display to prevent it from opening accidentally To open the LCD display release it by sliding the tab to the right 2 LCD display The monitor of your computer 1 2 3 5 4 6 7 8 9 10 Front ...

Страница 21: ...indow By pressing the center you can start an application or operate Internet Explorer Critical Point For some applications you cannot use the CoolScroll button to scroll up and down windows Critical Point About the characteristics of LCD displays For reasons of characteristics specific to LCD displays the following phenomena may occur but they are not defects in your LCD display The TFT color liq...

Страница 22: ...PC card slot Used to install optional PC cards The lower and upper slots are referred to as Slot 1 and Slot 2 respectively 5 PC card eject button Used to eject the PC card 6 Antitheft lock port Used to connect a commercially available antitheft cable 7 DC IN connector This is the connector to connect the AC adapter 8 S video port Outputs S video signals 1 2 3 4 5 7 6 8 Critical Point The antitheft...

Страница 23: ...ontrol dialog box to make system sounds louder CAUTION HEARING LOSS Turn down the volume to a minimum before connecting a device to the headphone jack Line In jack or microphone jack Failure to do so could cause damage to the device connected or result in hearing loss because of very loud sound produced 1 2 3 4 5 6 Critical Point If no sound comes out from the speakers even if you adjust the volum...

Страница 24: ...ptic mini plug 4 Mic In jack Used to connect a commercially available monaural microphone with a 3 5 mm mini plug for sound recording Some types of microphones e g dynamic microphones cannot be used with your computer So before purchasing a microphone make sure it is compatible with your computer 5 Floppy disk drive Reads and writes information on floppy disks 6 CD drive Reads information on CD RO...

Страница 25: ...omatically starts running when the temperature inside the computer rises to a specified temperature 1 2 3 4 5 6 CAUTION FAILURE Don t block the vent for the cooling fan or heat will remain in the computer and may cause it to malfunction IMPORTANT When connecting a peripheral to each port check the orientation of the connector and insert it straight 4 LAN port Used to connect the computer to a loca...

Страница 26: ...tery pack is installed here 2 Built in CD ROM drive An internal CD ROM drive is installed here 3 Built in 1 44MB floppy drive An internal floppy drive is installed here The illustration varies depending on the model and use conditions Bottom 3 2 ...

Страница 27: ... battery power 4 Hard Disk Access indicator This indicator appears when the internal hard disk is accessed 5 CD Access indicator This indicator appears when a CD is accessed 6 Floppy Disk Access indicator This indicator appears when a floppy disk is accessed 7 PC Card Access indicator This indicator appears when a PC card is accessed 8 Num Lock Numerical Lock indicator This indicator appears when ...

Страница 28: ... indicator LCD blinks periodically To deactivate the CD Auto Insertion feature follow these steps This setting only applicable for Windows 98 and Windows Me 1 Click the Start button and select Settings and Control Panel 2 If the System icon is not found in the Control Panel window click View all Control Panel options 3 Click the System icon 4 Click the Device Manager tab in the System Properties d...

Страница 29: ...ve only the active window as pictorial data press the key while holding the and keys down Using painting software e g Paint you can edit save and print pictorial data To do so you need to import it to the painting software by selecting the Paste command from the Edit menu 5 Delete key Used to delete the character on the right of the cursor With this key you can also delete the file or icon you sel...

Страница 30: ...lication key Used to open the pop up menu for the item selected This key has the same function as the right button of the Flat Point 13 Alt key Used in combination with other keys 14 Windows key Used to open the Start menu 15 Ctrl key Used in combination with other keys 16 Fn key This key specific to your computer is used in combination with other function keys as described below Turns on or off t...

Страница 31: ...his key again About the Ten key Mode The ten key mode refers to the mode that enables you to use certain character entry keys as ten keys a key arrangement that makes it easy to type in figures To activate the ten key mode simply press the key In the ten key mode is displayed on the status indicator LCD The figure you can enter with a ten key is marked on the front surface of the key If you connec...

Страница 32: ...ouse and their functions vary from application to application Pressing the CoolScroll button forward or backward enables you to easily scroll a window up or down By pressing the center of the CoolScroll button you can also start applications or operate Internet Explorer Critical Point The Flat Point may malfunction if condensation occurs or if it is moistened In addition if you operate it with a m...

Страница 33: ...ch you pointed has a submenu such items are marked with the submenu appears To drag an object move the mouse pointer onto the object move the object to the desired location by sliding the finger on the touch pad while holding the left button down and then move the finger off the pad Or move the mouse pointer onto the object and tap the touch pad twice in a row After that without moving the finger ...

Страница 34: ...ouse pointer speed When tapping the touch pad tap it quickly with the tip of a finger but not strongly The mouse pointer moves in the same direction as you slide a finger on the touch pad If the finger reaches one edge of the pad before you move the pointer to the desired location move the finger off the pad temporarily put it in an adequate place on the pad and start sliding the finger again ...

Страница 35: ...olScroll button you can also start applications or operate Internet Explorer CoolScroll button Using the CoolScroll Button Feature 1 Click on the Windows Explorer you want to scroll 2 Press the CoolScroll button forward or backward The active window starts scrolling up or down To advance push this backward To return push this forward SECTION 1 ...

Страница 36: ...for the first time 3 Press the CoolScroll button forward or backward to select the application you want to open The default programs on the CoolScroll menu is pre define as Screen Saver Calculator Notepad and Menu end These programs cannot be changed 4 Press the center of the CoolScroll button The menu disappears when the Menu end is selected The program will start when selected Like for example N...

Страница 37: ...s CoolScroll button while the Internet Explorer is active It contains Back Next Reload Stop Home Add to Favorites and Menu end You can select this features for browsing Critical Point If another window is activated while the CoolScroll button menu is open the window may scroll up or down as you move from one option to another in the menu using the CoolScroll button ...

Страница 38: ...f the one touch buttons switch as shown below depending on the mode switch position Mode switch 1 A 2 B 3 Internet 4 E mail Incoming mail indicator Mode switch position Functions of the one touch buttons Application Upper Allows you to start applications Lock Center Disables lock the one touch buttons Disc Player Lower Allows you to operate music CDs SECTION 1 ...

Страница 39: ...r next track Buttons Applications that start 1 A button NotePad 2 B button Calculator 3 Internet button 1 Internet Explorer Web browser 4 E main button 2 Outlook Express Buttons 1 2 3 4 Stop Eject 1 Play Pause Previous Track 2 Next Track 2 If you loading a music CD in your CD drive whenWindows is running CD Player automatically starts playing the CD You can use either one touch buttons and CD Play...

Страница 40: ...nction of the one touch buttons as an Application Launcher a Disc Player if available or locked The Disc Player is available only on select models see your LifeBook notebook specifications to determine the configuration of your system One of the unique features of your LifeBook notebook is the LifeBook Application Panel This panel allows you to operate the Disc Player applies only to certain model...

Страница 41: ...hentication Contact your service provider to determine if they support POP3 without Security Pass word Authentication Configuring your Lifebook Application Panel When you start Windows the LifeBook Application Panel is automatically activated As an application launcher the LifeBook Application Panel is very flexible giving you a variety of options To set up the Panel to best suit your needs we hav...

Страница 42: ...Application Panel When you receive your notebook these buttons are pre configured to launch specific applications For a list of the default applications associated with each button refer table below This may be different email programs set on the button To change an application associated with the Application A Application B or E mail buttons click on the tab for the button you would like to recon...

Страница 43: ...n order to reconfigure it to launch another program follow these easy steps 1 Select Internet and click on Specify a program to start 2 You can select Start a Program 3 Click or Start a browser and click next Select a programs from Start Menu or Specify a program directly to select the program you wish to change on the Internet button ...

Страница 44: ...ook Application Panel as often as you like Enabling disabling Application Launcher button Select Models Only At the bottom of each application setup page are two selectable options The first will Keep this button active even on Standby and the second will Keep this button active even on Turn Off You can enable disable either or both of these functions simply by check or unchecking the check Box Cr...

Страница 45: ...he Mail check setting screen appears Critical Point The E mail Notification LED is available on select LifeBook notebook models only To use the E mail LED notification you must have access to a POP3 Server with no Security Password Authentication Contact your service provider to determine if they support POP3 without Security Password Authentication Configure your E mail Account Settings ...

Страница 46: ...28 The Mail checking setting have 3 options for you to configure Checking time Interval check for new mail You can specific an interval to check for new mail Schedule check for new mail ...

Страница 47: ...r receiving mail Default setting You can specify the type of new mail notification by changing the color of the control panel and the Ring when mail incoming notice Email Notification LED Specify the E mail notification LED to blink when received a new mail You can specify the length of time E mail notification LED blinks ...

Страница 48: ...The special recipient can be added from the menu below it also allow you to change the color of the Notification area and the ring pattern of the special recipient you have aded Important mail You can specify the important mail with the different color display on the Notification area ...

Страница 49: ...fter mail checking from pressing Application Panel on Standby or Power off To configure Email button setting 1 Click on All Programs 2 Click LifeBook Application Panel 3 Select LifeBook Application Panel 4 Application Panel properties menu pop up on the screen 5 Select Specify program to start ...

Страница 50: ... 6 Select Checking for a new mail 7 Click Next and select Specify a program directly You can specify other Email program to launch on this button 8 Click Next and select LAN connect or Dial up connection ...

Страница 51: ...configuration as previously set in Dial Up Networking you wish to retrieve mail from Enter the POP3 Server name your account name and password for that account The account name and password should be the same information you entered in the Dial Up configuration After all the information has been entered test the connection by clicking on Verify Connection If an error occurs check the settings and ...

Страница 52: ... Press it again to continue Back This button is immediately to the right of the LCD display Press this button once to skip one track back Forward This is the second button to the right of the LCD Press this button once to skip forward one track Critical Point If you shut down from Windows while the Disc Player is playing an audio CD it will stop To continue to use the Disc Player restart the OS Th...

Страница 53: ...utomatically start over at the beginning as soon as it finishes the last track By default the Eject Button is disable from the CD Player Options Once you press the Eject button from the CoolView the drive will not eject If you want the Eject Button to be function uncheck this options Desktop Control Panel Your LifeBook notebook includes a desktop control panel You may use this panel to operate the...

Страница 54: ...on the LifeBook notebook The Disc Player desktop control panel is designed to be displayed in High Color 16 bit or in True Color 24 bit or more If you have your notebook s display set for 256 colors or less the Disc Player control panel will display in a basic mode You can change the CD Player design by selecting the setting from the pull down menu from the CD Player options by double click on the...

Страница 55: ...all programs and data in memory into the hard disk As compared to standby mode it takes more time for the computer to suspend and resume system operation because the power is turned off automatically When the MAIN switch is on the computer consumes a small amount of power to keep the one touch buttons operational To stop the power consumption turn the MAIN switch off Caution about standby and hibe...

Страница 56: ...n refer to the manual for your peripheral device When using a LAN connect the AC adapter select Never for each item on the Power Schemes tab of the Power Management Properties dialog box If you resume system operation when Manual is selected under Internal pointing device of the BIOS Setup window the Flat Point is activated regardless of the settings before the computer was put into standby or hib...

Страница 57: ... After a while the icon blinks on the status indicator LCD The illustration varies depending on the model and use conditions SUS RES switch Status indicator LCD Critical Point Don t hold the SUS RES switch down for more than 4 seconds If you do so the computer will be turned off and the data currently processed will be lost LCD display Status indicator LCD Critical Point To prevent the computer fr...

Страница 58: ... this method if you placed the computer into standby mode by closing the LCD display 1 Make sure that the icon is blinking on the status indicator LCD 2 Open the LCD display Unlock the LCD display by sliding the latch on the front panel to the right and lift the display while holding the computer with a hand After a while the system will resume at the same point as when you suspended operation The...

Страница 59: ...n the screen To turn on the display touch the Flat Point move the mouse If this does not turn on the display press the key or any other key If this operation does not still restore the display check whether the icon is blinking on the status indicator LCD If it is blinking the computer is still on standby In this case press the SUS RES switch to resume operation When power is supplied by the inter...

Страница 60: ...le The illustration varies depending on the model and use conditions Closing the LCD display 1 Make sure that the or icon is not displayed on the status indicator LCD then close the LCD display The icon is displayed on the status indicator LCD and the power is turned off after a while The illustration varies depending on the model and use conditions SUS RES switch Status indicator LCD LCD display ...

Страница 61: ...lay 1 Open the LCD display Unlock the LCD display by sliding the latch on the front panel to the right and lift the display while holding the computer with a hand A window appears on the screen showing the progress of the reloading of the saved data from the hard disk After a while the system will resume at the same point as when you suspended operation The illustration varies depending on the mod...

Страница 62: ...s the hard disk has enough free space to store all data in memory In hibernation mode the reception of an incoming call will not cause the computer to resume operation If the computer is put into hibernation mode when peripheral devices such as a PC card and a printer are connected to it information about those devices will be initialized when you resume system operation and therefore the system m...

Страница 63: ...nt time for battery recharging to make sure that the battery is fully charged When the remaining battery power is still 90 or more the unit does not start charging even if the AC adapter is connected Charging starts when the power is 89 or less When the MAIN switch is off the indication on the status indicator LCD disappears soon after charging is complete The battery charging capability deteriora...

Страница 64: ...ns that the battery is completely exhausted The remaining battery power is 0 Critical Point The remaining battery power indicator may show a different indicator value from the actual remaining battery power depending on the environment of use temperature battery usage and recharging cycle numbers etc because of the characteristics of the lithium ion battery Charging does not start even if the AC a...

Страница 65: ...of power If you save data on the hard disk when the battery is low always connect the AC adapter If the computer is left in a low battery condition it automatically goes into the standby mode If the system is reading writing on the hard disk or other data storage media however it will wait until the process is completed before entering the standby mode IMPORTANT This computer is preset to enter th...

Страница 66: ...computer with the battery power source The battery is a consumable product and the battery s charging capacity is reduced as the battery ages If your battery runs low quickly it is a sign that it is getting old Disposing of the battery When you dispose of a battery take measures so as to insulate the battery terminals with tape to prevent short circuiting Also check with your local government auth...

Страница 67: ...onnector WARNING ELECTRIC SHOCK Before replacing the battery pack be sure to turn off the computer and disconnect the AC adapter from it Also don t touch any connector of the computer or battery pack to avoid electric shock Tab Tab Internal battery pack 4 Install a new battery pack With the slit in the internal battery pack aligned with the projection on the computer push in the battery pack until...

Страница 68: ...ect on top of it Never touch the magnetically coated disk behind the shutter Don t put a magnet or any magnetized object close to a floppy disk Don t stick more than one label to a floppy disk Sticking two or more labels could prevent the floppy disk from being ejected Floppy Disks that can be Used with your Computer The floppy disk drive of your computer supports floppy disks of the following thr...

Страница 69: ...ng a Floppy Disk 1 Insert a floppy disk in the floppy disk drive With the arrow marked surface up insert a floppy disk until the floppy disk eject button pops out Ejecting a Floppy Disk 1 Check to see that is not lit on the status indicator LCD and press the floppy disk eject button The floppy disk pops out Floppy disk eject button Floppy disk eject button IMPORTANT If you press the floppy disk ej...

Страница 70: ...a floppy disk from being erased by mistake slide the write protect tab up to open the hole the disk is write protected To write data on a write protected floppy disk slide the tab down to close the hole Not write protected Write protect tab Write protected ...

Страница 71: ...y label on any surface of a disc or write anything to it with a ball point pen or pencil Be careful not to spill coffee or any other liquid over a disc When a disc is dirty or condensation occurs on it wipe the disc radially from the center with a slightly moistened cloth then with a dry cloth Don t use a hairdryer to dry it or don t let a wet disc dry naturally Don t use benzene thinner water rec...

Страница 72: ...ication used If you use the supplied CD R RW application leave the CD Auto Start feature enabled Loading a CD R or CD RW sometimes causes the supplied CD R RW application to start automatically If you don t want to use the application exit it If the computer detects flaws or scratches on the recorded surface of the CD R or CD RW it may stop writing data Take the following precautions when writing ...

Страница 73: ... the drive causing damage to the disc tray and drive or the disc itself When you are using a CD that starts automatically when it is loaded don t put your computer into standby mode If you place the computer into standby suspending operation mode while using an auto run CD the CD will start twice when you resume system operation when you restore the operation at the point at which you suspended op...

Страница 74: ... the status indicator LCD is blinking You can stop it from blinking if you want 3 Set a disc on the tray while holding the tray Align the hole of the disc with the projection at the center of the tray with the labeled surface up and push the disc down until it clicks into place Failure to fit a disc correctly onto the projection could prevent the disc from being ejected 4 Push the tray gently into...

Страница 75: ... while Windows is running causes CD Player to automatically start and play the CD You can continue the operation using either one touch buttons on the computer or buttons on CD Player Ejecting the Disc 1 Exit the application you started from the disc 2 Press the EJECT button The tray pops out 3 Pull out the tray gently EJECT button Disk tray ...

Страница 76: ...itical Point If the tray won t come out When Windows is terminated slide the mode switch down to the lower position then press the EJECT button If the Main switch is off in the O position slide it to the position to turn the power on and then press the EJECT button You may press the EJECT button even when the icon on the status indicator LCD is blinking You can stop it from blinking if you want Pr...

Страница 77: ...he Flat Point 4 Select Eject from the menu that appears The tray pops out a little 5 Pull out the tray gently and take out the disc from it If you cannot eject the disc by this method follow these steps 1 Turn off your computer 2 Insert a straightened paper clip etc into the pinhole on the right of the EJECT button The tray will pop out 3 Pull out the tray gently and take out the disc from it EJEC...

Страница 78: ... on the model and use conditions 11 Internal Modem CAUTION ELECTRIC SHOCK Before replacing the battery pack be sure to turn off the computer and disconnect the AC adapter from it Also don t touch any connector of the computer or battery pack to avoid electric shock IGNITION Do not connect this computer directly to a digital line such as ISDN or it may cause a fire or failure Always connect it via ...

Страница 79: ...e to the modular connector of the telephone line Insert the plug on the other end of the cable you have connected to the computer in Step 1 Modular connector Rosette connector IMPORTANT If your telephone line connector is rosette type it must be changed to a modular type If such a change is necessary have it done by an authorized person You can also ask your telephone company to do the work ...

Страница 80: ...uter environment purchase a new one with the proper length Caution in Using the Internal Modem Connecting to the Internet for a long time while still running some applications applies a considerable load on the CPU of the computer It may lead to interruption of communication via the internal modem In this case exit all applications you are running except your browser and e mail software before acc...

Страница 81: ...2 2 2 2 2 This section explains installation of options for this computer SECTION SECTION SECTION SECTION SECTION SECTION SECTION SECTION SECTION SECTION 2 2 2 2 2 SECTION 2 ...

Страница 82: ... Caution in Using PC Cards Observe the following points when using PC cards to prevent breakdown Do not place PC cards in high temperature locations and locations subject to direct sunlight Do not subject PC cards to strong shocks Avoid rubbing PC cards and building up static electricity Do not place heavy objects on top of PC cards Be careful to avoid spilling coffee and other liquids on PC cards...

Страница 83: ...on refer to the manual for your PC card Your computer does not support PC cards with a working voltage of 12V Preparing Necessary Items CAUTION INJURY Do not put your finger into the PC card slot when you install a PC card or you may be injured Installing a PC Card PC Card Prepare a PC card that meets your need PC Card driver A CD or floppy disk that contains the PC card driver is supplied with so...

Страница 84: ...lustration varies depending on the model and use conditions PC card PC card slot Critical Point If a message appears asking whether you want to restart the computer after you have removed a PC card driver follow these steps 1 Click No in the message window asking whether to restart the computer 2 Click the Start button and select Turn off computer In the Turn off computer Windows dialog box select...

Страница 85: ...e cable connected to the PC card or it will result in failure When you remove a PC card follow the procedure below or it will result in failure Some PC cards require shutting down when you remove them Consult with the manual of the PC card 1 Click Unplug or Eject Hardware on the taskbar Critical Point Don t eject the PC card by clicking the Stop button in the Remove Hardware dialog box that appear...

Страница 86: ...lustrations shown below vary depending on the model and use conditions 5 Eject the PC card Press the PC card eject button and pull out the PC card that has popped out 6 Push in the PC card eject button PC card eject button Critical Point The message This device cannot be removed may appears depending on the PC card inserted If this message appears shut down the computer and proceed to step 4 PC ca...

Страница 87: ... on the network device used So be sure to read also the manual for the network device used LAN cable Network device Manual for the network device used Connecting a LAN Cable WARNING ELECTRIC SHOCK Before connecting a LAN cable always turn off your computer and disconnect the AC adapter if it is connected or you could get an electric shock ELECTRIC SHOCK If it thunders immediately turn off the comp...

Страница 88: ...the Power Options icon is not found in the Control Panel window click View all Control Panel options 7 Click the Power Options icon 8 Click of System standby on the Power Schemes tab and select Never 9 Click OK 10 Make all necessary network settings Critical Point When disconnecting the LAN cable from the LAN port pull it while pushing in the tab to avoid damage to the plug When using the LAN devi...

Страница 89: ...nd children In the event any of these items is swallowed consult a doctor immediately CAUTION HOT The memory slots are installed in close proximity to a part that gets very hot during operation To avoid burn don t install or remove memory immediately after turning off the computer FAILURE When installing or removing memory don t touch its terminals or ICs but hold its edges Also be careful not to ...

Страница 90: ...on of the arrow to detach it 4 Pull the lug on the keyboard slightly in the direction of the arrow 5 Lift the keyboard carefully to open it Screw cover Cover Critical Point To avoid damage don t touch any components other than those needed for installation or removal of memory To avoid damage be careful not to drop a screw removed etc in the computer ...

Страница 91: ...eyboard carefully While aligning the tabs on the keyboard with the notches in the computer upper panel close the keyboard carefully so as not to catch any cable between the keyboard and the computer 8 Attach the cover and secure it with a screw Reattach the cover that was removed in step 3 9 Attach the screw cover as it was Notch in the RAM module Keyboard Tabs on the keyboard Cover Screw cover ...

Страница 92: ...e of the memory you added The figure shows an example of the expansion of 64 MB of memory Depending on the system configuration the memory size displayed may be 1 MB smaller than the actual memory size 6 Click OK The Control Panel window appears again Memory size IMPORTANT If memory is not installed correctly the message Extended memory error appears or nothing is displayed on the screen when you ...

Страница 93: ...puter and disconnect the AC adapter from it 2 Open the screw cover 3 Remove the screw one and slide the cover in the direction of the arrow to detach it 4 Pull the lug of the keyboard slightly in the direction of the arrow 5 Lift the keyboard carefully to open it Cover Lug Screw cover ...

Страница 94: ...otrusion on the connector insert it diagonally in the slot and then tilt it over until it clicks into place 8 Close the keyboard carefully While aligning the tabs on the keyboard with the notches in the computer upper panel close the keyboard carefully so as no catch any cable between the keyboard and the computer Hook Notch in the RAM module Keyboard Tabs on the keyboard ...

Страница 95: ...SECTION 2 77 9 Attach the cover and secure it with a screw Reattach the cover that was removed in step 3 10 Attach the screw cover as it was Cover Screw cover ...

Страница 96: ...this manual Use genuine products To know about Fujitsu genuine optional devices consult with your dealer We cannot guarantee the proper function of this computer when using peripherals from other sources If it becomes necessary to use a peripheral from another source consult with the manufacturer of that product Use peripherals that conform to ACPI standards This computer is set to ACPI mode Power...

Страница 97: ...me with a CD or floppy disk that contains their respective drivers Use the driver provided to install the driver for the USB device Manual for USB device Ways of connection vary from USB device to USB device So be sure to read also the manual for the USB device used SECTION 2 Connecting a USB Device 1 Connect a cable to the USB device you want to use 2 Plug the other end of the cable in the USB po...

Страница 98: ...plains how to display pictures on a TV screen by connecting a cable to the S video port on the left panel of your computer WARNING ELECTRIC SHOCK Before connecting or disconnecting a TV to or from the computer always turn off the computer and disconnect the AC adapter from it Also turn off the TV and unplug its power cable Failure to do so could lead to an electric shock CAUTION FAILURE Before con...

Страница 99: ...ter At that time fully insert the AV cable in the S video port 4 Connect the AV cable to the TV For the way of connection refer to the manual for your TV 5 Connect the power cable to the TV and turn it on 6 Connect the AC adapter to your computer and turn it on Then perform steps to display pictures on the TV screen IMPORTANT For the method of displaying pictures on a TV refer to the manual for it...

Страница 100: ...t can be secured with screws to the printer port on your computer Manual for the printer Ways of connection and setup procedures vary from printer to printer So be sure to read also the manual for the printer used Some printer manuals are contained on a CD Connecting a Printer WARNING ELECTRIC SHOCK Before connecting a printer always turn off your computer and disconnect the AC adapter if it is co...

Страница 101: ...ter 5 Connect the AC adapter to the computer and turn the power on 6 When using a printer for the first time you may need to install the driver Parallel port Tighten these screws Printer cable Caution in Using a Printer Even if the printer manual states that the driver will be installed automatically if the printer is connected and turned on the driver may not be installed as described in the manu...

Страница 102: ...ed each time you press the key while holding the key down When you activate or deactivate the Flat Point the message Internal pointing device Enabled or Internal pointing device Disabled appears on the screen respectively USB port Critical Point A USB mouse can be connected and disconnected even when the computer is on Connecting a USB mouse does not automatically disable the Flat Point To disable...

Страница 103: ...only when the Manual option is selected under Internal pointing device in the Detailed Menu of the BIOS Setup window If the Manual option is unselected select it The message Internal pointing device Enabled or Disabled does not appear on the screen if the Hotkey Utility is not install If you want to hold the Flat Point disabled select the Always disabled option under the Internal pointing device s...

Страница 104: ...our computer and external display to break down Prepare an external display that supports PC AT compatible computers Used to connect an external display to your computer Usually a display cable is connected to the back of a display or included with a display If no display cable is included with your external display or if the cable connector is not compatible with the external display port on your...

Страница 105: ...e CRT display For the way to connect the cable refer to the manual for your CRT display 4 Plug the power cable of the CRT display in a wall outlet and turn it on 5 Connect the AC adapter to the computer turn it on and then switch displays Critical Point The following may take place when you turn on your computer for the first time after connect ing an external display to it Images are displayed on...

Страница 106: ...ains what to do when trouble occurs with this computer and when messages are displayed Read this section as the necessity arises SECTION SECTION SECTION SECTION SECTION SECTION SECTION SECTION SECTION SECTION 3 3 3 3 3 SECTION 3 ...

Страница 107: ...ow LOW BATTERY Connect the AC adaptor When using the computer for the first time after leaving it unused for a long time connect the AC adaptor and switch on the main switch to switch on the power Nothing displayed on the LCD panel Checkpoint Is anything displayed on the status indicator LCD Is displayed on the LCD panel Cause and Solution Connect the AC adaptor and switch on the main switch Displ...

Страница 108: ...lay flashes Was the charging stopped midway Cause and Solution Check that the AC adaptor is correctly plugged into the power socket and into the computer If the ambient temperature is high and the battery temperature becomes too high during use the battery protection function may be triggered to stop the charging If the battery temperature falls too low the battery protection function may be trigg...

Страница 109: ...sed accessibility cannot be controlled by this item Set the write protect tab on the floppy disk to the write enable position If it works with a different floppy disk then the problem floppy disk may be damaged LCD panel does not close Checkpoint Is something caught in the LCD panel Cause and Solution Forcing the LCD panel closed can damage it Check for some thing caught in the LCD panel Also a me...

Страница 110: ...rsonal computer main unit is in operating mode because its CD ROM drive has an electronic lock Check that the personal computer main unit is in operating mode and press the EJECT button If for some reason the CD tray does not come out even when you press the EJECT button insert a clip or something into the hole to the right of the EJECT button and pull the tray out If the tray doesn t still come o...

Страница 111: ...tion from the BIOS is transferred to the installed operating system to provide it with information on the configuration and status of the hardware Bit An abbreviation for binary digit A single piece of information which is either a one 1 or a zero 0 bps An abbreviation for bits per second Used to describe data transfer rates Boot To start up a computer and load its operating system from disk ROM o...

Страница 112: ...oftware that make up your system and how it is allocated for use CRT Cathode Ray Tube A display device which uses a beam of electronic particles striking a luminescent screen It produces a visual image by varying the position and intensity of the beam Data The information a system stores and processes DC Direct current A voltage or current that does not fluctuate periodically with time Default Val...

Страница 113: ...sing one channel to process sound form all sources MPU 401 A standard for MIDI interfaces and connectors NTSC National TV Standards Commission The standard for TV broadcast and reception for the USA Operating System A group of control programs that convert application commands including driver programs into the exact form required by a specific brand and model of microprocessor in order to produce...

Страница 114: ... error messages may be displayed before the operating system is loaded If the self test detects failures that are so serious that operation can not continue the operating system will not be loaded Disk A spinning platter of magnetic data storage media If the platter is very stiff it is a hard drive if it is highly flexible it is a floppy disk if it is a floppy disk in a hard housing with a shutter...

Страница 115: ... than the 640KB recognized by MS DOS as system memory FCC Federal Communication Commission Floppy Disk A spinning platter of magnetic data storage media which is highly flexible GB Gigabyte Hard drive A spinning platter of magnetic data storage media where the platter is very stiff Hexadecimal A decimal notation for the value of a 4 bit binary number 0 9 A B C D E F Example 2F in hexadecimal 00101...

Страница 116: ...andom Access Memory A hardware component of your notebook that holds binary information both program and data as long as it has the proper power applied to it RAM Module A printed circuit card with memory and associated circuitry which allows the user to add additional memory to the computer without special tools Reset The act of reloading the operating system A reset erases all information stored...

Страница 117: ...cur SMART makes a status report available so that the LifeBook can prompt the user to back up the data on the drive Naturally not all failures are predictable SMART predictability is limited to those attributes which the drive can self monitor In those cases where SMART can give advance warning a considerable amount of precious data can be saved SRAM Static random access memory A specific technolo...

Страница 118: ...eo Random Access Memory A memory dedicated to video display data and control WFM Wired for Management is Intel s broad based initiative to reduce the total cost of ownership TCO of business computing without sacrificing power and flexibility Write Protect Prevent alteration of the binary state of all bits in a storage media Example all information on a device such as a floppy diskette a block of s...

Страница 119: ...tton 3 17 Cover Close Switch 3 Ctrl Key 12 Cursor Keys 12 D DC IN Connector 4 Delete Key 11 E End Key 12 Enter Key 12 Esc Escape Key 11 Expanding Memory 71 External Display Port 7 F Flat Point 3 14 Click 15 Double click 15 Drag 15 Point 15 Scroll 15 Floppy Disk 6 50 Access Indicator 9 Fn Key 12 Function Keys 11 H Hard Disk Access Indicator 9 Headphone Jack 6 Home Key 12 I IEEE 1394 DV Port 4 Infra...

Страница 120: ...ator 9 Key 11 O One touch Buttons 3 20 P Parallel Port 7 PC Card 64 Access Indicator 9 Eject Button 4 Slot 4 Pg Up and Pg Dn 12 Power Saving Function Hibernation Mode 37 Standby Mode 37 S S video port 4 Scroll Lock Indicator 10 SCSI Card 65 Selector Switch 22 Shift Key 13 Speakers 3 Status Indicator LCD 3 SUS RES Suspend Resume Indicator 9 Switch 3 U USB Port 7 V Volume Control 5 W Windows Key 12 ...

Отзывы: