background image

Troubleshooting and tips

Troubleshooting and tips

Refer to the safety notes in the "Safety/regulations" manual and in the

"Getting

started", Page 14

chapter when connecting or disconnecting cables.

If a fault occurs, try to correct it as described in the following documentation:

in this chapter

in the documentation for the connected devices

in the help systems of the software used

in the documentation for your operating system

Help if problems occur

Should you encounter a problem with your computer that you cannot resolve yourself:

Note the ID number of your device. The ID number is found on the type rating
plate on the back, the underside or the top of the casing.

For further clari

fi

cation of the problem, contact the Service Desk for your country (see the

Service Desk list or visit the Internet at

"http://support.ts.fujitsu.com/contact/servicedesk"

). When

you do this, please have ready the identity number and serial number of your system.

Troubleshooting

Power-on indicator remains unlit after you have
switched on your device

Cause

Troubleshooting

The mains voltage supply is faulty.

Check whether the power cable is plugged
properly into the device and a grounded
mains outlet.

Internal power supply overloaded.

Pull the power plug of the device out of the
mains outlet.

Wait approx. 3 min.

Plug the power plug into a properly grounded
mains outlet again.

Switch the device on.

28

Fujitsu

Содержание CELSIUS M740

Страница 1: ...System Operating Manual FUJITSU Workstation CELSIUS M740 CELSIUS M740power ...

Страница 2: ...tp www fujitsu com fts You can find driver updates at http support ts fujitsu com download Should you have any technical questions please contact our Hotline Service Desk see Service Desk list or from the Internet at http support ts fujitsu com contact servicedesk Your sales partner Your sales office We hope you enjoy using your new Fujitsu system ...

Страница 3: ......
Страница 4: ...jitsu Technology Solutions GmbH Mies van der Rohe Straße 8 80807 Munich Germany http www fujitsu com fts Copyright Fujitsu Technology Solutions GmbH 2014 All rights reserved Publication Date 11 2014 Order No A26361 K1447 Z320 1 7619 edition 2 ...

Страница 5: ... CELSIUS M740 CELSIUS M740power Operating Manual Your CELSIUS 5 Ports and operating elements 7 Important notes 9 Getting started 14 Operation 21 Troubleshooting and tips 28 System expansions 31 Technical data 74 Index 75 ...

Страница 6: ... America and other countries PS 2 is a registered trademark of International Business Machines Inc Pentium is a registered trademark of Intel Corporation USA Kensington and MicroSaver are registered trademarks of ACCO Brands Microsoft and Windows are trademarks or registered trademarks of the Microsoft Corporation in the United States and or other countries All other trademarks specified here are ...

Страница 7: ...4 Setting up the device 15 Connecting the machine to the mains 15 Connecting external devices 16 Ports on the device 16 Connecting a monitor 17 Connecting a USB mouse 18 Connecting a USB keyboard 18 Connecting external devices to the USB ports 18 Switching on for the first time installing the software 19 Switch on the monitor and the machine 19 Installing the software 20 Operation 21 Switch the de...

Страница 8: ... accessible drive 40 Removing an accessible drive 41 Installing removing a 3 reader in a 3 bay optional SmartCard or MultiCard 42 Removing the module holder 43 Screwing the reader onto the module holder 43 Installing a module holder with reader 44 Removing a module holder with reader 45 Removing the reader from the module holder 46 Installing the hard disk drive 46 Mounting or replugging the cold ...

Страница 9: ... preinstalled on your hard disk e g Windows 8 Further information on this device is also provided in the Quick Start Guide poster in the Safety regulations manual in the Warranty manual in the operating manual for the monitor in the manual for the mainboard in the documentation for your operating system in the information files e g PDF HTML DOC CHM TXT HLP Some of the manuals listed can be found i...

Страница 10: ... or a command used to start a program start exe This font indicates information that is displayed on the screen by a program e g Installation is complete This font indicates terms and texts used in a software interface e g Click on Save names of programs or files e g Windows or setup exe This font indicates cross references to another section e g Safety information cross references to an external ...

Страница 11: ...of the ports and operating elements on the device Please familiarise yourself with these components before starting to work with your device Front 1 2 3 4 5 6 7 8 1 Module bays for 51 4 drives 2 Module bays for 31 2 drives 3 ON OFF switch 4 Headphone port 5 Microphone jack 6 USB ports 2 x USB 3 0 2 x USB 2 0 7 Hard disk front panel removable 8 Casing lock optional Fujitsu 7 ...

Страница 12: ...rts and operating elements Rear 2 1 4 3 1 Holes for padlock lead seal and device for Security Lock 2 Alternating voltage socket AC IN 3 Ports for external devices device dependent 4 Slot covers 8 Fujitsu ...

Страница 13: ...he power socket so that the mains voltage is completely disconnected Operate the device only with the casing closed Replace the lithium battery on the mainboard in accordance with the instructions in Replacing the lithium battery Page 73 Caution components in the system can get very hot The activities described in these instructions must always be performed with the greatest care Repairs to the de...

Страница 14: ... electric shock Ensure that no liquid enters the system The surface can be cleaned with a dry cloth If particularly dirty use a cloth that has been moistened in mild domestic detergent and then carefully wrung out Use disinfectant wipes to clean the keyboard and the mouse Energy saving disposal and recycling Disposal Energysaving Recycling Drivers UtilitiesDVD UserDocumentationDVD You can find inf...

Страница 15: ...in the following countries Belgium Bulgaria Denmark Germany Estonia Finland France Greece UK Ireland Iceland Italy Croatia Latvia Liechtenstein Lithuania Luxembourg Malta Netherlands Norway Austria Poland Portugal Rumania Sweden Switzerland Slovakia Slovenia Spain Turkey Czech Republic Hungary Cyprus Contact the corresponding government office in the respective country for current information on p...

Страница 16: ...dio communications However there is no guarantee that interference will not occur in a particular installation If this equipment does cause harmful interference to radio or television reception which can be determined by turning the equipment off and on the user is encouraged to try to correct the interference by one or more of the following measures Reorient or relocate the receiving antenna Incr...

Страница 17: ...nt and the receiver Connect the equipment into an outlet on a circuit different from that to which the receiver is connected Consult the dealer or an experienced radio TV technician for help Fujitsu is not responsible for any radio or television interference caused by unauthorized modifications of this equipment or the substitution or attachment of connecting cables and equipment other than those ...

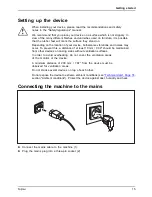
Страница 18: ...rstuse overview Preparingforuse Only a few steps are necessary to put your new device into operation for the first time Select a location for device and set up device Connect external devices such as mouse keyboard and monitor Check the voltage at the mains outlet and connect the device to an electrical outlet Switch the device on You will learn more about the individual steps in the following sec...

Страница 19: ...r To prevent this a distance of at least 10 mm 0 39 should be maintained from other devices on casing sides without ventilation surfaces In order to avoid overheating do not cover the ventilation areas of the monitor or the device A minimum distance of 200 mm 7 87 from the device must be observed for ventilation areas Do not stack several devices on top of each other Do not expose the device to ex...

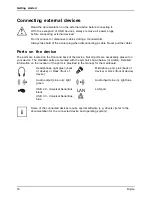
Страница 20: ...ent on your device The standard ports are marked with the symbols shown below or similar Detailed information on the location of the ports is provided in the manual for the mainboard Headphones light green back of device or black front of device Headphones Microphone port pink back of device or black front of device Microphonejack Audio output Line out light green Audiooutput Lineout Audio input L...

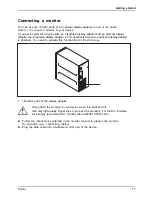
Страница 21: ...tional display adapter is attached You need to activate this function first in the BIOS Setup 1 1 Monitor ports of the display adapter Only attach the monitor to your device when it is switched off Use only high quality signal lines to connect the monitors For the DVI interface we strongly recommend DVI monitor cable S26361 F2391 L400 Follow the instructions contained in the monitor manual to prep...

Страница 22: ...ts e g printer scanner modem or keyboard USB devices are hot pluggable This means you can connect and disconnect USB cables while your device is switched on Additional information can be found in the documentation for the USB devices Connect the data cable to the external device Connect the data cable to one of the USB ports on your device Device drivers External USB devices which you connect to o...

Страница 23: ... during the software installation Contact your network administrator if you have any questions about these settings When you switch on the device for the first time the supplied software is installed and configured Plan a reasonable amount of time for this as this process must not be interrupted You may need the licence number for Windows during the installation The licence number is located on a ...

Страница 24: ... asked to input read the online Help in your operating system You will find more information on the system as well as drivers utilities and updates on the Drivers Utilities DVD and on the Internet at http www fujitsu com fts support You can find information and help on the Windows operating system functions on the Internet at http windows microsoft com 20 Fujitsu ...

Страница 25: ...tion Device Monitor or Briefly press the ON OFF switch If the operating system does not automatically switch the device into energy saving mode or switch it off press the ON OFF switch until the device switches off Warning this could lead to a loss of data If the device is switched off the device consumes a minimum of energy The ON OFF switch does not disconnect the device from the mains voltage T...

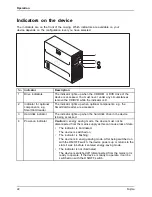
Страница 26: ... reader are accessed 3 Hard disk indicator The indicator lights up when the hard disk drive in the device is being accessed 4 Power on indicator Caution In energy saving mode the device must not be disconnected from the mains supply as this can cause loss of data The indicator is illuminated The device is switched on The indicator is flashing The device is in energy saving mode After being switche...

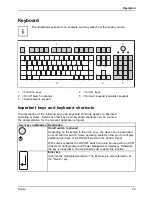
Страница 27: ...tails of other keys and keyboard shortcuts can be found in the documentation for the relevant application program Key key combination Description ON OFFswitch Button On off switch optional Depending on the setting in the BIOS Setup the device can be switched on or off with this switch Some operating systems allow you to configure additional functions of the ON OFF switch in the Control Panel With ...

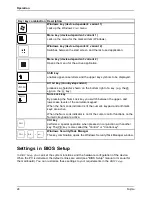
Страница 28: ...s of the calculator keypad When the Num Lock indicator is lit the numeric keypad and arithmetic keys are active When the Num Lock indicator is not lit the cursor control functions on the Numeric keypad are active Ctrl Keys Keys Keys Keys Ctrl key performs a special operation when pressed in conjunction with another key The Ctrl key is also called the Control or Control key Alt Ctrl Del Ctrl Alt De...

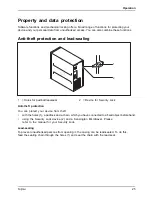
Страница 29: ...theftprotection KensingtonLock Chain 1 2 1 Holes for padlock lead seal 2 Device for Security Lock Anti theft protection You can protect your device from theft with the holes 1 a padlock and a chain which you have connected to a fixed object beforehand using the Security Lock device 2 and a Kensington MicroSaver Please refer to the manual for your Security Lock Lead sealing To prevent unauthorised ...

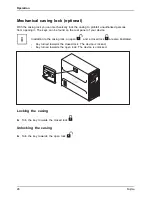
Страница 30: ...om opening it The keys can be found on the rear panel of your device In addition to the casing lock an open and a closed lock are also illustrated Key turned towards the closed lock The device is locked Key turned towards the open lock The device is unlocked Locking the casing Turn the key towards the closed lock Unlocking the casing Turn the key towards the open lock 26 Fujitsu ...

Страница 31: ...combine these functions You will find a detailed description of the Security menus and how to assign passwords in the manual for the mainboard or in the BIOS Setup manual Access authorisation via SmartCard Securityfunctions Accesspermission SmartCard In systems equipped with a SmartCard reader access can be restricted to those users who have a corresponding SmartCard Operating the SmartCard reader...

Страница 32: ...n the type rating plate on the back the underside or the top of the casing For further clarification of the problem contact the Service Desk for your country see the Service Desk list or visit the Internet at http support ts fujitsu com contact servicedesk When you do this please have ready the identity number and serial number of your system Troubleshooting Power on indicator remains unlit after ...

Страница 33: ...ust the brightness control For detailed information please refer to the operating manual supplied with your monitor Power cable not connected Switch off the monitor and the device Check that the monitor power cable is properly connected to the monitor and to a grounded mains outlet or to the monitor socket of the device Check that the device power cable is properly plugged into the device and a gr...

Страница 34: ... the technical manual for the mainboard in the documentation for the programs used Installing new software When installing programs or drivers important files may be overwritten and modified To be able to access the original data in the event of any problems following installation you should backup your hard disk prior to installation Restoring the hard disk contents You will find the instructions...

Страница 35: ...nding on its configuration level If further documentation was delivered with your device please also read this through carefully In addition before removing or installing system components please pay attention to the following The device must be switched off when installing removing the system expansions and may not be in energy saving mode Remove the power plug before opening the device Be carefu...

Страница 36: ...ve boards Make sure expansion boards are inserted straightly Never use sharp objects screwdrivers for leverage Boards with electrostatic sensitive devices ESD are identifiable by the label shown When handling boards fitted with ESDs you must always observe the following points You must always discharge static build up e g by touching a grounded object before working The equipment and tools you use...

Страница 37: ...ant notes Page 9 Disconnect the mains plug from the mains outlet Only insert the power plug after you have closed the casing Remove any connected wires which are in the way On devices with a casing lock Unlock the casing Lay the device on its side in the manner shown 2 1 Pull the locking device 1 and swivel the side part in the direction of the arrow 2 Fujitsu 33 ...

Страница 38: ...s for accessible 51 4 inch drives 1 x Ultra Slim in the top drive bay 1 x standard size in the bottom drive bay two drive bays for accessible 31 2 inch drives e g SmartCard or MultiCard Drive bays for multiple non accessible 21 2 and 31 2 drives hard disks Maximum equipment with standard installation kit four 21 2 inch drives or four 31 2 inch drives or two 21 2 inch drives and two 31 2 inch drive...

Страница 39: ...drive 1 3 2 Remove the screws 1 Push the drive carrier a few centimetres out of the casing in the direction of the arrow 2 Pull the drive carrier completely out of the casing in the direction of the arrow 3 Do not dispose of the cover of the Ultra Slim drive bay For cooling and protection against fire you must refit the cover if you remove the drive again later see Removing an accessible drive Pag...

Страница 40: ...g until the screw holes on the casing and the screw holes on the drive carrier are directly one above the other 1 Secure the drive carrier with the screws 2 Connect the cables to the drive Make sure the polarity is correct Close the casing see Closing the casing Page 34 It may be necessary to modify the entry for the drive in the BIOS Setup 36 Fujitsu ...

Страница 41: ...casing Page 33 1 3 2 Remove the screws 1 Push the drive carrier a few centimetres out of the casing in the direction of the arrow 2 Pull the drive carrier completely out of the casing in the direction of the arrow 3 1 1 3 2 Remove the screws 1 Pull the drive out of the drive carrier 2 Fujitsu 37 ...

Страница 42: ...e other 1 Secure the drive carrier with the screws 2 If you are not installing a new drive refit the previously removed cover Due to cooling fire protection and to avoid the penetration of foreign objects the drive bay must be closed Close the casing see Closing the casing Page 34 It may be necessary to modify the entry for the drive in the BIOS Setup 38 Fujitsu ...

Страница 43: ... 1 4 inch drive Requirement The casing is open see section Opening the casing Page 33 To use the latch function of the accessible 51 4 inch drive you must fit the corresponding drive cover before installing the drive in the casing Proceed as follows 2 3 1 Unlock the drive cover 1 Push the drive metal plate upwards 2 so it is released from the catches with which it is secured Lift the drive cover a...

Страница 44: ... For cooling and protection against fire you must refit the cover if you remove the drive again later see Removing an accessible drive Page 41 1 Slide the accessible drive together with the attached drive metal plate into the casing until it engages 1 Connect the cables to the drive Make sure the polarity is correct Close the casing see Closing the casing Page 34 It may be necessary to modify the ...

Страница 45: ... 1 3 2 Disconnect the cables connected to the drive Slide the clip in the direction of the arrow 1 Push the drive a few centimetres out of the casing in the direction of the arrow 2 Pull the drive completely out of the casing in the direction of the arrow 3 1 Remove the drive cover from the drive 1 Fujitsu 41 ...

Страница 46: ...ive in the BIOS Setup Installing removing a 3 reader in a 3 bay optional SmartCard or MultiCard Operation of the module is not permitted in Taiwan You can for instance install a SmartCard or MultiCard reader in the 3 drive bay The reader is mounted onto a module holder when installed in the casing SmartCard or MultiCard readers can be mounted on a module holder optional If you have ordered a devic...

Страница 47: ...older Push the module holder a few centimetres out of the casing in the direction of the arrow 2 Pull the module holder completely out of the casing in the direction of the arrow 3 Screwing the reader onto the module holder 2 2 a a 1 With the component side facing downwards slide the reader in the direction of arrow 1 into the guide on the module holder a Fasten the reader with the screws 2 Fujits...

Страница 48: ...ection of the arrow 1 until the screw holes on the casing and the screw holes on the reader are directly one above the other 1 Secure the module holder with the screws 2 Connect the cables to the boards and the mainboard Make sure the polarity is correct Close the casing see Closing the casing Page 34 44 Fujitsu ...

Страница 49: ...arrow 2 Pull the module holder completely out of the casing in the direction of the arrow 3 Remove the reader from the module holder see Removing the reader from the module holder Page 46 and reinstall the module holder corresponds to Installing a module holder with reader Page 44 or Remove the reader from the module holder see Removing the reader from the module holder Page 46 and install a blind...

Страница 50: ...stallation set for hard disk drives two 31 2 inch or 21 2 inch hard disks may be installed as standard upon delivery of your device The optional add on set includes the required EasyChange rails The maximum number of hard disks you can install is as follows four 21 2 inch drives or two 21 2 inch drives and two 31 2 inch drives or four 31 2 drives Standard assembly kit C78 for up to 4 drives 46 Fuj...

Страница 51: ...l expansion assembly kit C76 for up to 8 drives If you wish to switch the installation set from 31 2 inch to 21 2 inch before installing a hard disk you must first remove the hard disk fan and the card holder Removal of the hard disk fan the card holder and the installation of the installation set are described in the following chapters Fujitsu 47 ...

Страница 52: ... are preassembled in slots EP0 EP3 of the standard assembly kit Thus four 31 2 drives can be operated Assignment 1 Standard assembly kit EP0 P0 EP1 P1 EP2 P2 EP3 P3 EP4 EP5 EP6 EP7 Slot EP0 Connector P0 Boot HDD Slot EP1 Connector P1 Slot EP2 Connector P2 Slot EP3 Connector P3 Assignment 1 with connected connectors 48 Fujitsu ...

Страница 53: ...ves the connectors must be replugged as follows Assignment 2 Standard assembly kit EP0 EP1 EP2 P2 EP3 P3 EP4 P0 EP5 P1 EP6 EP7 Slot EP4 Connector P0 Boot HDD Slot EP5 Connector P1 Slot EP2 Connector P2 Slot EP3 Connector P3 Assignment 2 with connected connectors Fujitsu 49 ...

Страница 54: ...nector P1 Slot EP6 Connector P2 Slot EP7 Connector P3 Assignment 3 with connected connectors When replugging the cable proceed as follows Press the locking lugs on the connectors at the old slot inwards and disengage them Remove the connectors from the old slot Replace the connector at the new slot in the correct position To ensure that the connectors engage correctly always also push the locking ...

Страница 55: ...0 Boot HDD Slot EP1 Connector P1 Slot EP2 Connector P2 Slot EP3 Connector P3 Expansion cable Slot EP4 Connector P0 Slot EP5 Connector P1 Slot EP6 Connector P2 Slot EP7 Connector P3 Replacing the assembly kit Requirements There are not any hard disk drives installed in the drive bays Otherwise you must first remove the hard disk drives The casing is open see Opening the casing Page 33 The hard disk...

Страница 56: ...ry disconnect the drive cables from the installation kit Press the catch to unlock it and press the cable retainer backwards out of the opening 1 1 3 1 1 2 Undo the screws 1 on the old installation kit Slide the old installation kit in direction of the arrow 2 Take the old installation kit out of the casing 3 52 Fujitsu ...

Страница 57: ...ew assembly kit with the screws 3 Insert the connectors of the basic configuration cable and the extension cable if more than 4 drives at the respective slot in the correct position To ensure that the connectors engage correctly always also push the locking lugs outwards Reinstall the hard disk fan see Install the hard disk fan Page 69 Fujitsu 53 ...

Страница 58: ... of the hard disk in the casing may vary install either horizontally or vertically depending on the hard disk type The following images illustrate the installation of a 31 2 drive Removing the hard disk front panel 1 1 2 Press the unlocking keys on the sides of the hard disk front panel 1 Fold the hard disk front panel in the direction of the arrow 2 and remove it from the casing 54 Fujitsu ...

Страница 59: ...System expansions Removing the protective grille 1 Pull the protective grille away from the casing 1 Fujitsu 55 ...

Страница 60: ...d disk drive are mounted on the drive cage Secure the EasyChange rails on the side of the hard disk by inserting the upper pins of the EasyChange rail in the corresponding holes on the hard disk By default the wiring for standard installation max four 21 2 inch drives is installed If you wish to install other or different drives use the supplied cables 56 Fujitsu ...

Страница 61: ...Setup Removing a hard disk The principles for installing removing hard disks for the device as described below are identical for all types of hard disk Only the size and alignment of the hard disk in the casing may vary install either horizontally or vertically depending on the hard disk type The following images illustrate the installation of a 31 2 drive Removing the hard disk drive Open the cas...

Страница 62: ...ard disk is released Pull the hard disk drive out of the drive cage in the direction of the arrow 2 Pull the EasyChange rails off the hard disk drive If you no longer need the EasyChange rails secure them again at their location in the drive cage It may be necessary to modify the entry for the drive in the BIOS Setup 58 Fujitsu ...

Страница 63: ...ection of the arrow 1 The protective grille is secured Reattach the front panel to the casing see Securing the hard disk front panel Page 59 Securing the hard disk front panel 1 Place the hard disk front panel in the guide openings as illustrated Fold the hard disk front panel in the direction of arrow 1 until you feel it engage Fujitsu 59 ...

Страница 64: ...th an additional power supply in slot 6 Install a second display adapter in slot 4 The numbering of the slots can be seen on the mainboard and from outside on the rear wall of the casing Open the casing see Opening the casing Page 33 Board 1 1 2 1 With long PCI boards remove the upper part of the card holder at the front fan in order to be able to click the board into place at the front fan during...

Страница 65: ...away the slot cover For cooling protection against fire and in order to comply with EMC regulations you must refit the slot cover if you remove the board 2 1 Push the board into the slot 1 Swivel the retaining clamp back again until you feel it click into place 2 Connect the cables to the board For display adapters with additional power supply Attach the display adapter power cable to the power su...

Страница 66: ... the guide 1 and push it to the edge of the guide The upper part of the card holder engages Close the casing see Closing the casing Page 34 If you have installed or removed a board please check the relevant slot settings in the BIOS Setup If necessary change the settings Further information is provided in the board documentation 62 Fujitsu ...

Страница 67: ...to be able to release the board at the front fan during removal Push the locking lug on the upper removable part of the card holder in the direction of the arrow 1 Lift the card holder away from the fan 2 1 2 Push the mounting clip 1 towards the slot cover to unlock it then move it towards the back panel of the device Pull the board out of the slot in the direction of the arrow 2 Place the board i...

Страница 68: ...tection against fire and in order to comply with EMC electromagnetic compatibility regulations you must refit the slot cover 2 1 Slide the slot cover into the slot 1 Press on the retaining clip until it you feel it engage 2 64 Fujitsu ...

Страница 69: ...uide 1 and push it to the edge of the guide The upper part of the card holder engages Close the casing see Closing the casing Page 34 If you have installed or removed a PCI board please check the relevant PCI slot settings in the BIOS Setup If necessary change the settings Further information is provided in the PCI board documentation Fujitsu 65 ...

Страница 70: ...vels CELSIUS M740 CELSIUS M740power CELSIUS R940 CELSIUS R940power Rated power of the power supply PSU Continuous current Number of GFX ports 8 pin x 600 W 18 5 A 1 x x 1000 W 18 5 A 2 x 1300 W 18 5 A 3 Upgrading main memory Open the casing see Opening the casing Page 33 Mainmemory If the bays are located below the hard disk fan Remove the hard disk fan see Remove the hard disk fan Page 67 If the ...

Страница 71: ... hard disk fan Remove the hard disk fan Requirement open the casing see Opening the casing Page 33 Disconnect the fan cable from the mainboard 1 a Swivel the hood in the direction of the arrow 1 until the guide on the fan a fits through the grooves of the hood Unhook the hood Remove the hood from the casing Fujitsu 67 ...

Страница 72: ...System expansions 1 1 2 Move the catches of the fan in the direction of the arrow 1 so that the fan releases from the location Remove the fan from the casing 2 68 Fujitsu ...

Страница 73: ...in the casing 1 and ensure that the catches 2 engage Connect the fan cable to the mainboard a 1 Position the hood in the casing and slide the grooves of the hood into the guides on the fan a Carefully fold the hood down 1 until you feel it latch into place Fujitsu 69 ...

Страница 74: ...st remove the reverse fan Removing the rear fan Requirement open the casing see Opening the casing Page 33 Disconnect the fan cable from the mainboard 1 2 Press the catch of the fan in the direction of the arrow 1 so that the fan releases from the location Remove the fan from the casing 2 70 Fujitsu ...

Страница 75: ...or as described in the manual for the mainboard Install the heat sink again see Installing the heat sink Page 72 Close the casing see Closing the casing Page 34 Installing and removing heat sinks Removing the heat sink The shape and position of the heat sink are device dependent Open the casing see Opening the casing Page 33 Remove the hood of the hard disk fan and the hard disk fan itself see Rem...

Страница 76: ... so that the air flow is fed towards the back of the casing see arrow on the heat sink Tighten the screws Reinstall the hard disk fan and the hood of the hard disk fan see Install the hard disk fan Page 69 Never attach or detach fans during operation This can cause problems controlling the mainboard fan 72 Fujitsu ...

Страница 77: ...mended by the manufacturer Do not dispose of lithium batteries with household waste They must be disposed of in accordance with local regulations concerning special waste Make sure that you observe the correct polarity when replacing the lithium battery The plus pole must be on the top Lithiumbattery Replacing Replacing Replacing lithiumbattery Battery The lithium battery holder exists in differen...

Страница 78: ...ch Weight in basic configuration approx 18 kg 39 68 lbs Ambient conditions Environment class 3K2 Environment class 2K2 DIN IEC 721 part 3 3 DIN IEC 721 part 3 2 Temperature Operation 3K2 10 C 35 C 50 F 95 F Transportation 2K2 25 C 60 C 13 F 140 F The formation of condensation is not permitted while the device is in operation Clearance required to ensure adequate ventilation without air vents with ...

Страница 79: ...USB keyboard 18 Connecting a USB mouse 18 Contents of delivery 14 Ctrl Alt Del 24 Cursor keys 23 D Data protection 25 Device Connections 16 setting up 15 Device anti theft protection 25 closing 34 lead sealing 25 opening 33 switching off 21 switching on 21 transporting 9 10 upgrades 31 Devices connecting 18 Disposal 10 Drivers Utilities DVD 10 E Electromagnetic compatibility 11 Energy saving 10 Er...

Страница 80: ...e safety 9 Notes CE marking 11 important 9 Numeric keypad 23 O ON OFF switch 23 Overview Device 5 P Packaging 14 Packaging unpacking 14 Ports 7 16 Preparing for first use overview 14 Preparing for use overview 14 Property protection 25 R Recycling 10 Replacing lithium battery 73 Replacing lithium battery 73 Retransportation 9 10 S Safety information 9 Security functions BIOS Setup 27 Security func...

Страница 81: ...Index USB port 18 connecting keyboard 18 USB port connecting devices 18 User Documentation DVD 10 W Workstation 15 Fujitsu 77 ...

Отзывы: