background image

13

3   High Capacity Feeder B1-S/C3-DS

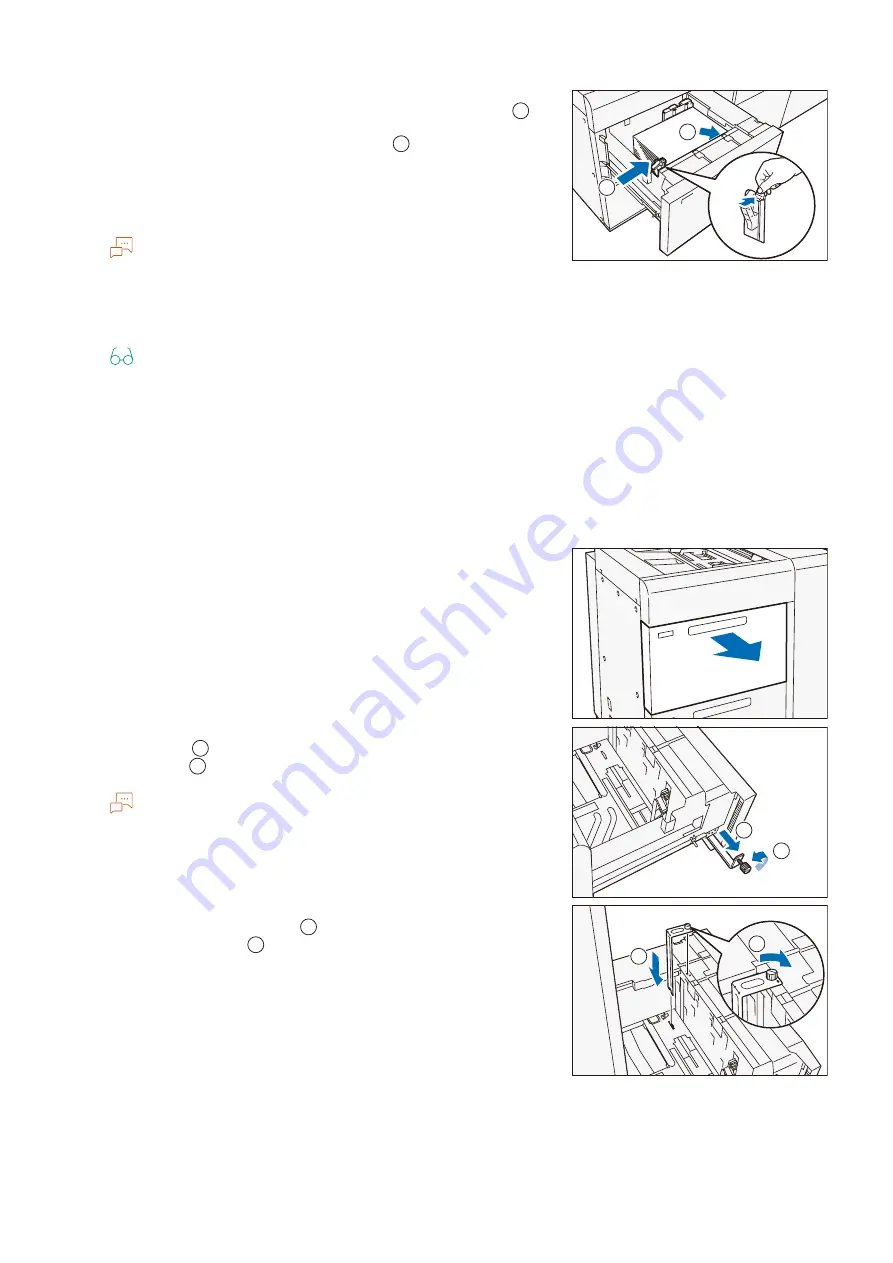
5.

Face the print surface up and load remaining paper with 
edges aligned according to the direction of the arrow (

).

6.

Align the side guide to the paper size (

).

To widen, pinch the clip with fingers and move the guide.

To narrow down, pinch the clip with fingers and move the guide 
by pushing it.

Note

 Confirm that the handle of the paper feeding accuracy is at the 
home position. When images are skewed (print position is 
displaced) even though paper is correctly loaded, change the 
paper feeding accuracy.

Refer

“Changing Paper Feeding Accuracy” (p.16)

7.

Push in the Paper Tray.

Postcards and other media

Use the postcard inserter supplied with the Paper Tray to set paper with the width of 100 to 182 
mm.

1.

Pull out the Paper Tray until it stops.

2.

When paper is already loaded in the tray, take out the paper.

3.

When using the guide supplied with the Paper Tray, loosen 
the screw [

] at the left side of the Paper Tray and remove 

the guide [

].

Note

The postcard inserter of C3-DS is placed in the upper paper 
tray.

The postcard inserter of B1-S is placed in the lower paper tray.

4.

Insert the guide into the cut at the right side on the bottom 
and the front screw hole (

) and tighten the screw of the 

guide to secure it (

).

1

2

1

2

2

1

1

2

1

2

1

2

Содержание Apeos C6580

Страница 1: ...April 2021 GM1040E1 1 Ver 1 FUJIFILM Business Innovation Corp Apeos C8180 Apeos C7580 Apeos C6580 Reference Guide Optional Units ...

Страница 2: ... system IC card reader Official site of our company In this manual safety instructions are preceded by the symbol Always read and follow the instructions before performing the required procedures For trademarks and notations in the manual refer to the Reference Guide Main Unit This manual may not be edited modified or copied in whole or in part without the written consent of the publisher Parts of...

Страница 3: ... can check the remaining paper volume 2 High Capacity Tray Paper Tray 6 Load paper here 3 Top Cover Open this cover to clear paper jams Item Specification Paper size A4 Letter JIS B5 7 25 x 10 5 184 x 267 mm Paper weight g m2 52 to 220 Maximum number of sheets sheets C2 paper 2 470 Dimensions mm Width 389 x Depth 610 x Height 377 Weight kg 29 3 2 1 ...

Страница 4: ...on 1 Pull out the Paper Tray 6 until it stops 2 When paper is already loaded in the tray take out the paper 3 If changing the Paper Size adjust the guide position 1 Open the end guide remove the screw for the guide in the back and remove the guide from the Paper Tray 6 2 Insert the protrusions under the guide into the Paper Size holes 3 Insert the Paper Tray 6 protrusions into the Paper Size holes...

Страница 5: ...rusions into the Paper Size holes on top of the guide and tighten the screw 7 Pull the handle for the end guide up align with the Paper Size while moving the handle along the groove and lower the handle Note The groove on the left side of the end guide 8 5 is not used 4 Fan a stack of paper face the print surface up and then load the paper with edges aligned according to the direction of the arrow...

Страница 6: ... Units 5 Close the end guide completely 6 Push in the Paper Tray 6 Setting special paper and other media Hole punched paper Paper orientation Load paper with holes facing the right side when viewed from the front of the machine ...

Страница 7: ... that none remain inside the machine When you have finished clearing the paper jam printing is resumed from the state before the paper jam occurred If a paper jam occurred during copying tap on Start Copying is resumed from the state before the paper jam occurred Note Clear the paper jams while the machine is on Exit 1 Hold the handle and move the unit all the way to the left 2 Remove the jammed p...

Страница 8: ...ndle and open the cover 3 Remove the jammed paper 4 Close the cover 5 Move the unit to the right and connect it with the main unit Paper Tray 6 1 Pull out the Paper Tray 6 until it stops 2 Remove the jammed paper 3 Push in the Paper Tray 6 2 1 1 2 ...

Страница 9: ...9 3 High Capacity Feeder B1 S C3 DS 3 High Capacity Feeder B1 S C3 DS 3 1 Device Components B1 S C3 DS 1 2 4 5 3 6 7 8 6 4 5 3 2 1 8 7 ...

Страница 10: ...r When paper jam occurs the indicator is turned on 4 Right Cover Open this cover to clear paper jams 5 Remaining Volume Indicator When the Paper Tray is in operation the top lamp is turned on You can check the remaining volume of paper with the 4 lamps each lamp indicates 25 at the center When Paper Replenish Indicator is turned on paper is empty 6 B1 S Consumables Storage Unit Stores papers and c...

Страница 11: ...Inserter is needed for Postcard by Japan Post and paper its length is shorter than 182 mm When the High Capacity Feeder is installed install the Bypass Tray to the High Capacity Feeder Feeding Capacity Number of Tray B1 S 2 290 C3 DS 2 290 x 2 trays Max 4 580 Note This value applies if our C2 paper is used Power supply B1 S AC 100 V 10 2 5 A 50 60 Hz common C3 DS AC 100 V 10 6 A 50 60 Hz common Ma...

Страница 12: ...ottom plate may not goes up next time the power is turned on In this case pull out the Paper Tray and confirm that the bottom plate goes down Then slowly insert the tray firmly After paper is loaded and when paper is supplied you can hear noise of air being sent This is the noise generated by the air assist function and not abnormal noise 1 Pull out the Paper Tray until it stops 2 When paper is al...

Страница 13: ...curacy Refer Changing Paper Feeding Accuracy p 16 7 Push in the Paper Tray Postcards and other media Use the postcard inserter supplied with the Paper Tray to set paper with the width of 100 to 182 mm 1 Pull out the Paper Tray until it stops 2 When paper is already loaded in the tray take out the paper 3 When using the guide supplied with the Paper Tray loosen the screw at the left side of the Pap...

Страница 14: ...aper size To widen pinch the clip with fingers and move the guide To narrow down pinch the clip with fingers and move the guide by pushing it 9 Push in the Paper Tray 10 Loosen the screw of the guide completely before removing the guide 11 Insert the removed guide into the designated position at the left side of the paper tray tighten the screw and keep it Special paper and other media Hole punche...

Страница 15: ...e machine Important Do not load too many envelopes If too many are set envelopes may become skewed and it may cause a machine break down Note If loaded with the flap open the envelope cannot be automatically recognized as standard size When the envelope has glue load it with its flap closed When loaded with flap closed and oriented facing the front of the machine a print defect may occur with the ...

Страница 16: ...ed the paper properly resulting in paper jams It is not effective when the postcard inserter is used 1 Pull out the Paper Tray until it stops 2 Move the handle at the top of the vertical guide clip to the rightmost position I position to enable the changing Note To reset the setting move the handle to the leftmost position 3 If the accuracy of paper feeding is not improved even if 2 is performed m...

Страница 17: ...the paper it may cause paper jams In the case of coated paper only one sheet can be loaded The image quality and paper feeding capability are not guaranteed when more than one sheet is loaded 1 Pinch the lock to adjust the Paper Guide to the size of loaded paper 2 Fan a stack of paper face the print surface up and insert the paper gently along the Paper Guide until it stops 3 When custom size pape...

Страница 18: ...ion Load paper with a tab facing the left side when viewed from the front of the machine Postcards Paper orientation SEF Long paper and other media 1 Loosen the 4 screws of the Paper Guide 2 Hold the center of the Paper Guide and adjust it to the size of loaded paper 3 Fan a stack of paper face the print surface up and insert the paper gently along the Paper Guide until it stops 4 Secure the 4 scr...

Страница 19: ...med from the state before the paper jam occurred If a paper jam occurred during copying tap on Start Copying is resumed from the state before the paper jam occurred The error indicator at the top of the machine is turned on Note Clear the paper jams while the machine is on Paper Tray 1 Remove the jammed paper P 19 When Indicator E5 is turned on P 20 When Indicator E6 is turned on C3 DS P 20 When I...

Страница 20: ...ore pulling it out 2 Remove the jammed paper 3 Confirm the Paper Guide position and push the tray When Indicator E6 is turned on B1 S when Indicator E7 is turned on C3 DS 1 Pull out the Paper Tray 6 or 7 until it stops Note Confirm that no paper is jammed inside the Right Cover before pulling it out 2 Remove the jammed paper 3 Confirm the Paper Guide position and push the tray ...

Страница 21: ...r E3 is turned on P 22 When Indicator E4 is turned on When Indicator E1 is turned on 1 Open the handle 1d upward turn the knob 1c to the right and remove the jammed paper 2 Return the handle 1d When Indicator E2 is turned on 1 Open the handle 1a to the right turn the knob 1c to the right and remove the jammed paper Note Turn the knob 1c 3 times or more 2 Return the handle 1a 3 1 2 1 2 3 3 1 2 1 2 ...

Страница 22: ... the jammed paper 2 Return the handle 1b When Indicator E4 is turned on 1 Open the handle 1a to the right turn the knob 1c to the right and remove the jammed paper 2 When it is difficult to remove the paper open the Upper Cover of the bypass tray and remove the jammed paper 3 Return the handle 1a 3 Close the cover 3 2 1 1 2 3 3 1 2 1 2 2 3 ...

Страница 23: ...h as benzine or thinner Doing so may damage the paint or coating on plastic parts Note Firmly close the cover after cleaning If the cover is open an error occurs and print cannot be available Feeding Paper When cleaning is performed many white spots appear for a while Perform paper feeding after cleaning to enhance the effect of cleaning 1 Create C 100 and M 100 data in SRA3 or A3 size 2 Make appr...

Страница 24: ...stops 2 Clean the roller in the feeder cover at the right side of the Paper Tray 1 Press the holder of the roller 1 in the arrow direction and pinch the pins of the roller 1 and remove it 2 Wipe the surface of the roller 1 with a soft moistened and tightly squeezed cloth 3 Install the roller 1 Note Check if the pins are fitted into the holder properly 4 Pinch the pins of the roller 2 and remove th...

Страница 25: ...as the roller 2 is removed 7 Install the roller 2 3 Push in the Paper Tray 4 Clean the other Paper Tray with the steps explained in 1 to 3 Cleaning paper feeding unit inside the Right Cover from Large Capacity Tray Note Do not push the rollers during cleaning If you press the rollers they may come off Using a dry non woven cloth is effective for cleaning of paper dust 1 Open the Right Cover ...

Страница 26: ...aper dust adhering to the paper feeding surface 4 Return the handle 1a 5 Open the handle 1b to the right 6 Clean inside the handle 1b 1 Wipe the surface of the roller with a soft moistened and tightly squeezed cloth 2 Wipe off paper dust adhering to the paper feeding surface 7 Return the handle 1b 8 Open the handle 1d upward Roller Paper path surface Roller Roller Paper path surface Roller ...

Страница 27: ...9 Clean inside the handle 1d 1 Wipe the surface of the roller with a soft moistened and tightly squeezed cloth 2 Wipe off paper dust adhering to the paper feeding surface 10 Return the handle 1d 11 Close the cover Roller Paper path surface ...

Страница 28: ...r paper jams 2 Tri Fold Output Tray Button Press the button to remove paper from the Tri Fold Output Tray The Tri Fold Output Tray is opened when the lamp stops blinking and comes on and the lock is released 3 Hole Punch Waste Container Punched pieces go in here Refer For the discard method of waste in the waste container refer to the label affixed on the machine 4 10 bin output device Output to t...

Страница 29: ...ut Tray Sort Offset available Stack Offset available Finisher Tray Sort Offset available Stack Offset available Booklet Tray Sort Stack Mail bin 10 bin Sort Stack Note The optional 10 bin output device is needed Paper size Top Output Tray Standard size Max A3 11 x 17 Min Postcard by Japan Post Custom size mm Width 100 to 330 Length 148 to 1 300 Finisher Tray Standard size Max A3 11 x 17 Min A5 Cus...

Страница 30: ...ame size papers Mail bin sheets 100 per bin Note This value applies if our C2 paper is used Mixed Size Stacking refers to a condition in which larger paper is stacked on top of smaller paper such as A4 on top of JIS B5 or JIS B4 on top of A4 Staple With staples Maximum number of sheets of paper sheets 50 Note Up to 65 sheets are possible if 65 sheet cartridge is installed Paper may be displaced or...

Страница 31: ... size and paper type Paper size Standard size Max A3 11 x 17 Min JIS B5 Custom size mm Width 182 to 330 Length 257 to 457 Paper weight g m2 Uncoated 64 to 300 Coated 106 to 220 Dimensions mm Finisher Width 771 x Depth 692 x Height 1 054 Finisher with Booklet Maker Width 776 x Depth 692 x Height 1 054 Finisher with Booklet Maker 10 bin output device Width 873 x Depth 692 x Height 1 603 Weight kg 45...

Страница 32: ...eference Guide Optional Units 151 to 176 15 7 7 7 177 to 220 10 5 5 5 221 to 300 3 3 3 3 301 to 350 3 3 Paper weight g m2 Side Stitch Saddle stitch Uncoated Coated Uncoated Coated Ejection is not available ...

Страница 33: ...r customer support center or sales agency If the staple looks like any of the following images contact our customer support center or sales agency Note Depending on the usage condition such as the paper type staples may be bent or bent staples may be caught inside of the unit causing paper jamming If you open the Staple Cartridge cover be sure to remove all bent staples Not removing bent staples m...

Страница 34: ...pply on the Touch Panel Display 2 Confirm that the machine is not operating and open the Cover 3 Hold the handle and remove the cartridge When using the 65 sheet cartridge flip the handle down and remove the cartridge 4 Check to make sure that there is no staple inside of the Finisher 5 Push the metal part of the cartridge up ...

Страница 35: ...nto the original position Hold the handle and lightly press it up until you hear a click 8 Close the cover Staple cartridges for saddle stitch 1 Confirm that the machine is not operating and open the Cover 2 Pull out Booklet Maker 4 3 Hold the handle of the staple cartridges R2 R3 and pull them out 4 Remove the jammed staples 1 2 1 2 ...

Страница 36: ...llow the message displayed to remove the jammed paper Gently remove the paper being careful not to tear it If paper is torn while it is being removed from the machine remove all the torn pieces making sure that none remain inside the machine When you have finished clearing the paper jam printing is resumed from the state before the paper jam occurred If a paper jam occurred during copying tap on S...

Страница 37: ...d paper 4 Return the handle 1a 5 Close the cover Exit Finisher Tray 1 Remove the paper that is jammed in the Exit Booklet Tray 1 Open the Cover 2 Remove the jammed paper in the Booklet Tray to the right direction 3 If it is difficult to remove the paper turn the knob 4a to the right and remove the paper output in the exit of the Booklet Tray 4 Close the cover 1 2 3 1 2 3 2 1 1 2 2 1 1 2 ...

Страница 38: ...over 1 Open the Cover Handle 3a 1 Open handle 3a upward and remove the jammed paper 2 Return the handle 3a Handle 3d 1 Open the handle 3d to the right and remove the jammed paper 2 Return the handle 3d Maker 1 Pull out Booklet Maker 4 1 2 1 2 1 2 1 2 ...

Страница 39: ...om the exit of the 10 bin output device slowly pull out the paper and remove it Note When it is difficult to remove the paper lift the bins to make space and remove it 2 Open the Front Cover of the 10 bin output device 3 Open the inner cover 7a to the left 4 When paper protrudes from the exit of the 10 bin output device slowly pull out the paper downward and remove it 1 2 1 2 ...

Страница 40: ...he cover Note If the Front Cover of the Finisher is opened even just a little a message is displayed and the machine does not work 7 Close the cover 7a of the 10 bin output device 8 Close the Front Cover of the 10 bin output device Note If the Front Cover of the 10 bin output device is opened even just a little a message is displayed and the machine does not work ...

Страница 41: ...er Open this cover to clear paper jams 3 Tri Fold Output Tray Paper is ejected only to this tray in case of inner C Fold and Z Fold sheets Item Specification Z Fold Half Sheet Paper size A3 11 x 17 8 K JIS B4 Paper weight CD2 60 to 90 g m2 Uncoated CD3 64 to 90 g m2 Uncoated Tri fold Paper size A4 Letter Paper weight CD2 60 to 90 g m2 Uncoated CD3 64 to 90 g m2 Uncoated Paper capacity sheets 40 No...

Страница 42: ...42 Reference Guide Optional Units Maximum power consumption W 100 Dimensions mm CD2 Width 235 x Depth 725 x Height 992 CD3 Width 232 x Depth 588 x Height 992 Weight kg CD2 55 CD3 52 Item Specification ...

Страница 43: ...n you have finished clearing the paper jam printing is resumed from the state before the paper jam occurred If a paper jam occurred during copying tap on Start Copying is resumed from the state before the paper jam occurred On CD2 the error indicator at the top of the Finisher is turned on When the priority device indicator blinks first of all perform the paper jam operation Note Clear the paper j...

Страница 44: ...he knob 2c to the left and remove the jammed paper 2 Return the handle 2g When Indicator E12 is turned on 1 Pull out the Tri Fold Output Tray 2d 2 Open the handle 2e to the right turn the knob 2c to the left and remove the jammed paper 3 Return the handle 2e 4 If it is difficult to remove the paper open the handle 2f to the right turn the knob 2c to the left and remove the jammed paper 5 Return th...

Страница 45: ...45 5 Folder Unit 6 Return the Tri Fold Output Tray 2d to the original position 3 Close the cover 4 Check the curl direction of the jammed paper and correct the curl Refer Curl correction p 66 ...

Страница 46: ... turned on When the priority device indicator blinks first of all perform the paper jam operation 2 Top Output Tray Outputs are delivered here 3 Extension Tray Install this tray to output long paper 4 Finisher Tray Side stitch paper is ejected Note When 2 000 sheets or more of paper with large downward curl are output a stack of output sheets may fall In this case set the lowest curl correction of...

Страница 47: ...e stitch This unit is used to replace staples for side stitch 10 Staple cartridges for saddle stitch This unit is used to replace staples for saddle stitch There are two 11 Hole Punch Waste Container Punched pieces go in here Refer For the discard method of waste in the waste container refer to the label affixed on the machine 12 Cover of Interface Module Open this cover to clear paper jams 13 Err...

Страница 48: ... B4 or greater 100 copies or 1 500 sheets Booklet Tray 20 copies Note This value applies if our C2 paper is used Mixed Size Stacking refers to a condition in which larger paper is stacked on top of smaller paper such as A4 on top of JIS B5 or JIS B4 on top of A4 If there are 17 or more sheets per copy on the Booklet Tray the maximum number is 16 copies Storage of paper exceeding 330 x 488 mm is no...

Страница 49: ...0 Bi Fold 5 Paper size Standard size Max A3 11 x 17 Min JIS B5 Custom size mm Width 182 to 330 Length 257 to 488 Paper weight g m2 Uncoated 60 to 350 Coated 106 to 350 Power supply AC 100 V 10 3 A 50 60 Hz common Note Power of Interface Module is supplied from Finisher D or Finisher D with Booklet Maker Maximum power consumption W 300 Dimensions mm Finisher Width 855 x Depth 725 x Height 1 200 Fin...

Страница 50: ... exceeding A4 size Uncoated Coated Uncoated Coated 52 to 59 100 35 65 35 30 25 60 to 71 72 to 80 35 35 81 to 90 30 91 to 105 50 30 50 30 20 20 106 to 128 45 15 129 to 150 20 20 20 20 10 151 to 176 177 to 220 5 221 to 256 4 257 to 300 10 10 10 10 3 301 to 350 Although staple is available the stitch accuracy and paper feeding capability are not guaranteed ...

Страница 51: ...ith the length of 364 mm or more Long paper Pull the Top Output Tray to the right remove it from the lower fixed position A and insert the claws at the lead edge of the tray to the upper fixed position B Note Normally set the tray at the lower fixed position If the tray is at the upper fixed position of the exit paper may fall from the Top Output Tray and a paper jam may occur when paper is output...

Страница 52: ...ition A for paper with the width of 256 mm or less 3 Insert 2 extension trays until they stop Note Pass them through over the guide at the rear side of the tray until they stop Thin paper loading wire When it is difficult to load thin paper install the wire Note The tray capacity is 10 sheets Paper of which width is 256 mm or less cannot be used The supported paper weights are from 82 to 209 g m2 ...

Страница 53: ...orrection of Interface Module For Interface Decurler Module Inserter set the highest curl correction of Interface Decurler Module and upward curl correction of Inserter If thick paper is curled downward a paper jam may occur For Interface Module set the downward curl correction of Interface Module For Interface Decurler Module Inserter set the lowest curl correction of Interface Decurler Module an...

Страница 54: ...ontact our customer support center or sales agency If the staple looks like any of the following images contact our customer support center or sales agency Note Depending on the usage condition such as the paper type staples may be bent or bent staples may be caught inside of the unit causing paper jamming If you open the Staple Cartridge cover be sure to remove all bent staples Not removing bent ...

Страница 55: ...l out R1 Note After removing the Staple Cartridge check to make sure that there is no staple inside of the Finisher 3 Open the cover of the unit and remove the jammed staples 4 Insert the unit into the original position 5 Close the cover Staple cartridges for saddle stitch 1 Confirm that the machine is not operating and open the Cover ...

Страница 56: ...handle of the staple cartridge R2 and pull it out 4 Remove the jammed staples 5 Insert the cartridge into the original position Hold the handle and lightly press it up until you hear a click Note Align the marks 6 Slowly insert Booklet Maker 3 all the way 7 Close the cover ...

Страница 57: ...ver of the unit and remove all the deformed staples 2 Move the handle on the rear side of the unit in the arrow direction Note Please be very careful not to hurt your nails and fingers etc when moving the handle 3 Turn it over as the handle is at the moved position and take out the Staple Cartridge from the unit 4 Remove the staples that stick out from the Staple Cartridge Caution Caution Please b...

Страница 58: ...58 Reference Guide Optional Units 5 Insert the staple cartridge into the unit Caution Caution Please be very careful not to hurt your fingers etc when separating staples ...

Страница 59: ... sure that none remain inside the machine When you have finished clearing the paper jam printing is resumed from the state before the paper jam occurred If a paper jam occurred during copying tap on Start Copying is resumed from the state before the paper jam occurred The error indicator at the top of the machine is turned on When the priority device indicator blinks first of all perform the paper...

Страница 60: ...per Note Hold the lead edge of the paper and remove it 2 If it is difficult to remove the paper turn the knob 1b to the right and remove the jammed paper 3 Return the handle 1a When Indicator E2 is turned on 1 Open the handle 1c to the right turn the knob 1e to the right and remove the jammed paper Note Jammed paper may be hidden at the upper section 2 Return the handle 1c When Indicator E3 is tur...

Страница 61: ... remove the jammed paper 2 Return the handle 1d When Indicator E5 is turned on 1 Open the handle 1d to the right turn the knob 1f to the left and remove the jammed paper 2 Return the handle 1d When Indicator E6 is turned on 1 Remove the paper that is jammed in the Exit of the Finisher Tray 2 Open and close the cover 3 Close the cover 1 2 3 1 2 3 1 2 3 1 2 3 ...

Страница 62: ...n Indicator E7 is turned on P 63 When Indicator E8 is turned on P 63 When Indicator E9 is turned on When Indicator E7 is turned on 1 Open the handle 3a to the left and remove the jammed paper 2 If it is difficult to remove the paper pull out Booklet Marker 3 and remove the jammed paper 3 Open and close the cover 4 Return the handle 3a 5 Slowly insert Booklet Maker 3 all the way 1 2 1 2 1 2 1 2 ...

Страница 63: ...ng it out 2 Turn the knob 3b to the left and remove the jammed paper 3 Slowly insert Booklet Maker 3 all the way When Indicator E9 is turned on 1 Turn the knob 3b to the right and remove the paper that is output in the Booklet Tray 3 Close the cover 4 Check the curl direction of the jammed paper and correct the curl Refer Curl correction p 66 1 2 1 2 1 2 1 2 ...

Страница 64: ... 1a to the right turn the knob 1c to the left and remove the jammed paper 3 Return the handle 1a 4 If it is difficult to remove the paper open the handle 1b upward turn the knob 1c to the right and remove the jammed paper 5 Return the handle 1b 6 Close the cover 1 2 3 1 2 3 3 2 1 1 2 3 ...

Страница 65: ...riority device indicator blinks first of all perform the paper jam operation 2 Curl correction button Press the button to correct paper curl This curl correction function can be used during printing 3 Cover Open this cover to clear paper jams Item Specification Power supply Maximum power consumption AC 100 V 10 2 5 A 50 60 Hz common 250 W Dimensions mm Width 340 x Depth 725 x Height 992 Weight kg ...

Страница 66: ...UTO mode the indicator showing the present direction and intensity of curl correction turns on only for a brief moment When manually applying the curl correction make adjustments while using this indicator lighting as a guide After applying the curl correction by upward curl correction button or downward curl correction button when feeding thick paper embossed paper or OHP film the AUTO is entered...

Страница 67: ...n button is pressed the degree of correction is changed The higher the indicator s position the stronger the correction Downward curl Downward curl correction is performed when output paper is curled downward Every time the downward curl correction button is pressed the degree of correction is changed The lower the indicator s position the stronger the correction Indicator Mode Function ...

Страница 68: ...m the state before the paper jam occurred If a paper jam occurred during copying tap on Start Copying is resumed from the state before the paper jam occurred The error indicator at the top of the machine is turned on When the priority device indicator blinks first of all perform the paper jam operation Note Clear the paper jams while the machine is on 1 Open the Cover 2 Open the handle 1a downward...

Страница 69: ...69 7 Interface Decurler Module 4 When it is difficult to remove the paper open the handle 1c upward and remove the jammed paper 5 Return the handle 1c 6 Close the cover 2 1 1 2 ...

Страница 70: ...rm the paper jam operation 2 Curl correction button Use this button when curl cannot be corrected even if the highest correction or lowest correction of Interface Decurler Module is performed The correction method is the same as the Interface Decurler Module The 3 correction levels are available OFF upward and downward Refer Curl correction p 66 3 Interleaf Cover Tray Paper Tray T1 Load paper to b...

Страница 71: ...r the following papers folding displacement and or paper wrinkles occur Use Bypass Tray for these papers Coated of which paper weight is 127 g m2 or less Blank paper not to be printed of which paper weight is 80 g m2 or less Tray capacity sheets 250 Note This value applies if our C2 paper is used Power supply Supplied from Interface Decurler Module Dimensions mm Width 700 x Depth 725 x Height 1 23...

Страница 72: ...e body paper output from the printer main unit Load paper first before starting the job 1 Align and load paper Important Do not load paper above the maximum fill line It may cause paper jams or machine malfunction 2 Hold the center of the Paper Guide and adjust it to the size of loaded paper Note Adjust the guide to lightly touch the paper If the Paper Guide width is narrower or wider than the pap...

Страница 73: ... occurred during copying tap on Start Copying is resumed from the state before the paper jam occurred The error indicator at the top of the machine is turned on When the priority device indicator blinks first of all perform the paper jam operation Note Clear the paper jams while the machine is on 1 Remove the jammed paper P 73 When Indicator E1 is turned on P 74 When Indicator E2 is turned on P 74...

Страница 74: ... difficult to remove the paper open the handle 1c to the right turn the knob 1b to the left and remove the jammed paper 5 Return the handle 1c 6 Close the cover When Indicator E3 is turned on 1 Open the Cover 2 Open the handle 1d downward turn the knob 1e to the left and remove the jammed paper Note Jammed paper may be hidden at the upper section 3 Return the handle 1d 3 1 2 1 2 3 1 2 3 1 2 3 2 3 ...

Страница 75: ...ve the paper open the handle 1a upward turn the knob 1e to the right and remove the jammed paper 5 Return the handle 1a 6 Close the cover 2 Check the curl direction of the jammed paper and correct the curl Refer Curl correction p 66 1 2 3 1 2 3 ...

Отзывы: