background image

19

Chapter 2 Interface Decurler Module

2.2

Curl Correction

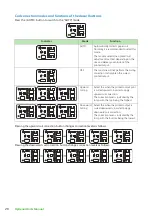
By pressing decurl buttons, you can correct the paper curl caused by heat and pressure.
As far as the printer is powered on, the decurl buttons function regardless of whether the printer is running
or idle.

Important

This curl correction function is intended to be used during printing. Fine adjustment according to the char-
acteristics of each paper can be made by using Stock Library.
For  detailed  information  on  how  to  regard  the  Stock  Library,  refer  to  "Stock  Library"  in  the 

Stock Library

Manager Manual

.

Since paper curl can easily cause stapling problems, make sure you always check the curl direction of out-
put paper to properly correct paper curl.

Note

If you correct curl while the printer is running, the new mode is applied to the sheet delivered immediately
after the button is pressed.

 1.

Check the curl direction of output paper.

 2.

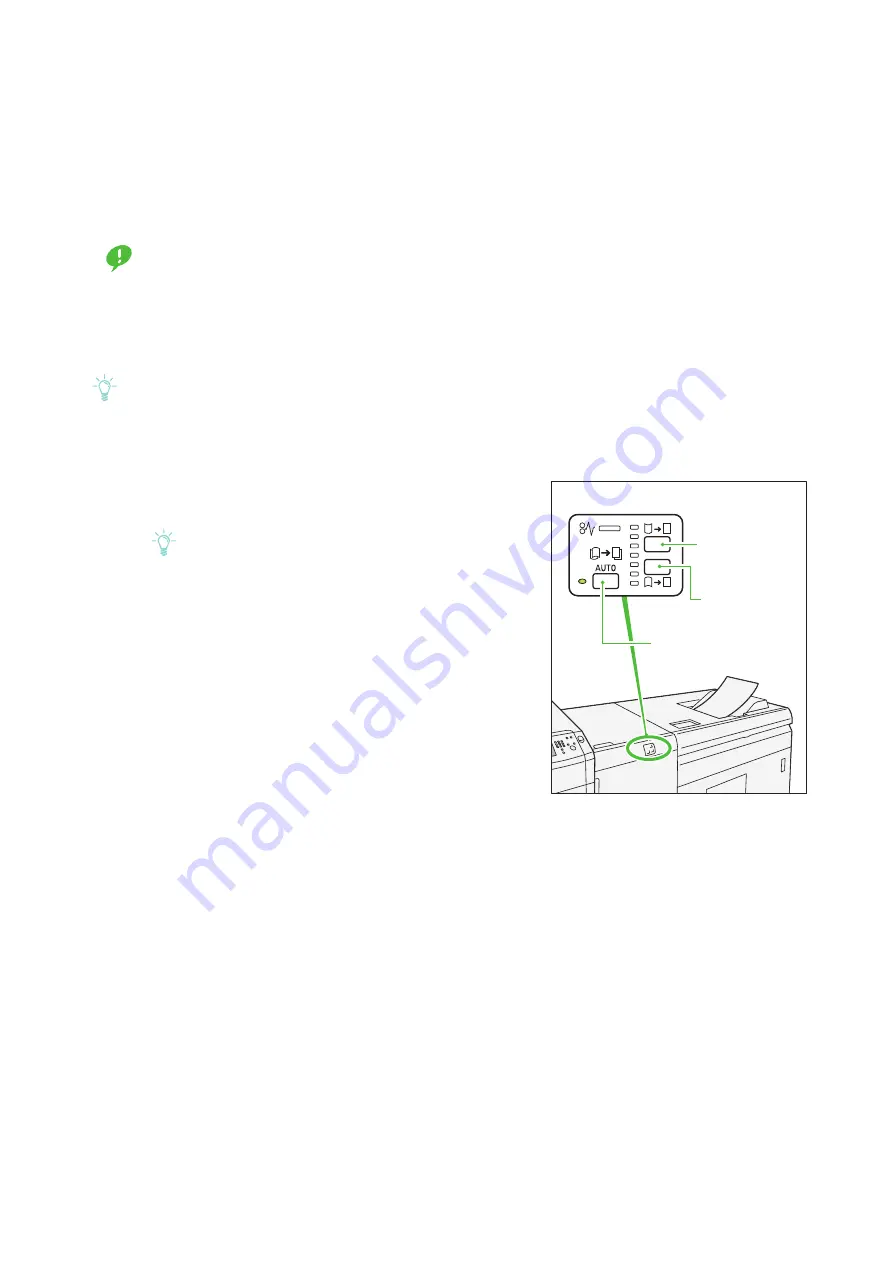
Make sure a decurl button lamp is lit and press the
button. 

Note

When feeding paper in "AUTO" mode, the lamps illu-
minate briefly to indicate the direction and level of
correction as paper curl is corrected. Use these lamps
as a guide when correcting paper curl manually.

Upward curl
correction button

<AUTO> button

Downward
curl correction button

Содержание Versant 3100 Press

Страница 1: ...t 3100 Press Optional Units Manual 2nd High Capacity Feeder C1 DS Interface Decurler Module Inserter High Capacity Stacker Crease Two sided Trimmer Folder Unit Finisher SquareFold Trimmer Finishing Transport ...

Страница 2: ... responsible for any direct or indirect damages arising from or caused by such data loss Fuji Xerox is not responsible for any breakdown of machines due to infection of computer virus or computer hack ing Important 1 This manual is copyrighted with all rights reserved Under the copyright laws this manual may not be copied or modified in whole or part without the written consent of the publisher 2 ...

Страница 3: ...ght of paper This manual is intended to provide first time users of the Versant 3100 Press with necessary information such as operating procedures and precautions on using the optional units Before using the Versant 3100 Press please read this manual thoroughly to obtain the best performance of the Versant 3100 Press After reading this manual please keep it in a safe place for further reference It...

Страница 4: ...ide the Right Side Cover 14 1 2 3 Paper Jams in the Paper Feeding Unit 17 Chapter 2 Interface Decurler Module 18 2 1 Machine Components 18 2 2 Curl Correction 19 2 3 Paper Jams 21 Chapter 3 Inserter 23 3 1 Machine Components 23 3 2 Loading Paper 25 3 3 Paper Jams 26 Chapter 4 High Capacity Stacker 30 4 1 Machine Component 30 4 2 Output Paper 32 4 2 1 Output Trays 32 4 2 2 Control Buttons 32 4 3 Pa...

Страница 5: ...lts 69 7 3 3 Re inserting the Staple Cartridge 72 7 4 Waste Container 74 7 4 1 Staple Waste Container 74 7 4 2 Hole Punch Waste Container 76 7 5 Paper Jams 77 7 5 1 Paper Jams in the Finisher 77 7 5 2 Paper Jams in the Saddle Stitch Unit 81 7 5 3 Paper Jams in the Paper Feeding Unit 84 Chapter 8 SquareFold Trimmer 85 8 1 Machine Components 85 8 2 Output Paper 87 8 2 1 Output Trays 87 8 2 2 Spine f...

Страница 6: ...ce procedures for the printer unit These descriptions are also applied to the printer unit equipped with Offset Catch Tray Versant 3100 Press User Interface Manual Describes the operations of the user interface UI for operating the printer The user interface allows you to confirm status of the printer and to set the printer behavior Versant 3100 Press Paper Jams Quick Access Guide Illustrates poss...

Страница 7: ...s and precautions on using the optional units Organization of This Manual This manual identifies components as well as covers procedures to clear paper jams for each of the optional units Chapter 1 2nd High Capacity Feeder C1 DS Chapter 2 Interface Decurler Module Chapter 3 Inserter Chapter 4 High Capacity Stacker Chapter 5 Crease Two sided Trimmer Chapter 6 Folder Unit ...

Страница 8: ...Optional Units Manual 8 Chapter 7 Finisher Chapter 8 SquareFold Trimmer Chapter 9 Finishing Transport ...

Страница 9: ... optional units Indicates the names of tabs options buttons menus and file names on the touch screen display Indicates the names of reference sections in this manual characters to be entered path names and messages XXX Manual Indicates the names of the reference manuals Paper Orientation There are two paper orientations Long Edge Feed LEF and Short Edge Feed SEF The figures below describe front re...

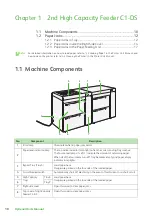
Страница 10: ... 2 Paper level indicator lamp The top active indicator lamp lights when the corresponding Tray is active The four center lamps 1 25 indicate the amount of remaining paper When all of the four lamps turn off Tray becomes empty and paper empty indicator lamp lights 3 Bypass Tray Tray 5 Load paper here Images are printed on the face side of the loaded paper 4 Circuit breaker switch Automatically shut...

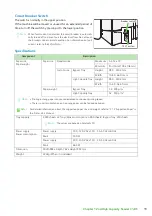
Страница 11: ... 98 0 330 2 mm Width 148 0 660 4 mm High Capacity Tray Height 98 0 330 2 mm Width 148 0 488 0 mm Paper weight Bypass Tray 52 300 g m 2 High Capacity Tray 52 350 g m 2 Note Printing on long paper can cause decreased continuous printing speed There is a certain limitation on how long paper can be fed and delivered Refer For detailed information about the supported paper size and weight refer to 2 1 ...

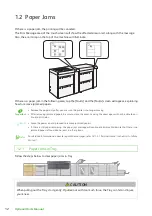
Страница 12: ...er moving After removing jammed papers be sure to close the cover Leaving the cover open will not be able to con tinue to print jobs Note Leave the power on and proceed to remove jammed papers If there is still paper remaining the paper jam message will continue to display Make sure that there is no jammed paper left and also no jams in other places Refer For detailed information on how to regard ...

Страница 13: ...s of paper are loaded remove all the sheets from the Tray 2 Close the cover 3 Fan the paper you removed and make sure all four corners are aligned correctly Then reload the paper If you have difficulty in removing jammed papers open the cover on the right side to remove the paper inside Refer For detailed information on paper jams inside the right side cover refer to 1 2 2 Paper Jams inside the Ri...

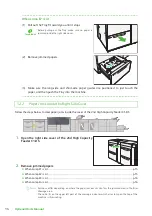
Страница 14: ...per Jams inside the Right Side Cover Follow the steps below to clear paper jams inside the cover of the 2nd High Capacity Feeder C1 DS 1 Open the right side cover of the 2nd High Capacity Feeder C1 DS 2 Remove jammed papers When Lamp E1 is Lit p 15 When Lamp E2 is Lit p 15 When Lamp E3 is Lit p 16 When Lamp E4 is Lit p 16 Note Solutions differ depending on where the paper jam occurs Confirm the ja...

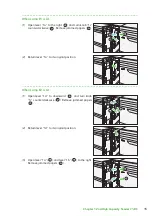
Страница 15: ...lockwise Remove jammed papers 2 Return lever 1a to its original position When Lamp E2 is Lit 1 Open lever 1d to downward and turn knob 1c counterclockwise Remove jammed papers 2 Return lever 1d to its original position 3 Open lever 1a and lever 1b to the right Remove jammed papers 2 1 3 1 2 3 1 2 3 1 2 3 1 2 3 3 1 2 3 ...

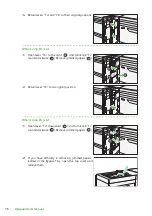
Страница 16: ...d turn knob 1c counterclockwise Remove jammed papers 2 Return lever 1b to its original position When Lamp E4 is Lit 1 Open lever 1d downward and turn knob 1c counterclockwise Remove jammed papers 2 If you have difficulty in removing jammed papers loaded in the Bypass Tray open the top cover and remove them 1 2 3 1 2 3 1 2 3 1 2 3 ...

Страница 17: ...ote The E5 error lamp of the High Capacity Feeder C3 DS will illuminate 1 Pull out the top cover of the High Capacity Feeder C3 DS toward you until it stops Important Before pulling out the Tray make sure no paper is jammed inside the right side cover 2 Open lever 2a to the right and lever 2b upward Remove jammed papers 3 Return levers 2a and lever 2b to their original positions 4 Close the cover ...

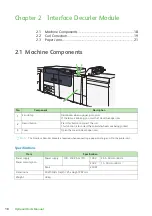
Страница 18: ...ription 1 Error lamp Illuminates when a paper jam occurs If the lamp is blinking you must first clear the paper jam 2 Decurl button Press this button to correct the curl This function is to correct the curl while sheets are being printed 3 Cover Open this cover to clear paper jams Item Specification Power supply Power consumption Power supply 100 240 V AC 10 100 V 2 5 A 50 Hz or 60 Hz 240 V 1 A 50...

Страница 19: ... Library in the Stock Library Manager Manual Since paper curl can easily cause stapling problems make sure you always check the curl direction of out put paper to properly correct paper curl Note If you correct curl while the printer is running the new mode is applied to the sheet delivered immediately after the button is pressed 1 Check the curl direction of output paper 2 Make sure a decurl butt...

Страница 20: ...The module selects the optimal curl adjustment method depending on the size and delivery orientation of the printed output OFF The machine will not perform the curling correction to straighten the curled printed output Upward Curling Select this when the printed output print is curled upwards in order to apply upward curl correction The correction level is indicated by the lamp with the top being ...

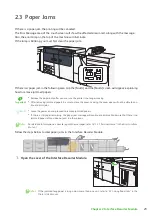
Страница 21: ... longer moving After removing jammed papers be sure to close the cover Leaving the cover open will not be able to con tinue to print jobs Note Leave the power on and proceed to remove jammed papers If there is still paper remaining the paper jam message will continue to display Make sure that there is no jammed paper left and also no jams in other places Refer For detailed information on how to re...

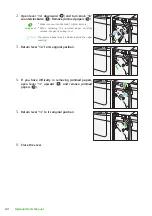
Страница 22: ...e When removing the jammed paper carefully remove it by gently pulling it out Note The jammed paper may be hidden behind the upper covering 3 Return lever 1a to its original position 4 If you have difficulty in removing jammed papers open lever 1c upward and remove jammed papers 5 Return lever 1c to its original position 6 Close the cover 1 2 3 1 2 3 1 2 1 2 ...

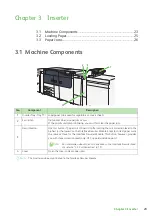
Страница 23: ...rity unit lamp is blinking you must first clear the paper jam 3 Decurl button Use this button if paper curl still persists after setting the curl correction level to the highest or the lowest on the Interface Decurler Module Steps to correct paper curl is the same as those for the Interface Decurler Module This button however provides you with three correction levels only OFF upward and downward R...

Страница 24: ...the following paper types and Saddle Stitch Bi fold because the combination can cause misalignment of folding positions and wrinkle Coated Paper weighing 127 g m 2 or lighter Blank sheets unprinted paper weighing 80 g m 2 or lighter Tray capacity 250 sheets Note The values are based on Colotech 90 Power supply Supplied from the Interface Decurler Module Dimensions Width 700 x Depth 725 x Height 1 ...

Страница 25: ...e maximum fill line It may cause paper jams or machine malfunctions 2 Hold the center of the paper guides and slide them to the desired paper size Important Slide the guides gently to just touch the edges of the paper If the distance between the guides is too long or short relative to the paper paper jams may occur Special Media Setting Hole punched paper Orientation Place the holes of paper on th...

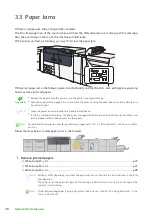
Страница 26: ...nt jobs Note Leave the power on and proceed to remove jammed papers If there is still paper remaining the paper jam message will continue to display Make sure that there is no jammed paper left and also no jams in other places Refer For detailed information on how to regard the messages refer to 1 2 1 Services Home in the User Interface Manual Follow the steps below to clear paper jams in the Inse...

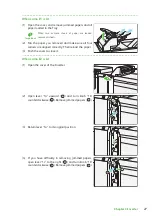
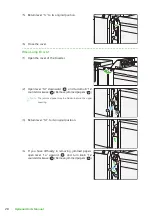
Страница 27: ... sure all four corners are aligned correctly Then reload the paper 3 Push the cover to close it When Lamp E2 is Lit 1 Open the cover of the Inserter 2 Open lever 1a upward and turn knob 1b counterclockwise Remove jammed papers 3 Return lever 1a to its original position 4 If you have difficulty in removing jammed papers open lever 1c to the right and turn knob 1b counterclockwise Remove jammed pape...

Страница 28: ...er 2 Open lever 1d downward and turn knob 1e counterclockwise Remove jammed papers Note The jammed paper may be hidden behind the upper covering 3 Return lever 1d to its original position 4 If you have difficulty in removing jammed papers open lever 1a upward and turn knob 1e counterclockwise Remove jammed papers 1 2 3 1 2 3 1 2 3 1 2 3 ...

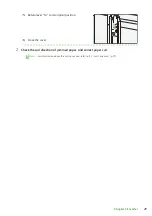
Страница 29: ...nserter 5 Return lever 1a to its original position 6 Close the cover 2 Check the curl direction of jammed paper and correct paper curl Refer For information about the Curl Correction refer to 2 2 Curl Correction p 19 ...

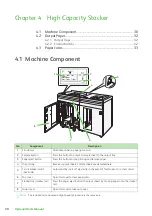
Страница 30: ...tton Press this button to output a sample sheet to the output tray 3 Paper eject button Press this button to stop printing and remove paper 4 Output tray Receives output sheets Sample sheets are delivered here 5 Circuit breaker switch back side Automatically shuts off electricity in the event of fault current or a short circuit 6 Top cover Open this cover to clear paper jams 7 Stacker tray stacker...

Страница 31: ...Item Specification Tray capacity Output tray 500 sheets Stacker tray 5 000 sheets Note The values are based on a paper less than 80 g m 2 Paper size Output tray Standard size Maximum A3 13 x 19 Minimum Postcard 100 x 148 mm Custom size Height 98 0 330 2 mm Width 148 0 660 4 mm Stacker tray Standard size Maximum A3 13 x 19 Minimum JIS B5 Custom size Height 203 0 330 2 mm Width 182 0 488 0 mm Paper ...

Страница 32: ...ur Print Server For detailed information on how to regard the method of specification refer to customer documentation supplied with Print Servers For detailed information about the Purge function refer to 2 2 Output Paper in the Printer Unit Manual 4 2 2 Control Buttons Sample Button Press this button to output a sample sheet to the output tray Paper Eject Button Press this button to stop printing...

Страница 33: ...e to close the cover Leaving the cover open will not be able to con tinue to print jobs Note Leave the power on and proceed to remove jammed papers If there is still paper remaining the paper jam message will continue to display Make sure that there is no jammed paper left and also no jams in other places Refer For detailed information on how to regard the messages refer to 1 2 1 Services Home in ...

Страница 34: ...the top of the machine is illuminating Refer If the jammed long paper is lying across more than one unit refer to 3 3 4 Long Paper Jam in the Printer Unit Manual When Lamp E1 is Lit 1 Open the top cover of the High Capacity Stacker 2 Open lever 1b upward and remove jammed papers 3 Return lever 1b to its original position 4 Close the cover When Lamp E2 is Lit 1 Open the top cover of the High Capaci...

Страница 35: ...emove jammed papers 3 Return lever 1b to its original position 4 Close the cover When Lamp E3 is Lit 1 Open the top cover of the High Capacity Stacker 2 Open lever 1b upward and turn knob 1a counterclockwise Remove jammed papers 3 Return lever 1b to its original position 1 3 2 1 2 3 1 3 2 1 2 3 ...

Страница 36: ... Remove jammed papers 5 Return lever 2b to its original position 6 Close the cover When Lamp E4 is Lit 1 Open the top cover of the High Capacity Stacker 2 Open lever 2a downward and remove jammed papers 3 Return lever 2a to its original position 4 Close the cover 3 1 2 1 2 3 1 2 1 2 ...

Страница 37: ...e High Capacity Stacker 2 Open lever 2b upward and turn knob 2c counterclockwise Remove jammed papers 3 Return lever 2b to its original position 4 Close the cover When Lamp E6 is Lit 1 Press the paper eject button 2 Make sure the lower cover is unlocked and then open it 3 1 2 1 2 3 ...

Страница 38: ...e stacker cart back into its original position 5 Close the cover When Lamp E7 is Lit 1 Remove any paper coming out at the exit of the out put tray 2 Open the top cover of the High Capacity Stacker 3 Open lever 1b upward and remove jammed papers 4 Return lever 1b to its original position 1 2 1 2 ...

Страница 39: ...8 is Lit 1 Open the top cover of the High Capacity Stacker 2 Open lever 3b upward and turn knob 3a clockwise Remove jammed papers 3 Return lever 3b to its original position 4 Close the cover 2 Check the curl direction of jammed paper and correct paper curl Refer For information about the Curl Correction refer to 2 2 Curl Correction p 19 1 2 1 2 1 2 3 1 2 3 ...

Страница 40: ... Trimmer can be only attached to the Finisher No Component Description 1 Error lamp Illuminates when a paper jam occurs If the priority unit lamp is blinking you must first clear the paper jam 2 Waste full lamp This lamp starts lighting when it is time to empty the waste container and blink when the waste container becomes full 3 Upper cover Open this cover to clear paper jams 4 Lower cover Open t...

Страница 41: ...ing Saddle Stitch Bi Fold You may also apply crease to paper weighing 156 g m 2 or lighter but the crease quality i e whether you can fold the output paper sheets easily by hand along the crease lines can not be guaranteed If wrinkles occur around crease lines on output sheets when you are using Saddle Stitch Bi Fold set Crease Pressure to a lower value in Stock Library Manager For information on ...

Страница 42: ... suitable for trim It can cause paper jam Note The same is also applied to paper sheet having no margin around its top edge We have evaluated the following paper types and verified that they work with trim Xerox Symphony Yellow Blue Pink Green We have evaluated the following color densities 194 0 330 2 mm trim 182 0 330 2 mm crease Trim A B Feed direction Crease 210 488 mm 386 mm or smaller trim a...

Страница 43: ...int the waste full lamp changes from lighting to blinking 1 Open the lower cover of the Crease Two sided Trim mer 2 Pull out Waste Container 3 Discard all waste Important Be sure to dispose of it entirely If some waste or scraps remain the container will become full before the message appears again causing machine mal functions Make sure there is no waste left inside especially beneath the frame t...

Страница 44: ...e the paper only after you are sure the printer is no longer moving After removing jammed papers be sure to close the cover Leaving the cover open will not be able to con tinue to print jobs Note Leave the power on and proceed to remove jammed papers If there is still paper remaining the paper jam message will continue to display Make sure that there is no jammed paper left and also no jams in oth...

Страница 45: ...e E on the upper left part of the message indicates which error lamp on the top of the machine is illuminating Refer If the jammed long paper is lying across more than one unit refer to 3 3 4 Long Paper Jam in the Printer Unit Manual When Lamp E1 is Lit 1 Open lever 1a downward lever 1b down ward and lever 1d upward Remove jammed papers Note The jammed paper may be hidden behind the upper covering...

Страница 46: ...position a mark resem bling an open padlock 2 Open lever 1a downward and lever 1b down ward 3 Turn knob 1c clockwise and remove jammed papers 4 Return levers 1a and lever 1b to their original posi tions 5 If you have difficulty in removing jammed papers open lever 1d upward and lever 2a to the left 1 2 1 2 1 2 1 2 1 2 1 2 ...

Страница 47: ...eir original positions When Lamp E3 is Lit 1 Turn knob 2 counterclockwise to align the mark on the knob with the unlock position a mark resem bling an open padlock 2 Open lever 2c downward and remove jammed papers Note The jammed paper may be hidden behind the upper covering 3 Return lever 2c to its original position 1 2 1 2 1 2 1 2 ...

Страница 48: ... of the jammed sheet and pull out the sheet to remove it If you have difficulty in removing the jammed paper sheet grasp the top edge at the inner side right side of the sheet and pull out the sheet to remove it 3 Return levers 2e lever 2d and lever 2c to their original positions When Lamp E5 is Lit 1 Open lever 3a to the right lever 3b to the left 1 2 3 1 2 3 1 2 1 2 1 2 3 1 2 3 1 2 1 2 ...

Страница 49: ...erclockwise and remove jammed papers 4 Return levers 3a and lever 3b to their original posi tions When Lamp E6 is Lit 1 Open lever 3a to the right lever 4b down ward and lever 4c to the right Remove jammed papers 2 Turn knob 4d counterclockwise and remove jammed papers 1 2 1 2 1 2 1 2 1 2 4 3 1 2 3 4 1 2 1 2 ...

Страница 50: ...nd remove jammed papers 5 Return levers 3a lever 4b and lever 4c to their original positions When Lamp E7 is Lit 1 Open lever 3a to the right and turn knob 2f counterclockwise Important Make sure you turn the knob 5 times or more 2 Pull out the Trimmer Waste Container and then replace it back again repeat this step continuously three times or more 2 3 1 1 2 3 2 1 1 2 1 2 1 2 ...

Страница 51: ...over 2 Open lever 3a to the right and open lever 3d to the right 3 Use the poker to sweep waste around the Trimmer Unit into the Trimmer Waste Container 4 If you have difficulty sweeping waste into the Trim mer Waste Container you can use the poker to gather waste and then remove the waste by hand 5 Return levers 3a and lever 3d to their original positions 1 2 1 2 ...

Страница 52: ...ehind the container Use the poker to remove any waste left inside Refer For information about the container refer to 5 2 Trimmer Waste Container p 43 3 Close the cover 4 Check the curl direction of jammed paper and correct paper curl Refer For information about the Curl Correction refer to 2 2 Curl Correction p 19 ...

Страница 53: ... Tri fold output tray button Press this button to open the tri fold output tray Item Specification Z Fold Half Sheet Paper size A3 Tabloid 11 x 17 8K JIS B4 Paper weight 60 90 g m 2 Uncoated Tri fold Paper size A4 Letter 8 5 x 11 Paper weight 60 90 g m 2 Uncoated Tray capacity 30 sheets Note The values are based on Colotech 90 Power supply Power consumption Power supply 100 240 V AC 10 100 V 1 A 5...

Страница 54: ...Fold jobs can be delivered to this tray only Tri fold Output Tray Button When you press the button the lamp begins to flash When the tri fold output tray is unlocked the button lamp illuminates pull out the tri fold output tray Tri fold output tray Tri fold Output Tray Button ...

Страница 55: ...nt Remove the paper only after you are sure the printer is no longer moving After removing jammed papers be sure to close the cover Leaving the cover open will not be able to con tinue to print jobs Note Leave the power on and proceed to remove jammed papers If there is still paper remaining the paper jam message will continue to display Make sure that there is no jammed paper left and also no jam...

Страница 56: ... message indicates which error lamp on the top of the machine is illuminating Refer If the jammed long paper is lying across more than one unit refer to 3 3 4 Long Paper Jam in the Printer Unit Manual When Lamp E10 is Lit 1 Open lever 2a upward and lever 2b to the left Remove jammed papers 2 Return levers 2a and lever 2b to their original posi tions When Lamp E11 is Lit 1 Open lever 2g to the righ...

Страница 57: ... fold output tray 2d 2 Open lever 2e to the right and turn knob 2c counterclockwise Remove jammed papers 3 Return lever 2e to its original position 4 If you have difficulty in removing jammed papers open lever 2f to the right and turn knob 2c counterclockwise Remove jammed papers 3 2 1 1 2 3 3 2 1 1 2 3 ...

Страница 58: ...ts original position 6 Return the tri fold output tray 2d to its original position 3 Close the cover 4 Check the curl direction of jammed paper and correct paper curl Refer For information about the Curl Correction refer to 2 2 Curl Correction p 19 ...

Страница 59: ...4 7 2 1 Output Trays 64 7 2 2 Control Buttons 66 7 3 Staple Cartridge 67 7 3 1 Replacing the Cartridge 67 7 3 2 Staple Faults 69 7 3 3 Re inserting the Staple Cartridge 72 7 4 Waste Container 74 7 4 1 Staple Waste Container 74 7 4 2 Hole Punch Waste Container 76 7 5 Paper Jams 77 7 5 1 Paper Jams in the Finisher 77 7 5 2 Paper Jams in the Saddle Stitch Unit 81 7 5 3 Paper Jams in the Paper Feeding...

Страница 60: ...ay Receives output sheets 4 Booklet tray Receives output sheets 5 Booklet output button Press this button to move delivered booklets to a place where they can be removed 6 Cover Open this cover to clear paper or staple jams replace Staple Cartridge or remove hole punch waste 7 Staple Waste Container Collects waste from the stapler 8 Staple cartridge for side stitch Contains staples for side stitch...

Страница 61: ...out staples A4 3 000 sheets Finisher D6 Plus and Finisher D6 with Booklet Maker 2 000 sheets JIS B4 or larger 1 500 sheets Mix stack 350 sheets Finisher tray with staples A4 200 sets or 3 000 sheets Finisher D6 Plus and Finisher D6 with Booklet Maker 2 000 sheets JIS B4 or larger 100 sets or 1 500 sheets Booklet tray 20 sets Note The values are based on Colotech 90 Mix stack means a set of paper s...

Страница 62: ...lues are based on Colotech 90 Paper size Standard size Maximum A3 13 x 19 Minimum JIS B5 Custom size Height 182 0 330 2 mm Width 257 0 488 0 mm Paper weight Uncoated 60 350 g m 2 Coated 2 350 g m 2 Power supply Power consumption Power supply 100 240 V AC 10 100 V 3 A 50 Hz or 60 Hz 240 V 1 5 A 50 Hz or 60 Hz Peak 100 V 300 W 240 V 360 W Dimensions Finisher D6 Width 855 x Depth 725 x Height 1 200 m...

Страница 63: ...e of a mixture of paper type or paper weight In an environment at a low temperature and low humidity stapling of 40 sheets or more may cause paper jams Note The printer determines paper type and paper weight based on paper information set for the job not based on paper actually loaded in the tray The printer determines the number of sheets per job based on job information and thus when multifeeds ...

Страница 64: ...to not fully be ejected and this causes Paper Full to be detected frequently you need to change the tray angle Especially you will need to change the angle of the tray by changing its position as shown in B when using the following paper types that tend to cause Paper Full Light weight 106 g m 2 or lighter coated paper Coated paper whose long edges are 364 mm or longer Long paper CAUTION Never tou...

Страница 65: ...ule and to downward on the Inserter Booklet Tray Note The booklet tray is attached to Finisher D6 with Booklet Maker However if SquareFold Trimmer is installed the booklet tray is attached to SquareFold Trimmer Saddle Stitch Bi Fold jobs can be delivered to this tray only If sheets are curled Printing on A5 paper with up curl may cause paper jams In this case you need to set the curl correction le...

Страница 66: ...ove delivered booklets to a place where they can be removed Note If SquareFold Trimmer is installed pressing this button moves delivered booklets to the position where to remove from the booklet tray installed on SquareFold Trimmer E1 E2 E3 E4 E5 E6 E7 E10 E11 E12 E8 E9 Booklet output button ...

Страница 67: ... the Staple Cartridge that Fuji Xerox recommends for the Finisher Important After replacing the cartridge be sure to close the cover Leaving the cover open will not be able to continue to print jobs Staple Cartridge for Side Stitch 1 Make sure the printer has stopped operations and then open the cover of the Finisher 2 Pull out R1 3 Holding the staple cartridge at the position indicated by the arr...

Страница 68: ...ations and then open the right cover of the Finisher 2 Pull out the Saddle Stitch Unit 3 toward you until it stops 3 While holding the tabs on the staple cartridge pull out the cartridge to remove it Note There are two booklet staple cartridges provided Check the message to see which cartridge should be replaced Type of supply Product code Quantity box Staples Type XE CWAA0856 5 000 staples x 2 se...

Страница 69: ... tried the following solu tions If printed sheets are stapled as shown in the figures below contact your local Fuji Xerox representative Important Depending on the type of paper being stapled the stapled nails may be bent If the bent nails are stuck inside the machine they may eventually cause paper jams When you open the cover of the staple cartridge remove any bent staple Otherwise it may cause ...

Страница 70: ...he cover of the Finisher 2 Pull out R1 Note After removing the staple cartridge check the inside of the Finisher for any remaining staples 3 Open the unit cover and remove jammed staples as shown in the figure 4 Insert the unit to its original position 5 Close the cover If you cannot remove the staples by performing the above procedures contact your local Fuji Xerox repre sentative CAUTION Be care...

Страница 71: ...ns and then open the cover of the Finisher 2 Pull out the Saddle Stitch Unit 3 toward you until it stops 3 While holding the tabs on the staple cartridge pull out the cartridge to remove it 4 Remove jammed staples as shown in the figure CAUTION Be careful not to get injured when removing jammed staples ...

Страница 72: ... Re inserting the Staple Cartridge If a staple cartridge has been inserted incorrectly or removed accidentally perform the following proce dures to re insert the staple cartridge into the cartridge unit Note Use the same procedure when a staple cartridge has been detached from the unit 1 Open the staple cartridge cover as shown in the fig ure and remove any bent or jammed staples 2 Locate the leve...

Страница 73: ...ile holding the lever and then take out the staple cartridge from the unit 4 Tear the outside staples along the line as shown in the figure 5 Insert the staple cartridge into the unit CAUTION When tearing staples be careful not to hurt your fingers ...

Страница 74: ... not rec ognize the Waste Container has been replaced After replacing the waste container be sure to close the cover Leaving the cover open will not be able to continue to print jobs Note A Staple Waste Container comes with the Staple Cartridge for Side Stitch 1 Make sure the printer has stopped operations and then open the cover of the Finisher 2 Move the lock lever under R5 leftward to the opene...

Страница 75: ...roperly Do not disassemble the contain ers and return them to your local Fuji Xerox represen tative 5 Insert the new Staple Waste Container from the lower end into its original position Important To prevent injury do not put your fingers on top of the container 6 Move the lock lever under R5 rightward to the closed lock mark as shown in the figure 7 Close the cover ...

Страница 76: ...ot recognize the container has been emptied After disposing the waste be sure to close the cover Leaving the cover open will not be able to continue to print jobs 1 Make sure the printer has stopped operations and then open the cover of the Finisher 2 Pull out the R4 3 Discard all waste Important Be sure to dispose of it entirely If some waste or scraps remain the container will become full before...

Страница 77: ...ve the paper only after you are sure the printer is no longer moving After removing jammed papers be sure to close the cover If you do not close the cover occur and you will be unable to continue with the job Note Leave the power on and proceed to remove jammed papers If there is still paper remaining the paper jam message will continue to display Make sure that there is no jammed paper left and a...

Страница 78: ...rea The code E on the upper left part of the message indicates which error lamp on the top of the machine is illuminating Refer If the jammed long paper is lying across more than one unit refer to 3 3 4 Long Paper Jam in the Printer Unit Manual When Lamp E1 is Lit 1 Open lever 1a to the left and remove jammed papers Note Grasp the leading edge of the jammed sheet and pull out the sheet to remove i...

Страница 79: ...lever 1c to the right and turn knob 1e clockwise Remove jammed papers Note The jammed paper may be hidden behind the upper covering 2 Return lever 1c to its original position When Lamp E3 is Lit 1 Pull jammed papers out of the output tray 2 Open and close the cover of the Finisher 2 1 3 1 2 3 ...

Страница 80: ...e Remove jammed papers 2 Return lever 1d to its original position When Lamp E5 is Lit 1 Open lever 1d to the right and turn knob 1f counterclockwise Remove jammed papers 2 Return lever 1d to its original position When Lamp E6 is Lit 1 Pull jammed paper out of the finisher tray 2 1 3 1 2 3 2 1 3 1 2 3 ...

Страница 81: ...the Saddle Stitch Unit Follow the steps below to clear paper jams in the Saddle Stitch Unit 1 Open the cover of the Finisher 2 Remove jammed papers When Lamp E7 is Lit p 82 When Lamp E8 is Lit p 82 When Lamp E9 is Lit p 83 Note Solutions differ depending on where the paper jam occurs Confirm the jammed area in the Error Message area The code E on the upper left part of the message indicates which ...

Страница 82: ... papers 2 If you have difficulty in removing jammed papers pull out the Saddle Stitch Unit 3 and remove jammed papers 3 Return lever 3a to its original position 4 Push the Saddle Stitch Unit 3 gently into the machine until it stops When Lamp E8 is Lit 1 Pull out the Saddle Stitch Unit 3 toward you until it stops Important Check Lever 3a for paper jam before pulling out the unit 2 1 1 2 1 2 1 2 ...

Страница 83: ...ly into the machine until it stops When Lamp E9 is Lit 1 Turn knob 3b clockwise and remove jammed papers from the booklet tray exhaust 3 Close the cover 4 Check the curl direction of jammed paper and correct paper curl Refer For information about the Curl Correction refer to 2 2 Curl Correction p 19 1 2 1 2 1 2 1 2 ...

Страница 84: ...jams in this area can occur only when Finishing Transport is installed 1 Open the cover of the Finisher 2 Remove jammed papers When Lamp E7 is Lit 1 Open lever 3a to the left and lever 3b to the left 2 Turn knob 1b clockwise and remove jammed papers 3 Return levers 3a and lever 3b to their original posi tions 3 Close the cover 2 1 1 2 2 1 1 2 ...

Страница 85: ...klet Maker No Component Description 1 Left side cover Open this cover to clear paper jams 2 Right side cover Open this cover to clear paper jams 3 Circuit breaker switch back side Automatically shuts off electricity in the event of fault current or a short circuit 4 Booklet tray Receives output sheets 5 Spine flattener strength adjustment button Press this button to adjust the thickness of printed...

Страница 86: ...to Finisher D6 with Booklet Maker Paper weight Capacity Trim Saddle Stitch 30 sheets Bi Fold 5 sheets Square Fold Saddle Stitch 30 sheets Note The values are based on Colotech 90 Square back binding is not supported for Bi Fold or Saddle Stitch of less than 5 sheets Trimming size 2 20 mm Booklet tray capacity One set 15 bind and above 20 sets One set 16 bind and below 15 sets Note The values are b...

Страница 87: ...d jobs can be delivered to this tray only 8 2 2 Spine flattener Strength Adjustment Button Press this button to adjust the thickness of printed booklets Modes and Functions of the Spine flattener Strength Adjustment Pressing the button changes spine flattener strength levels as follows The adjustment level is indicated by the lamp with the top being the highest Output tray Booklet tray Spine flatte...

Страница 88: ... off the printer does not recognize the container has been emptied 1 Make sure that the printer has stopped operations and pull out the Waste Container slowly 2 Holding the belt on the Waste Container pull out the container with both hands 3 Discard all waste Important Be sure to dispose of it entirely If some waste or scraps remain the container will become full before the message appears again c...

Страница 89: ... will not be able to con tinue to print jobs Note Leave the power on and proceed to remove jammed papers If there is still paper remaining the paper jam message will continue to display Make sure that there is no jammed paper left and also no jams in other places Refer For detailed information on how to regard the messages refer to 1 2 1 Services Home in the User Interface Manual Follow the steps ...

Страница 90: ...quare Fold Trimmer to open it 2 Remove jammed papers 3 If you have difficulty in removing jammed papers open the cover of the Finisher 4 Turn knob 3b clockwise and remove jammed papers 5 Close the cover When Lamp E3 is Lit 1 Press the button on the right side cover of the SquareFold Trimmer to open it ...

Страница 91: ...91 Chapter 8 SquareFold Trimmer 2 Remove jammed papers 3 Close the cover ...

Страница 92: ...untries or regions Refer For details on the functions of your 3rd Vendor Finisher refer to the manual supplied with the device Specifications No Component Description 1 Error lamp Illuminates when a paper jam occurs 2 Cover Open this cover to clear paper jams Item Specification Power supply Power consumption Power supply 100 240 V AC 10 100 V 5 A 50 Hz or 60 Hz 240 V 2 A 50 Hz or 60 Hz Peak 100 V ...

Страница 93: ...nly after you are sure the printer is no longer moving After removing jammed papers be sure to close the cover Leaving the cover open will not be able to con tinue to print jobs Note Leave the power on and proceed to remove jammed papers If there is still paper remaining the paper jam message will continue to display Make sure that there is no jammed paper left and also no jams in other places Ref...

Страница 94: ...m occurs Check the error lamp on the top of the machine If you have difficulty in removing jammed papers open the cover of the Finisher When Lamp 1 is Lit 1 Open lever 1 downward and remove jammed papers 2 Return lever 1 to its original position When Lamp 2 is Lit 1 Open lever 2 to the right and turn the knob counterclockwise Remove jammed papers 2 Return lever 2 to its original position 1 2 1 2 ...

Страница 95: ...o the left and turn the knob clockwise Remove jammed papers 2 Return lever 3 to its original position When Lamp 4 is Lit 1 Open lever 4 downward and turn the knob clockwise Remove jammed papers 2 Return lever 4 to its original position 3 Close the cover 1 2 1 2 1 2 1 2 ...

Страница 96: ...55 High Capacity Stacker 33 Inserter 26 Interface Decurler Module 21 SquareFold Trimmer 89 S Specifications 2nd High Capacity Feeder C1 DS 11 Crease Two sided Trimmer 41 Finisher 61 Finishing Transport 92 Folder Unit 53 High Capacity Stacker 31 Inserter 24 Interface Decurler Module 18 SquareFold Trimmer 86 Staple Cartridge 67 Staple Waste Container 74 W Waste Container Crease Two sided Trimmer 43 ...

Отзывы: