Every 25 hours:
Check hardware tightness;
vibration can loosen bolts
11
. Check tightness of the
hardware periodically
12
.
Every 50 hours:
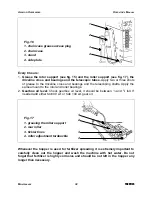
Check the blades
for excessive wear or damage. Be sure the rotor turns freely. Inspect
all the drive chains and make sure they are well lubricated
(see fig. 15 & 16)
.
After the first 200 hours:
Remove the chain case cover
(being sure not to damage the gasket), clean the chain
sprockets with kerosene, replace the sprockets and reassemble using fresh
GP
grease
(approximately) 2.2 lb.
4.03 - Changing Rotors
The aerator-overseeder can use two different types of blades: A straight aerating blade
and a standard tilling blade. Each of the two types requires a different rotor.
It is always recommended to purchase the machine with both rotors in order to get the
most use out of the aerator-overseeder. Changing the rotor is a very simple operation.
Both types consist of two side supports and a center flanged rotor. The center flanged
rotor is either an aerating rotor or a tilling rotor. The two side supports (one left and one
right) are the same for whichever center rotor is being used. The center rotor is bolted to
the two side supports by 16 bolts (8 per side)
(see fig. 18)
.
To change from one rotor to the other, unbolt these 16 bolts, remove the center rotor
and bolt the other rotor in place. An operation which is performed in just a few minutes
but gives great flexibility to the machine.
M
AINTENANCE
33
FRONTIER
A
ERATOR
-O
VERSEEDER
O
PERATOR
’
S
M
ANUAL
12
See Table 4, page 29.
11
See Table 4, page 29.
1
2
3
Fig. 18
1. optional center tilling rotor
2. end flanges connected by 8 bolts
3. side support
Содержание TR2058
Страница 1: ...O P E R A T O R S M A N U A L AERATOR OVERSEEDER TR2058 Manual 5BP960374B Date 08 07 2012...
Страница 41: ......
Страница 42: ......
Страница 44: ...Manual 5BP960374B Date 08 07 2012 Frontier OM GRT 258 US lwp Printed in the USA August 31 2012...


