30
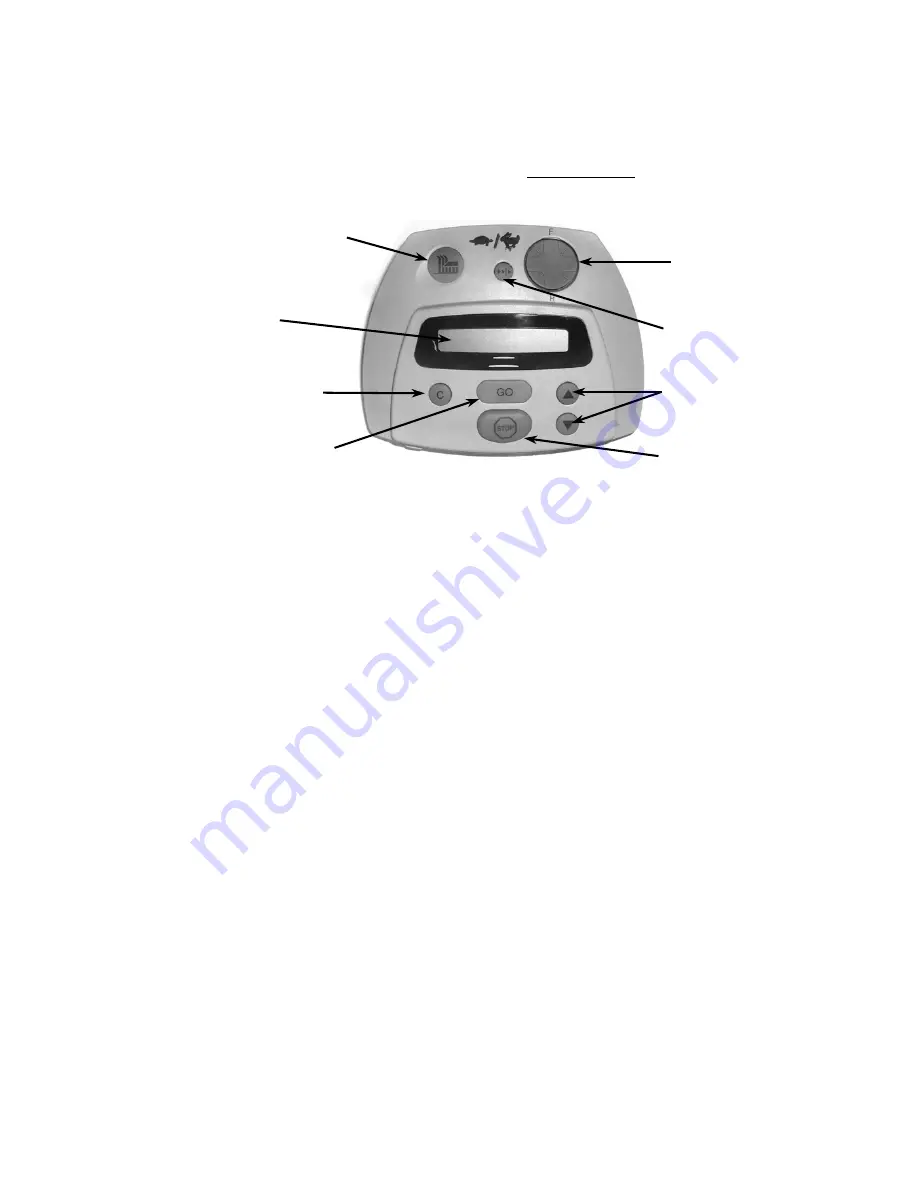
4. GO/Start
button
2. LCD display
window
8. Navigation
button
6. Scroll arrows for
menu selection
5. Stop button
3. Clear/cancel
button
1. Manual blade
engagement button
7. Manual drive speed
control – fast/slow
2.2 Using The Manual Controller
The Robomow is equipped with a Manual Controller. It enables you to manually drive and operate
the mower. To get started on using the Manual Controller, study figure 2.3 to view the various
operating controls and their functions. Refer to Chapter 5, Manual Operation for full details regarding
use of the Manual Controller.
1. Manual blade engagement button –
manual engagement of the blades requires two distinct
button operations in order to operate. This is called a two-step OPC design, where OPC stands for
Operator Presence Control. If at any time you release the blade engagement button the blades will
stop and the previous steps must be repeated. See section 5.2 for full details on manual mowing.
2. LCD
window
display
– displays the text messages using a Liquid Crystal Display (LCD). Also
shows current battery status. If exposed to direct sunlight for extended periods, the display may
be difficult to read. Move it to a spot out of direct sunlight or otherwise shade the display and it will
quickly return to normal.
3. Clear/cancel
button
– as described in item 1, this button is used as part of the two-step button
sequence in order to engage the blades in manual mowing. In addition, this button is used to
cancel a selection shown in the LCD window when making user selections. It is also used as a
means to reverse back out of the menu options that can be accessed in user options, returning
you to the main screen.
4. GO/Start
button
– the main operating button for automatic operation. In addition it is used as a
button for making or confirming selections made under user options in the LCD window.
5. Stop
button
– pressing this button will stop all operation of the blades and wheel motors when in
the automatic operation mode. It can also be used to stop an operation in progress before it has
commenced.
6. Scroll for menu selection
– there are various options and settings available to the user, which
are accessed through the Manual Controller. These menus and options are shown on the LCD
window as text. Some of these items require selecting a specific option, where more than one is
available. The arrow button, up and down, allows you to scroll through these different options.
7. Manual drive speed control
– the manual drive function is equipped with two ground speeds, fast
and slow. In order to change the ground speed, press the button once to switch to the opposite
speed of travel. When in fast mode, a button press will switch it to slow and vice versa. The mower
must be moving using the drive control feature for the feature to work.
8. Navigation
button
– pressing this button in the desired direction will allow manual driving of the
mower. Use light pressure on the navigator pad, gently rolling it to the desired direction of travel
for driving. The drive button is omni-directional in forward and reverse and constant pressure must
be maintained for continued operation.
Figure 2.3 - Manual Controller Layout
Содержание Robomow RL1000
Страница 1: ...Operating Safety Manual RL1000 Docking Station www friendlyrobotics com DOC0076A ...
Страница 42: ...42 ...
Страница 73: ...73 www friendlyrobotics com ...


