background image

Foundry Hardware Installation Guide for the FES, FESX, and FWSX

2 - 8

© 2006 Foundry Networks, Inc.

June 2006

Optionally, one or two 10-Gigabit Ethernet uplink ports for 10-Gigabit Small Form Factor Pluggable (XFP) 
MSA-compliant optical transceivers

Note that one port out of the first four Copper ports or the four Fiber ports can be active at a time (see “FES 10/
100/1000 Mbps Ports” on page 2-9).  For example, you can use ports 1 –4 of the Gigabit Copper ports or ports 1F 
– 4F of the Gigabit Fiber ports.  You can use a combination of fiber and copper ports or all copper or all fiber ports, 
as needed. 

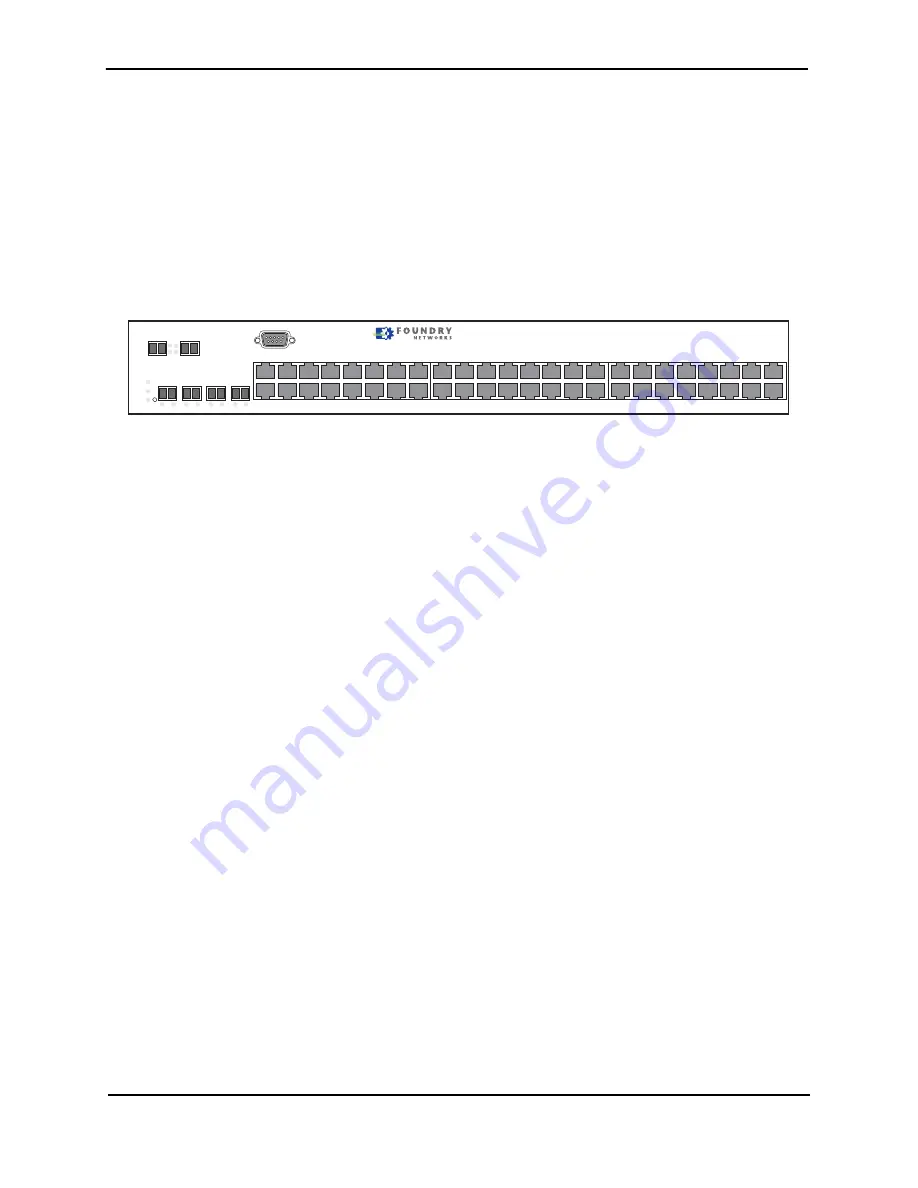
The following figure shows the front panel of the FESX448.  The FESX648 and FWSX448 looks similar to the 
FESX448.

Figure 2.10

FESX448 Front Panel

Control Features

Each device’s front panel has the following control features:

Serial management interface (the port labeled 

Console

)

Reset button

10/100 ports with RJ-45 copper connectors (FES only)

10/100/1000 ports with RJ-45 copper connectors

10/100/1000 ports with mini-GBIC slots for SFP MSA-compliant fiber transceivers

100/1000 ports with mini-GBIC slots for SFP MSA-compliant fiber transceivers (FESX424HF)

Optionally, one or two 10 Gigabit Ethernet ports for XFP MSA-compliant fiber connector(s) (FESX and FWSX 
only)

Serial Management Interface (Console Port)

The serial management interface enables you to configure and manage the device using a third-party terminal 
emulation application on a directly connected PC.  A straight-through EIA/TIA DB-9 serial cable (M/F) ships with 
the device.  The serial management interface (the port labeled 

Console

) is located in the left corner of the front 

panel.

Reset Button

The reset button allows you to restart the system without switching the power supplies off and on or using the CLI 
or Web management interface.  The button is located to the right of the serial management interface and is 
recessed to prevent it from being pushed accidentally. 

FES Network Interfaces

The FES2402, 4802, and 9604 provide the following interfaces:

10Base-T/100Base-T (10/100) copper ports

10/100/1000Base-T copper or Fiber Gigabit uplink ports

The FES12GCF provides the following interfaces:

10/100/1000Base-T copper or Fiber Gigabit uplink ports

For information about the type of fiber optic modules supported on FES devices, see “Fiber Optic Modules” on 
page 2-15.

Console

PS2

PS1

Power

1

2

FastIron Edge X448

FastIron Edge X448

1F

Lnk Act

Lnk Act

2F

Lnk Act

3F

Lnk Act

4F

Lnk Act

1

2

3

4

1

2

5

6

1

2

7

8

9

10

11

12

15

16

17

18

19

20

21

22

23

24

Act

Lnk

25/49

26/50

13

14

25

26

31

32

30

27

28

29

33

34

35

36

37

38

39

40

41

42

47

48

46

43

44

45

Содержание FES

Страница 1: ...Stackable Hardware Installation Guide FastIron Edge Switch FastIron Edge Switch X Series FastIron Workgroup Switch X Series 4980 Great America Parkway Santa Clara CA 95054 Tel 408 207 1700 www foundry...

Страница 2: ...the property of Foundry or other third parties You are not permitted to use these Marks without the prior written consent of Foundry or such appropriate third party Foundry Networks BigIron FastIron I...

Страница 3: ...1 4 TELEPHONE ACCESS 1 4 WARRANTY COVERAGE 1 4 CHAPTER 2 PRODUCT OVERVIEW 2 1 PRODUCT OVERVIEW 2 1 SUPPORTED CONFIGURATIONS 2 2 SOFTWARE FEATURES 2 3 POE APPLICATIONS 2 3 WIRELESS APPLICATIONS 2 3 HAR...

Страница 4: ...POWER SUPPLY 3 7 INSTALLING THE DEVICE 3 8 DESKTOP INSTALLATION 3 8 RACK MOUNT INSTALLATION 3 8 WALL MOUNT INSTALLATION 3 9 POWERING ON THE SYSTEM 3 9 VERIFYING PROPER OPERATION 3 9 OBSERVING THE POWE...

Страница 5: ...ARDWARE MAINTENANCE SCHEDULE 6 1 REPLACING A POWER SUPPLY 6 2 INSTALLATION PRECAUTIONS AND WARNINGS 6 2 DETERMINING WHICH POWER SUPPLY FAILED 6 2 AC POWER SUPPLIES 6 2 DC POWER SUPPLIES 6 3 VERIFYING...

Страница 6: ...7 3 CABLE SPECIFICATIONS 7 5 POWER CORDS 7 6 POWER SUPPLY SPECIFICATIONS 7 6 OVERVIEW 7 6 KEY FEATURES 7 7 PHYSICAL DIMENSIONS AND WEIGHT 7 7 INPUT CONNECTOR 7 8 REGULATORY COMPLIANCE 7 8 ENVIRONMENT...

Страница 7: ...ration procedures show how to perform tasks using the CLI This guide also includes instructions for managing and maintaining the hardware This guide applies to the following products collectively call...

Страница 8: ...shown in Table 1 1 What s Included in This Edition This edition describes the following software releases For the FastIron Edge Switch products 03 3 01a 03 3 00 03 2 00 03 1 02 03 1 01 03 1 00 03 0 0...

Страница 9: ...FESX FSX and FWSX provides configuration procedures for system level features and provides configuration information for enterprise routing protocols including IP RIP IP multicast OSPF BGP4 VRRP and...

Страница 10: ...each software release lists features that are supported on the FWSX and describes how configuration procedures or defaults differ from those on other Foundry devices due to the FastIron Workgroup Swi...

Страница 11: ...services such as Voice over IP VoIP The FES FESX and FWSX come in a variety of models providing an integral range of network connectivity within the entire enterprise network These switches provide hi...

Страница 12: ...tivity delivering Gigabit over Copper GoC to the desktop within the enterprise Distribution Layer and the service provider data center for high end servers cluster computing and network attached stora...

Страница 13: ...PS near IP powered devices With power sourcing devices such as Foundry s FES2402 POE and FES4802 POE power is consolidated and centralized in the wiring closets improving the reliability and resilienc...

Страница 14: ...t physical dimensions power supply specifications and pinouts see the chapter Hardware Specifications on page 7 1 FES2402 FES4802 FES9604 The FastIron Edge Switch FES family provides high 10 100 port...

Страница 15: ...ports The following figures show the front panels of these FastIron Edge Switches Figure 2 5 FastIron Edge Switch 2402 POE 99C Act Lnk 100C 99F 100F 49 50 61 62 73 74 85 86 1 2 13 14 25 26 37 38 Cons...

Страница 16: ...ivers Four combination Gigabit Copper Fiber uplink ports The copper ports support 10 100 1000Base T RJ 45 connectors The fiber ports support 100 1000 SFPs Optionally one or two 10 Gigabit Ethernet upl...

Страница 17: ...Pluggable XFP MSA compliant optical transceivers The ports numbered from 1 24 support POE Note that one port out of the first four Copper ports or the four Fiber ports can be active at a time For exam...

Страница 18: ...FP MSA compliant fiber connector s FESX and FWSX only Serial Management Interface Console Port The serial management interface enables you to configure and manage the device using a third party termin...

Страница 19: ...pper interface for 10 100 1000Base T Cat5 copper cabling Mini GBIC slot for CWDM 1000Base BX LH LX or SX fiber cabling The copper ports provide auto MDI MDIX detection see the Foundry Switch and Route...

Страница 20: ...t POE devices only On The port is providing in line power to the power consuming device such as a VoIP phone or other device that is connected to the port Off The port is not providing in line power 1...

Страница 21: ...s listed in the section FESX and FWSX Network Interfaces on page 2 11 The output of the show media command displays the type of media installed in the ports FESX and FWSX Combination Ports One port ou...

Страница 22: ...for the fiber ports The 10 Gbps fiber connectors use the LEDs located next to the fiber ports LEDs for FESX424 POE Ports The fiber and copper ports on the FESX424 POE provide status information using...

Страница 23: ...1000 Fiber Port LEDs on FESX424HF Left for upper copper Right for lower copper connector On The link is up Off The link is down Blinking The port is transmitting or receiving traffic 10 Gbps Port LEDs...

Страница 24: ...the feature NOTE Port regions do not apply to trunk group configurations on the FESX and FWSX However port regions do apply to port monitoring and unknown unicast configurations on the FESX and FWSX...

Страница 25: ...se 02 3 01 for the FESX424HF 100BaseFX Supported only on the FESX424HF 100BaseFX is also known as the fiber version of 100BaseTX 100BaseFX uses two strands of multi mode fiber MMF for receive and tran...

Страница 26: ...100BaseFX Multimode SFP maximum distance is 2 kilometers Bidirectional singlemode SFP maximum distance is 10 kilometers To enable support for 100BaseFX on a fiber port enter the following command at t...

Страница 27: ...on how it was ordered from the factory All models have two power supply slots enabling you to install a second power supply for redundancy Direct current DC supplies are available for some devices in...

Страница 28: ...y Figure 2 12 shows a rear view of a FastIron Stackable device containing one DC power supply The supplies are standard for all four models In addition the supplies are the same as the ones used in th...

Страница 29: ...power supplies are supported in the following devices FESX448 FESX648 FWSX448 The RPS8 AC and RPSX 448 AC power supplies are auto sensing and auto switching The supplies provide 600 watts of total ou...

Страница 30: ...use extensive damage to your equipment Figure 2 16 shows a rear view of the FESX424 POE containing one AC power supply Figure 2 16 RPS X424 POE AC power supply Figure 2 14 shows a rear view of the FES...

Страница 31: ...ure threshold associated with it to determine at which speed the fan should operate Fan speed switches are as follows slow to medium medium to slow medium to fast fast to medium If desired you can cha...

Страница 32: ...Foundry Hardware Installation Guide for the FES FESX and FWSX 2 22 2006 Foundry Networks Inc June 2006...

Страница 33: ...onnecting Network Devices and Checking Connectivity Unpacking a System The Foundry systems ship with all of the following items Please review the list below and verify the contents If any items are mi...

Страница 34: ...on to the switch or router A management station such as a PC running a terminal emulation application A straight through EIA TIA DB 9 serial cable F F The serial cable can be ordered separately from F...

Страница 35: ...on page 3 6 4 Install the Foundry device on a desktop in an equipment rack or on the wall Installing the Device on page 3 8 5 Once the device is physically installed plug the device into a nearby powe...

Страница 36: ...lighter devices above Power Precautions CAUTION Use a separate branch circuit for each AC power cord which provides redundancy in case one of the circuits fails CAUTION Ensure that the device does no...

Страница 37: ...power supply or the device could be damaged as a result The device can be running while a power supply is being installed or removed but the power supply itself should not be connected to a power sou...

Страница 38: ...he following procedures Installing a redundant AC power supply Installing an AC Power Supply on page 3 6 Installing a redundant DC power supply Installing a DC Power Supply on page 3 7 Installing an A...

Страница 39: ...e press inward on the two latches near the edges of the cover plate to unlock the plate then remove the plate 3 Remove the power supply from its packaging 4 Prepare the positive negative and ground wi...

Страница 40: ...ttom and progressively place lighter devices above Desktop Installation 1 Set the device on a flat desktop table or shelf Make sure that adequate ventilation is provided for the system a 3 inch cleara...

Страница 41: ...If your device has more than one power supply installed repeat this procedure for each power supply 1 Connect the power cord supplied with the device to the power connector on the power supply on the...

Страница 42: ...er you assign an IP address you can access the system through Telnet the Web management interface or IronView Network Manager To attach a management station using the serial port 1 Connect a PC or ter...

Страница 43: ...ettings listed above make sure the terminal emulation session is running on the same serial port you attached to the Foundry system The EIA TIA 232 serial communication port serves as a connection poi...

Страница 44: ...Serial port pin assignments showing cable connection options to a terminal or PC 1 2 3 4 5 6 7 8 9 1 2 3 4 5 6 7 8 9 Reserved DB 9 to DB 9 Female Switch Reserved Reserved Reserved Terminal or PC 1 2...

Страница 45: ...NOTE You cannot assign a password using the Web management interface You can assign passwords using IronView Network Manager if an enable password for a Super User has been configured on the device T...

Страница 46: ...C mode FESX Switch enable 2 Access the CONFIG level of the CLI by entering the following command FESX Switch configure terminal FESX Switch config 3 Enter the following command to set the super user p...

Страница 47: ...Foundry device to obtain IP addresses for the hosts on the network Devices Running Layer 3 Software Before attaching equipment to a Foundry Layer 3 Switch you must assign an interface IP address to t...

Страница 48: ...his command erases the factory test configuration if still present FESX Switch erase startup config CAUTION Use the erase startup config command only for new systems If you enter this command on a sys...

Страница 49: ...ivers For port pinouts see the section 10 100 and Gigabit Port Pinouts on page 7 4 Cable Specifications See Cable Specifications on page 7 5 for cable lengths and types Connecting to Ethernet or Fast...

Страница 50: ...MDI port or designate the port as an MDIX port For more information about this feature and how configure it see the Foundry FastIron X Series Configuration Guide or the Foundry Switch and Router Inst...

Страница 51: ...ber Optic Connectors To avoid problems with the connection between the fiber optic module SFP mini GBIC or XFP and the fiber cable connectors Foundry strongly recommends cleaning both connectors each...

Страница 52: ...s After you install the network cables you can observe certain LEDs to determine if the network connections are functioning properly Table 4 2 outlines the LEDs related to the network connections the...

Страница 53: ...work device and that the receive port on the Foundry device is connected to the transmit port on the other network device If you are not certain remove the two cable connectors from the port connector...

Страница 54: ...ng See Using Virtual Cable Testing to Diagnose a Cable on page 4 10 If the other procedures don t resolve the problem try using a different port or a different cable Using Virtual Cable Testing to Dia...

Страница 55: ...peed The port s current line speed Local pair The local link name Pair Length The cable length when terminated or the distance to the point of fault when the line is not up Remote pair The remote link...

Страница 56: ...Foundry Hardware Installation Guide for the FES FESX and FWSX 4 12 2006 Foundry Networks Inc June 2006...

Страница 57: ...el or shutdown level If the device s temperature exceeds the safe threshold shutdown level the device will shut itself down The software reads the temperature sensor according to the chassis poll time...

Страница 58: ...egrees The default shutdown temperature is 55 0 C degrees You can change the warning and shutdown temperatures using the following commands The valid range for each value is 0 125 C degrees NOTE You c...

Страница 59: ...es not affect the operation of the other fan The fans can operate at speeds of low medium and high The system uses a fan speed switch and a default or configured temperature threshold associated with...

Страница 60: ...e threshold for a fan speed switch enter a command such as the following FESX Switch temp fan speed slow to medium 30 This command causes the system to switch the fan speed from slow to medium if the...

Страница 61: ...MAC address entries All MAC address entries for a specified Ethernet port All MAC address entries for a specified VLAN A specified MAC address entry in all VLANs FESX Switch show chassis power supply...

Страница 62: ...0d0 Syntax clear mac address mac address ethernet port num vlan number If you enter the clear mac address command without any parameters the software removes all MAC entries Use the mac address parame...

Страница 63: ...nents Foundry recommends cleaning the fiber optic connectors on a fiber optic port and the connected fiber cable each time you disconnect the cable Otherwise you can replace the following hardware com...

Страница 64: ...Power Precautions on page 3 4 CAUTION Do not install the device in an environment where the operating ambient temperature might exceed 40o C 104o F CAUTION Never leave tools inside the chassis Determi...

Страница 65: ...k the plate then remove the plate 3 Remove the power supply from its packaging 4 With one hand hold the bar on the front panel of the power supply With the other hand support the underside of the powe...

Страница 66: ...bay has a cover plate press inward on the two latches near the edges of the cover plate to unlock the plate then remove the plate 3 Remove the power supply from its packaging 4 Prepare the positive n...

Страница 67: ...occurs Displaying the Status of the Power Supplies You can display the status of the power supplies by entering the show chassis command at any level of the CLI The display shows whether a power suppl...

Страница 68: ...n page 6 2 or Removing a DC Power Supply on page 6 4 Use the appropriate procedures according to the type of supply or supplies installed in the device 4 Remove the device s cover and faceplate Use a...

Страница 69: ...the chassis and on top of the main board Use a 2 Phillips head screwdriver to fasten the three screws on the 10 Gigabit module Affix the screws loosely at first then tighten them once you are sure the...

Страница 70: ...ert the protective covering into the port connectors 4 Pull the fiber optic module out of the port by pulling the bail latch forward away from the front panel of the module This unlocks the module fro...

Страница 71: ...3 Gently insert the cable connector s a tab on each connector should face upward into the port connector s until the tabs lock into place 4 Observe the link and active LEDs to determine if the network...

Страница 72: ...Foundry Hardware Installation Guide for the FES FESX and FWSX 6 10 2006 Foundry Networks Inc June 2006...

Страница 73: ...ntents Description See Page Chassis specifications Physical dimensions and weight 7 2 Environmental considerations 7 2 Cooling system 7 3 Regulatory compliance 7 3 Warranty 7 3 Pinouts and Signaling 7...

Страница 74: ...S FESX and FWSX Platform Height Width Depth Weight FES2402 FES4802 FES12GCF FESX424 FWSX424 FESX624 2 63 in 6 68 cm 17 5 in 44 45 cm 19 6 in 49 78 cm 25 lbs 11 36 kg fully loaded including dual redund...

Страница 75: ...e 43 dB A Regulatory Compliance Table 7 5 lists the Electromagnetic Compatibility EMC Immunity standards and safety agency approvals for the FastIron family of switches Warranty The FastIron family of...

Страница 76: ...owing Cable Connection Options to a Terminal or PC 10 100 and Gigabit Port Pinouts 10Base T 100Base TX ports come with RJ45 jacks for standard unshielded twisted pair UTP Category 5 cable connections...

Страница 77: ...SMF 9 n a 2 10000 10km 1000Base LHA SMF 9 n a 2 70000 70km 1000Base LHB SMF 9 n a 2 150000 150km 1000Base LX MMF 62 5 500 2 550 MMF 50 400 2 550 MMF 50 500 2 550 SMF 9 n a 2 5000 1000Base SX MMF 62 5...

Страница 78: ...latory Compliance on page 7 8 Environmental Considerations on page 7 10 Electrical Specifications on page 7 11 Overview Each FastIron stackable switch comes with one alternating current AC or direct c...

Страница 79: ...The remaining power supply provides enough power for all the ports For more information see Installing a Redundant Power Supply on page 3 6 All power supplies are auto sensing and auto switching Key f...

Страница 80: ...standards RPS8 AC RPSDC X424 POE RPS X424 POE AC RPS X448 AC 2 46 in H x 8 67 in W x 7 6 in D 6 25 cm H x 22 03 cm W x 19 30 cm D 6 lbs 2 72 kg Power Supply Input Connector Properties RPS5 AC RPS8 AC...

Страница 81: ...ndards Immunity Standards RPS5 AC RPS5 DC RPS X424 AC RPS X424 DC CISPR 22 Class A FCC Class A VCCI Class A IC ICES 003 Class A Canada EN55022 Class A Harmonic Current Emissions Class A EN61000 3 2 wi...

Страница 82: ...ne sont autoris s qu au personnel technique qualifi ACHTUNG Zugang zur Bedienung nicht erf rderlich Wartung nur durch qualifiziertes Personal Table 7 11 Environmental Considerations for Power Supplie...

Страница 83: ...cifications Operating range 85 VAC to 254 VAC 50 60 Hz 85 VAC to 254 VAC 50 60 Hz 40 VDC to 60 VDC Input Specifications Input voltage range 100 240 VAC 40 to 60 VDC 100 to 240 VAC 48 to 60 VDC Input c...

Страница 84: ...Foundry Hardware Installation Guide for the FES FESX and FWSX 7 12 2006 Foundry Networks Inc June 2006...

Страница 85: ...er than the FES2402 POE or FES4802 POE will cause extensive damage to your equipment VORSICHT Das Netzger t RPS8 AC ist f r den ausschlie lichen Gebrauch in Model FES2402 POE und FES4802 POE konzipier...

Страница 86: ...ectado a la corriente CAUTION Do not install the device in an environment where the operating ambient temperature might exceed 40o C 104o F VORSICHT Das Ger t darf nicht in einer Umgebung mit einer Um...

Страница 87: ...s cerca de los conectores de corriente de entrada CAUTION All devices with DC power supplies are intended for installation in restricted access areas only A restricted access area is where access can...

Страница 88: ...ti avec l outil appropri Le connecteur sertissage doit permettre la s curisation aux deux vis de borne de terre sur le bo tier PRECAUCI N Para un sistema de CC suministro de corriente continua con No...

Страница 89: ...r new systems If you enter this command on a system you have already configured the command erases the configuration If you accidentally do erase the configuration on a configured system enter the wri...

Страница 90: ...lliert wird muss die Steckplatztafel angebracht werden Wenn ein Steckplatz nicht abgedeckt wird l uft das System hei MISE EN GARDE Si vous n installez pas de module dans un slot vous devez laisser le...

Страница 91: ...ibra ptica utilizan l ser de clase 1 WARNING Make sure the rack or cabinet housing the device is adequately secured to prevent it from becoming unstable or falling over ACHTUNG Stellen Sie sicher dass...

Страница 92: ...ENT N utilisez pas les poign es des unit s de bloc d alimentation pour soulever ou porter un dispositif en ch ssis ADVERTENCIA No use las asas de las unidades de suministro de corriente para alzar o t...

Страница 93: ...ento puede estar activado cuando se est instalando o retirando un suministro de corriente pero el suministro de corriente en s no deber estar conectado a la fuente de corriente De no hacerlo as podr a...

Страница 94: ...orblech gesteckt werden wenn dieses vom Geh use abgenommen wird Der Ventilator kann sich unter Umst nden noch mit hoher Geschwindigkeit drehen AVERTISSEMENT Faites attention de ne pas accidentellement...

Отзывы: