background image

OMNIS

CANNER

  User Guide

8 - 6

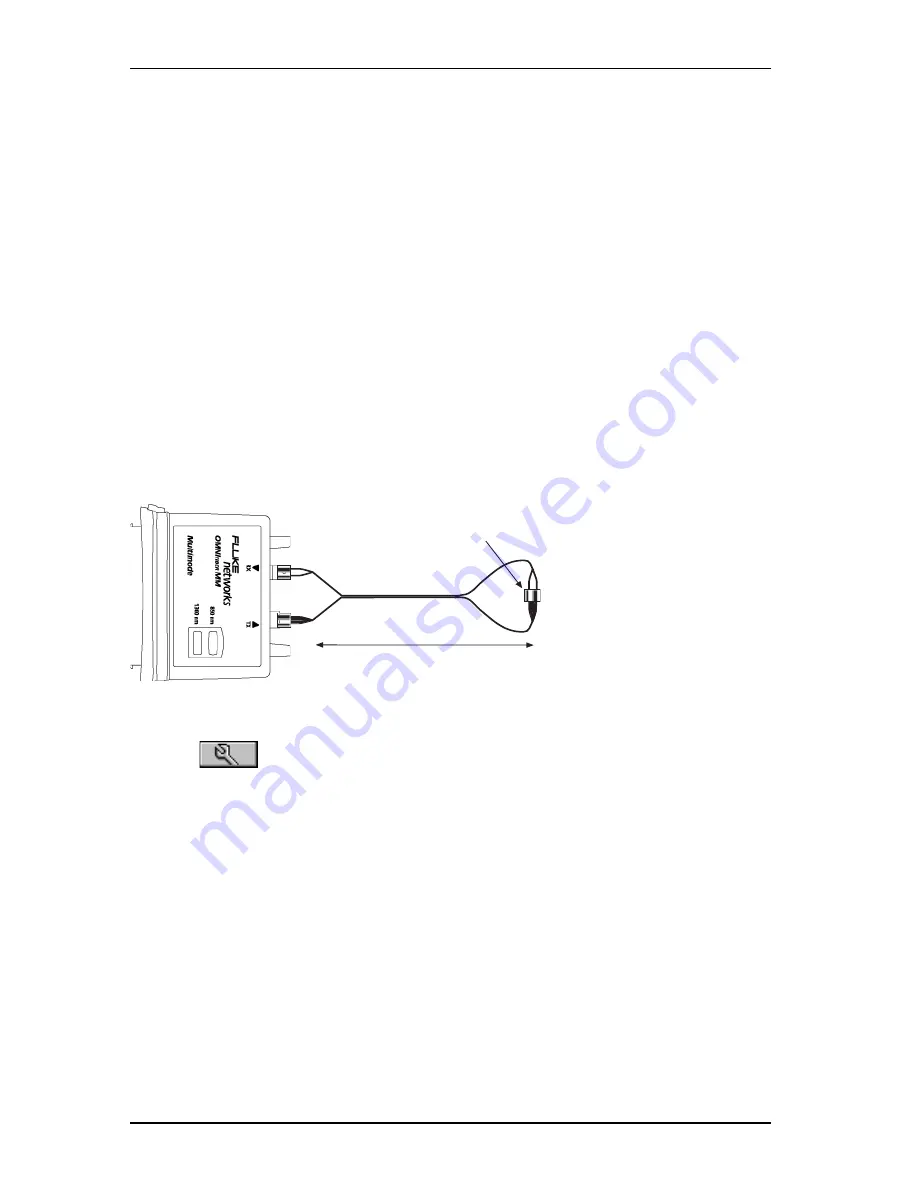
2 m Launch Cable

Coupler

Two Jumper Reference Method in Loopback Mode

The OMNIF

IBER

 Main can be used without the remote to make measure-

ments on a single fiber. In this state the TX fiber is looped back to the
RX port of the same OMNIF

IBER

 adapter.

Note

During the Autotest, the loss and length of the white fiber will be
subtracted from the length of the fiber under test. Since the loss in a
short jumper cable is negligible, the loss measurement of the fiber
under test will be accurate. The length measurement will be off by
the length of the jumper cable (about 2 meters). This primarily
affects the length accuracy of very short cables.

1. Connect the launch
cable to the OMNIF

IBER

.

The 

black 

fiber

attached to the 

TX

(transmit) port and the

white 

fiber to the 

RX

(receive) port.

2. Use a connector
adapter to mate the
connections on the
other end.

3. Press 

 (Setup) to open the 

SETUP 

screen and then select 

Set

Reference 

to set the reference.

4. Disconnect the white connector from both the RX port and the
connector adapter. Do not disturb the black fiber attached to
OMNIFiber’s TX port.

5. Leave the two 

white 

ends dangling.

6. Attach the cable to be tested to the connector adapter and the
OMNIFiber’s open RX port .

Содержание OMNIFiber

Страница 1: ...OMNIScanner 2 OMNIFiber ...

Страница 2: ...nstalled links against all common cabling and network standards including Category 6 Class E and Gigabit Ethernet OMNIFIBER verifies installed links against TIA and ISO standards as well as other fiber network application requirements PN 1752581 English 2950 4500 08E Rev 01 March 2002 3 02 2002 Fluke Networks Inc All rights reserved Printed in USA All product names are trademarks of their respecti...

Страница 3: ...e Networks authorized service center within the warranty period To obtain warranty service contact your nearest Fluke Networks authorized service center to obtain return authorization information then send the product to that service center with a description of the difficulty postage and insurance prepaid FOB Destination Fluke Networks assumes no risk for damage in transit Following warranty repa...

Страница 4: ...aching the Connector Adapter 1 11 Editing with OMNIScanner 1 12 Predefined Lists 1 12 Editing Numeric Fields with the Spin Control 1 12 Editing Alphanumeric Fields 1 13 Technical Support 1 14 Product Versions 1 14 Chapter 2 Getting Started Twisted Pair Networks 2 1 Charging OMNIScanner s Battery 2 1 OMNIScanner s Project Screen 2 1 Certification of Network Installations 2 2 Setting the Reference 2...

Страница 5: ...METHOD AUTOTEST 3 6 Loopback Autotest using OMNIFiber main 3 7 Running a Fiber Autotest 3 8 Fiber Autotest Results 3 9 Chapter 4 Setup 4 1 Configuring OMNIScanner 4 1 Set Reference 4 2 Set Reference with the OMNIFiber Adapters 4 2 Autotests 4 3 Viewing Details for Copper and Fiber Autotests 4 3 Cables 4 5 Projects 4 7 Configurations 4 10 Autotest Run Options 4 11 Autotest Save Options 4 12 User Op...

Страница 6: ...rements with OMNIScanner 5 17 Coax Tests 5 17 Cable Trace 5 18 Chapter 6 Diagnostics 6 1 OMNIScanner s Diagnostic Functions 6 1 Wiremap 6 1 Wiremap Displays 6 2 TDNXT 6 3 Using TDNXT to Diagnose a Link 6 4 TDNXT Examples 6 5 TDRL 6 6 Using TDRL to Diagnose a Link 6 8 TDRL Examples 6 8 Impulse Noise 6 10 Cable Trace 6 11 Office Locator 6 11 Chapter 7 Results 7 1 Autotest Results 7 1 Viewing Autotes...

Страница 7: ...alling the USB Driver 12 1 Uploading OMNIScanner2 Test Results to the PC 12 3 Downloading Configurations to OMNIScanner2 12 4 Remote Controlling OMNIScanner2 12 5 Appendix A Technical Specifications A 1 Physical Characteristics A 1 User Interface A 1 Power A 2 Environmental A 2 Measurement Port Test Interface A 2 Serial Port A 2 Universal Serial Bus A 2 MultiMediaCard Interface A 3 Memory A 3 OMNI...

Страница 8: ... A 7 Delay OMNIFiber MM multimode A 7 Delay OMNIFiber SM single mode A 7 High Voltage Input Protection A 7 Appendix B Batteries B 1 Battery Packs B 1 Battery Charging B 2 Battery Tips B 2 Appendix C OMNIFiber PASS FAIL Criteria C 1 Appendix D Cable Pin Outs D 1 Serial Cable DB 9 Male to DB 9 Female Pin outs D 1 Serial Cable DB 9 Male to DB 25 Female Pin outs D 1 Cable Pin Out Signals D 2 ...

Страница 9: ...OMNISCANNER User Guide TOC 6 ...

Страница 10: ...ER MM multimode and OMNIFIBER SM single mode expand the tester s capabilities to certify installed fiber links against TIA and ISO standards Fiber cabling can be verified at 850 1300 1310 and 1550 nm wavelengths The Graphical User Interface OMNISCANNER s graphical user interface consists of a backlit LCD display quick access menus arrow keys and descriptive menu options that guide you through cert...

Страница 11: ... 850 and 1300 nm over multimode fiber and at 1310 and 1550 nm over single mode fiber Up to 1000 Autotests can be saved to nonvolatile memory Saved results can be easily uploaded to the PC with ScanlinkTM software ScanlinkTM Tools Software PC based software expands OMNISCANNER s user interface and aids with the management of projects Scanlink Tools consist of the OMNISCANNER Configuration software ...

Страница 12: ... available by pressing ENTER when the cursor is located on user definable fields A predefined selection list will appear and the rest of the display will be inactive Spin Control The spin control is available by pressing ENTER on editable fields that allow for increasing or decreas ing numeric values by depressing the é or ê keys Scrollbars Use the é and ê keys on the keypad to move up and down in...

Страница 13: ...PTER USBPORT DB 9SERIAL MMCCARD OMNISCANNER2 CONNECTOR SOCKET OMNISCANNER2 OMNISCANNER s Keypad ON OFF When turned on OMNISCANNER will display the project screen Backlight Press the Backlight key to toggle the backlight between its two levels of brightness Press and hold the Backlight key to display the CON TRAST screen Use the é and ê keys on the keypad to adjust the ...

Страница 14: ...then select the highlighted item as the new default When in an editable field press the ENTER key to start the edit process and press ENTER again when finished with the editing process Alphanumeric Keys 1 Use the 0 through 9 keys to enter numeric and alphabetic characters in editable fields Alphabetic and special characters are shown above each numbered key on the keypad The 1 key allows entry of ...

Страница 15: ...phs to MMC Copy Project to MMC Copy Results to MMC Erase a letter Clear a field Copy Circuit ID List Circuit IDs Detail Retest Graph Pair NextPage Previous Page Select Set Default Switch to 850nm Switch to 1300nm Switch to 1310nm Switch to 1550nm Set Reference Continue Test Switch to Continuous Wave Switch to Modulated 2KHz Wave SwitchtoOMNISCANNER Info Switch to OMNIREMOTE Info Dial phone number ...

Страница 16: ...VE CABLE FROM HAZARDOUS SOURCE Charge Green OMNIREMOTE is inactive the AC adapter is present and the battery pack is being charged Green flashing OMNIREMOTE battery is fully charged Red flashing OMNIREMOTE battery is low OMNIREMOTE Keys ON OFF When turned on OMNIREMOTE will blink the LEDs λ λ λ λ λ Lambda When OMNIFIBER is attached to OMNIREMOTE the remote unit can be used as a light source With t...

Страница 17: ...EMOTE can be connected but its use is optional OMNISCANNER detects the presence of the remote unit and automatically configures it for the measurement to be performed Twisted Pair Measurements requiring the use of OMNIREMOTE Autotest Return Loss Wiremap ELFEXT and Power Sum ELFEXT NEXT and Power Sum NEXT ACR and Power Sum ACR Attenuation Twisted Pair Measurements not requiring the use of OMNIREMOT...

Страница 18: ...h the scanner is con nected is referred to as the Scanner end and the end at which the remote unit is connected is referred to as the Remote end OMNISCANNER displays test results for both ends of the link Press or to toggle the display between Scanner and Remote test results Note Refer to the graphics in Chapter 2 Getting Started Typical Test Configurations for instructions on connecting OMNISCANN...

Страница 19: ...shing OMNIFIBER istransmitting 1310nm modulatedlightat 1300 1310nm 1300 Orange Part 1 of Two Way test 1310nm completed switchfibers OMNIFIBER SM LED Indicators LED Color Description 1310nm Green OMNIFIBERistransmitting at1310nm 1310nm Green flashing OMNIFIBERistransmitting modulatedlightat 1310nm 1310nm Orange Part1ofTwoWaytest completed switchfibers 1550nm Green OMNIFIBERistransmitting at1550nm 1...

Страница 20: ...ing the black push button latches The cover will be released 2 Push the OMNIFIBER adapter onto OMNIScanner s 160 pin connector until it snaps into position 3 To remove OMNIFIBER use the push button latches to release the secured adapter 4 Protect OMNIFIBER s 160 pin connector by snapping the cover back in place Attaching the Connector Adapter OMNIFIBER has one ST style connector port TX and one th...

Страница 21: ...e cursor to the field to be edited and press ENTER A pop up list will be displayed while the main screen becomes inactive 2 Use the é or ê arrow keys to move the cursor to the appropriate item or value and press ENTER to select it as the new default Editing Numeric Fields with the Spin Control 1 Use the é or ê arrow keys to move the cursor to the field to be edited The entire field will be highlig...

Страница 22: ...p down list containing letters to choose from Example Press 8 to choose t u v or the number 8 Note Alphabetic and special characters are printed above each numbered key on the keypad For example ABC is printed above the 2 key 4 Use the é or ê arrow key to move to the appropriate character or simply press 8 on your keypad repeatedly until the appropriate letter or number appears in the highlighted ...

Страница 23: ...ll USA 1 888 99 FLUKE 1 888 993 5853 Canada 1 800 363 5853 Europe 31 402 675 200 Beijing 86 10 6512 3435 Japan 81 3 3434 0181 Singapore 65 738 5655 Anywhere in the world 1 425 446 4519 For operating assistance in the USA call 1 800 283 5853 Product Versions To display the software version the hardware version the serial and the factory calibration data for OMNISCANNER press and hold the Backlight ...

Страница 24: ...factory calibration data The serial number can also be found on the back of each unit To display information for OMNIFIBER attach the OMNIFIBER adapters to OMNISCANNER and OMNIREMOTE connect the units with the supplied fiber launch cable and press the Setup function key Select Fiber Info to open the FIBER INFO screen which contains the serial numbers the date the adapters were last factory calibra...

Страница 25: ...OMNISCANNER User Guide 1 16 ...

Страница 26: ...e OMNISCANNER Project screen Press the ON OFF key to power the unit on and display the Project screen with its three user definable items Project Autotest and Cable The Project name will be highlighted Use the ê to move the highlight to the Autotest or Cable field Press ENTER when a field is highlighted to change the current Project Autotest or Cable OMNISCANNER will auto sense the Adapter Battery...

Страница 27: ...nitial certification perform the following 1 Run a self test by setting the reference for OMNISCANNER and OMNIREMOTE periodically e g weekly 2 Select the appropriate Project Autotest specification and Cable type Certification Perform the following for each installed cable to be tested 3 Attach OMNISCANNER to one end of the link which is typically at the patch panel in a wiring closet 4 Attach OMNI...

Страница 28: ... setting the process should be repeated periodically to ensure unit verification OMNISCANNER stores reference data for up to 5 remote units by serial number 1 To set the reference connect OMNISCANNER and OMNIREMOTE using the PERMANENT LINK ADAPTER and CHANNEL ADAPTER supplied with the scanner as shown 2 Turn OMNISCANNER on 3 Press Setup 4 Select Set Reference 1 abc def ghi jkl mno prs tuv wxy qz 2...

Страница 29: ...ture is very useful for grouping test results and eases uploading and sorting of Autotests stored in the scanner 1 Use the é or ê to highlight Project and press ENTER 2 Select the appropriate Project from the pop up list and press ENTER 3 Use the é or ê to highlight Autotest and press ENTER 4 Select the appropriate Autotest from the pop up list and press ENTER 5 Use the é or ê to highlight Cable a...

Страница 30: ...l immedi ately verify that OMNIREMOTE is attached If OMNIREMOTE is not attached OMNISCANNER will wait until it is attached before running the Autotest 3 Press ESC at any time to cancel the Autotest 4 The AUTOTEST screen is displayed while Autotest is running The Autotest and the Cable name are displayed at the top of the screen A gauge indicates the test progress Tests will be listed with their in...

Страница 31: ...st enter a Circuit ID into the Circuit ID field Circuit IDs can be setup to automatically increment See Chapter 4 Setup Projects Editing a Circuit ID for further informa tion If an incrementing Circuit ID was created in the PROJECT Setup screen the Circuit ID field will already contain the next available Circuit ID that can be used as a default 4 To change the name using OMNISCANNER s edit feature...

Страница 32: ...to OMNISCANNER s internal memory Note Saving graphs will reduce the number of Autotests that can be stored Press Save to MMC to save the test results to the MultiMediaCard OMNISCANNER2 only Press Save with Graphs to MMC to save the test results with their graphs to the MultiMediaCard OMNISCANNER2 only Note Saving graphs will reduce the number of Autotests that can be stored 8 Press ESC to return t...

Страница 33: ...OMNISCANNER User Guide 2 8 ...

Страница 34: ...tions of each available test Most Autotest result screens have a retest feature for diagnostic purposes Press Retest to run continuous tests for the same cable The arrow located on the Retest button will be turning for the duration of the test Press Retest once more to stop the continuous measurement OMNISCANNER will display the last measured data Note Retest invalidates an Autotest After using th...

Страница 35: ...ner of the titlebar to indicate whether the information is pertinent for OMNISCANNER or OMNIREMOTE To toggle between the two screens press to open the screen that contains the information for OMNISCANNER Press to display the information for OMNIREMOTE The RETURN LOSS and NEXT screens have Diagnostic function keys to help you with the interpretation of failed test results See Chapter 6 TDRL and TDN...

Страница 36: ...s the link only from jack to jack including the Modular 8 plug that plugs into the Jack Link with Punch Down Block and Modular 8 Jack The graphic shows the connection of OMNISCANNER to an IDC 110 block in the wiring closet and OMNIREMOTE to a Modular 8 jack in the work area The Punch Down Block Adapter kits 110 A LINK ADAPTER and 110 B LINK ADAPTER are avail able as optional accessories to interfa...

Страница 37: ...odular 8 plug use the sup plied modular 8 CHANNEL ADAPTER and attach OMNISCANNER and OMNIREMOTE to the channel patch cords Note Best results for Category 6 channel tests will be obtained when using OMNISCANNER software version 4 0 or higher which utilizes AVC Adaptive Vector CancellationTM For more information on the Permanent Link the Basic Link and the Channel please visit www cabletesting com C...

Страница 38: ...er that is now attached 2 Use the é or ê to highlight Project and press ENTER 3 Select the appropriate Project from the pop up list and press ENTER Select a project name for test result management Cables were previ ously assigned to a specific project through the use of the OMNISCANNER Configuration utility See Chapter 9 Uploading and Printing for further information about OMNISCANNER Configuratio...

Страница 39: ...on 4 To assign a unique circuit id to the Autotest enter a Circuit ID into the Circuit ID field Circuit IDs can be setup to automatically increment See Chapter 4 Setup Projects Editing a Circuit ID for further information If an incrementing Circuit ID was created in the PROJECT Setup screen the Circuit ID field will already contain the next available Circuit ID that can be used as a default 5 To c...

Страница 40: ...ous tests for the same coaxial cable The arrow located on the Retest button will be turning for the duration of the test 9 Press Retest once more to stop the continuous measure ment Note Retest invalidates a coaxial Autotest After using the retest feature the coaxial test must be repeated before results can be saved Viewing Coaxial Test Results To view stored test result press the Results function...

Страница 41: ...OMNISCANNER User Guide 2 16 ...

Страница 42: ...ble from the Project screen Press the ON OFF key to power the unit on and display the project screen with its three user definable items Project Autotest and Cable The Project name will be highlighted Use the ê to move the highlight to the Autotest currently selected Use the ê to highlight the currently selected Cable type OMNISCANNER will auto sense the Adapter Battery and Memory status are graph...

Страница 43: ...eparation Prior to initial certification perform the following 1 Attach an OMNIFIBER to OMNISCANNER This will be referred to as the OMNIFIBER MAIN 2 Attach an OMNIFIBER to OMNIREMOTE This will be referred to as the OMNIFIBER REMOTE 3 Establish a reference power by setting the reference 4 Select the appropriate Project Autotest specification and Cable type Certification Perform the following for ea...

Страница 44: ...ence must be established least once each calendar day that the OMNIFIBER is used 1 Attach the connector adapters to each of the OMNIFIBER RX ports 2 To set the reference value connect the OMNIFIBER MAIN and OMNIFIBER REMOTE using launch cables jumpers and couplers See Chapter 8 Fiber Optic Reference Methods for further information 3 Press Setup and then select Set Reference 4 The CONNECT JUMPERS s...

Страница 45: ...t through the use of the OMNISCANNER Configuration software See Chapter 9 Uploading and Printing for further information about OMNISCANNER Configuration The Project feature is very useful for grouping test results and eases uploading and sorting of Autotests stored in the scanner 1 Use the é or ê to highlight Project and press ENTER 2 Select the appropriate Project from the pop up list and press E...

Страница 46: ...est Cable or Project for further information Running an Autotest for Fiber Optic Cabling Preparing an Autotest Connect OMNIFIBER MAIN to the near end of the RX TX fiber pair you are testing and connect OMNIFIBER REMOTE to the far end Depending on the method that was used to obtain the reference connect your fibers as follows 2 JUMPER METHOD AUTOTEST To run an Autotest when the 2 Jumper Method was ...

Страница 47: ...ER 3 Connect the white connectors to the RX ports on the OMNIFIBER 4 Connect the OMNIFIBER MAIN to one end of the duplex link under test and the OMNIFIBER REMOTE to the opposite end 5 Press 3 JUMPER METHOD AUTOTEST To run an Autotest when the 3 Jumper Method was used to set the Reference proceed as follows 1 Do not disconnect the launch cables that are attached to the OMNIFIBER 2 m Launch Cable 2 ...

Страница 48: ...e loopback Autotest assumes that the 2 Jumper Method was used to make the reference measurement To run a Loopback Autotest proceed as follows 1 Do not disconnect the black launch cable which is attached to the TX port of the OMNIFIBER it is circled in the graphic 2 Do not disconnect the coupler from the black launch cable it is circled in the graphic 3 Disconnect the white launch cable from the RX...

Страница 49: ...s on one fiber OMNISCANNER will assume that both fibers of a duplex link have the same number of connections 2 To change the number of Splices use the ê to highlight the field and press ENTER Use the é or ê arrow key to adjust the number of splices in your link To determine the total number of splices simply count all of the splices on one fiber OMNISCANNER will assume that both fibers of a duplex...

Страница 50: ...was performed an icon for OMNISCANNER or OMNIREMOTE will appear next to the fiber s name Press or to view results for the fibers with light transmis sion in the opposite direction The arrows flip vertically to indicate that there are two results for each fiber one from TX to RX and one from RX to TX Note Values measured with OMNIFIBER will be compared against the preprogrammed PASS FAIL limits OMN...

Страница 51: ...t the bottom of the screen if applicable To store the Autotest Result for the fiber listed on the right side press the Save function key located on the right side To store the Autotest Result for the fiber listed on the left side press the Save function key located on the left side ...

Страница 52: ...re allows you to define edit and preset many items They are conveniently organized and can be easily accessed by pressing the assigned number on your alphanumeric keypad or by highlighting the item and then pressing ENTER From the Project screen press the Setup function key to open the SETUP screen è è è ...

Страница 53: ...SC to return to the SETUP screen Set Reference with the OMNIFIBER Adapters Note The fiber reference expires each day at midnight It must be set each calendar day that OMNIFIBER adapters are used The reference value should also be set every time the test configuration changes A reference value must be established before a loss measurement can be calculated With the OMNIFIBER adapters attached to OM...

Страница 54: ...f Autotests contained in that folder Use the é or ê arrow key to highlight a specific Autotest Copper tests are marked with a twisted pair icon Fiber optic tests are marked with a fiber icon Press Set Default to select it as the Autotest to run Press Detail to review the Autotest s limits Viewing Details for Copper and Fiber Autotests For twisted pair cabling the Autotest Detail screen consists of...

Страница 55: ...r may not show limits in the description field An precedes the test name for tests being performed during the Autotest but the results are not used to determine PASS or FAIL Defined test limits will be displayed right below the test name If a test has no limit the limit description field will be empty For fiber optic cabling the View Autotest Detail screen shows the standard being used in the titl...

Страница 56: ... Cables to display the CABLES screen It contains a list of cable manufacturers If there are cables in a folder the manufacturer folder will appear full otherwise it will be empty Highlight a cable manufacturer that is marked by a folder containing items and press ENTER to display the list of cables in that manufacturer s folder Use the é or ê arrow key to highlight the desired cable Copper cables ...

Страница 57: ...ance are definable Note A new or edited cable will be saved in the Custom Cables folder For an accurate Length test the NVP Nominal Velocity of Propagation must be set correctly The value is usually specified by the cable vendor and OMNISCANNER has a large library of cables with the manufacturer s specified NVP To determine the NVP of a cable with a known length press Measure to capture the length...

Страница 58: ...Note Default fibers cannot be edited A fiber cable s Graded Refractive Index GRI differs depending on the supplier To receive accurate length results OMNISCANNER allows you to define the GRI values for both wavelengths To change the fiber s mode use the é or ê arrow key to highlight the mode Press Enter to select Multimode 62 2 mm Multimode 50 mm or Single mode Press Save to save the edited cable ...

Страница 59: ...ion When the first Circuit ID field is completed press Copy to copy the First Circuit ID into the Last Circuit ID field Quickly edit the Last Circuit ID field Press List to display the Circuit ID screen It contains a scrollable list of all Circuit IDs created for the project Highlight a circuit ID and press Print label to quickly print a label See Label Printer in this Chapter for further informat...

Страница 60: ... characters which allows the sophisticated construction of Circuit IDs Each character can be incremented The example shows how to quickly create an incremental Circuit ID Enter MT F01 MyTest Floor 01 PP01 Patch Panel 01 P01 Position 01 in the First Circuit ID field Press ENTER to terminate the edit mode Use the ê to highlight the Last Circuit ID field and press ENTER Enter MT F12 MyTest Floor 12 P...

Страница 61: ...ress Copy once you have completed the First Circuit ID This function will copy the First Circuit ID into the Last Circuit ID field Now edit the Last Circuit ID field Press ESC to return to the SETUP screen Configurations Select Configurations to display the CONFIGURATIONS screen It contains a list of all configurations which are currently stored on the MultiMediaCard that can be read by OMNISCANNE...

Страница 62: ... you want OMNISCANNER to auto matically move to the failed test result The Jump to Fail box will be checked Use the ê to advance to the Report field and press ENTER Select Margin if you want OMNISCANNER to report the result measured in dB for the worst margin Select Worst dB if you want the worst overall dB value to be reported as in OMNISCANNER software versions prior to v4 0 Press ENTER to set t...

Страница 63: ...tiMedia Card for more information about MMC Select Internal if you want to save the results to OMNISCANNER s internal memory or select Inter nal Auto Save if you want the results stored automatically after a test has been completed In either case results can be transferred to the ScanlinkTM Tools soft ware program See Chapter 9 Uploading and Printing for more information In the Save Graph Options ...

Страница 64: ... the default volume select Low to turn the volume down and select OFF to turn the sound off Use the éê keys to highlight the desired volume and press ENTER to select it as the default volume To edit the Date Month Day Year use the è key to highlight the portions you want to change Press ENTER to edit the highlighted segment Use the éê keys to change the displayed values in incre ments of 1 Press E...

Страница 65: ... and OMNIREMOTE was last set is shown at the top of the screen The Hardware and Software Versions and the Serial number of the remote unit are displayed The Battery status is represented with a gauge Factory Calibration data is displayed at the bottom of the screen You may need to provide Serial Number and Factory Calibration data when having repairs or refurbishments done or when calling for Tech...

Страница 66: ...Formatting will start immediately The formatting time is dependent on the capacity of the MultiMediaCard 8MB will require 2 min utes Regional Settings Select Regional Settings to open the REGIONAL screen The settings affect the way OMNISCANNER displays dates and numbers The REGIONAL screen displays the Language that is currently selected To change the language press ENTER and use the éê keys to hi...

Страница 67: ...reen The label printer name is displayed Press ENTER to turn the Auto Print feature on or off Select YES if you want OMNISCANNER to automatically print a label after the Autotest has been saved Select NO if you want to manually initiate the print process Press ENTER when done Use the è to advance to the Font Size field and press ENTER Labels can be printed with small or large fonts Select Small or...

Страница 68: ...pair fiber optic and coaxial cabling Measuring Twisted Pair Cabling OMNISCANNER allows you to run various individual tests The tests are conveniently grouped into two screens and can be accessed separately with the alphanumeric keypad Press the Measurements function key to display the MEASURE MENTS screen Press the Page Down function key to scroll to the second screen containing MEASUREMENTS Press...

Страница 69: ...iber optic cabling Measuring Coaxial Cabling With the coax adapter attached press the Measurements function key to display the MEASUREMENTS screen for coaxial ca bling Selecting an individual Test Highlight the test you want to perform using the é or ê keys on your keypad and press ENTER or direct dial a test by pressing its associated number on the OMNISCANNER keypad ...

Страница 70: ... right corner of the titlebar indicating whether the information on the screen is pertinent for OMNISCANNER or OMNIREMOTE Toggle between the screens by pressing to open the screen that contains the information for OMNISCANNER and to display the information for OMNIREMOTE Note The PASS FAIL criteria are based on the Autotest currently selected in the Project screen Several measurements will display...

Страница 71: ... the é or ê keys to magnify the area of the graph where the cursor is located The graph can be magnified 1x 2x 4x or 10x Use the ç or è keys to move the cursor within the graph 1x 2x 4x 10x Use the cursor to display values for the desired frequency ...

Страница 72: ...o line between wire pairs indicates an open An X between a wire pair indicates a reversed pair A between wirepairs indicates a short The measured length of the pairs 1 2 3 6 4 5 and 7 8 are shown on the left side In the example OMNISCANNER displays split pairs on 1 2 and 4 5 although they are wired straight through a reversed pair 3 6 an open on wire 7 and a short on wire 8 to the Shield Press ESC...

Страница 73: ... the first column fol lowed by small icons to indicate whether the pair is open or shorted The measured Length and the Delay are displayed for each pair The result for the shortest pair is tagged with a PASS or FAIL indica tor OMNIScannerEnd Found is displayed instead of a value the cable is either too long or properly terminated The length result can be displayed in meters or feet See Chapter 4 S...

Страница 74: ...r combination is tagged with a PASS Marginal PASS Marginal FAIL or FAIL indicator Press or to toggle between the NEXT results for OMNISCANNER and OMNIREMOTE Press Graph to display the NEXT graph for the highlighted pair combination NEXT is dis played for the frequency indicated by the cursor position Press Pairs to view NEXT graphs for other pair combinations Press Diagnostics to display the TDNXT...

Страница 75: ...worst dB value regardless of the Report setting in the RUN OPTIONS screen Return Loss The Return Loss function measures the uniformity of a cable s imped ance OMNISCANNER injects a signal into the cable and measures the reflected signal strength Return Loss measures the difference between the transmitted signal delivered to the cable and the reflected signal at the input port of the cable The refl...

Страница 76: ...tion ELFEXT is reported in dB and results are computed for twelve pair combinations at the OMNISCANNER and the OMNIREMOTE end of the cabling In the ELFEXT screen the worst case margin for all near and far pair combinations is shown at the top of the screen The pair combinations are displayed in the column on the left side followed by the ELFEXT value the margin limit and the frequency The result f...

Страница 77: ...tworks this is the highest frequency at which the signal can easily be distinguished from background noise Bandwidth is reported as the frequency where ACR is 3dB In the ACR screen the Bandwidth is displayed at the top of the screen The pair combinations are located in the column on the left side followed by the measured ACR the ACR margin limit and the fre quency The result for each pair combinat...

Страница 78: ...pair combination Power Sum NEXT is calculated from NEXT for individual pair combinations and takes into account the crosstalk from multiple transmission pairs When reporting Power Sum NEXT OMNISCANNER displays results for pairs rather than pair combinations The PS NEXT measurement is required to assure proper operation of networks employing simultaneous transmission on more than one pair in a link...

Страница 79: ...en the worst case margin for all near and far pairs is shown at the top of the screen The pairs are displayed in the column on the left side followed by the PSELFEXT in decibels dB the margin limit and the frequency The result for each pair is tagged with a PASS Marginal PASS Marginal FAIL or FAIL indicator Press or to toggle between the PSELFEXT results for OMNISCANNER and OMNI Remote Press Graph...

Страница 80: ...t side followed by the PSACR in decibels dB the margin limit and the frequency The result for each pair is tagged with a PASS or FAIL indicator Press or to toggle between Power Sum ACR results for OMNISCANNER and OMNIREMOTE Press Graph to view the graph for the currently highlighted pair Attenuation and PSNEXT are displayed for the frequency indicated by the cursor position Press Pairs to view Att...

Страница 81: ...ull length of the fibers under test The LENGTH DELAY screen displays the GRI 1300 nm nanometers for multimode fiber and 1310 nm for single mode fiber The length limit and the actual derived length are displayed in meters or feet The delay is displayed in nanoseconds nS Press ESC to exit the LENGTH DELAY screen Loss The Loss function measures the signal loss in a fiber optic cable The adapters inje...

Страница 82: ...fying fiber cables with a tone locator use the 2KHz modulated mode Press Continuous or Modulated to change the light source When using OMNIFIBER MM multimode press or to change the wavelength of the OMNIFIBER Main transmitted and received wavelengths When using OMNIFIBER SM single mode press or to change the wavelength of the OMNIFIBER Main transmitted and received wavelengths Either Main or Remot...

Страница 83: ...NNER User Guide 5 16 light is continuous the green LED will not blink Press to set the reference value place it in the appropriate field and start calculating the loss Press ESC to exit the POWER METER screen ...

Страница 84: ...oo long or terminated in its characteristic impedance The Termination function displays whether a cable is open or shorted When the field Length displays NEF the Termination will display Impedance defines the relationship of voltage and current in an electrical circuit Each Cable or transmission line is designed to have specific impedance which allows proper matching to the currents of the transmi...

Страница 85: ...ink Adapter Make sure that the cable is not grounded as a grounded cable will weaken the signal A multi tone trace signal will begin transmitting To enhance the signal insert a grounding plug into the ground jack located left of the DB 9 Serial Connector A grounding plug is included in the optional Cable Tracer II kit you may use any grounding cable that has a standard insulated phone tip plug 2 T...

Страница 86: ...ulse Noise trace cables and locate office drops Press the Diagnostics function key to display the DIAGNOS TICS screen Wiremap Wiremap identifies the location of opens breaks and pairs that are shorted This allows quick identification of the fault location Select Wiremap to display the WIREMAP screen The screen displays the wire connections between OMNISCANNER and OMNIREMOTE The pairs that are bein...

Страница 87: ...engths of pairs 1 2 3 6 4 5 and 7 8 are shown on the left side of the Wiremap If the selected cable is shielded or screened shield continuity will be measured and if the shield fails the test Wiremap will display the error WIRE IS OPEN Wiremap checks the continuity of each wire In this example there is no line between pin 5 at each end which indicates a break in connection Use the number on the le...

Страница 88: ...nnection and cable faults It assists you with diagnosis and troubleshooting of NEXT failures and the verification of test cables connectors and plugs While the NEXT graph shows the link test limits and the frequency at which a failure occurred the TDNXT graph displays NEXT vs distance S Bands provide a time domain limit to verify that the connections are within the desired category of performance ...

Страница 89: ... the corresponding pair combination and the distance to the cursor position are displayed above the graph The example shows a Time Domain NEXT that exceeds the S Bands The worst NEXT is displayed at 7ft the connection location The conclusion is that the connection caused the failure Press ESC to exit the TDNXT screen Using TDNXT to Diagnose a Link The S Band limit lines provide an easy method to p...

Страница 90: ...DNXT screen to further review and diagnose the graph The cursor is positioned at the worst peak which is outside the S Bands Looking at the TDNXT graph we can reach the conclusion that the connection located at 2 meters did not meet the required performance and is the cause of failure BAD CABLE GOOD CONNECTION The cursor in the NEXT graph is located at the worst NEXT at 6 2 MHz which is outside th...

Страница 91: ...f the amount of reflected energy in a link Reflections occur at points of impedance discontinuity such as connec tors transitions from patch cables to horizontal cables and impedance structure within a cable Return Loss faults are diagnosed by using the TDRL Time Domain Return Loss function OMNISCANNER uses TDRL to determine the amount of Return Loss as a function of distance TDRL with new S Band ...

Страница 92: ...Domain Return Loss graph The funnel like lines are the upper and lower S Bands S Bands are limit lines for con nections as a function of distance from the cable end They provide a quantita tive measure of Return Loss at the connection point which is typically located at the end of the test cable at about 2 meters 7ft The measurement unit for the horizontal graph can be displayed in meters m or fee...

Страница 93: ...by the cable portion of the link If failures occur at both ends of the link use or to diag nose each end Failures at both ends of the link can interact TDRL Examples The following examples show the diagnostics process that is performed to identify failures on typical links with 2 meter test cables GOOD CABLE BAD CONNECTION The cursor in the Return Loss graph is located at the worst Return Loss at ...

Страница 94: ... the require ments The Return Loss in the cable is the source of the failure even though the cable s Return Loss response peaks are less than those of the connection By knowing that the connection meets its performance requirement the cable is easily identified as the non compliant compo nent of the link The following table summarizes the typical diagnosis process Return Loss TDRL exceeds Conclusi...

Страница 95: ...itself Impulse Noise counts the impulses detected on a given pair Select Impulse Noise to open the IMPULSE NOISE screen The current date and time is shown in the upper left The monitored pair is shown in the upper right Impulses sec indicates the number of wide band impulses that exceed 30 mv peak to peak that were detected in the last 1second interval Total Impulses indicates the total number of ...

Страница 96: ...ing plug is included in the optional Cable Tracer II kit you may use any grounding cable that has a standard insulated phone tip plug 2 To determine the cable path use the multi tone sound as a guide and simply trace along the wire where the tone is loudest The tracer needs to be within one foot of the hidden cable Press ESC to exit the CABLE TRACE screen Office Locator The Office Locator function...

Страница 97: ...ns and display the ID of the Office Locator adapter found at the far end of the attached cable If you are testing a cable that does not have an Office Locator attached at the other end OMNISCANNER will display a question mark Press ESC to exit the OFFICE LOCATOR screen ...

Страница 98: ...Black Project folders identify results stored on MMC See Chapter 11 MultiMediaCard for further information To quickly remove all Autotests from a project highlight the project in the RESULTS screen and press the Delete function key A message will prompt you to confirm the operation To view more detailed test information highlight a project name and press ENTER The previously highlighted PROJECT NA...

Страница 99: ...d return to the PROJECT NAME screen If the PROJECT NAME was changed it will now appear in the title bar together with the numeric test counter Viewing Autotest Results The Project Name screen shows a Circuit ID and a PASS FAIL icon for each saved Autotest The following PASS FAIL icons can be displayed Passed twisted pair Autotest Failed twisted pair Autotest Twisted Pair Autotest without PASS FAIL...

Страница 100: ...st of tests varies depending on the kind of Autotest that was performed See Chapter 5 Measurements for detailed information about each measurement screen Use the éê on your keypad to highlight a test Press ENTER to open the test result screen for that particular test Use the ç or è on your keypad to quickly page through all test results Note If Save with Graphs or Save with Graphs to MMC was selec...

Страница 101: ...ght The arrows also indicate the fiber that the PASS or FAIL result is for The number of Connectors and Splices is shown at the bottom of the screen if the Autotest loss criteria is formula based See Appendix C for further information Press or to toggle between the results for OMNISCANNER and OMNIREMOTE Press ESC to return to the PROJECT NAME screen Press ESC to return to the RESULTS screen For Co...

Страница 102: ...accomplished as described above When a MultiMediaCard is inserted OMNISCANNER2 will allow you to copy results to the portable card To copy the test result s contained in one project to the MMC highlight the appropriate Project folder in the RESULTS screen and then press Copy Project to MMC This function is available only for Projects in the internal flash light Project folder To copy all internal ...

Страница 103: ...OMNISCANNER User Guide 7 6 ...

Страница 104: ...efinitions and three corresponding reference methods Link Reference Multimode Single mode Where Used Definition Method Standard Standard link 2 1 jumper TIA 526 14A TIA 526 7 TIA 568 B cross or equivalent Method B Method A 1 ISO 11801 connects 100Base X cable plant 1000Base X ATM Fibre Channel FDDI Token Ring link 1 2 jumper TIA 526 14A TIA 526 7 10 Base X cross or equivalent Method A Method A 2 T...

Страница 105: ...can be marked with other color schemes or cable markings to differentiate them Pay close attention to the colors to avoid improper fiber connections The Reference Methods For testing of networks with different connector styles please consult the Fluke Networks web site http www flukenetworks com support It is very important that the transmitter TX port connections are not disturbed after the refer...

Страница 106: ...h cable to the RX receive port of the fiber adapter that is attached to OMNIREMOTE 3 Leave the two white fiber connectors dangling and unconnected 4 Connect one end of another black launch cable to the TX transmit port of the fiber adapter that is attached to OMNIREMOTE 5 Connect the other end of that black launch cable to the RX receive port of the fiber adapter that is attached to OMNISCANNER 6 ...

Страница 107: ... transmitter port and the white fiber to the RX receiver port 2 Connect a launch cable to the fiber adapter that is attached to OMNIREMOTE The black fiber attaches to the TX transmitter port and the white fiber to the RX receiver port 3 Use a connector adapter to mate the two black fiber connectors 4 Use a connector adapter to mate the two white fiber connectors 5 Press Setup to open the SETUP scr...

Страница 108: ...ter that is attached to OMNIREMOTE The black fiber attaches to the TX transmitter port and the white fiber to the RX receiver port 3 Use two connector adapters to mate the black TX connector to the white RX connector through a third jumper cable 4 Use two connector adapters to mate the other black TX connector to the white RX connector through a third jumper cable 5 Press Setup to open the SETUP s...

Страница 109: ...e The length measurement will be off by the length of the jumper cable about 2 meters This primarily affects the length accuracy of very short cables 1 Connect the launch cable to the OMNIFIBER The black fiber attached to the TX transmit port and the white fiber to the RX receive port 2 Use a connector adapter to mate the connections on the other end 3 Press Setup to open the SETUP screen and then...

Страница 110: ...cturing of cable libraries Projects can easily be downloaded to several OMNISCANNER OMNISCANNER Configuration allows you to import limits that can be used in custom Autotests These limits can be viewed and printed with the extensive graphing utility OMNISCANNER Remote Control is designed to control OMNISCANNER from your PC It allows you to run Autotests that can be uploaded viewed and printed OMNI...

Страница 111: ...OMNISCANNER User Guide 9 2 ...

Страница 112: ...ote To ensure compatibility always update the OMNISCANNER software together with the Scanlink Tools software Updating OMNISCANNER and OMNIREMOTE Software Note The update process will erase all test results stored in memory Use Scanlink to upload the results before updating OMNISCANNER s soft ware To update OMNISCANNER with the files you have downloaded from the WWW to your PC proceed as follows 1 ...

Страница 113: ...es the update file 6 To verify the software update press and hold the Backlight key located right above the ESC key The software version will be displayed 7 To verify the update for OMNIREMOTE press OMNISCANNER s Setup function key and then select the option Remote Info The new software version will be displayed Com 1 or Com 2 DB 9 to DB 25 or DB 9 to DB 9 Serial Cable AC Adapter AC Adapter Test C...

Страница 114: ...g and Downloading Portable Data OMNISCANNER2 can store data on a very small removable MultiMediaCard This allows for unlimited expansion of memory capacity and transferal of test data without taking OMNISCANNER2 out of service Available MultiMediaCard readers and adapters allow data to be uploaded directly to laptops or PCs Tests can be saved in OMNISCANNER2 s internal flash memory or to the optio...

Страница 115: ...SETUP screen A gauge will indi cate the progress See Chapter 4 Setup For mat MMC for further information Formatting time varies depending on the size of the MultiMediaCard the 8MB card can be formatted in about 2 minutes The MMC Structure The file structure on the MMC is Windows file system compatible When saving test results to the MMC Project folders will be created which allow you to easily ret...

Страница 116: ...PCs including many notebooks on the market today are fully USB ready The Hot swapping feature allows you to attach or remove OMNISCANNER2 on the fly without having to shut down and restart your PC OMNISCANNER2 will be detected automatically This feature is espe cially useful when uploading results from several scanners Of course the USB works with Scanlink Upload Utility OMNISCANNER Configuration ...

Страница 117: ...l the driver First the install wizard will find the new device OMNIScanner2 Click Next to continue Then it will search for a driver for OMNISCANNER2 We recommend accepting the default setting Search for the best driver for your device Click Next to continue Now select the option CD Rom drive to start the search for the USB driver Click Next to continue Next Windows will detect the location of the ...

Страница 118: ... speed USB cable 3 Turn on OMNISCANNER2 4 Run the Scanlink software and click on the Upload button in the toolbar or select Upload in the File menu 5 In the Scanner Type field select OMNISCANNER 6 Select the appropriate port USB 7 Click Upload to establish communi cations between Scanlink and OMNISCANNER2 and upload the Autotest data that are stored in the scanner s memory 8 Scanlink can upload da...

Страница 119: ... further information Downloading Configurations to OMNISCANNER2 1 To download Configurations from OMNISCANNER Configuration soft ware to one or several OMNISCANNER2s first turn your PC on 2 Connect the PC with OMNISCANNER2 via the high speed USB cable 3 Turn OMNISCANNER2 on 4 Run the OMNISCANNER Configuration software highlight a Configuration and click the Download button 5 To make sure that you ...

Страница 120: ... PC on 2 Connect OMNISCANNER2 and OMNIREMOTE via the link to be tested 3 Use the USB Cable to connect OMNISCANNER2 to the PC and then turn on OMNISCANNER2 4 Run the OMNISCANNER Remote Control software 5 Select Setup Communication Port and select USB as the Port 6 Click the Connect button As soon as the connection occurs the OMNISCANNER s serial number will be displayed OMNISCANNER Remote Control w...

Страница 121: ...al OMNISCANNER2s but only one at a time can be remote controlled If you have more than one scanner connected the USB Connection List will appear and allow you to select the scanner you wish to remote control The OMNISCANNER2s are listed by serial number Select a scanner and click OK to continue ...

Страница 122: ...backlight Backlit keypad with tactile feedback numeric input dedicated func tions four soft functions and cursor pad Context sensitive help and operating instructions Tone generating audio for warning or other user feedback Date stamp of all tests OMNIREMOTE LED Displays Pass Indicator GREEN for test results Status Indicator GREEN for OMNIREMOTE status various blink rates Fail Indicator RED for te...

Страница 123: ...peration or charging Environmental Operating Temperature 0 C to 50 C 32 F to 122 F Storage Temperature 10 C to 55 C 14 F to 131 F Operating Humidity non condensing 5 to 90 Storage Humidity 5 to 95 Regulatory Compliance 2 Class A Measurement Port Test Interface Ultra low Crosstalk test interface that supports testing of all four pairs 160 pin test interface connector which exceeds 10 000 mating cyc...

Страница 124: ... can be stored in permanent flash memory They are not subject to loss due to power or battery failures OMNISCANNER Autotest Functions Full suite of tests to determine if cable meets generic cabling or network type requirements Extended performance range Cabling CAT 6 and CAT 7 TIA standard Autotests ISO IEC standard Autotests Vendor specific Autotests IEEE standard Autotests ATM standard Autotests...

Страница 125: ...wing tables provide typical specifications for the intrinsic instrument parameters relating to the measurement accuracy model and the calculated typical accuracy for the basic link permanent link and channel configurations Note Refer to the TIA field tester specifications for a definition of the accuracy model TABLE A1 1 INSTRUMENT INTRINSIC MEASUREMENT PARAMETERS AS A FUNCTION OF MEASUREMENT CONF...

Страница 126: ...connected Uses OMNIREMOTE for complete mapping of wiring at both ends of the cable NEXT Test all six pair combinations from both directions using OMNIREMOTE Frequency Range 1 to 300 MHz Dynamic Range 100dB Measurement Accuracy Calculated per TIA error model Accuracy Significantly exceeds Level III requirements Measurement Resolution 0 1dB Return Loss Measures Return Loss on all four pairs from bot...

Страница 127: ...tion mea surements Bandwidth Computed for the link or channel under test bandwidth indicates the highest frequency for which the worst case pair to pair crosstalk NEXT is at least 3dB less than the attenuation Length Range 0 to maximum distance where max distance 457 m 1500 ft for twisted pair cable Accuracy K Length resolution NVP uncertainly where K 4 of length or 0 6 m 2ft whichever is greater ...

Страница 128: ...ution 0 10 000nS 8nS resolution 10 000 80 000nS High Voltage Input Protection The test interface withstands input hazard conditions that arise from normal telephone interfaces 48 VDC at less than 80 mA or 24 VAC power used to power many telephone keysets The unit detects when a voltage of greater than 15 volts is applied on the inputs and sounds a warning to alert the user to remove the hazard con...

Страница 129: ...OMNISCANNER User Guide A 8 ...

Страница 130: ...n the Scanner and press down on the battery pack until it clicks into place Rechargeable Battery Pack AC Connector Keypad The batteries have a limited number of recharge cycles Typically capacity is warranted by the battery manufacturer for about 200 recharge cycles The capacity of a battery is highly dependent on the way it is recharged Generally batteries that are fully discharged before the rec...

Страница 131: ...s The graphic LCD displays charging status on the OMNISCANNER while LEDs indicate the status on the OMNIREMOTE unit Status conditions are as follows Charge RED for OMNIREMOTE low battery status Charge GREEN while OMNIREMOTE battery is charging Charge GREEN blinking when battery is charged Battery Tips Power off the unit before changing the battery pack Charging is only enabled when the unit is tur...

Страница 132: ...rmula 4 11801 Equation for 1300nm fiber of mated connections x 0 75 of splices x 0 3 length x 1dB 1000m OLB Optical Link Budget OLB is the loss measured in a fiber link Loss in the connectors the splices and the cable are added up to the total link loss or OLB The TIA 568B Equation and the ISO 11801 Equation specify the OLB Each has certain PASS FAIL criteria based on the number of connectors and ...

Страница 133: ...OMNISCANNER User Guide C 2 ...

Страница 134: ...ns of the electronic signals transmitted through each pin in a connector Serial Cable DB 9 Male to DB 9 Female Pin outs DB 9 Male DB 9 Female 1 1 2 2 3 3 4 4 5 5 6 6 7 7 8 8 9 9 Serial Cable DB 9 Male to DB 25 Female Pin outs DB 9 Male DB 25 Female 1 8 2 3 3 2 4 20 5 7 6 6 7 4 8 5 9 22 ...

Страница 135: ...25 DB 9 Male Female Female Pin Pin Pin Signal Signal Description 5 7 5 GND Protective Ground 3 2 3 TXD Transmitted Data 2 3 2 RXD Received Data 7 4 7 RTS Request to Send 8 5 8 CTS Clear to Send 4 20 4 DTR DataTerm Ready 6 6 6 DSR Data Set Ready 1 8 1 CD Received Line Signal Detector 9 22 9 RI Ring Indicator ...

Страница 136: ......

Отзывы: