


Tips
Changing the Auto Set Options
8
99
Changing the Auto Set Options
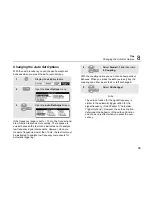
With the next procedure you can choose how auto set
behaves when you press the
AUTO
(auto set) key.
1
Display the
USER
key labels.
2
Open the
User Options
menu.
3
Open the
Auto Set Adjust
menu.
If the frequency range is set to > 15 Hz, the Connect-and-
View function responds more quickly. The response is
quicker because the test tool is instructed not to analyze
low frequency signal components. However, when you
measure frequencies lower than 15 Hz, the test tool must
be instructed to analyze low frequency components for
automatic triggering:
4
Select
Signal > 1 Hz
, then jump
to
Coupling
.
With the coupling option you can choose how auto set
behaves. When you press the
AUTO
(auto set) key, the
coupling can either be set to dc or left unchanged:
5
Select
Unchanged
.
Note
The auto set option for the signal frequency is
similar to the automatic trigger option for the
signal frequency. (See Chapter 5: “Automatic
Trigger Options”). However, the auto set option
determines the behavior of the auto set function
and shows only effect when you press the auto
set key.
Содержание 19xC
Страница 2: ......
Страница 9: ...Contents continued v A Bushealth Measurements A 1...
Страница 10: ......
Страница 36: ...Fluke 19xC 2x5C Users Manual 26...
Страница 60: ...Fluke 19xC 2x5C Users Manual 50...
Страница 110: ...Fluke 19xC 2x5 Users Manual 100...
Страница 146: ...Appendices Appendix Title Page Bushealth Measurements A 1...
Страница 147: ......


