background image

 Gebruiksaanwijzing Prestige Stelvio Racer Pro i - 13

4. Gebruik

Stap 3
1. 

Bevestig de computer (71) op de stuurstang. Voer als eerste de data kabel door het 
vierkante gat in het stuur en monteer het geheel met vier bouten (80). 

2. 

Bevestig het stuur aan de speed bike met behulp van bouten (73) en ringen (72).

3. 

Verbind nu de data kabel uit het frame met de data kabel van de computer (71).

1PC

3

1PC

Содержание FFC20703

Страница 1: ...www flowfitness com Gebruiksaanwijzing Manual ...

Страница 2: ...ruikt of gereproduceerd in welke vorm of op welke wijze dan ook zondervoorgaande schriftelijke toestemming van Flow Fitness All rights reserved Nothing in this instruction manual may be used or reproduced in any form or way without the express written permission of Flow Fitness Handleiding Nederlands Manual English 3 49 50 64 ...

Страница 3: ... 1 Belangrijke onderdelen 7 2 2 Specificaties 7 3 Fitness 8 3 1 Trainen op hartslag 8 3 2 Warming up en cooling down 10 4 Gebruik 11 4 1 Montage 11 4 2 Gebruik computer 20 4 3 Trainen met apps 29 4 4 Onderhoud 31 5 Algemene informatie 32 5 1 Training schema s 32 5 2 Exploded view 34 5 3 Probleemoplossen 36 6 Garantie 37 6 1 Garantie 37 ...

Страница 4: ...ct juist functioneert In geval van storing of defect stoppen met trainen en direct contact opnemen met uw dealer Gebruik het product nooit als deze defect is Dit product is alleen bedoeld voor thuisgebruik en dient op een vlakke ondergrond te staan Dit product mag door maximaal één persoon tegelijk worden gebruikt Het product is geschikt voor personen met een lichaamsgewicht tot 140 kilogram Zorg ...

Страница 5: ...voor dat alle gebruikers op de hoogte zijn van de waarschuwingen en voorschriften zoals vermeld in deze gebruiksanwijzing Dit product is bedoeld voor gebruik in een schone droge omgeving Opslag in koude en of vochtige ruimtes zou tot problemen in het product kunnen leiden Dit product is niet geschikt voor therapeutische ondersteuningen of het professioneel gebruik ervan in de fysiotherapie WAARSCH...

Страница 6: ...van de speed bike Tevens bevat de handleiding tips en adviezen over hoe u het beste kunt trainen Wij adviseren u voor het gebruik van de Stelvio Racer Pro i Speed Bike eerst deze handlei ding aandachtig te lezen zodat het product optimaal en veilig kan worden gebruikt Flow Fitness wenst u veel succes en plezier met trainen 2 Introductie ...

Страница 7: ...pecificaties Lengte Hoogte Breedte Gewicht 120 cm 120 cm 851 cm 47 kg 2 1 Belangrijke onderdelen Computer Verticaal verstelbaar stuur Horizontaal en verticaal verstelbaar zadel Pedaal met SPD en toeclips Noodrem Hoofdframe Adapter aansluiting Transportwielen Stelvoetjes ...

Страница 8: ...et beste op 60 van uw maximale hartslag trainen Wanneer uw trainingsdoel is om de conditie te verbeteren dan is dat 85 van uw maximale hartslag Het lichaam slaat energie op in twee vormen koolhydraten en vetten Bij een inspanning gebruiken we een combinatie van deze twee energievoorraden Wanneer de in spanningsintensiteit hoog is kiest het lichaam grotendeels voor snel verbrandbare energie te wete...

Страница 9: ... is verdeeld in twee fasen De eerste fase bestaat uit zes weken en is een goede richtlijn voor beginners of personen die sinds lange tijd weer gaan trainen Gedurende deze fase wordt de intensiteit van de training langzaam opgebouwd Na zes weken begint de tweede fase U kunt dan kiezen voor een trainingsschema om gewicht te verliezen of om uw conditie te verbeteren Leeftijd Gewicht verliezen slagen ...

Страница 10: ... zodat uw rechterzijde wordt gestrekt Houd dit gedurende één seconde vast Ontspan en doe vervolgens dezelfde beweging met uw linker arm Herhaal dit drie tot vier keer Knee bend Plaats uw voeten op schouder breedte en strek uw handen voor uw uit Buig nu langzaam door uw knieen niet meer als 10 centimeter Kom rustig omhoog en herhaal deze oefening een aantal keren Lower back stretch Begin met uw kni...

Страница 11: ... Racer Pro i 11 4 Gebruik Stap 1 1 Bevestig de voorvoet 2 aan het hoofdframe 1 met behulp van twee inbusbouten 9 en ringen 10 2 Bevestig de voorvoet 3 aan het hoofdframe 1 met behulp van twee inbusbouten 9 en ringen 10 1PC 1 3 3 Montage ...

Страница 12: ...e moeren onder het zadel los met de meegeleverde steeksleutel zodat het zadel op de zadelpen geschoven kan worden Positioneer het zadel nu in de gewenste hoek Het zadel kan zowel naar voren horizontal als naar achter geheld worden afhankelijk van uw persoonlijke voorkeur Controleer na het bepalen van de hoek of de zadelpunt recht naar voren wijst 3 Draai vervolgens de moeren weer stevig vast 1PC 1...

Страница 13: ... 71 op de stuurstang Voer als eerste de data kabel door het vierkante gat in het stuur en monteer het geheel met vier bouten 80 2 Bevestig het stuur aan de speed bike met behulp van bouten 73 en ringen 72 3 Verbind nu de data kabel uit het frame met de data kabel van de computer 71 1PC 3 1PC ...

Страница 14: ...vindt zich aan de rechterkant van de fiets terwijl u erop zit Let op dat het rechter pedaal met de klok mee moet worden 3 Monteer het linker pedaal 30L op de linker crank De rechter crankset bevindt zich aan de rechterkant van de fiets terwijl u erop zit Let op dat het linker pedaal tegen de klok in gedraaid moet worden 4 Monteer de bidon houder 83 met de twee bouten 24 5 Sluit vervolgens de adapt...

Страница 15: ... training verhogen van de weerstand RECOVERY Analyse van conditie aan de hand van hartslag herstel RESET Terug naar het hoofdmenu 5 seconden indrukken voor herstar ten van de console STAR STOP Starten of stoppen van training MODE Bevestig de instelling of selectie DOWN Selectere van training programma s of het verlagen van de waarde Tijdens een training verlagen van de weerstand ...

Страница 16: ...et aantal verbruikte calorieën PULSE Weergave van uw hartslag in BPM Hartslagen Per Minuut Deze waarde is enkel zichtbaar wanneer uw de hand sensoren stevig vast grijpt of een optionele 5kHz hartslagband draagt Deze waarde wordt ook nog weergegeven in een grafiek aan de rechterzijde van het scherm WATT Het geleverde vermogen in wattage Opstarten Plug de adapterkabel in het contact van het product ...

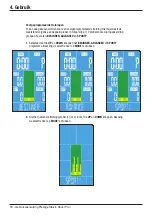
Страница 17: ...aarden in TIME DISTANCE CALORIES PULSE 2 Stel de gewenste tijdsduur in met de UP en DOWN knoppen Bevestig de selectie door op MODE te drukken 3 Stel de gewenste afstand in met de UP en DOWN knoppen Bevestig de selectie door op MODE te drukken 4 Stel de gewenste calorieën in met de UP en DOWN knoppen Bevestig de selectie door op MODE te drukken 5 Stel de gewenste harstlag in met de UP en DOWN knopp...

Страница 18: ...erstand volgens een bepaald profiel In totaal zijn er 12 profielen die zijn ingedeeld in 3 groepen Te weten BEGINNER ADVANCED en SPORTY 1 Selecteer met de UP en DOWN knoppen het BEGINNER ADVANCED of SPORTY programma Bevestig de selectie door op MODE te drukken 2 Stel het gewenste trainingsprofiel 1 t m 4 in met de UP en DOWN knoppen Bevestig de selectie door op MODE te drukken ...

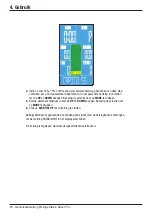
Страница 19: ...rtslag gestuurd te trainen Voor dit training programma heeft uw een Flow Fitness harstlagband nodig niet inbegrepen Er zijn 4 verschillende niveau s 55 75 90 of Target Heart Rate TAG Het niveau is een percentage van uw maximale hartslag die berekend wordt a d h v uw leeftijd 1 Selecteer met de UP en DOWN knoppen het CARDIO programma Bevestig de selectie door op MODE te drukken 2 Vul nu uw leeftijd...

Страница 20: ...met de UP en DOWN knoppen Bevestig de selectie door op MODE te drukken 5 Stel de gewenste tijdsduur in met de UP en DOWN knoppen Bevestig de selectie door op MODE te drukken 6 Druk op START STOP om te training te starten Let op Wanneer er gedurende 6 seconden geen signaal van de harslagband is ontvangen zal de melding PULSE INPUT in het display verschijnen De training is afgelopen wanneer de inges...

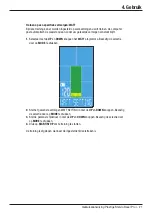
Страница 21: ... constant blijft 1 Selecteer met de UP en DOWN knoppen het WATT programma Bevestig de selectie door op MODE te drukken 2 Stel het gewenste vermogen WATT SETTING in met de UP en DOWN knoppen Bevestig de selectie door op MODE te drukken 3 Stel de gewenste tijdsduur in met de UP en DOWN knoppen Bevestig de selectie door op MODE te drukken 4 Druk op START STOP om te training te starten De training is ...

Страница 22: ...ndt u de verschillende codes en de bijbehorende uitleg Als de meting klaar is verschijnt er een code op de monitor De code ligt tussen de F1 F6 Hieronder is aangegeven welke code bij welke conditie niveau hoort F1 uitstekend F2 goed F3 voldoende F4 matig F5 slecht F6 zeer slecht geen correcte meting Belangrijk 1 De RECOVERY conditiemeting start alleen op als er een hartslag gedetecteerd wordt Voor...

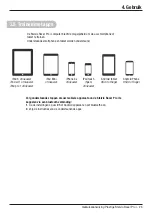
Страница 23: ...iPad air 1 of nieuwer iPad pro 1 of nieuwer iPad Mini of nieuwer iPhone 4s of nieuwer iPod touch 5gen of nieuwer Android tablet OS4 3 of hoger Android Phone OS4 3 of hoger Volg onderstaande stappen om uw mobiele apparaat aan de Stelvio Racer Pro i te koppelen via een bluetooth verbinding 1 Ga de instellingen op uw iOS of Android apparaat en zet bluetooth aan 2 Volg de instructies van de ondersteun...

Страница 24: ...ndleiding kinomap html iConsole Training Met de iConsole app kunt u de Stelvio Racer Pro i Speed Bike met uw smartphone of tablet bedienen Uw trainingen opslaan in een logboek of virtueel trainen deze app is geheel gratis Download de iConsole app door in de app of play store te zoeken naar iconsole of volg een van de onderstaande links Apple iOS App store https itunes apple com us app ic training ...

Страница 25: ... dat alle onderdelen goed droog zijn voordat deze weer worden gebruikt Flow Fitness adviseert om periodiek de bouten en moeren van de scharnierpunten te con troleren en indien nodig aan te draaien Gebruik hiervoor het bij het product aangeleverde gereedschap Om onnodige slijtage te voorkomen moet de Speed Bike uitsluitend binnenshuis en in een droge omgeving worden gebruikt 3 6 Onderhoud ...

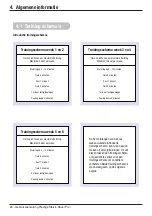
Страница 26: ...uten Train 5 minuten Rust 1 minuut Train 3 minuten 1 minuut rustig bewegen Cooling down 5 minuten Trainingsschema week 5 en 6 Train op 60 van uw maximale hartslag Maximaal 5 keer per week Warming up 5 10 minuten Train 6 minuten Rust 1 minuut Train 4 minuten 3 minuut rustig bewegen Cooling down 5 minuten Na het volbrengen van het zes weken durende introductie trainingsschema kunt u een keuze maken ...

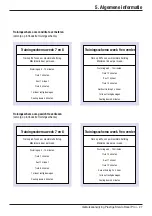
Страница 27: ...n verder Train op 90 van uw maximale hartslag Maximaal 6 keer per week Warming up 5 10 minuten Train 10 minuten Rust 1 minuut Train 10 minuten Herhaal training 2 a 3 keer 1 minuut rustig bewegen Cooling down 5 minuten Trainingsschema week 7 en 8 Train op 60 van uw maximale hartslag Maximaal 6 keer per week Warming up 5 10 minuten Train 7 minuten Rust 1 minuut Train 5 minuten 1 minuut rustig bewege...

Страница 28: ...28 Gebruiksaanwijzing Prestige Stelvio Racer Pro i 5 Algemene informatie 4 2 Exploded view ...

Страница 29: ...36 Platte kabel 1 37 Knop 2 38 Inlay stuurbuis 2 39 Stuurbuis afdekkap 1 40 Knop 1 41 Ring 1 42 Eindkap 2 43 Bout M10 40L 1 44 Moer 2 45 Cap 1 46 Motor 1 47 Noodrem eindstop 1 48 Noodrem afstandsbus 1 49 Noodrem drijfstang 1 50 Noodrem afdekkapje 1 51 Moer 4 52 Noodrem 1 53 Front cover L R 1 54 Schroef 3 55 Transportwiel 2 56 Ring 2 57 Borgmoer M8 4 58 Vliegwiel 1 59 Lager 2 60 As vliegwiel 1 61 R...

Страница 30: ... of Android apparaat krijgt geen verbinding met de Stelvio Racer Pro i Oplossing 1 Ga naar de bluetooth instellingen van uw smartphone of tablet en voer de optie Forget this device of Vergeet dit apparaat uit 2 Sluit alle apps op uw smartphone of tablet 3 Trek de stekker van de Speed Bike uit het stopcontact Wacht 5 seconden sluit de speed bike weer aan 4 Herhaal de bluetooth connectie stappen uit...

Страница 31: ...efect naar eigen inzicht verhelpen Indien het defect binnen het garantietermijn valt zal dit kosteloos gebeuren De garantie vervalt wanneer er gebreken zijn onstaan aan het product door een onjuiste montage van het toestel dan wel wanneer er sprake is van het niet juist opvolgen van de instructies zoals beschreven in deze handleiding reparaties aan het product zijn verricht door anderen dan door F...

Страница 32: ...www flowfitness com en Manual ...

Страница 33: ...portant parts 43 2 2 Specifications 43 3 Fitness 44 3 1 Training by heart rate 44 3 2 Warming up and cooling down 46 4 Use 47 4 1 Assembly 47 4 2 Use of the computer 56 4 3 Maintenance 67 5 General information 68 5 1 Training schedule 68 5 2 Exploded view 70 5 3 Troubleshooting 72 6 Warranty 73 6 1 Warranty 73 Content ...

Страница 34: ...duct as described in this instruction manual Before using this product check that the product functions as it should In case of malfunction or a defect stop training immediately and contact your vendor Do not use the product when there is a malfunction The product is only meant for use in the home and it has to be positioned on a flat surface The product can only be used by one person at the time ...

Страница 35: ...ey are loose The owner of the product is responsible for all users to be aware of the warnings and instructions as mentioned in this instruction manual This product is intended for use in a clean and dry environment Storage in cold and or moist areas could lead to problems with the product This product is not suitable for therapeutic supports or professionally use in physical therapy WARNING Have ...

Страница 36: ...Also you will find tips and advice on how to make the most of your training sessions We advise you to carefully read this instruction manual before using the Stelvio Racer Pro i Speed Bike so that you can use it safely and benefit from it maximally Flow Fitness wishes you successful and enjoyable training sessions 2 Introduction ...

Страница 37: ...h Height Width Weight 2 1 Important parts 120 cm 120 cm 851 cm 47 kg Computer Vertically adjustable handlebar Vertically and horizontally adjustable handlebar Pedal with SPD and toe clips Emergency brake Main Frame Power plug Transporting wheels Adjustable feet ...

Страница 38: ...your training goal is to lose weight then the most effective training is at 60 of your maximum heart rate If your training goal is to improve your stamina then you should train at 85 of your maximum heart rate The body stores energy in two forms carbohydrates and fat When we exercise we use a combination of these two energy supplies If the training intensity is at a high level the body will mostly...

Страница 39: ...ach your training goals The schedules are divided in two phases The first phase can be used for beginners or persons who start training after a long period of inactivity During this phase the level of intensity is built up gradually After six weeks the second phase begins You can then choose a training schedule to lose weight or improve your stamina Age Weight lost beats per minute 60 Improve stam...

Страница 40: ... the right side of your torso are stretched Hold this position for one second Relax and make the same motion on the other side of your body Repeat this three or four times Knee bend Set your feet shoulder width apart and your stretched your hands out Lower yourself no more than 10cm by bending your knees Come back up again and repeat several times Lower back stretch Begin on all fours Stretch your...

Страница 41: ...1 4 Use Step 1 1 Attach the front stabilizer 2 to the main frame 1 by assembling the two allen bolts 9 with washer 10 2 Attach the front stabilizer 3 to the main frame 1 by assembling the two allen bolts 9 with washer 10 3 3 Assembly 1PC 1 ...

Страница 42: ...acing the seat 7 onto the seat post 4 the two nuts underneath the seat need to be loosened with the included wrench Now slide the seat onto the seat post and adjust the angle of the seat into your preferred position Make sure the front if the seat is pointing straight to the front of the speed bike Now fasten the two nuts underneath the seat tightly 1PC 1PC NO 41 1PC NO 43 1PC NO 6 1PC NO 40 2 ...

Страница 43: ...at the back of the computer trough the square hole Then assemble the computer 71 by fastening the for bolts 80 2 Assemble the handlebar to the main frame by fastening bolts 73 together with the washer 72 3 Now connect the data cable form the frame with the data cable from the back of the computer 80 1PC 3 1PC ...

Страница 44: ...on the right hand side of the speed bike as you sit on it The right pedal needs to be fastened clockwise 3 Assemble the left pedal 30L to the left crank on the left hand side of the speed bike as you sit on it The left pedal needs to be fastened counter clockwise 4 Assemble the bottle cage 83 by fastening bolts 24 into the main frame 5 Connect the adapter 1PC 4 ...

Страница 45: ...esistance during a training RECOVERY Stamina test based on the recovery of your heart rate RESET Back to the main menu Press and hold for 5 seconds to restart the console STAR STOP Starting or stopping a training exercise MODE Confirm the setting or selection DOWN Selection of the training exercises or decrease a training value Decrease the resistance during a training ...

Страница 46: ...tion of you burned calories PULSE Display of your heart rate in BPM Beats Per Minute This value is only visible when wearing an optional 5kHz Flow Fitness Chest belt The PULSE value is also displayed in a chart on the right side of the screen WATT The current output in WATT Power up Connect the adapter to the speed bike and outlet for powering up the screen as displayed below When powering up the ...

Страница 47: ... the preferred training duration with the UP and DOWN buttons Confirm the selection by pressing MODE 3 Set the preferred distance with the UP and DOWN buttons Confirm the selection by pressing MODE 4 Set the preferred calorie target with the UP and DOWN buttons Confirm the selection by pressing MODE 5 Set the preferred heart rate target with the UP and DOWN buttons Confirm the selection by pressin...

Страница 48: ... will vary according to the selected profile In total there are 12 different profiles categorized in 3 groups BEGINNER ADVANCED and SPORTY 1 Select BEGINNER ADVANCED or SPORTY training with the UP and DOWN buttons Press MODE to confirmthe selection 2 Choose the desired training profile 1 4 with the with the UP and DOWN buttons Confirm the selection by pressing MODE ...

Страница 49: ...Cardio With this training it is possible to train by using your heart rate For this training program you need to wear a optional chest belt There are 4 different levels 55 75 90 or Target Heart Rate TAG The level is a percentage of your maximal heart rate which is calculated on the base of your age 1 Select CARDIO with the UP and DOWN buttons Press MODE to confirm the selection 2 Set your age with...

Страница 50: ... MODE If you have selected one of the percentages you can skip this step 5 Set the preferred training duration with the UP and DOWN buttons Confirm the selection by pressing MODE 6 Press START STOP to start the training program Please note When there is no pulse detected for 6 seconds the display will show PULSE INPUT The program is finished when one of the target values reaches zero ...

Страница 51: ...sistent 1 Select WATT with the UP and DOWN buttons Press MODE to confirm the selection 2 Set the preferred output WATT with the UP and DOWN buttons Confirm the selection by pressing MODE 3 Set the preferred training duration with the UP and DOWN buttons Confirm the selection by pressing MODE 4 Press START STOP to start the training program The program is finished when the set training time has ela...

Страница 52: ...e visible After the countdown a code will appear This code displays your stamina level Explanation of the code is shown in the table below F1 Excellend F2 Good F3 Average F4 Below average F5 Bad F6 Very bad no correct measurement Important 1 The RECOVERY stamina test will only start when a heart rate is detected by an optional Flow Fitness 5kHz chest belt 2 Your stamina is based upon the time in w...

Страница 53: ...3 or newer iPad air 1 or newer iPad pro 1 or newer iPad Mini or newer iPhone 4s or newer iPod touch 5gen or newer Android tablet OS4 3 of higher Android Phone OS4 3 of higher Follow the steps below to connect your mobile device with the Stelvio Racer Pro i using a bluetooth conneciton 1 Go to the settings on your mobile device and turn bluetooth on 2 Follow the instructions of the supported apps ...

Страница 54: ...le iOS App store https itunes apple com nl app kinomap id611177969 mt 8 Google Antroid Play Store https play google com store apps details id com kinomap training For further support please visit https www flowfitness com manual kinomap html iConsole Training The iC training app lets you control the Stelvio Racer Pro i Speed Bike with your smartphone or tablet You can also log your training result...

Страница 55: ...tect However make sure that all parts are completely dry before they are used again Flow Fitness advises to fasten nuts and bolts check and fasten pivot points once every six weeks For fastening use the tool supplied with the product To prevent unnecessary wear the product can only be used indoors and in a dry environment 3 5 Maintenance ...

Страница 56: ...inutes Rest 1 minute Train 3 minutes Calmly train 1 minute Cooling down 5 minutes Schedule week 5 and 6 Train at 60 of your maximum heart rate Max 5 times a week Warming up 5 10 minutes Train 6 minutes Rest 1 minute Train 4 minutes Calmly train 3 minutes Cooling down 5 minutes After completing the introduction training schedule for six weeks you can choose the follow up training schedule that is b...

Страница 57: ...beyond Train at 90 of your maximum heart rate Max 6 times a week Warming up 5 10 minutes Train 10 minutes Rest 1 minute Train 10 minutes Repeat training 2 or 3 times Calmly train 1 minute Cooling down 5 minutes Schedule week 7 and 8 Train at 60 of your maximum heart rate Max 6 times a week Warming up 5 10 minutes Train 7 minutes Rest 1 minute Train 5 minutes Calmly train 1 minute Cooling down 5 mi...

Страница 58: ...58 Manual Prestige Stelvio Racer Pro i 5 General information 4 2 Exploded view ...

Страница 59: ... 2 35 Sensor cable 1 36 Flexible Flat Cable 1 37 Knob 2 38 Tube clamp 2 39 Trim cover 1 40 Round knob 1 41 Washer 1 42 End cap 2 43 Carriage bolt M10 40L 1 44 Hexagon nut 2 45 Cap 1 46 Motor 1 47 Brake limit tube 1 48 Brake Bushing 1 49 Brake bar 1 50 Brake trim cover 1 51 Hexagon nut 4 52 Brake knob 1 53 Front cover L R 1 54 Hexagon screw 3 55 Wheel 2 56 Washer 2 57 Nylon cap M8 4 58 Flywheel 1 5...

Страница 60: ... Problem My iOS or Android device is not connecting with the Stelvio Racer Pro i Speed Bike Solution 1 Go to the bluetooth setting on your mobile device and select the option Forget this device 2 Close all apps on your mobile device 3 Unplug the Speed Bike for 5 seconds 4 Repeat the bluetooth connection steps in this user manual In case your problem is not resolved or not described consult the fit...

Страница 61: ...ro i 61 The warranty is provided by the Flow Fitness distributor of your country and the reseller where you have purchased your product Please check https www flowfitness com en dealers for contact information 5 Warranty 5 1 Warranty ...

Страница 62: ...62 Prestige Stelvio Racer Pro i Notities Notes ...

Страница 63: ...Prestige Stelvio Racer Pro i 63 Notities Notes ...

Страница 64: ...Prestige Stelvio Racer Pro i www flowfitness com ...

Отзывы: