background image

Notice to user

3

3.1

Calibration

Gas detection: no re-calibration recommendation. The ability to detect gases is not influ-
enced by the calibration and will not degrade over time.

Temperature measurement: annual re-calibration recommended. Contact your local
sales office for instructions on where to send the camera.

3.2

Accuracy

For very accurate results, we recommend that you wait 5 minutes after you have started
the camera before measuring a temperature.

3.3

Disposal of electronic waste

Electrical and electronic equipment (EEE) contains materials, components and substan-
ces that may be hazardous and present a risk to human health and the environment
when waste electrical and electronic equipment (WEEE) is not handled correctly.

Equipment marked with the below crossed-out wheeled bin is electrical and electronic
equipment. The crossed-out wheeled bin symbol indicates that waste electrical and elec-
tronic equipment should not be discarded together with unseparated household waste,
but must be collected separately.

For this purpose all local authorities have established collection schemes under which
residents can dispose waste electrical and electronic equipment at a recycling centre or
other collection points, or WEEE will be collected directly from households. More de-
tailed information is available from the technical administration of the relevant local
authority.

3.4

Training

For training resources and courses, go to http://www.flir.com/support-center/training.

3.5

Documentation updates

Our manuals are updated several times per year, and we also issue product-critical notifi-
cations of changes on a regular basis.

To access the latest manuals, translations of manuals, and notifications, go to the Down-
load tab at:

http://support.flir.com

In the download area you will also find the latest releases of manuals for our other prod-
ucts, as well as manuals for our historical and obsolete products.

3.6

Important note about this manual

FLIR Systems issues generic manuals that cover several cameras within a model line.

#T810411; r. AC/70277/70566; en-US

6

Содержание GF7 Series

Страница 1: ...User s manual FLIR GF7x series...

Страница 2: ...tos megjegyz s Az eszk z haszn lata el tt figyelmesen olvassa el s tartsa be az sszes utas t st figyelmeztet st vint zked st s jogi nyilatkozatot Nota importante Prima di utilizzare il dispositivo imp...

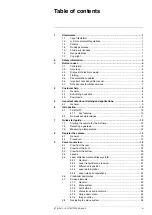
Страница 3: ...features 10 6 2 Gas leak example images 11 7 Quick start guide 12 7 1 Starting the camera for the first time 12 7 2 Detecting a gas leak 12 7 3 Measuring a temperature 12 8 Register the camera 13 8 1...

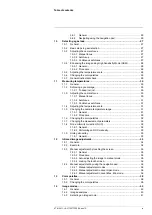
Страница 4: ...31 11 5 Changing the camera temperature range 31 11 5 1 General 31 11 5 2 Procedure 32 11 6 Changing the color palettes 32 11 7 Changing the measurement parameters 32 11 8 Non uniformity correction N...

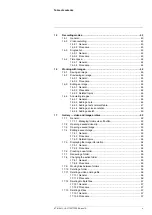
Страница 5: ...a sketch 50 17 Gallery video and image archive 52 17 1 General 52 17 1 1 Managing folders via soft button 52 17 2 Opening a saved video clip 52 17 3 Opening a saved image 53 17 4 Editing a saved image...

Страница 6: ...18 8 4 Procedure 65 19 Working with color alarms and isotherms 67 19 1 General 67 19 2 Color alarms 67 19 2 1 General 67 19 2 2 Image examples 67 19 2 3 Setting up above below and interval alarms 68...

Страница 7: ...ion sharpness 86 21 10 Adjusting the angle of the lens 87 21 11 Operating the laser distance meter 87 21 11 1 General 87 21 11 2 Procedure 88 21 12 Measuring areas 88 21 12 1 General 88 21 12 2 Proced...

Страница 8: ...8 26 4 1 General 108 26 4 2 Procedure 108 26 5 More information 108 27 About video and image files 109 27 1 General 109 27 2 File naming convention 109 27 2 1 Resetting the image counter 109 27 3 Imag...

Страница 9: ...face of the product 1 6 Usage statistics FLIR Systems reserves the right to gather anonymous usage statistics to help maintain and improve the quality of our software and services 1 7 Copyright 2020 F...

Страница 10: ...lowing two conditions 1 this device may not cause harmful interference and 2 this device must accept any interference received including interference that may cause undesired operation WARNING Applica...

Страница 11: ...r radiation or the sun This can have an unwanted effect on the accuracy of the camera It can also cause damage to the detector in the camera CAUTION Do not use the camera in temperatures more than 50...

Страница 12: ...ut of this range it can cause the battery to become hot or to break It can also decrease the performance or the life cycle of the battery CAUTION The temperature range through which you can remove the...

Страница 13: ...ith IR lens f 74 mm 6 When you hold the camera make sure that you support the lens with your hand The lens is heavy and the joint between the optics and camera housing is not strong enough to support...

Страница 14: ...t be discarded together with unseparated household waste but must be collected separately For this purpose all local authorities have established collection schemes under which residents can dispose w...

Страница 15: ...pply to your particular camera model 3 7 Note about authoritative versions The authoritative version of this publication is English In the event of divergences due to translation errors the English te...

Страница 16: ...l or method between the camera and your device e g SD card reader HDMI Ethernet USB or FireWire Device type PC Mac iPhone iPad Android device etc Version of any programs from FLIR Systems Full name pu...

Страница 17: ...rognosis and reporting is a highly advanced skill It requires professional knowledge of thermography and its applications and is in some countries subject to certification and legislation Consequently...

Страница 18: ...work environment The FLIR GF77 is ideal for Industrial plants Renewable energy producers Natural gas power plants Locations along the natural gas supply chain Liquid natural gas LNG terminals and sto...

Страница 19: ...otating optical block vibrant touchscreen LCD and eyepiece for ease of use in direct sunlight Streamlined reporting features Organize your findings in the field using the built in voice annotation GPS...

Страница 20: ...creen The leak will resemble a smoke plume emanating from the point of the leak Note To obtain optimal contrast try to find a suitable background by aiming the camera toward the object from different...

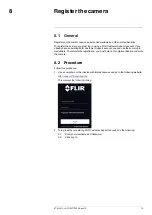
Страница 21: ...e same login credentials To complete the registration you must enter a four digit verification code into the camera 8 2 Procedure Follow this procedure 1 Use a computer or other device with internet a...

Страница 22: ...e required information and click Create Account 4 On the camera select Settings Device settings Camera information Register camera This displays the following dialog box Note The first time you start...

Страница 23: ...h the navigation pad This displays a dialog box with the seri al number of the camera 6 On the computer enter the serial number of the camera and click Validate 7 When the serial number is validated c...

Страница 24: ...the registration is completed the four digit code is displayed Note The code is also sent by e mail to the address registered with your FLIR Customer Support account The code is also displayed in you...

Страница 25: ...elect a digit Push the navigation pad left right to navigate to the previous next digit When all digits have been entered push the navigation pad right to select Submit Push the navigation pad to conf...

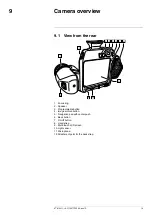
Страница 26: ...peaker 3 Programmable button 4 Image archive button 5 Navigation pad with center push 6 Back button 7 On off button 8 Hand strap 9 Multi touch LCD screen 10 Light sensor 11 Microphone 12 Attachment po...

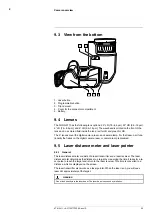
Страница 27: ...Save button 3 Viewfinder 4 Knob to change the dioptric correction for the viewfinder 5 Attachment point for the neck strap 6 Laser receiver 7 Laser transmitter 8 Camera lamp left and right sides 9 Inf...

Страница 28: ...relies on the digital camera laser or camera lamp is disabled 9 5 Laser distance meter and laser pointer 9 5 1 General The laser distance meter consists of a laser transmitter and a laser receiver The...

Страница 29: ...when an image is saved There is no effect on the Object distance setting in live mode If the target reflection is low or if the target is angled from the laser beam there may be no return signal and...

Страница 30: ...er and display By means of a sensor the camera will register when you look into the viewfinder and then automatically turn off the display This behavior can be changed by a setting Select Settings Dev...

Страница 31: ...ons 1 Work folder button Touch to open a menu where you can create new folders and change the active folder 2 Lamp button Touch to turn on off the camera lamp 3 Continuous autofocus button Touch to en...

Страница 32: ...di cator is white When the battery is charging the indicator is green When the battery status is below 20 the in dicator is red The remaining storage capacity is below 100 MB A Bluetooth headset is co...

Страница 33: ...ing all overlay page 33 9 8 Navigating the menu system 9 8 1 General The figure above shows the two ways to navigate the menu system in the camera Using your finger or a stylus pen specially designed...

Страница 34: ...e values in dialog boxes push the navigation pad up down or left right To confirm changes and settings in menus and dialog boxes push the center of the navigation pad To leave dialog boxes and to go b...

Страница 35: ...scale manually By centering on the temperatures around the background of the gas you can make the gas appear more clearly Selecting a different color palette can make it easier to see the gas cloud 1...

Страница 36: ...m 2 Select Image mode and push the navigation pad This displays a submenu 3 Select HSM and push the navigation pad 10 5 Adjusting the temperature scale By default the camera continuously adjusts the i...

Страница 37: ...bmenu 3 Use the navigation pad to select a different palette 4 Push the navigation pad to confirm and exit the menu mode 10 7 General instrument check The following general instrument check process en...

Страница 38: ...size of the detector the lens and the distance to the target Use the center of the spot tool as a guide to the minimum possible object size and get closer if necessary Make sure to stay away from dan...

Страница 39: ...for the best image presentation Use this automatic mode first but do not hesitate to adjust the temperature scale of the infrared image manually For more information see section 12 Infrared image adju...

Страница 40: ...n pad This displays a submenu 3 Use the navigation pad to select a different palette 4 Push the navigation pad to confirm and exit the menu mode 11 7 Changing the measurement parameters For accurate m...

Страница 41: ...rmation see section 21 15 Assigning functions to the programmable buttons page 90 11 9 Hiding all overlay 11 9 1 General The camera overlay consists of overlay graphics and image overlay information T...

Страница 42: ...uching the screen or by using the navigation pad For more information see sections 12 3 Manual adjustment by touching the screen page 35 and 12 4 Manual adjustment by using the navigation pad page 36...

Страница 43: ...ure scale minimum and maximum limits place your finger on the screen and move it up down 3 To change the minimum limit or the maximum limit do the following 3 1 Touch the maximum or minimum temperatur...

Страница 44: ...setting you can manually adjust the level by using the navi gation pad You can also change the upper and lower temperatures individually Select the type of manual image adjustment mode under Settings...

Страница 45: ...ure scale minimum and maximum limits push the navigation pad up down 3 To change the minimum limit or the maximum limit do the following Push the navigation pad left right to select highlight the maxi...

Страница 46: ...t the camera uses to display different temperatures A different palette can make it easier to see a gas cloud and to analyze an image This table explains the different types of color palettes Iron Arc...

Страница 47: ...tes 1 Push the navigation pad to display the menu system 2 Select Color and push the navigation pad This displays a submenu 3 Use the navigation pad to select a different palette 4 Push the navigation...

Страница 48: ...High Sensitivity Mode HSM page 28 Note For the Thermal MSX Thermal and Picture in picture image modes all thermal and visual information is stored when an image is saved This means that you can edit...

Страница 49: ...al Thermal MSX Picture in picture Digital camera 14 3 Selecting an image mode 1 Push the navigation pad to display the menu system 2 Select Image mode and push the navigation pad This displays a subme...

Страница 50: ...Video is selected it will only be possible to select the image mode Thermal If the digital camera is disabled Settings Save options storage Digital cam era Off it will only be possible to select the...

Страница 51: ...rding mode is selected the camera will auto switch to Thermal image mode 15 2 2 Procedure 1 Push the navigation pad to display the menu system 2 Select Recording mode and push the navigation pad This...

Страница 52: ...n each saved image Total number of images Periodic saving will stop when the set number of images have been saved Note If you select the camera will keep on saving images until the memory card is full...

Страница 53: ...it the image Note The camera must be configured to display a preview image before saving Select Settings Save options storage Preview image before saving On 16 2 2 Procedure 1 To preview an image push...

Страница 54: ...d isotherms page 67 16 4 Annotating images 16 4 1 General You can save additional information with an infrared image by using annotations Annota tions make reporting and post processing more efficient...

Страница 55: ...comment table 16 4 3 1 General You can save a table with textual information to the image file This feature is a very effi cient way of recording information when you are inspecting a large number of...

Страница 56: ...ate a text comment file us ing a FLIR Thermography software 16 4 3 3 2 Manually creating a table template 16 4 3 3 2 1 General A text comment file tcf is an annotation format that is proprietary to FL...

Страница 57: ...up appears in a text editor such as Notepad Site Company A Company B Location Substation A Object Engine Vent Vault Door ObjectID A1a1 A1b2 A1c3 Deviation Overload Moisture Draft Remedy Replace Fix No...

Страница 58: ...pad 5 A context menu is displayed 6 To start a recording select Record and push the navigation pad 7 To stop the recording select Stop and push the navigation pad 8 To listen to the recording select P...

Страница 59: ...color of the sketch tools select Draw and push the navigation pad Select the color and push the navigation pad To erase select Eraser and push the navigation pad Erase parts of the sketch by touching...

Страница 60: ...everal folders New video clips and images will be saved to the active folder at the top of the Gallery You can create new folders rename a folder change the active folder move files between the folder...

Страница 61: ...To edit the image delete the image display image information or add annotations select the icon and push the navigation pad This displays a menu to the right 5 To view the previous next image push th...

Страница 62: ...larms and isotherms page 67 17 5 Displaying the image information 17 5 1 General The image information consists of date time and items related to temperature measure ments When you save an image the i...

Страница 63: ...n completed touch Done on the soft keyboard 17 8 Changing the active folder 17 8 1 General New video clips and images are saved to the active folder 17 8 2 Procedure 1 Push the image archive button Th...

Страница 64: ...select the icon and push the navigation pad This displays a dialog box 5 To delete the folder select Delete and push the navigation pad 17 11 Deleting a video or image file 17 11 1 General You can del...

Страница 65: ...e marked with a tick 5 On the right toolbar select the icon and push the navigation pad This displays a dialog box 6 To delete the selected items select Delete and push the navigation pad 17 13 Deleti...

Страница 66: ...a submenu 3 Use the navigation pad to select one of the following Select No measurements to remove all tools Select Center spot to add a center spot Select Hot spot to add a hot spot detection within...

Страница 67: ...depending on the type of tool Remove the tool Resize move center and rotate the tool Set alarms Display maximum minimum average and area values Set local parameters When completed select Done and pus...

Страница 68: ...ompleted push the navigation pad and select Done 7 Push the navigation pad to confirm and exit the menu mode 18 5 Changing the measurement parameters 18 5 1 General For accurate measurements it is imp...

Страница 69: ...to a low value the Reflected temperature also becomes important The parameters Object distance Atmospheric temperature and Relative humidity are relevant for longer distances The External IR window co...

Страница 70: ...ocedure 1 To select the measurement tool touch the tool on the screen The tool is now dis played with one or more handles 2 Push the navigation pad or touch and hold the tool This displays a context m...

Страница 71: ...navigation pad This displays a submenu 5 Use the navigation pad to select one or more of the following Select Max to display the maximum value Select Min to display the minimum value Select Avg to di...

Страница 72: ...d delta 2 Push the navigation pad This displays a dialog box where you can select the meas urement tools that you want to use in the difference calculation You can also select a fixed temperature refe...

Страница 73: ...gers the alarm Applicable values are Above Below or Off Alarm limit The temperature value that will be the critical condition when an alarm is triggered or not Alarm sound Applicable values are Beep o...

Страница 74: ...assumes that you have previously set up a difference calculation Follow this procedure 1 To set up an alarm for a difference calculation do the following If you are defining user presets select Add m...

Страница 75: ...e condensation and insulation alarms You can make the camera trigger the following types of color alarms Above alarm This will apply a contrasting color to all pixels with a temperature above the spec...

Страница 76: ...on pad This displays a submenu 3 Use the navigation pad to select one of the following Above alarm Below alarm Interval alarm 4 Push the navigation pad The threshold temperature is displayed at the to...

Страница 77: ...in the building It will trigger when the insulation level which is called the thermal index in the camera falls below a preset value of the energy leakage through a wall Different building codes reco...

Страница 78: ...The relative humidity level at which you want the alarm to be triggered A relative humidity of 100 means that water vapor condenses from the air as liquid water dewpoint A relative humidity of about 7...

Страница 79: ...pection point when an image is saved The oper ator can also manually select the status add comments and add more images and videos The inspection route work flow typically involves the following steps...

Страница 80: ...20 2 1 Drop down menu To display the drop down menu tap the current point indicator In the drop down menu it is possible to Set the status of the current inspection point View the filenames of images...

Страница 81: ...n route structure tap an item in the list Figure 20 2 Figure 20 2 shows an example of a level with inspection points The first inspection point has one or more images and the status is set to green Th...

Страница 82: ...ation 4 To edit the inspection point data tap the current point indicator This displays a drop down menu where you can do the following Set the status of the inspection point see section 20 3 3 1 Sett...

Страница 83: ...displays a soft keyboard 3 Enter text by touching the screen 4 When completed tap Done 5 The comment is displayed in the drop down menu You can also see the comment by tapping the document icon 20 3...

Страница 84: ...tion routes 3 In the list tap the inspection route where you want to add the inspection point This displays the next level in the route structure 4 Continue to tap an item in the list until you reach...

Страница 85: ...iple levels of nodes sites assets and inspection points The inspection route file also defines the available statuses and the configuration of the camera behavior The inspection route file can be crea...

Страница 86: ...rd in the camera This file can be used as a basis when manually editing an XML file 1 Make sure that there is no inspection route XML file on the memory card 2 Select Settings Save options storage Ins...

Страница 87: ...e LED on the battery charger glows continuously the batteries are fully charged 5 It is good practice to disconnect the stand alone battery charger from the mains socket when the batteries are fully c...

Страница 88: ...g the camera using a USB cable connected to a computer takes considerably longer than using the USB battery charger or the stand alone battery charger If the camera is on it may use more power than th...

Страница 89: ...amera To turn on the camera push the on off button To turn off the camera push and hold the on off button for more than 0 5 second Note Do not remove the battery to turn off the camera 21 4 Adjusting...

Страница 90: ...When autofocusing the infrared camera can use one of the following focus methods Contrast The focus is based on maximizing the image contrast Laser The focus is based on a laser distance measurement T...

Страница 91: ...lly adjust the focus by rotating the focus ring For large lenses that cover the laser transmitter and receiver the laser functionality is disabled This means that continuous autofocus is not available...

Страница 92: ...ut ergonomics 21 8 1 General To prevent strain related injuries it is important that you hold the camera ergonomically correctly This section gives advice and examples on how to hold the camera Note A...

Страница 93: ...Handling the camera 21 21 8 2 Figure T810411 r AC 70277 70566 en US 85...

Страница 94: ...iewfinder The beams can cause damage to the camera This includes the devices that emit laser radiation or the sun To adjust the viewfinder s dioptric correction look through the viewfinder and rotate...

Страница 95: ...ter determines the distance to a target by measuring the time it takes for a la ser pulse to reach the target and return to the laser receiver This time is converted to a distance which is displayed o...

Страница 96: ...receiver the laser functional ity is disabled This means that the area measurement function is not available The distance measured by the laser distance meter can be used as the basis for area calcula...

Страница 97: ...amera An SD memory card A computer to move image and video files to and from the camera using a USB C to USB A or a USB C to USB C cable A video monitor or projector using a USB C to HDMI adapter A US...

Страница 98: ...the USB C connector in the connector bay Connect the oth er end of the USB cable to the computer 3 Turn on the camera 4 Do one of the following Move the files to the computer using a drag and drop op...

Страница 99: ...de Switch Thermal Digital camera Switch between the image modes Thermal and Digital camera For more information see section 14 Image modes page 40 Switch Thermal Thermal MSX Switch between the image m...

Страница 100: ...ability of this feature is dependent on the lens model The camera lamp can be used as a flash for the digital camera When the flash function is enabled the camera lamp will flash when an image is save...

Страница 101: ...he navigation pad Follow the on screen instructions Note You must rotate the camera slowly 21 18 Changing the camera lenses Note Before a new lens can be used with the camera the lens camera combinati...

Страница 102: ...Carefully pull out the lens 3 The infrared detector is now fully exposed Do not touch this surface If you see dust on the detector follow the instructions in 22 3 Infrared detector page 100 T810411 r...

Страница 103: ...mera lens is fully in its open position Correct The tooth 1 is in its end position at the black stop pin 2 Wrong You must rotate the inner ring until the tooth 1 reaches the black stop pin 2 5 Careful...

Страница 104: ...6 Rotate the inner ring of the lens 30 clockwise The lens makes a click when it locks in place 7 Make sure that the two index marks are aligned indicating that the lens is locked in place T810411 r A...

Страница 105: ...two attachment points indicated in the figure 21 20 Hand strap To replace the hand strap follow this procedure 1 Remove the battery 2 Open the hook and loop fastener and remove the hand strap from th...

Страница 106: ...acket at the base of the camera 6 Push the bracket into the camera Make sure that the two holes in the hand strap are aligned with the holes in the bracket 7 Tighten the two T6 screws 8 Thread the loo...

Страница 107: ...leaning cloth it must be dry Do not use a lens cleaning cloth with the liquids that are given in section 22 2 1 above These liquids can cause material on the lens cleaning cloth to become loose This m...

Страница 108: ...the dust cannot be removed by following this procedure the infrared detector must be cleaned mechanically This mechanical cleaning must be carried out by an authorized service partner CAUTION In Step...

Страница 109: ...s page 106 23 3 Camera temperature range The Camera temperature range menu displays the temperature range of the camera The unit or depends on the temperature unit setting see section 23 5 Device set...

Страница 110: ...od of image files and much more With this setting the name of a saved image video file will be FLIRxxxx where xxxx is an incremental counter Ex ample FLIR0001 When the counter has reached 9999 the fil...

Страница 111: ...tion see section 21 17 Calibrating the compass page 92 Lamp laser This submenu includes the following settings Enable lamp laser This setting is used to enable the camera lamp and the laser Enable lam...

Страница 112: ...tion is selected a dialog box is displayed with more informa tion You can choose to execute the reset action or to cancel Camera information This submenu displays information about the camera No chang...

Страница 113: ...e SSID select Network name SSID and push the navigation pad To change the WPA2 password select Password and push the navigation pad Note These parameters are set for your camera s network They will be...

Страница 114: ...Bluetooth device is in visible mode 5 Select Available devices and push the navigation pad 6 Wait until a list of available devices is displayed This will take about 15 seconds 7 When a Bluetooth dev...

Страница 115: ...e to add more values from the FLIR meter Added values are then indicated by a box with a number that counts up each time a new value is added To find out whether a FLIR meter is supported by the camer...

Страница 116: ...documentation procedure 26 4 1 General The following procedure can form the basis for other procedures using FLIR meters and infrared cameras 26 4 2 Procedure Follow this procedure 1 Use the infrared...

Страница 117: ...Push the navigation pad to display the menu system 2 Select Settings and push the navigation pad This displays the Settings menu 3 Use the navigation pad to select Device settings Reset options Reset...

Страница 118: ...mages need to be slightly different which can be accomplished by a minute movement of the camera You should hold the camera firmly in your hands do not put it on a tripod which will make these images...

Страница 119: ...Mechanical drawings 28 See next page T810411 r AC 70277 70566 en US 111...

Страница 120: ...G H 1 3 2 5 4 C F B D G E A 6 Rev B 1 2 Scale 2016 FLIR Systems Inc All rights reserved worldwide No part of this drawing may be reproduced stored in a retrieval system or transmitted in any form or b...

Страница 121: ...eserved worldwide No part of this drawing may be reproduced stored in a retrieval system or transmitted in any form or by any means electronic mechanical photocopying recording or otherwise without wr...

Страница 122: ...reserved worldwide No part of this drawing may be reproduced stored in a retrieval system or transmitted in any form or by any means electronic mechanical photocopying recording or otherwise without w...

Страница 123: ...reserved worldwide No part of this drawing may be reproduced stored in a retrieval system or transmitted in any form or by any means electronic mechanical photocopying recording or otherwise without...

Страница 124: ...CE Declaration of conformity 29 See next page T810411 r AC 70277 70566 en US 116...

Страница 125: ......

Страница 126: ...ishes the relation between emitted radiation the quantity value and the electrical output signal the indication This first step of the calibration procedure consists of obtaining a homo geneous or uni...

Страница 127: ...rs All FLIR Systems cameras are drift compensated when they are first delivered to the customer and when they are recalibrated by FLIR Systems serv ice departments 30 5 Calibration verification and ad...

Страница 128: ...al situation they should all give the same output sig nal However each individual element has its own response so the output is not uniform This deviation from the ideal result is calculated and used...

Страница 129: ...s acquired several companies with world leading expertise NEOS 2019 Endeavor Robotics 2019 Aeryon Labs 2019 Seapilot 2018 Acyclica 2018 Prox Dynamics 2016 Point Grey Research 2016 DVTEL 2015 DigitalOp...

Страница 130: ...uring to lenses and system elec tronics to final testing and calibration all production steps are carried out and supervised by our own engineers The in depth expertise of these infrared specialists e...

Страница 131: ...ms operates a worldwide service network to keep your camera running at all times If you discover a problem with your camera local service centers have all the equipment and expertise to solve it withi...

Страница 132: ...support flir com Copyright 2020 FLIR Systems Inc All rights reserved worldwide Disclaimer Specifications subject to change without further notice Models and accessories subject to regional market cons...

Отзывы: