FLIR Ariel Gen III CM-3304-11-I Скачать руководство пользователя страница 126

September 4, 2017

120

Appendices

CM-3304/CM-3308 User and Installation Guide

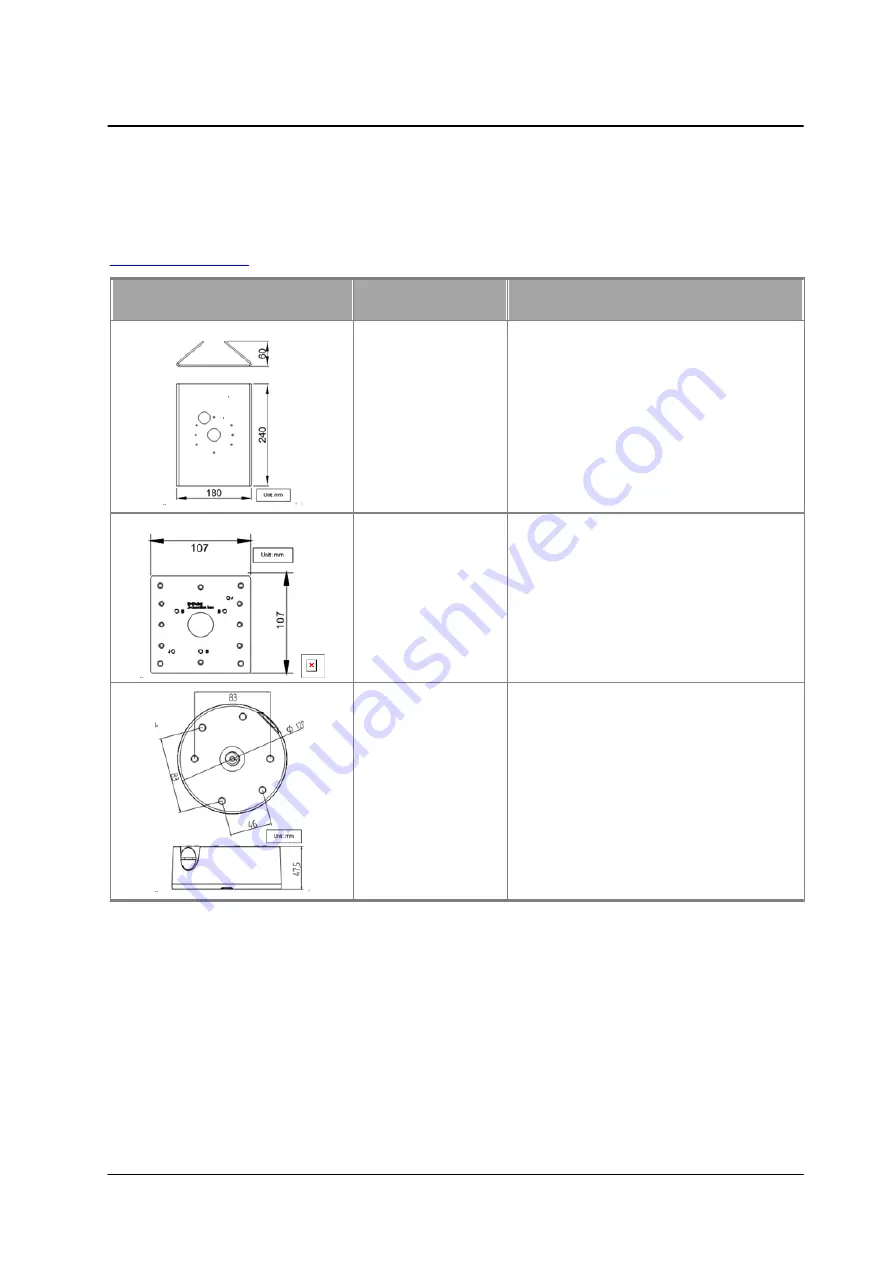
10.9 Mounting Accessories

The following mounting accessories are available from FLIR for installation of your Ariel Gen III CM-330x
series  camera.   For more information on available options, contact your FLIR sales representative or visit

www.flir.com/security

.

Image

Part Number

Description


CB-POLE-31

Pole Mount Bracket

CB-4S-31

4S Mounting Bracket


CB-WLBX-31

Wall Junction Box

Содержание Ariel Gen III CM-3304-11-I

Страница 1: ...Ariel Gen III User and Installation Guide CM 3304 CM 3308 Ver 1 September 4 2017 i ...

Страница 2: ...e the property of their respective owners This product is protected by patents design patents patents pending or design patents pending The contents of this document are subject to change FLIR Systems Inc 6769 Hollister Avenue Goleta California 93117 USA Phone 888 747 FLIR 888 747 3547 International 1 805 964 9797 For technical assistance please call us at 1 888 388 3577 or visit the Service Suppo...

Страница 3: ...ar household or other commercial waste or by other regular municipal waste collection means Instead and in order to prevent possible harm to the environment or human health all EEE products including any cables that came with the product should be responsibly discarded or recycled To identify a responsible disposal method nearby please contact the local waste collection or recycling service the or...

Страница 4: ...September 4 2017 CM 3304 CM 3308 User and Installation Guide iv ...

Страница 5: ... Access the Camera 17 7 Configuring the Unit s Initial IP Address 19 8 Configuring Communication Settings 27 9 Configuration and Operation 33 CM 330x Web Interface 33 9 1 Live View 35 9 2 Recording 36 9 2 1 Capturing a Picture 36 9 2 2 Viewing Live Video from a Media Player 37 9 2 3 Settings 38 9 3 System Tab 39 9 3 1 Streaming Tab 75 9 3 2 Camera Tab 86 9 3 3 Logout 98 9 4 10 Appendices 99 Techni...

Страница 6: ...Table of Contents Table of Contents vi CM 3304 CM 3308 User and Installation Guide September 4 2017 Acronyms and Abbreviations 119 10 8 Mounting Accessories 120 10 9 ...

Страница 7: ...imitation as they apply to their unique site requirements FLIR Systems Inc and its agents make no guarantees or warranties to the suitability for the users intended use FLIR Systems Inc accepts no responsibility for improper use or incomplete security and safety measures Failure in part or in whole of the installer owner or user in any way to follow the prescribed procedures or to heed WARNINGS an...

Страница 8: ...practices that are useful or provide some benefit for installation and use of FLIR products Un Conseil correspond à une information et aux bonnes pratiques utiles ou apportant un avantage supplémentaire pour l installation et l utilisation des produits FLIR General Cautions and Warnings This section contains information that indicates a procedure or condition where there are potential hazards SAVE...

Страница 9: ...s vis Aucune pièce se trouvant à l intérieur de l unité ne nécessite un entretien par l utilisateur Seul un technicien formé et qualifié est autorisé à entretenir et à réparer cet équipement Respectez les codes et réglementations locaux et assurez vous que l installation et l utilisation sont conformes aux normes contre l incendie et de sécurité Caution Do not drop the camera or subject it to phys...

Страница 10: ...ds such as from tripping wire fraying overheating etc Ensure that nothing rests on the unit s cables or power cords Ample Air Circulation Leave enough space around the unit to allow free air circulation Cabling Considerations Units should be placed in locations that are optimal for the type of video cabling used between the unit and the cameras and external devices Using a cable longer than the ma...

Страница 11: ...des three models CM 3304 11 I CM 3304 21 I CM 3308 11 I CM 330x Mini Dome Camera The units feature the following sensor and motorized varifocal lenses CM 3304 11 I CM 3304 21 I CM 3308 11 I Image Sensor 1 2 9 Sony IMX326 1 2 9 Sony IMX326 1 2 5 Sony IMX274 Effective Pixels H x V 4MP 2560x1440 4MP 2560x1440 8MP 3840x2160 Sensor resolution pixels 2560x1440 2560x1440 3840x2160 Field of View 2 8 8 5mm...

Страница 12: ...tream 2560x1440 25 30fps 2560x1440 25 30fps 3840x2160 25 30fps Dual stream 2560x1440 1920x 1080 15fps 2560x1440 1920x 1080 15fps 3840x2160 1920x 1080 15fps Triple stream 2560x1440 1920x 1080 720x576 480 15fps 2560x1440 1920x 1080 720x576 480 15fps 3840x2160 1920x 1080 720x576 480 15fps The units feature True Day Night ICR and an infrared LED illuminator They also include Audio Line In Audio Line O...

Страница 13: ...etection and notifications Two regions of interest Gamma correction White balance 8 privacy zones 802 1X and SSL TLS security protocols SNMP v1 v2c v3 and SNMP traps Up to 9 users Supports up to 128GB microSDXC card UPnP support ONVIF Profiles S and G Alarm In Out Audio Line In Line Out Powered by 802 3af PoE IP67 enclosure with IK10 vandal proof protection Built in heater 2 2 Package Contents The...

Страница 14: ...r and Installation Guide Related Information DNA 2 1 User Manual CM CAPX 31 Pendant Mount Installation Guide CM 4S 31 Adapter Plate Junction Box Installation Guide CM BKBX 31 Mini Dome Conduit Back Box Kit Installation Guide CM 330x Dessicant User Guide ...

Страница 15: ...ember 4 2017 Hardware Description CM 3304 CM 3308 User and Installation Guide 3 Hardware Description Following are the CM 330x fixed focal camera s dimensions CM 330x Side Dimensions CM 330x Front Dimensions ...

Страница 16: ...uilt in system cable that includes an RJ 45 Ethernet jack a 2 wire terminal connector for alarm in out and a 2 wire terminal connector for audio in out The cable includes an LED that flashes green to indicate power on and network activity The LED is not illuminated if there is no network activity CM 330x System Cable ...

Страница 17: ...IA GeForce 6 Series or ATI Mobility Radeon 9500 Operating System Windows 7 8 8 1 and 10 all 64 bit versions Windows Server 2003 Windows Server 2008 32 bit version Web Browser Microsoft Internet Explorer 10 and above 32 bit version Microsoft Edge 38 and above Chrome v 55 and above Firefox v 50 and above Network Card 10Base T 10 Mbps or 100Base TX 100 Mbps operation Viewer ActiveX control plug in fo...

Страница 18: ...September 4 2017 CM 3304 CM 3308 User and Installation Guide 12 ...

Страница 19: ...at there is sufficient temperature regulation to support the unit s requirements cooling heating Operating temperature should be kept in the range 40 to 50 C 40 to 122 F with no more than 90 non condensing humidity Attention Afin d éviter tout dommage dû à une surchauffe ou toute panne de l unité assurez vous que la régulation de température est suffisante pour répondre aux exigences de l unité re...

Страница 20: ...e camera 2 Insert a microSDXC card up to 128GB Class 10 in the card drive 3 Verify that the card status is displayed as mounted in the System Events Handler SD Card screen 4 Configure the camera to store snapshots and recordings from the System Events Source screens Reset Button and microSD Card Drive To reboot the camera 1 Using a pointed tool press the reset button for approximately five seconds...

Страница 21: ...puissance nominale de l alimentation PoE est 48VDC 0 2A 3 Si la caméra est installée pour une utilisation extérieure l alimentation PoE doit être installé avec l étanchéisation appropriée 4 Comme une unité d alimentation Listed le PoE doit être marqué comme LPS ou Limited Power Source 5 Ce produit doit être installé par un technicien qualifié L installation doit se conformer à tous les codes locau...

Страница 22: ...ew and configure the camera via a LAN you must attach the camera via the network switch or router to the same subnet network segment or VLAN as the computer that manages the unit If the PC is on a different subnet than the camera you will not be able to access the camera via a web browser If there is a DHCP server on the network it is recommended to use FLIR s Discovery Network Assistant DNA utili...

Страница 23: ... require any installation The software is provided as a single standalone executable It runs on any PC DNA provides a central location for listing all the supported FLIR Professional Security camera models accessible over the network Once listed each camera can be right clicked to access and change the network settings If the network settings are changed for some reason a new search will relist th...

Страница 24: ...September 4 2017 CM 3304 CM 3308 User and Installation Guide 18 ...

Страница 25: ...that does not use a DHCP server or is managed by FLIR s Latitude VMS manually enter its IP address in the DNA utility Note 1 It is possible to set the IP address without changing the subnet 2 The unit and the PC must be physically connected on the same network segment To manage the camera using Horizon Meridian or on a DHCP enabled network 1 Insert the CD included in the package in your computer s...

Страница 26: ...or Firefox the video is displayed in the Live View window If your browser is Internet Explorer a message is displayed requesting you to install a plug in Web Interface with Internet Explorer Browser 7 If you do not have the Microsoft Visual C 2008 Redistributable libraries installed on your PC the following error message is displayed In this case download and install the vcredist_x86 exe file from...

Страница 27: ... CM 3308 User and Installation Guide 8 Click Continue The vcredist_x86 exe information bar opens Visual C Redistributable Plug in Information Bar Click Run The Microsoft Visual C 2008 Redistributable Setup wizard opens Microsoft Visual C 2008 Redistributable Setup Wizard ...

Страница 28: ...the Unit s Initial IP Address CM 3304 CM 3308 User and Installation Guide Click Next The License Terms screen opens Microsoft Visual C Redistributable License Terms Screen Select the I have read and accept the license terms check box ...

Страница 29: ...our PC skip to the next step 9 Click here on the screen to download the Ariel Player plug in The Ariel Player plug in information bar opens Ariel Player Plug in Information Bar When using Internet Explorer in closed networks occasionally the browser will not install the Ariel Player on the client PC because it cannot verify the Ariel Player s digital signature This may be because the local certifi...

Страница 30: ...nloads screen opens View Downloads Screen b Right click on the ArielPlayer msi file Run Anyway Option c Select Run anyway The normal installation process starts 10 Click Run on the Ariel Player plug in information bar 11 Follow the instructions in Appendix 10 5 for installing the Player After installing the Player the Live View is displayed ...

Страница 31: ...dow is displayed DNA Assign IP Use DHCP Screen 4 Uncheck Use DHCP 5 Enter the unit s default IP address 192 168 0 250 Subnet mask and Gateway IP address in the respective field 6 Click Update The unit reboots with the new settings 7 Click on the unit in DNA s Discover List The camera s Login window opens See Figure Login Window 8 Enter the default User Name admin and Password admin Note The user n...

Страница 32: ...September 4 2017 CM 3304 CM 3308 User and Installation Guide 26 ...

Страница 33: ...e found in the DNA utility folder in the supplied CD or click the DNA icon 3 In the DNA application click the DNA button 4 If the Windows Firewall is enabled a security alert window pops up 5 To continue click Allow Access Latitude users should consult the Latitude Installation Instructions on disabling the Windows Firewall Windows Firewall Screen 6 Click Assign IP All the discovered IP devices wi...

Страница 34: ...hat opens select Assign IP The Assign IP dialog is displayed DNA Assign IP Use DHCP Dialog Box Tip Record the camera s MAC address for future reference 8 To access DNA do one of the following a For DHCP not supported by Latitude i Select Use DHCP Do not use for Latitude ii Click Update and wait for status b For Static IP recommended for Latitude users DNA Assign IP Static IP Dialog Box ...

Страница 35: ...t s Login dialog box Login Dialog Box 10 Log into the unit with the default user name admin and password admin Note 1 Both the user name and password are case sensitive 2 It is strongly advised that administrator s password be altered for security reasons If the User Account Control dialog box opens and requests you to install the install cab file click Yes If the ActiveX installation is not succe...

Страница 36: ...the installation CD or from FLIR Support MS Visual C 2008 Redistributable Error Message 11 If a popup message appears for running the ActiveX add on click Allow Note If the password is changed and the Latitude AdminCenter Discovery feature is in use deselect all other proprietary types Select FLIR as the Unit Type so that the new password can be configured in the Discovery Add Unit Manually settin...

Страница 37: ...04 CM 3308 User and Installation Guide 12 Install the web player See Installing and Deleting the Web Player Note If you have previously installed a web player application on the PC you should delete the existing web player from the PC before accessing the camera ...

Страница 38: ...September 4 2017 CM 3304 CM 3308 User and Installation Guide 32 ...

Страница 39: ...d from a 32 bit version of Microsoft Internet Explorer 10 and above Microsoft Edge 38 Chrome v 55 and above or Firefox v 50 and above To access the unit via the web browser 1 Open the browser 2 Enter the unit s IP address in the browser s address bar 3 Press the ENTER key on your PC keyboard The unit s Login window is displayed See Figure Login Window 4 Enter the user name default admin and passwo...

Страница 40: ...e user name By default Admin is displayed Logout Link Click Logout to exit the web interface Model Number Displays the model number Above the Live View window the selected video format date and time are displayed Below the Live View window the firmware version is displayed To the left of the Live View window the View Mode buttons are displayed All buttons are displayed in Internet Explorer browser...

Страница 41: ...t Explorer Audio button Click the Audio button to listen to the audio output through a loudspeaker The button allows the user to listen to audio streaming over the web if a audio is enabled and b if an audio event is enabled and triggered by exceeding the threshold Settings are configured on the Audio screen Displayed only with Internet Explorer Lens Control button Click the Lens Control button to...

Страница 42: ...e Recordings that are triggered by events such as motion detection are stored on a microSDXC card which can store up to 128GB of data The card is not included To view a triggered event recording 1 In your browser enter the camera s FTP address ftp camera_ip 2 Enter the Admin user name and password 3 Open the folder for the event according to the type of event motion detection tampering etc Files a...

Страница 43: ...PEG The camera supports sending unicast and multicast streams via the RTSP protocol Unicast streams include the suffix stream followed by the stream number without a space Multicast streams include the suffix streamXm where X is the stream number 1 2 or 3 To view a media stream with VLC 1 Open VLC 2 From the Media tab select Open Network Stream The Open Media screen is displayed VLC Open Media Scr...

Страница 44: ...ution entered in URL string agree with the resolution set in the Streaming Video Settings screen 4 Click Play The video stream is displayed in the media player Audio will also be streamed Media Player Screen 9 3 Settings Device and client PC parameters are set from the Settings tab in the navigation bar Upon clicking Settings the Settings menu is displayed in the sidebar Three sections are display...

Страница 45: ...gs Click the System tab to expand the menu The CM 330x includes the following System menu CM 330x System Sidebar Click the link to open the tabs for the various functions Lens Control Basic Configuration User Accounts Network Events Source Events Handler 9 3 1 1 Lens Control The Lens Control screen enables control of the lens zoom and focus functions Lens Control Screen ...

Страница 46: ...re To manually set the focus 1 In the Focus Control section move the slider to the desired focus between Far 1 to Near 100 2 From the Step drop down list select the number of steps to set the focus 1 2 4 8 16 32 64 or 128 To set the Zoom Trigger Control 1 In the Zoom Trigger Control section from the Zoom Trigger drop down list select ON or OFF This setting determines if the camera will automatical...

Страница 47: ...th PC Enter the date and time in the respective field Synchronize with NTP Server Selecting this option opens the NTP Settings section NTP Setting Section a Enter the following details in the NTP Setting section Enable From the drop down list select Manual to set the NTP server manually or From DHCP Server to set the time according to the network DHCP server Server Address Enter the IP address for...

Страница 48: ...umber product serial number and product MAC address To access the Firmware screen click Basic Configuration Firmware Firmware Screen To update system firmware 1 Click Browse to locate the firmware file 2 Select the file The file name is displayed for example ArielFHD_20161230 3 Click Upgrade The upgrade process takes about three minutes After the firmware has upgraded successfully the camera reboo...

Страница 49: ...ess netmask address and gateway address TV format and image rotation settings Click Full factory defaults to restore factory defaults including network settings Caution Clicking Full factory defaults causes the camera to lose all network settings Attention Sélection par Défaut Complet d Usine entraîne la caméra de perdre tous les paramètres réseau To select the TV format 1 Click Basic Configuratio...

Страница 50: ...shed To restore full factory defaults 1 Click Full factory defaults The camera reboots After the reboot finishes a popup window opens with the message Rebooting completed Note Since the unit s IP address might change when restoring full factory defaults it is recommended to use DNA to discover the unit after rebooting 2 Click OK The browser is refreshed 9 3 1 2 5 OSD The OSD On Screen Display scre...

Страница 51: ...olor From the drop down list select Black or White default setting Location X Move the slider from 1 to 10 to set the location on the screen for the OSD The default setting is 1 Location Y Move the slider from 1 to 10 to set the location on the screen for the OSD The default setting is 1 3 In the Event section configure the following settings in case an event occurs Background Color From the drop ...

Страница 52: ...re assigned to each access level An Administrator has access to all screens By default the camera includes the Administrator access level There can be more than one Administrator The default Administrator cannot be deleted An Operator has access to the Live View screen An Operator can change the playback stream take and store a snapshot record live video and view it in full screen mode There can b...

Страница 53: ...ess Level Dialog Box 3 Select Operator or User and enter the User Name and Password Filled Access Level Dialog Box 4 Click Save The new Operator or User name is displayed in the Account Setting list Updated Account Setting List To modify an operator or user 1 Click Modify 2 Enter the new User Name or Password To delete an operator or user 1 Click Delete The operator or user is deleted from the Acc...

Страница 54: ...ost network settings Network General Screen To configure basic settings 1 In the Basic Settings section do the following a In the Device Name text box enter a friendly name for the camera b In the HTTP Port text box enter the port number The range is from 1025 to 65535 The default port is 80 c From the Enable LDAP drop down list select ON or OFF If you select ON verify that the information in Netw...

Страница 55: ...ing IPv4 to connect to the network in Manual mode In PPPoE and DHCP modes the IPv4 address is assigned automatically c IPv4 Subnet Mask Used to determine if the destination is in the same subnet The default value is 255 255 255 0 Enter the IPv4 subnet mask address if you are using IPv4 to connect to the network in Manual mode In PPPoE and DHCP modes the IPv4 subnet mask address is assigned automat...

Страница 56: ... default setting Device Name The camera connects to the UPnP server by using the default camera name User Input The camera connects to the UPnP server by using a friendly name Enter the name in the Friendly Name text box that opens when this option is selected UPnP User Input Screen To enable SSL 1 In the SSL section from the Enable SSL drop down list select ON The default is OFF Note You must ins...

Страница 57: ...he user will not be able to remotely access them via FTP 9 3 1 4 3 RTSP The RTSP screen is used for transmitting the encoded video stream The RTSP protocol is used for establishing the connection and controlling the streaming data between the camera and a device over the web Each stream can be sent by unicast to one device or broadcasted by multicast to multiple devices Unicast requires larger net...

Страница 58: ...he RTSP server s URL The default is stream1 2 From the Metadata drop down list select ON or OFF The default is OFF 3 From the Address Type drop down list select Manual or Auto The default is Auto 4 In the Multicast URL text box enter the multicast URL The default is stream1m Valid multicast addresses are in the range 224 0 1 1 239 255 255 254 Note Switches routers and devices must be configured to...

Страница 59: ...Write Community String text box enter the community name that has read write access to all supported SNMP objects except read only objects The default value is private 4 In the Trap Community String text box enter the community to use when sending a trap message to the management system The default value is public Traps are used by the camera to send messages to the management system for important...

Страница 60: ... used for managing the entities in the communications network is downloaded 9 3 1 4 5 802 1X The 802 1X screen is used for enabling the camera to access a network protected by the 802 1X EAPOL Extensible Authentication Protocol over LAN authentication protocol Before using this function you must register a user name and password for the 802 1X server and configure the authentication server Contact...

Страница 61: ...cate The Status is displayed as Not Installed until the CA certificate is downloaded 6 Do one of the following Click Save The status is displayed as Not Installed until the configuration is saved Click Test and Save to test and save the configuration To enable EAP PEAP 1 Select EAP PEAP The Basic Settings screen opens By default the Inner Authentication protocol is MSCHAPV2 EAP PEAP Screen 2 Enter...

Страница 62: ...P address 1 From the Filter drop down list select Deny 2 Check the Enable checkbox for each IP address for which you want to deny access 3 Enter the IP address in the Address text box 4 Click Save 9 3 1 4 7 DDNS The DDNS Dynamic DNS screen is used for network access if you select PPPoE as the default network connection Before configuring the system to use DDNS you must first register with a DDNS s...

Страница 63: ...3 In the Base DN text box enter or edit the default Distinguished Name Domain Components of the parent entry This is used for searching the directory tree in the LDAP server The default setting is dc ipcamera dc com 4 In the Bind DN Template text box enter or edit the attributes used for authenticating the camera on the LDAP server The default setting is uid u dc users dc ipcamera dc com 5 In the ...

Страница 64: ...o use HTTPS on the camera an HTTPS certificate must be installed The HTTPS certificate can be obtained either by creating and sending a certificate request to a Certificate Authority CA or by creating a self signed HTTPS certificate as described below Note The self signed certificate does not provide the same level of security as a CA issued certificate To configure SSL settings 1 From the Method ...

Страница 65: ...anization Name Enter the name of the organization to which the entity identified in Common Name belongs Organization Unit Name Enter the name of the organizational unit to which the entity identified in the Common Name field belongs Email Address Enter the email address of the person responsible for maintaining the certificate 3 Click Generate Certificate to save the certificate request after comp...

Страница 66: ...down list select Upload Certificate The Upload Certificate screen is displayed Upload Certificate Screen 2 Do one of the following To locate and upload a self signed certificate click Upload Certificate Browse To locate and upload a Certificate Authority CA certificate click CA Certificate Browse 3 Click Upload The certificate is uploaded ...

Страница 67: ...pering 9 3 1 5 1 Alarm The Events Source Alarm screen is used for enabling an alarm when an event occurs and for defining actions when an alarm occurs Actions include Sending an alarm Defining the method for storing a snapshot in the camera s microSD card Sending a snapshot of the event to an FTP server Recording an event in the camera s microSD card Sending email notifications Displaying text on ...

Страница 68: ...FTP checkbox to store a snapshot on a remote FTP site By default it is not checked To record an event on the camera 1 In the Recording section select the Record on Edge checkbox to record a clip on the camera s microSD card By default it is not checked 2 Click Save To enable sending an email notification 1 In the Email section select the Enable checkbox By default Enable is not checked 2 In the Su...

Страница 69: ...rt Time column enter the time s and day s you want to trigger an action 3 In the End Time column enter the time s and day s you want to stop the action 4 Select the Action checkbox if you want to enable the action at these times 5 Select the Select Deselect All checkbox as required 6 Click Apply The times for the schedule are displayed in orange in the Arming Schedule Setting section of the screen...

Страница 70: ...y Threshold is exceeded A number of actions can be taken including Defining the method for storing a snapshot in the camera s microSD card Sending a snapshot of the event to an FTP server Storing a recording of the audio event in the camera s microSD card Displaying text on screen over the recording or snapshot Sending an email notification of the audio event Setting the arming schedule Events Sou...

Страница 71: ...en displays on clips and snapshots Note Recording must be enabled from the System Events Handler Recording Settings screen in order to record audio To enable using audio 1 Select the Audio checkbox By default Audio is not enabled To set the audio level 1 Move the Sound Intensity Threshold slider to the desired level between 1 100 To define the method to store a snapshot 1 See instructions in the A...

Страница 72: ...ult Enable is not checked 2 Click Save Area To configure motion zone area settings 1 From the Sensitivity drop down list select High Medium or Low The camera reacts to slight changes in motion or brightness in the motion zone when set to High while the camera reacts to big changes in brightness or motion when set to Low To define the method to store a snapshot 1 See instructions in the Alarm secti...

Страница 73: ...here is a network conflict Events Source Network Screen To enable notifications 1 Select Enable By default Enable is not checked 2 Click Save To start recording 1 In the Recording section select the Record on Edge checkbox By default it is not checked 2 Click Save To activate the on screen display 1 In the OSD section select Enable By default Enable is not checked 2 In the Text text box enter the ...

Страница 74: ...e Alarm section To enable sending an email notification 1 See instructions in the Alarm section To define OSD text 1 See instructions in the Alarm section To set the arming schedule 1 See instructions in the Alarm section 9 3 1 5 6 Tampering The Events Source Tampering screen enables you to Enable and define tampering settings Send an alarm upon a tampering event Define the method for storing a sn...

Страница 75: ...ensitivity drop down list select High Medium or Low To define the method to store a snapshot 1 See instructions in the Alarm section To record the event on the camera 1 See instructions in the Alarm section To enable sending an email notification 1 See instructions in the Alarm section To define OSD text 1 See instructions in the Alarm section To set the arming schedule 1 See instructions in the A...

Страница 76: ...ding Settings SD Card Snapshot Sound 9 3 1 6 1 Email It is possible to send notifications to up to 10 email addresses Note Before configuring email settings check that There is an SMTP mail server on the local area network LAN The network is connected to either an intranet or the Internet TCP IP settings including DNS Server settings are configured in the Network General screen To configure email ...

Страница 77: ...mail server password 3 In the Sender Settings area configure the following settings a Sender Email Address In the text box enter the sender s email address b Attach Image From the drop down list select ON or OFF default setting 4 In the Email Address List section do the following for each email address a Select the checkbox in the Enable column By default Enable is not checked b Enter the email ad...

Страница 78: ...enter the FTP server IP address 2 In the Port text box enter the email server port number 3 In the User Name text box enter the FTP server user name 4 In the Password text box enter the FTP server manager s password 5 From the Mode drop down list select Active or Passive default setting In passive mode FTP the client initiates both connections to the server solving the problem of firewalls filteri...

Страница 79: ... you select One Shot do the following a In the Clip Duration text box enter a value from 5 to 10 seconds b In the Clip Size text box enter a value from 10 to 20 MB If you select Continuous In the Clip Size text box enter a value from 10 to 20 MB Events Handler Recording Settings Continuous Screen 3 Click Save 9 3 1 6 5 SD Card The SD Card screen is used for configuring the microSD card The card st...

Страница 80: ...apture between snapshots The default is 1 frame 3 In the Post Event Capture Count text box enter the number of frames more than one to capture after taking a snapshot The default is 3 frames 4 Click Save 9 3 1 6 7 Sound The Sound screen enables you to upload up to 10 small PCM audio files These sound files can be triggered upon any event that is set in the Events Source section For example you can...

Страница 81: ...ttings 1 From the Current Profile drop down list select 1 2 or 3 The default is 1 Each of the three Current Profiles has its own settings The available parameters depend on the selected resolution Each profile supports up to three concurrent streams Stream1 Stream2 and Stream3 which can be configured separately to send two streams simultaneously with optimized quality and bandwidth 2 From the Corr...

Страница 82: ...mum frame is displayed by default The higher the FPS the smoother the motion in the video d From the Rate Control drop down list select CBR or CVBR The default is CBR Select CBR Constant Bit Rate if you are monitoring simple scenes CBR uses more storage capacity than CVBR It wastes storage on simple scenes while not allocating enough storage for complex sections resulting in degraded quality Move ...

Страница 83: ...DSPs become more able to handle the processing load g Set the GOP to a value from 1 60 NTSC or 1 50 PAL The default is 30 for NTSC and 25 for PAL one I Frame transmitted every second The GOP is a group of successive pictures within a coded video stream Each coded video stream consists of successive GOPs GOP structure specifies the order in which intra coded frames and inter coded frames are arrang...

Страница 84: ...th MJPEG compression The following resolutions are available H 265 H 264 Only PAL NTSC 2560 x 1440 25 fps 2560 x 1440 30 fps 1920 x 1080 25 fps 1920 x 1080 30 fps 1280 x 720 25 fps 1280 x 720 30 fps 720 x 576 25 fps 720 x 480 30 fps H 265 H 264 H 265 H 264 MJPEG NTSC Stream1 Stream2 2560 x 1440 15 fps H 264 H 265 1920 x 1080 15 fps H 264 H 265 MJPEG 1280 x 720 15 fps H 264 H 265 MJPEG 720 x 480 15...

Страница 85: ...EG NTSC Stream1 Stream2 Stream3 2560 x 1440 15 fps H 264 H 265 1920 x 1080 15 fps H 264 H 265 MJPEG 1280 x 720 15 fps H 264 H 265 MJPEG 720 x 480 15 fps H 264 H 265 MJPEG 1280 x 720 15 fps H 264 H 265 MJPEG 1280 x 720 15 fps H 264 H 265 MJPEG 720 x 480 15 fps H 264 H 265 MJPEG 720 x 480 15 fps H 264 H 265 MJPEG 720 x 480 15 fps H 264 H 265 MJPEG 1920 x 1080 30 fps H 264 H 265 MJPEG 1280 x 720 30 f...

Страница 86: ... MJPEG 720 x 576 15 fps H 264 H 265 MJPEG 720 x 576 15 fps H 264 H 265 MJPEG 1920 x 1080 25 fps H 264 H 265 MJPEG 1280 x 720 25 fps H 264 H 265 MJPEG 1280 x 720 25 fps H 264 H 265 MJPEG 720 x 576 25 fps H 264 H 265 MJPEG 720 x 576 25 fps H 264 H 265 MJPEG 720 x 576 25 fps H 264 H 265 MJPEG 1280 x 720 25 fps H 264 H 265 MJPEG 1280 x 720 25 fps H 264 H 265 MJPEG 1280 x 720 25 fps H 264 H 265 MJPEG 7...

Страница 87: ...e available H 265 H 264 Only PAL NTSC 3840 x 2160 25 fps 3840 x 2160 30 fps 1920 x 1080 50 fps 1920 x 1080 60 fps 1920 x 1080 25 fps 1920 x 1080 30 fps 1280 x 720 25 fps 1280 x 720 30 fps 720 x 576 25 fps 720 x 480 30 fps H 265 H 264 MJPEG H 265 H 264 MJPEG NTSC Stream1 Stream2 3840 x 2160 15 fps H 264 H 265 1920 x 1080 15 fps H 264 H 265 MJPEG 1280 x 720 15 fps H 264 H 265 MJPEG 720 x 480 15 fps ...

Страница 88: ...64 H 265 MJPEG 3840 x 2160 25 fps H 264 H 265 720 x 576 25 fps H 264 H 265 MJPEG 1920 x 1080 50 fps H 264 H 265 MJPEG 1280 x 720 25 fps H 264 H 265 MJPEG 720 x 576 25 fps H 264 H 265 MJPEG 1920 x 1080 25 fps H 264 H 265 MJPEG 1280 x 720 25 fps H 264 H 265 MJPEG 720 x 576 25 fps H 264 H 265 MJPEG 1280 x 720 25 fps H 264 H 265 MJPEG 1280 x 720 25 fps H 264 H 265 MJPEG 720 x 576 25 fps H 264 H 265 MJ...

Страница 89: ... 265 MJPEG 1280 x 720 25 fps H 264 H 265 MJPEG 1280 x 720 25 fps H 264 H 265 MJPEG 720 x 480 25 fps H 264 H 265 MJPEG 720 x 480 25 fps H 264 H 265 MJPEG 720 x 480 25 fps H 264 H 265 MJPEG 1920 x 1080 30 fps H 264 H 265 MJPEG 1280 x 720 30 fps H 264 H 265 MJPEG 1280 x 720 30 fps H 264 H 265 MJPEG 720 x 480 30 fps H 264 H 265 MJPEG 720 x 480 30 fps H 264 H 265 MJPEG 720 x 480 30 fps H 264 H 265 MJPE...

Страница 90: ...265 MJPEG 1280 x 720 25 fps H 264 H 265 MJPEG 1280 x 720 25 fps H 264 H 265 MJPEG 720 x 576 25 fps H 264 H 265 MJPEG 720 x 576 25 fps H 264 H 265 MJPEG 720 x 576 25 fps H 264 H 265 MJPEG 1920 x 1080 25 fps H 264 H 265 MJPEG 1280 x 720 25 fps H 264 H 265 MJPEG 1280 x 720 25 fps H 264 H 265 MJPEG 720 x 576 25 fps H 264 H 265 MJPEG 720 x 576 25 fps H 264 H 265 MJPEG 720 x 576 25 fps H 264 H 265 MJPEG...

Страница 91: ... privacy zone number from the list of Zone 1 through Zone 8 2 From the Privacy Color Setting drop down list select Black Grey or White The default setting is Black 3 In the Enable section select ON The default setting is OFF 4 Use your mouse to draw a region of interest on the screen 5 Click Save The privacy zone is displayed on the screen Repeat the above steps for each privacy zone To delete a p...

Страница 92: ...ct ROI 1 or ROI 2 and click Clear The ROI is deleted 9 3 3 Camera Tab The Camera tab includes three screens Exposure Picture Adjustment and White Balance Note Settings are saved automatically Clicking Reset returns the settings to factory defaults 9 3 3 1 Exposure Screen The Exposure screen is used for configuring basic exposure settings and day night settings The configurable settings depend on t...

Страница 93: ... the Exposure section Exposure Mode From the drop down menu select Auto Shutter Min Shutter Speed Select a suitable shutter speed according to the environmental luminance The following table displays the options Auto Shutter Min Shutter Speed PAL NTSC PAL NTSC 1 100 1 120 1 2500 1 2500 1 250 1 250 1 5000 1 5000 1 500 1 500 1 10000 1 10000 1 1000 1 1000 ...

Страница 94: ...ppear in silhouette The backlight function of the camera allows it to adjust the exposure of the entire image to properly expose the subject in the foreground From the drop down list select one of the following options for the backlight compensation OFF Upper 2 3rd Lower 2 3rd Central 1 3rd Central 1 6th Left Right or OFF default setting The settings are as follows Backlight Compensation Settings ...

Страница 95: ...ite for nighttime operation This activates IR mode by putting the camera into Night mode Time Select Fast Normal or Slow to set the reaction time of the IRC filter When set to Fast the filter switches faster between Day and Night modes The default setting is Normal Sensitivity Use the slider to set the sensitivity between Low and High when switching from Day to Night mode or Night to Day mode When...

Страница 96: ...n above Backlight Compensation See the explanation in the Auto Shutter Mode section above Digital WDR See the explanation in the Auto Shutter Mode section above In the Day Night Switch Control section configure the following settings Mode See the explanation in the Auto Shutter Mode section above Time See the explanation in the Auto Shutter Mode section above Sensitivity See the explanation in the...

Страница 97: ...s mode is used to set a fixed exposure while other parameters can change Auto Iris Mode Exposure Settings Configure the settings in the Exposure section Exposure Mode From the drop down menu select Auto Iris Minimum Shutter Speed Set the options Auto Iris Min Shutter Speed PAL NTSC 1 6 25 1 7 5 1 12 5 1 15 1 25 1 30 1 50 1 60 ...

Страница 98: ...ee the explanation in the Auto Shutter Mode section above Digital WDR See the explanation in the Auto Shutter Mode section above In the Day Night Switch Control section configure the following settings Mode See the explanation in the Auto Shutter Mode section above Time See the explanation in the Auto Shutter Mode section above Sensitivity See the explanation in the Auto Shutter Mode section above...

Страница 99: ... levels Increasing the value of the fixed shutter increases the amount of light entering the sensor which allows a brighter and more detailed image In a similar manner utilizing gain and increasing its level increases the sensitivity of the image sensor which brightens the image and add details This increases the level of noise in the image The CM 3304 and the CM 3308 have different configuration ...

Страница 100: ...5000 1 250 1 250 1 10000 1 10000 1 500 1 500 Gain Set the gain between 0 48 dB CM 3304 or 0 36 dB CM 3308 Increasing the gain lightens dark pictures resulting from low level lighting The default is 0 Digital WDR See the explanation in the Auto Shutter Mode section above In the Day Night Switch Control section configure the following setting Mode See the explanation in the Auto Shutter Mode section...

Страница 101: ...optimal mix of light and dark regions within the scene from the two shutters Shutter WDR Screen Shutter WDR On Shutter WDR Off Note The frame rate is limited to 25fps when Shutter WDR is enabled Configure the settings in the Exposure section Exposure Mode From the drop down menu select Shutter WDR Exposure Value See the explanation in the Auto Shutter Mode section above Backlight Compensation See ...

Страница 102: ...creen enables you to configure picture quality color and mirror flip settings Picture Adjustment Screen Settings are saved automatically after configuration To restore settings to factory default click Reset To configure quality settings 1 In the Quality section configure the following settings Sharpness Set the slider between 0 100 which provides the highest sharpness around the edges and for sma...

Страница 103: ...o 100 which provides the deepest hue The default is 0 To configure mirror flip settings 1 In the Mirror Flip Setting section from the Orientation drop down list select one of the following Flip This setting flips the image upside down Mirror This setting views the image from a different angle Both This setting views the image upside down from a different angle OFF default 9 3 3 3 White Balance The...

Страница 104: ...Adjusts the red color in the image from 0 to 511 The higher the number the redder the image The default setting is 64 o B Gain Adjusts the blue color in the image from 0 to 511 The higher the number the bluer the image The default setting is 64 b To quickly balance the color click One Push 9 4 Logout Selecting the Logout link on the Home page to close the session The following message appears Logo...

Страница 105: ... included in this section Technical Specifications Internet Security Settings on Internet Explorer Installing UPnP Settings on Internet Explorer Deleting Temporary Internet Files on Internet Explorer Installing and Deleting the Web Player Network Settings Troubleshooting Acronyms and Abbreviations Mounting Accessories ...

Страница 106: ... lux with IR 30 IRE Video Compression Dual stream H 265 Main profile H 264 Main and High profile MJPEG Stream2 and Stream3 only Video Resolution H 265 H 264 and MJPEG CM 3304 11 I Single Stream Dual Stream Triple Stream 4MP 25 30fps 4MP Full HD 1080p 15fps 4MP Full HD 1080p HD 720p 15fps CM 3304 21 I 4MP 25 30fps 4MP Full HD 1080p 15fps 4MP Full HD 1080p HD 720p 15fps CM 3308 11 I 8MP 25 30fps Ful...

Страница 107: ...orized varifocal lens Viewing Angle HFoV 36 103 15 34 42 104 IR Illuminator IR Range Up to 30m 98 feet Angle of illumination 60 LED Type High efficiency SMD Peak Emission Wavelength nm 850 Operation Image Settings Exposure Control Yes Gain Control Yes Backlight Compensation Yes Gamma Correction 0 45 1 Brightness Manual Contrast Manual Saturation Manual Hue Manual Sharpness Manual 0 100 White Balan...

Страница 108: ...ity Detection 1x Audio in 1x Audio out Alarm 1x Alarm in 1x Alarm out Languages English Arabic Czech Simplified Chinese Traditional Chinese French German Hungarian Italian Japanese Polish Portuguese Russian Spanish MicroSD Card Recording Up to 128GB microSDXC card not included Analytics Motion Detection When the unit detects motion a corresponding action is triggered On Off by zone object size sen...

Страница 109: ...e G LDAP Video Streaming RTSP RTP Event Notification HTTP event query HTTP event client pulling SMTP FTP Event Storage Recordings and snapshots Password Levels User and Administrator Security 802 1X EAP MD5 EAP TTLS EAP PEAP IP address filtering SSL SNMPv3 AES DES MD5 and SHA Firmware Upgrade Flash memory for upgrading camera firmware via HTTP Operating Systems Windows Server 2003 Windows Server 2...

Страница 110: ...perating Temperature 40 to 50 C 40 to 122 F Operating Humidity Up to 90 relative humidity non condensing Certifications Safety AS NZS CISPR22 Class B EN50130 4 EN61000 3 2 3 EN61000 4 2 3 4 5 6 8 11 EN61000 6 3 Class B UL 60950 1 Electromagnetic Interference EMC ANSI C63 4 2009 FCC 47 CFR Part 15 Subpart B Class B CISPR Pub 22 EN55022 1998 Class A EN55032 2012 EN60950 1 2006 A11 2009 A1 2010 A12 2...

Страница 111: ...is blocked either set Internet security level to default or change ActiveX controls and plug in settings To set the default Internet security level 1 Start Internet Explorer IE 2 From the Command Bar toolbar select Tools and select Internet Options from the menu that appears Command Bar Toolbar Select Internet Options 3 In the Internet Options window that appears select the Security tab 4 Select i...

Страница 112: ...ettings Internet Zone dialog box opens 5 In the Security Settings Internet Zone dialog box under ActiveX controls and plug ins set all the following options to Enable or Prompt Automatic prompting for ActiveX controls Binary and script behaviors Download signed ActiveX controls Download using ActiveX controls Initialize and script ActiveX not marked as safe Run ActiveX controls and plug ins Script...

Страница 113: ...e discovered and displayed in Network locations under Other Devices Control Panel Network Window To enable UPnP discovery in Windows 7 8 and 8 1 1 Click Start and select Control Panel 2 Click Network and Internet 3 Click Network and Sharing Center 4 Click Change advanced sharing settings 5 Expand the Home or Work node select Turn on network discovery Windows 7 8 and 8 1 Advanced Sharing Settings D...

Страница 114: ...k discovery is allowed to communicate through Windows Firewall and that other firewalls are not interfering with network discovery To enable UPnP discovery in Windows 10 1 Open the Control Panel 2 Click Network and Sharing Center 3 Click Change advanced sharing settings 4 In the Network discovery and File and printer sharing sections select Turn on network discovery Windows 10 Advanced Sharing Set...

Страница 115: ...ing 1 Click Start and type in the Search box services msc The Services Local dialog box appears Windows Services Local Dialog Box 2 In the Services Local dialog box scroll down the list to UPnP Device Host and verify that it shows the status Started If Started is not displayed right click and select Start from the shortcut menu ...

Страница 116: ...temporary Internet files 1 In Internet Explorer IE from the Command Bar toolbar click Tools and select Internet Options from the menu that appears Command Bar Toolbar Select Internet Options 2 In the General tab in the Internet Options dialog box click Delete 3 In the Delete Browser History dialog box that appears select Temporary Internet files Uncheck Cookies and History to keep this data Then c...

Страница 117: ...after accessing the camera Installing the Web Player with Internet Explorer If your browser is Internet Explorer a message is displayed requesting you to install a plug in Web Interface with Internet Explorer Browser To install the Web Player 1 Click here on the screen to download the Ariel Player plug in The Ariel Player plug in information bar opens Run Ariel Player Plug in Information Bar 2 Cli...

Страница 118: ...nd Installation Guide 3 Click Next to install the Ariel Player plug in on your PC Ariel Player Setup Wizard Screen 2 Ariel Player Setup Wizard Screen 3 4 Click Close when the Installation Complete dialog box is displayed Ariel Player Setup Wizard Screen 4 ...

Страница 119: ...start your computer in order to save changes Ariel Player Restart System Dialog Box a Click Yes The computer reboots and the Rebooting Completed message appears b Click OK The Live View screen is displayed Deleting the Web Player Users who have previously installed the Web Player in the PC should first delete the existing player file from the PC and then install the new Web Player before accessing...

Страница 120: ... and select Control Panel The Control Panel opens 2 In the Control Panel select Programs and Features 3 From the installed program list select Ariel Player 4 On the banner bar click Uninstall 5 If prompted to confirm the Uninstall click Yes After deleting the previous player file you must clear your computer s cache memory To clear your computer s cache memory 1 In the Control Panel click Internet...

Страница 121: ...e Browsing History dialog box check Preserve Favorites website data Temporary Internet files and website files Cookies and website data and Tracking Protection ActiveX Filtering and Do Not Track 4 Click Delete The Internet Properties dialog box opens 5 Click OK Your computer s cache memory is deleted After the cache is cleared the Web Player installation wizard opens 6 Follow instructions above to...

Страница 122: ...ocols SSL TLS over HTTP HTTPS must be enabled if your network uses SNMPv3 Multicast Streaming As defined in the units Video streaming multicast Uses the ONVIF address defined by the Video Management System Multicast UDP 9766 Unit self publishing Uses IP address 224 9 9 9 NTP 123 Time synchronization with a network time server using SNTP RTSP 554 RTP session setup RTP 2000 to 65535 Multimedia strea...

Страница 123: ...er IP address assignments and lease Alternatively move the camera to an isolated network and make sure camera gets DHCP address and is accessible Move the camera back to the network and test it If you still have issues reset the camera physically by pressing the reset button on the rear of the camera and test the camera again This will ensure the camera releases the IP address The IP address respo...

Страница 124: ...is within specification Streaming video image is hanging stopped Confirm the unit s video streaming settings Refresh your browser screen F5 Check that the bandwidth and bit rate settings of the network are set properly Check that other processes and applications are not causing undue latency Check that the firewall analysis or blocking is not interfering with the video stream and supports the requ...

Страница 125: ...264 Video Compression Standard HTTP Hypertext Transport Protocol HTTPS Hypertext Transport Protocol Secure IP Internet Protocol JPEG Joint Photographic Experts Group LDAP Lightweight Directory Access Protocol MD5 Message Digest 5 encryption algorithm MJPEG Motion Joint Photographic Experts Group NTP Network Time Protocol ONVIF Open Network Video Interface Forum OSD On Screen Display ROI Region of ...

Страница 126: ...accessories are available from FLIR for installation of your Ariel Gen III CM 330x series camera For more information on available options contact your FLIR sales representative or visit www flir com security Image Part Number Description CB POLE 31 Pole Mount Bracket CB 4S 31 4S Mounting Bracket CB WLBX 31 Wall Junction Box ...

Страница 127: ...CM 3304 CM 3308 User and Installation Guide September 4 2017 121 ...

Страница 128: ...es PH 1 888 747 3547 Support FX 1 805 685 2711 w w w flir com security Corporate Headquarters FLIR Systems Inc 27700 SW Parkw ay Ave Wilsonville OR 97070 USA PH 1 503 498 3547 FX 1 503 498 3153 Document CM 3304 CM 3308 User and Installation Guide Version Ver 1 Date September 4 2017 Language en US ...

Отзывы: