


Advice:
The selection/confirmation by
depressing the red knob will be indicated by a
symbol " " in the display next to the
corresponding green key. You then have the
choice either to press the red knob or the
green key " ". If you have made a mistake
in entering the instruction, then this can be
cancelled by pressing the green key next to
the "C" (correction/cancel). The minimum
time between two depressions should be 0.5 s!
➜
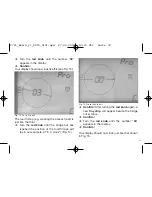
The uppermost green key is the menu
selection key. Possible menu options are:
SEL, Pro, CnF, POL, rEL, CH1, CH2, rES.
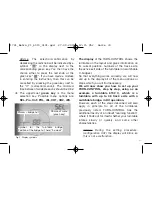
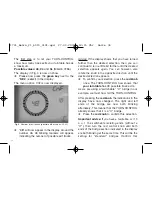
The display of the TURN-CONTROL shows the
turntable on the layout and gives information on
its current position, numbers of the track exits,
the active exit side of the turntable (on switchable
C-bridges).
So that everything works correctly, we will now
call up in the display all of the menu options or
steps which you will find necessary.
We will now show you how to set up your
TURN-CONTROL, step by step, using as an
example a turntable 6152 C, which is a
turntable with up to 48 track exits with a
switchable bridge, in DC operation.
However, each of the steps described will also
apply in principle for all of the turntables
previously listed. TURN-CONTROL has the
additional facility of an inbuilt "learning function"
where it finds out for itself whether your turntable
rotates slowly or quickly, and some other
characteristics.
Advice:
During the setting procedure,
(configuration CnF) the display will blink, so
this is not a malfunction.
33
Symbol for the turntable bridge
Position of the bridge hut; here:“9 o’clock“
Choice of menu
(green key)
Marker = bridge hut
Fig. 5 Display symbols
1721_Betra_21_6915_0101.qxd 27.09.2007 12:15 Uhr Seite 33


