background image


www.eu.fishersci.com/fisherbrand


Table of Contents   

1 INTRODUCTION ................................................................................................ 4 

1.1 Product Features ......................................................................................... 5


1.2 Main Applications ........................................................................................ 6


1.3 Specifications .............................................................................................. 7


1.4 Operation ..................................................................................................... 8


1.5 The Control Panel ........................................................................................ 9


2 INSTALLATION ............................................................................................... 10


2.1 Preparation for Installation ......................................................................... 10


2.2 Items Included ........................................................................................... 10


2.3 System Structure and Flow Diagrams ....................................................... 11


2.4 Installation ................................................................................................. 14


3 SYSTEM START UP AND OPERATION ......................................................... 19


3.1 Check List Prior to System Start Up .......................................................... 19


3.2 System Start Up and Time Setting............................................................. 20


3.3 Routine Operations .................................................................................... 26


4 MAINTENANCE ............................................................................................... 27


4.1 Replacing the AccuDuo P Pack, U Pack Cartridges and the Final Filter ... 28


4.2 Replacing the UV Lamp (For UV Models) .................................................. 30


4.3 Replacing the RO Membrane .................................................................... 32


4.4 Replacing the Fuse .................................................................................... 34


5 BASIC TROUBLESHOOTING ......................................................................... 35 

6 PARTS AND ORDER INFORMATION ............................................................. 36 

7 WARRANTY INFORMATION........................................................................... 38 


Содержание 15489689

Страница 1: ...www eu fishersci com fisherbrand Accu20 Ultrapure Water System USER MANUAL...

Страница 2: ...www eu fishersci com fisherbrand 2 This Manual Is Applicable to the Following Fisher Scientific Accu20 Models 15489689 Accu20 Water System 230V 15499689 Accu20 Water System UV SET 230V...

Страница 3: ...ture and Flow Diagrams 11 2 4 Installation 14 3 SYSTEM START UP AND OPERATION 19 3 1 Check List Prior to System Start Up 19 3 2 System Start Up and Time Setting 20 3 3 Routine Operations 26 4 MAINTENA...

Страница 4: ...nuous flow of high quality pure water Please contact us or your local distributor if you encounter any issues during installation and use Professional engineers are fully trained to support you Safety...

Страница 5: ...quipped with a Safeguard AccuDuo P Pack cartridge and a dual column AccuDuo U Pack ultra purification cartridge to ensure optimum quality of the final product water No storage tank is required which e...

Страница 6: ...s Here are some typical applications HPLC mobile phase preparation Preparation of reagent blank solutions As sample diluents for GC HPLC AA ICP MS and other analytical techniques Preparation of buffer...

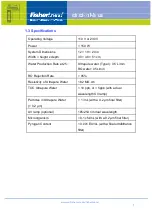
Страница 7: ...re water Type I 0 5 L min RO water 0 5L min RO Rejection Rate 95 Resistivity of Ultrapure Water 18 2 M cm TOC Ultrapure Water 10 ppb or 5ppb with a dual wavelength UV lamp Particles in Ultrapure Water...

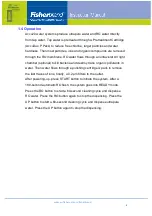
Страница 8: ...amber optional to kill bacteria and destroy trace organic pollutants in water Then water flows through a polishing cartridge U pack to remove the last traces of ions finally a 0 2 m filters to the out...

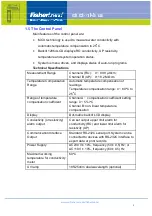
Страница 9: ...ion of readings Temperature compensation range 0 60o C to 25o C Range of temperature compensation coefficient Channel A compensation coefficient setting range 0 5 o C Channel B non linear temperature...

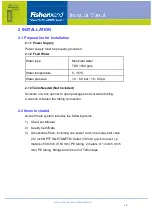
Страница 10: ...en the tubing connection 2 2 Items Included Accu20 main system includes the following items 1 One User Manual 2 Quality Certificate 3 Accessories Pack including one power cord one 3 way ball valve 1 2...

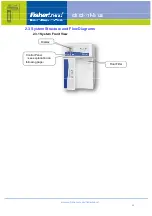
Страница 11: ...www eu fishersci com fisherbrand 11 2 3 System Structure and Flow Diagrams 2 3 1 System Front View Display Control Panel see explanation on following page Final Filter...

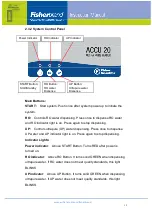
Страница 12: ...dicator light is on Press again to stop dispensing Indicator Lights Power indicator Above START Button Turns RED after power is turned on RO indicator Above RO Button It turns solid GREEN when dispens...

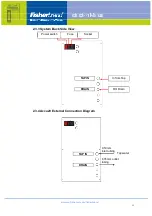
Страница 13: ...ci com fisherbrand 13 2 3 3 System Back Side View 2 3 4 Accu20 External Connection Diagram In from Tap RO Drain TAP IN DRAIN 9 53mm inlet tubing Tap water 6 35mm outlet tubing DRAIN TAP IN Power switc...

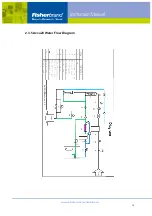
Страница 14: ...www eu fishersci com fisherbrand 14 2 3 5 Accu20 Water Flow Diagram...

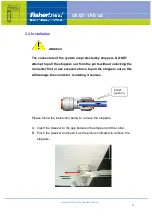
Страница 15: ...ports without unlocking the connector first or use excessive force to pull the stoppers out as this will damage the connector rendering it useless Please follow the instruction below to remove the sto...

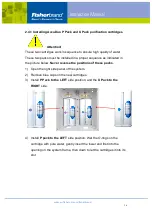
Страница 16: ...dicated in the picture below Never reverse the positions of these packs 1 Open the right side panel of the system 2 Remove blue caps on the new cartridges 3 Install P Pack to the LEFT side position an...

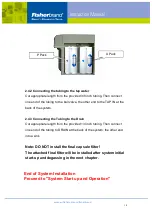
Страница 17: ...Lock the cartridge with the lock key to the notch on the look pin 7 Install the U Pack cartridge to the RIGHT side of the P Pack in the same procedure as that for P Pack Insert the lock key into the n...

Страница 18: ...system 2 4 3 Connecting the Tubing to the Drain Cut appropriate length from the provided 1 4 inch tubing Then connect one end of the tubing to DRAIN at the back of the system the other end into a sin...

Страница 19: ...tap water meets minimal requirements Check List Results Water quality Municipal water TDS 500 ppm Water temperature 5 45o C Pressure 1 0 6 0 bar 15 90 psi If water hardness is greater than 100 ppm Fi...

Страница 20: ...g order Year Month Day then Hours Minutes Second row RO status XX X S cm 25o C RO Water conductivity compensated to 25o C Third row UP status XX X M cm 25o C Ultrapure UP water resistivity compensated...

Страница 21: ...g if set countdown RO Dispense RO water dispense mode time displayed is the preset time of dispensing if set countdown RO SET POINT RO water conductivity is above preset level failure The green light...

Страница 22: ...the upper conductivity limit at the first few seconds of the RO flush This message disappears after RO reaches quality standard and the green light stops blinking If the blinking of RO indicator ligh...

Страница 23: ...em into flush mode then it will go to Ready mode Attention In the following two situations you need to perform the extra 1800 seconds RO cleaning procedure Hold the UP button for 3 seconds to initiate...

Страница 24: ...system begins dispensing water During the cleaning RO indicator light blinks indicating water quality does not meet the preset standard Once the cleaning is completed RO indicator light stops blinking...

Страница 25: ...ogen removal is needed install the device the same way as the final filter 3 2 4 Setting up System Clock System default time is preset If you need to change system time follow the procedure below 1 Pr...

Страница 26: ...ng 2 If you dispense ultrapure water again within 1 minute after the previous dispense the 60 second cleaning cycle will not re initiate UP water is dispensed immediately after pressing the UP button...

Страница 27: ...mp 12 18 months Increase in TOC Final Filter Remove bacteria and particles Change with the U Pack purification cartridge Reduce in flow rate When needed Flow rate is less than 0 5 liter per minute Pre...

Страница 28: ...Power off the system 2 Screw off the final filter and remove the system right side panel 3 Remove the used cartridges by lifting up the lock chip and then pull the cartridges out 4 Remove blue caps on...

Страница 29: ...0 L UP water 10 15 minutes until the UP indicator light stops blinking and no bubbles come out of the spout Water resistivity should reach 18 2 M cm by then 8 Press the UP button again to stop dispens...

Страница 30: ...This system equipped with a lamp cover to prevent UV light leakage This cover must be on ALL TIME when a UV lamp is installed Caution Keep the UV lamp straight in and out of the stainless steel chamb...

Страница 31: ...n contact with the quartz glass of the UV lamp 6 Carefully insert the new UV lamp into its chamber When about 2 3 of the lamp is inserted hold the UV lamp and connect it to the ballast cable connector...

Страница 32: ...lush eyes with a large amount of water If you still feel uncomfortable please seek medical attention Caution RO reverse osmosis membrane should be replaced by a fully trained professional technician 1...

Страница 33: ...labels RO IN RO OUT and RO DRAIN on the new membrane housing 6 Install the assembled RO membrane onto the support rack 7 Power up the system then press the START button 8 Check system leakage If there...

Страница 34: ...icated in the picture below 1 Unplug the power cord from the system 2 Put the head of a small head screw driver in the notch 3 Use the back wall of the power cord receptacle as the point of support to...

Страница 35: ...ged Replace AccuDuo P Pack Reverse osmosis RO membrane clogged Replace RO membrane Final filter clogged Replace final filter UP Resistivity dropped at dispensing AccuDuo U Pack cartridge is exhausted...

Страница 36: ...e Each 15489729 Ultrapurification Cartridge AccuDuo U Pack cartridge Each 15499729 Ultrapurification Cartridge and final filter AccuDuo U Pack cartridge with a 0 2 m final capsule filter Set 15409739...

Страница 37: ...0V 50 Hz Main control board 110V 60 Hz RO Booster Pump UP circulation pump Resistivity Sensor Conductivity Sensor Low Pressure switch Pressure Gauge Pressure relief pump Commonly Used Connector Packag...

Страница 38: ...has passed the ISO9001 2008 quality management system Water System Limited Warranty Thermo Fisher Scientific warrants the water system against defects due to materials and workmanship when used in com...

Страница 39: ......
Отзывы: