background image

Lit. No. 49591, Rev. 05 

July 15, 2020

27775, 28069, 57000, 57000‑1, 57000‑3

FIRE AND EXPLOSION

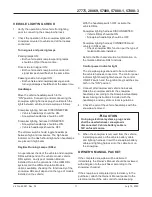
Be careful when using gasoline. Do not use gasoline 

to clean parts. Store only in approved containers away 

from sources of heat or flame.

CELL PHONES

A driver's first responsibility is the safe operation of 

the vehicle. The most important thing you can do 

to prevent a crash is to avoid distractions and pay 

attention to the road. Wait until it is safe to operate 

Mobile Communication Equipment such as cell 

phones, text messaging devices, pagers, or two‑way 

radios.

VENTILATION

BATTERY SAFETY

1/4-20

109

154

1/4-28

121

171

5/16-18

150

212

5/16-24

170

240

3/8-16

269

376

3/8-24

297

420

7/16-14

429

606

7/16-20

9/16-12
9/16-18

5/8-11
5/8-18
3/4-10
3/4-16

7/8-9

7/8-14

474

669

644

909

1-8

1-12

704

995

1/2-13

1/2-20

11.9
13.7

24.6

27.3

43.6

26.9
53.3

93

148

49.4
69.8

77.9

106.4
120.0

8.4
9.7

17.4

19.2
30.8
35.0
49.4
55.2
75.3
85.0

M6 x 1.00

M12 x 1.75

M8 x 1.25

M14 x 2.00

M10 x 1.50

M27 x 3.00

M22 x 2.50

M30 x 3.50

M24 x 3.00

M20 x 2.50

11.1

19.5
38.5

67

107

7.7

613

778

1139

1545

450

428
562
796

1117

M33 x 3.50
M36 x 4.00

2101
2701

1468
1952

325

M16 x 2.00

231

167

M18 x 2.50

318

222

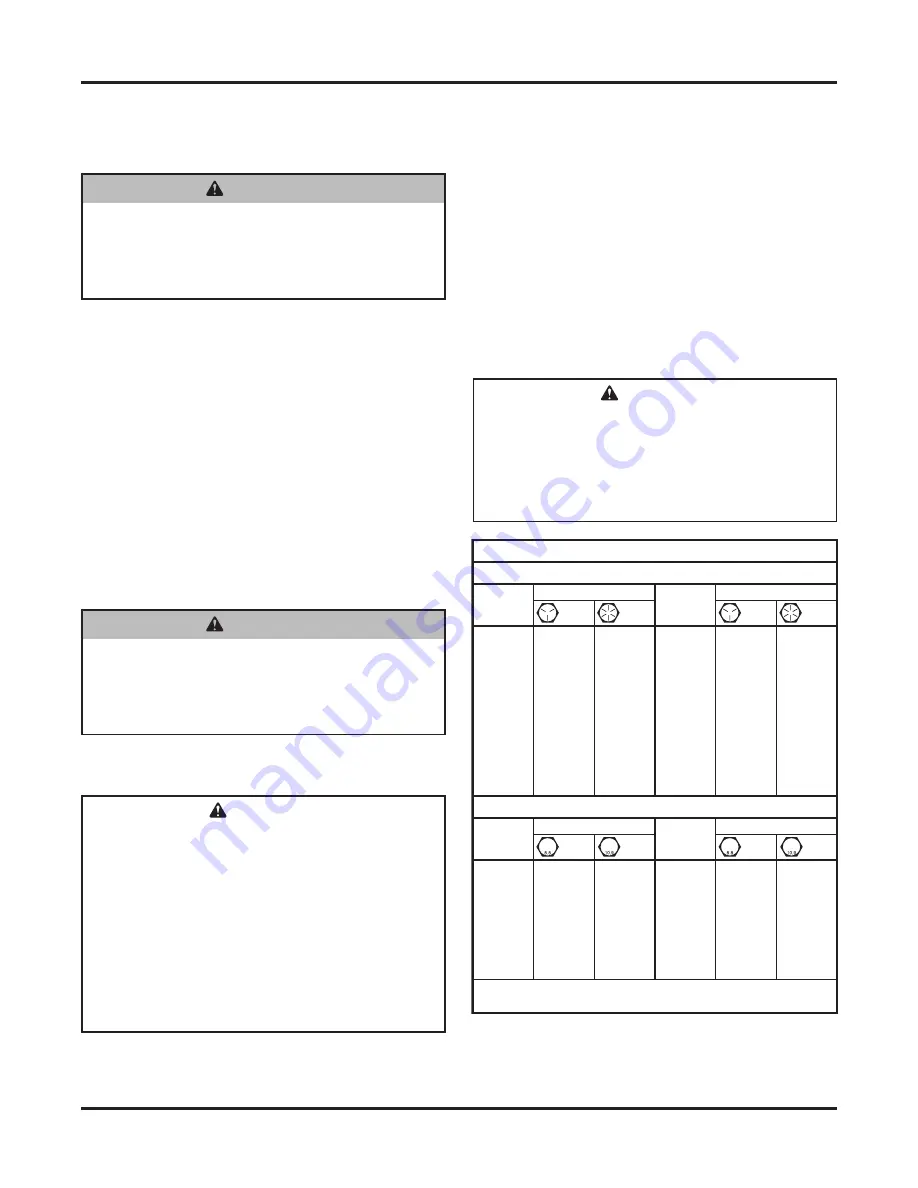
Recommended Fastener Torque Chart

Size

Size

Torque (ft-lb)

Grade

5

Grade

8

Metric Fasteners Class 8.8 and 10.9

These torque values apply to fasteners

except those noted in the instructions.

Torque (ft-lb)

Grade

5

Grade

8

Size

Size

Torque (ft-lb)

Class

8.8

Class

10.9

Torque (ft-lb)

Class

8.8

Class

10.9

Inch Fasteners Grade 5 and Grade 8

 CAUTION

Batteries normally produce explosive gases, 

which can cause personal injury. Therefore, 

do not allow flames, sparks, or lit tobacco 

to come near the battery. When charging or 

working near a battery, always cover your 

face and protect your eyes, and also provide 

ventilation.

•  Batteries contain sulfuric acid, which burns 

skin, eyes, and clothing.

•  Disconnect the battery before removing or 

replacing any electrical components.

 CAUTION

Read instructions before assembling. 

Fasteners should be finger tight until 

instructed to tighten according to the torque 

chart. Use standard methods and practices 

when attaching snowplow, including proper 

personal protective safety equipment.

 WARNING

Vehicle exhaust contains lethal fumes. 

Breathing these fumes, even in low 

concentrations, can cause death. Never 

operate a vehicle in an enclosed area without 

venting exhaust to the outside.

 WARNING

Gasoline is highly flammable and gasoline 

vapor is explosive. Never smoke while 

working on vehicle. Keep all open flames 

away from gasoline tank and lines. Wipe up 

any spilled gasoline immediately.

NOISE

Airborne noise emission during use is below 70 dB(A) 

for the snowplow operator.

VIBRATION

Operating snowplow vibration does not exceed 

2.5 m/s

2

 to the hand‑arm or 0.5 m/s

2

 to the whole 

body.

TORQUE CHART

Содержание 27775

Страница 1: ...ific vehicle application recommendations before installation The eMatch selection system has specific vehicle and snowplow requirements SD Series Snowplows Installation Instructions Fisher Engineering...

Страница 2: ...dous situation that if not avoided may result in minor or moderate injury It may also be used to alert against unsafe practices WARNING CAUTION AND INSTRUCTION LABELS Become familiar with and inform u...

Страница 3: ...ARNING Hydraulic fluid under pressure can cause skin injection injury If you are injured by hydraulic fluid get medical attention immediately SAFETY PRECAUTIONS Improper installation and operation cou...

Страница 4: ...orque values apply to fasteners except those noted in the instructions Torque ft lb Grade 5 Grade 8 Size Size Torque ft lb Class 8 8 Class 10 9 Torque ft lb Class 8 8 Class 10 9 Inch Fasteners Grade 5...

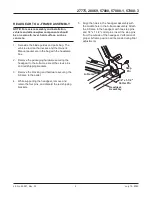
Страница 5: ...ring the headgear to the A frame except the clevis pins and red shipping brackets 3 Remove the blocking and hardware securing the A frame to the pallet 4 While supporting the headgear remove and retai...

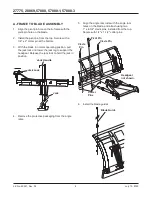
Страница 6: ...BLY 1 Align the pivot pin hole on the A frame with the pivot pin hole on the blade 2 Install the pivot pin from the top Secure with a 1 4 x 2 cotter pin at the bottom 3 With the blade in normal operat...

Страница 7: ...filled and fully tested 1 Attach the snowplow to the vehicle according to the instructions on the headgear 2 Remove the cover of the hydraulic unit 3 Remove and discard the factory installed pipe plu...

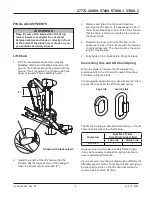
Страница 8: ...rubber washer must be installed under the slotted holes Hand tighten fasteners 4 Connect the headlamp wires to the headlamps 5 Aim the headlamps according to the Snowplow Headlamp Beam Aiming Instruct...

Страница 9: ...length as the chain on the driver s side 4 Reattach the loose end of the lift chain to the passenger s side of the A frame with the retained U bolt and locknuts The chain must be the same length on bo...

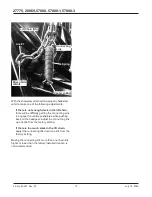
Страница 10: ...ecting pins to engage the vehicle pushplates while pushing back on the headgear Adjust the connecting link up one link from the factory setting If there is too much slack in the lift chain adjust the...

Страница 11: ...ctionality of the snowplow DRLs will depend on the type of module installed on the vehicle With the headlamp switch OFF activate the vehicle DRLs Snowplow lighting harness DISCONNECTED Vehicle DRLs sh...

Страница 12: ...rations or specifications used Fisher Engineering or the vehicle manufacturer may require or recommend optional equipment for snow removal Do not exceed vehicle ratings with a snowplow Fisher Engineer...

Отзывы: