840653
23
5.1.1
Lock
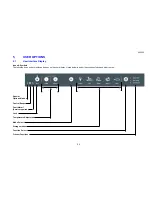
The Lock mode disables the control panel so that the storage environment cannot accidentally be changed.
The display will automatically lock after 15 seconds of the display not being used or whenever the drawer is
closed. The red lock icon will appear above the Lock button when the panel is locked.
To use the Lock mode:
•
Press the
LOCK
button for 1 second to lock or 3 seconds to unlock the control panel.
5.1.2
Mode Select
The CoolDrawer has five operating modes: deep freeze, chiller, fridge, pantry and wine cooler. To change
the storage mode:
•
Open the drawer.
•
Press the
LOCK
button for 3 seconds to unlock the control panel.
•
Within 15 seconds, press the
MODE SELECT
button to scroll to the required storage mode.
Note:
The icon for the selected storage mode will flash until the compartment is at a suitable temperature for
food to be added into the compartment (this will take between 1 and 6 hours). All cabinets leave the factory
set to the Freezer mode by default.
5.1.3
Temperature Adjustment
Used to increase or decrease the temperature range within each mode selected.
5.1.4
Special Options Mode
To Enter Special Options Mode:
•
Open the drawer.
•
Press the
LOCK
button for 3 seconds to unlock the control panel.
•
Within 15 seconds, press and hold the
LOCK
button, then within 1 second press the
MODE
SELECT
button and hold for 3 seconds until the Special Options mode icon is displayed.
When the appliance is in Special Options mode:
•
The light will not operate when the drawer is opened.
•
The door alarm will not operate.
•
The display will not be illuminated except for the Special Options icon.
•
Opening the drawer will not affect the compressor or fans.
•
If the power to the appliance is turned off whilst in this mode, the appliance will continue in Special
Options mode when the power is restored.
Special Options mode will automatically de-activate 80 hours after activation.
Содержание RB36S25MKIW
Страница 1: ...840653 Service Manual CoolDrawer Models RB36S25MKIW RB90S64MKIW ...
Страница 12: ...840653 12 3 4 Integrated Panel Preparation ...
Страница 14: ...840653 14 3 5 Create Cut Outs In Frame 3 6 Locate And Secure Install Brackets ...
Страница 15: ...840653 15 3 7 Attach Inlet And Outlet Vent Ducts 3 8 Attach Power Cord And Trim Brackets ...
Страница 16: ...840653 16 3 9 Move Product Into Cavity 3 10 Fit Drawer Panel Attachment Hooks ...
Страница 17: ...840653 17 3 11 Attach Drawer Panel To Front Of Drawer ...
Страница 18: ...840653 18 3 12 Secure Trim Brackets To Cabinetry 3 13 Attach Trims To Sides Of Cabinetry ...
Страница 19: ...840653 19 3 14 Attach False Panel 3 15 Check Operation ...
Страница 53: ...840653 53 11 WIRING DIAGRAMS Ω Ω Ω Ω Ω Ω Ω Ω Ω Ω ...
Страница 54: ...840653 54 ...
Страница 77: ...840653 77 ...


