EN
3
Ferm
ElEcTric sOldEring sET
The numbers in the text refer to the diagrams
on page 2.
For your own safety and that of others,
we recommend that you read this
instruction manual carefully before
using this saw. Keep this instruction
manual and the documentation
provided with the saw for future
reference.
introduction
This appliance is designed for domestic use. This
soldering gun is suitable for soldering on printed
circuit boards, soldering of plastic and for burning
work on wood and leather. All other applications
are specifically excluded.
contents
1. Machine information
2. Safety instructions
3. Operating
4. Working indications
5. Service & maintenance
1. Machine information
Technical specifications
Voltage
230 V~
Frequency
50 Hz
Power consumption: soldering gun
100 W
Power consumption: soldering iron
30 W
Intermittent service
12 s / 48 s
Type of protection
II
Weight
0.6 kg
contents of packing
1 Soldering gun with tip
1 Soldering iron
1 Soldering help with magnifying glass
1 Solder suction tool
1 Stand for soldering iron
1 Roll of solder
1 Soldering paste
1 Terminal pin
1 Spare tip
1 Operating instructions
Check all parts for shipping damage. Should you
detect any damage, or should any parts be
missing, please notify the dealer from whom the
machine was bought.
Product information
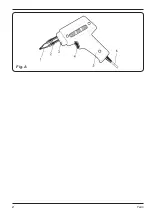
Fig. A
1.
Tip
2. Fixing screw
3. Status indicator
4. Switch
5. Handle
6. Power supply lead.
2. Safety instructions
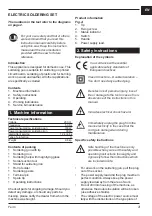
Explanation of the symbols
In accordance with essential
applicable safety standards of
European directives
Class II machine – Double insulation –
You don’t need any earthed plug.
Denotes risk of personal injury, loss of
life or damage to the tool in case of non-
observance of the instructions in this
manual.
Indicates electrical shock hazard.
Immediately unplug the plug from the
mains electricity in the case that the
cord gets damaged and during
maintenance
Specific safety instructions
Safe handling of the machine is only
possible when you read the safety and
operating instructions thoroughly and
rigorously follow the instructions which
are included inside.
• For all work on the soldering gun, pull the plug
out of the socket.
• The power supply lead and the plug must be in
perfect condition. Always keep the power
supply lead away from the area of work.
• Do not drill into housing of the machine, as
otherwise the double insulation will be broken
(use adhesive shields).
• The voltage of the electric power source must
tally with the instructions on the type plate of
Содержание SGM1001
Страница 2: ...2 Ferm Fig A...
Страница 67: ...RU 67 Ferm 2 1 2 3 4 5 1 230 50 100 30 12 48 II 0 6 1 1 1 1 1 1 1 1 1 1 1 2 3 4 5 6 2 o o o o o o II...
Страница 68: ...RU 68 Ferm EN60335 1 1 5 2 3 4 3 4 12 48...
Страница 69: ...RU 69 Ferm 10 1 2 4 60 40...
Страница 70: ...RU 70 Ferm 60 40 5 H...
Страница 71: ...UA 71 Ferm 2 1 2 3 4 5 1 230 50 100 30 12 48 0 6 1 1 1 1 1 1 1 1...
Страница 72: ...UA 72 Ferm 1 1 1 2 3 4 5 6 2 EN60335 1...
Страница 73: ...UA 73 Ferm 1 5 2 3 4 3 4 12 48 10 1 2...
Страница 74: ...UA 74 Ferm 4 60 40 60 40 5...
Страница 75: ...EL 75 Ferm Ferm ET KO HTH IO 2 1 2 3 4 E 5 1 T 230 V 50 Hz 100 W 30 W 12s 48s II 0 6 kg 1 1 1 1 1 1 1 1 1 1...
Страница 76: ...EL 76 Ferm A 1 2 3 4 5 6 2 CE II H H N 60335 1...
Страница 77: ...EL 77 Ferm 1 5 mm2 3 A 4 3 4 12 48 10...
Страница 78: ...EL 78 Ferm 2 4 E 60 40 60 40 5...
Страница 79: ...EL 79 Ferm o...
Страница 80: ...80 Ferm...
Страница 81: ...81 Ferm...
Страница 82: ...82 Ferm...
Страница 84: ...www ferm com 1311 04 2013 Ferm B V...


