


16
en
➤
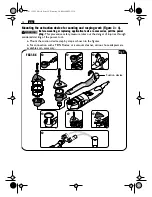
Loosen the clamping lever and swivel
it to the stop.
➤
Pull out the fastening element.
➤
Clean the tool holder, the application
tool and the fastening element.
➤
Place the application tool exactly onto
the star-shaped tool holder. Pay atten-
tion that the application tool has a flush
fit.
➤
Insert the fastening element to the
stop into the tool holder.
➤
Swivel the clamping lever back until it
engages.
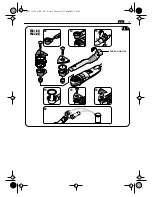
Clamp cutting blades for the vehicles sector as shown in (Figure. 8).
Before mounting or replacing
application tools or accesso-
ries, pull the power plug.
This preventive
safety measure rules out the danger of injuries
through accidental starting of the power tool.
For all work or when changing
application tools, always wear
protective gloves.
Danger of injury from the
sharp edges of the application tools. Applica-
tion tools can become very hot while work-
ing. Danger of burns!
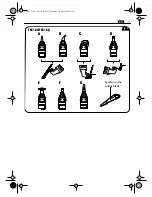
The cutting blades marked with a symbol
(Fig. 8) may only be operated as indicated.
A Cutting blade, straight and curved.
B Cutting blade, bent at right angles.
C Cutting blade, U-form.
D Cutting blade, L-form.
E Scraping knife.
F Scraping knife.
G Cutting blade with stop roller.
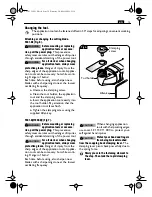
The cutting blades marked with a symbol
(Fig. 8) may only be operated as indicated.
Guide the straight, bent or off-set cutting
blades at a right-angle to the window flange.
For U-form cutting blades, pay attention that
the ridge of the cutting blade is guided parallel
to the vehicle window.
The scraper knife is used for cutting back
bond remainders on the window flange or
the pane. Before re-bonding the vehicle win-
dow, cut back the remaining bead to a height
of approx. 2 mm.
180
°
Fig. 7
Fastening
element
Tool holder
Clamping
lever
Cover
WARNING
CAUTION
3 41 01 120 21 0.book Seite 16 Dienstag, 26. Mai 2009 2:21 14


