


MP3020
INSTALLATION MANUAL - EN
Edition 1.0 May 2021
Pag. 8 di 12
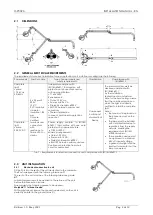
N.
Screw (without locking) the nuts (12)
and the remaining
washers (11) on the screws (8) of the
ceiling flange (1)
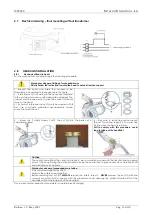
O.
Unscrew the three screws (19) of the column (14) and remove the bushing
(20)
P.
Insert the bushing (20) on the lamp pin (21)
Q.
Insert in the pin (21) groove the key switch (22)
Warnings for suspended masses
SAFETY COMPONENT:
# 22
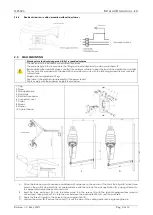
R.
Slip - from the top - inside the column (14) a traction cord.
S.
Connect the lamp conductor to the traction cord.
T.
Fit the lamp on the column (14) and fix it with the three screws (19); make sure
the bores of the bushing (20) match the screws seat on the column (14) and tighten.
Simultaneously pull the traction cord to push out the conductor of the lamp
from the column fixing flange (7) of about 200 mm.
U.
Connect the lamp conductor to the terminal board (6) (see electrical diagrams).
V.
Check the perpendicularity of the column by acting on the nuts (9).
W.
Tighten the nuts (12) and washers (11) to fix the flange (7), making it independent
of the fixing rail (23).
X.
Adhere the ceiling light (16) to the ceiling, pushing it against the ring (15).
2.4.3
Electrical drawing – ceiling mounting with transformer
Warnings for suspended masses
SAFETY COMPONENT:
# 19 (3 PCS)
Содержание MP3020
Страница 1: ......


