background image

RESTRICTED USE ONLY


Fargo Electronics, Inc.


Persona C30e Card Printer User Guide (Rev. 1.1) 

6-4

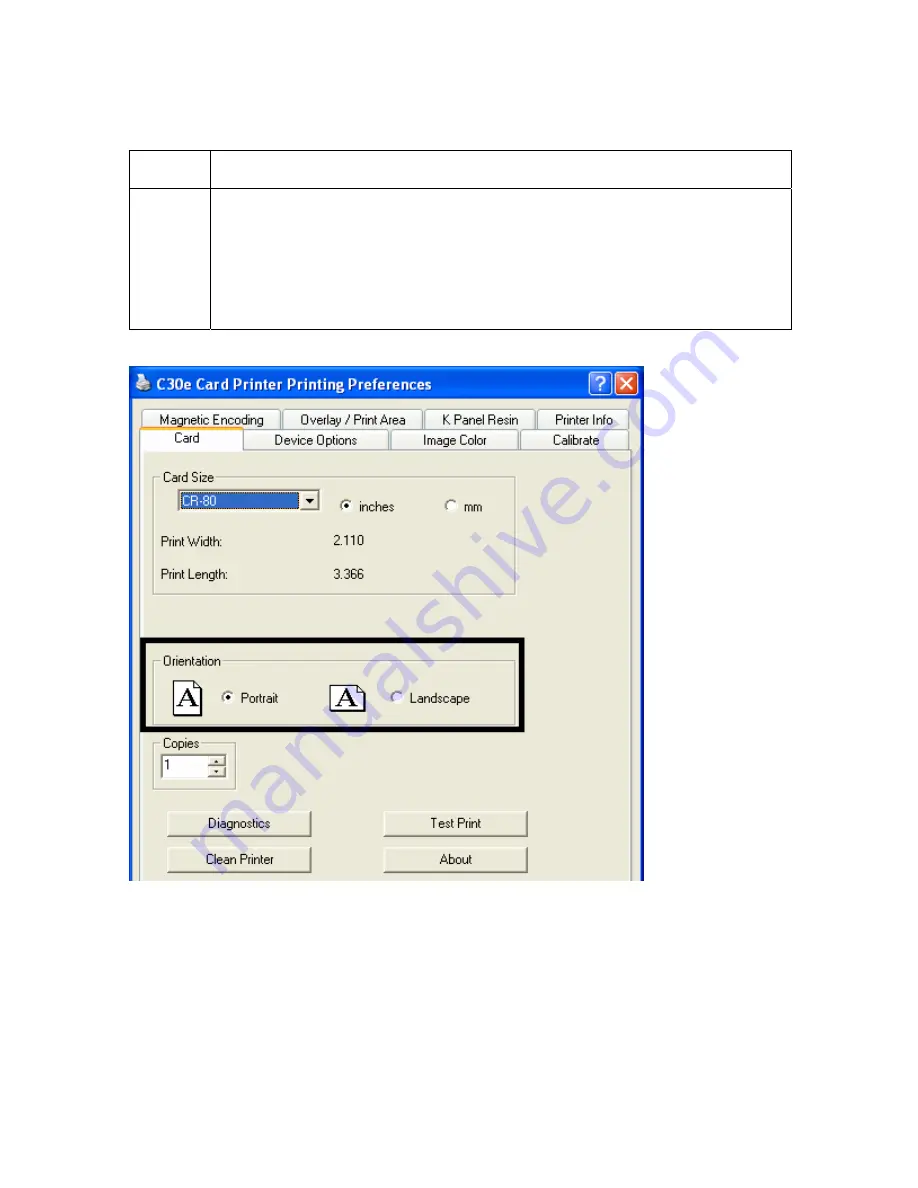
Adjusting the Orientation Option 

Step Description 

1 Select 

Portrait

 to cause the card to print in a vertical orientation. 

OR 

Select 

Landscape

 to cause the card to print in a horizontal orientation.  

(

Note:

  An icon illustrating a printed card helps represent the difference 

between the two.)   


Содержание Persona C30e

Страница 1: ...Persona C30e Card Printer User Guide Rev 1 1 Single side Model Dual side Model Single side plus Mag Model Dual side plus Mag Model Part Number L001173 user guide...

Страница 2: ...irements guidelines and models for our technical training and user documentation At all times the Copyright Protection Notice for each document was adhered to within our Fargo documentation process Th...

Страница 3: ...Unpacking and Inspection __________________________________________________________ 3 2 Reviewing the Printer front view ____________________________________________________ 3 2 Reviewing the Printer...

Страница 4: ..._____________5 1 Technical Specification Ethernet Option ________________________________________________ 5 1 Functional Specification Ethernet Option________________________________________________ 5...

Страница 5: ..._______ 6 36 Using the Settings button __________________________________________________________ 6 38 Using the Magnetic Encoding tab _______________________________________________6 39 Using the Enc...

Страница 6: ...__________________________________ 6 109 Adjusting the Lo Co Voltage Offset_________________________________________________ 6 110 Using the Mag Top of Form Option_____________________________________...

Страница 7: ...1 Serial Number 80453289____________________________________ 10 2 Reviewing Example No 2 Serial Number A1280224 ___________________________________ 10 2 Section 11 Glossary of Terms _________________...

Страница 8: ...You can use the automated Table of Contents to quickly locate for example an error message a procedure the index or an appendix Troubleshooting Replacement Removal Diagnostic and Navigation Procedures...

Страница 9: ...It may be damaged if exposed to static electricity discharges Information that raises potential electrostatic safety issues is indicated by a warning symbol as shown to the left To prevent equipment...

Страница 10: ...Parts 1 Card Feed 6 Card Feed 13 Card Input Roller 2 Print Stepper 7 Ribbon Sensor 14 Cleaning Roller 3 Ribbon Drive 8 Ribbon Encoder 15 Card Feed Roller 4 Print Headlift 9 Headlift Sensor 16 Printhe...

Страница 11: ...formation is received from the PC 2 Printer checks the installed Ribbon type stored in memory against the Ribbon type command that was sent from the Printer If Ribbon type does not match the Pause but...

Страница 12: ...Card Feed Sensor detects trailing edge of card 12 The Print Stepper Motor queues card to the middle of the platen Roller All Stop 13 The Print Headlift Motor engages 14 The Print Headlift Sensor detec...

Страница 13: ...nued Step Process 26 After Ribbon advances a few encoder clicks assume Ribbon free of card All Stop 27 Repeat steps 9 through 22 for the appropriate number of color overlay panels 28 The Card is eject...

Страница 14: ...Sequence Step Process 1 On Power up the Printer checks the current state of the Card Feed Sensor and the Headlift Sensor 2 If the Headlift Sensor is found to be open the Headlift Motor will turn unti...

Страница 15: ...les for a Class B digital device Note These requirements are designed to provide reasonable protection against harmful interference in a residential installation If equipment operation in a residentia...

Страница 16: ...6mmL x 54mmW CR 79 3 295 L x 2 043 W 83 7mmL x 51 9mmW Accepted Card Thickness 9 mil to 40 mil 009 23mm to 040 1 02mm Accepted Card Types PVC polyester cards with polished PVC finish or Re Writable c...

Страница 17: ...it Windows 2000 XP 2003 Print Method Dye Sublimation Resin Thermal Transfer Resin Thermal Transfer Print Speed Print Speeds 7 seconds per card 514 cards per hour K 12 seconds per card 300 cards per ho...

Страница 18: ...upply Frequency 50 Hz 60 Hz System Requirements x86 based PC or compatible Windows 2000 Windows XP Windows 2003 500MHz computer with 256MB of RAM or higher 500MB free hard disk space or higher Weight...

Страница 19: ...bon passes beneath the Printhead hundreds of thermal elements within the Printhead heat the dyes on the Ribbon When these dyes are heated they diffuse into the surface of the card A separate pass is m...

Страница 20: ...serves to cancel the current print job and reset the Printer for the next print job If a card is left within the Printer after a print job is canceled it will automatically be ejected when the Printer...

Страница 21: ...rmal transfer print methods each provide their own unique benefits print Ribbons are available in resin only dye sublimation only and combination dye sublimation resin versions To make it easier to re...

Страница 22: ...applications Resin black bar codes are readable by both infrared and visible light bar codes scanners Premium Resin Black K provides 1 000 prints This Ribbon provides maximum resin durability ideal f...

Страница 23: ...o poor print quality and will greatly reduce the life of the Printhead 2 Always store the card stock in its original packaging or in a clean dust free container 3 Do not print onto cards that have bee...

Страница 24: ...sin black panel A clear overlay panel O is also included on most Ribbons to protect the dye sublimation images Dye Sublimation images must have an overlay panel applied to them or they will quickly be...

Страница 25: ...for the Printer to achieve consistent color coverage Certain types of Proximity cards have an uneven surface that will inhibit consistent color transfer Certain types of smart card chips are raised sl...

Страница 26: ...ide and backside of each card Display Flipper Table Module Assembly Here are references within this document See the Print Both Sides option in the Using the Device Options tab C30e section See the Fr...

Страница 27: ...Printer Setup and Installation Printer Setup and Installation Choosing A Good Location Follow these guidelines Place the unit in a location with adequate air circulation to prevent internal heat build...

Страница 28: ...re that no damage has occurred during shipping Make sure that all supplied accessories are included with your unit Check that the following items are included Power Supply US EU Power Cable Software I...

Страница 29: ...RESTRICTED USE ONLY Fargo Electronics Inc Persona C30e Card Printer User Guide Rev 1 1 3 3 Reviewing the Printer front view Cartridge being installed...

Страница 30: ...connect the Printer s USB cable until prompted during the Printer Driver installation Step Procedure 1 Plug the AC adapter power cable into the back of the Printer See Display A 2 Plug the wall power...

Страница 31: ...talling the Print Ribbon Cartridge The Fargo Persona C30e Card Printer uses a one piece disposable Ribbon Cartridge load system Step Procedure 1 To install the Ribbon Cartridge simply open the front C...

Страница 32: ...er right arrow of display b Remove the Ribbon securing tape as shown in Display A middle right arrow of display 3 Slide the Ribbon Cartridge into the Printer as shown in this section 4 Raise the front...

Страница 33: ...TRICTED USE ONLY Fargo Electronics Inc Persona C30e Card Printer User Guide Rev 1 1 3 7 Installing the Print Ribbon Cartridge continued Display B Shows direction that Cartridge is inserted in the Prin...

Страница 34: ...ide down and if applicable the magnetic strip up and towards the front of the Printer To print using Batch Mode follow the instructions below Step Procedure 1 Open the Card Hopper Cover 2 Press the Ca...

Страница 35: ...ics Inc Persona C30e Card Printer User Guide Rev 1 1 3 9 Installing Blank Cards into the Card Hopper continued Display B Press the Card Hopper Load Lever down Insert the cards Here the Lever is still...

Страница 36: ...D USE ONLY Fargo Electronics Inc Persona C30e Card Printer User Guide Rev 1 1 3 10 Installing Blank Cards into the Card Hopper continued Here are the cards ready to insert Here the Input Hopper Door i...

Страница 37: ...ona C30e Card Printer User Guide Rev 1 1 3 11 Lowering the Card Output Hopper Step Procedure 1 The Fargo Persona C30e comes with a Card Output Hopper to hold cards after they have been printed Pull th...

Страница 38: ...econds the CD s installer program will automatically open Follow the CD s on screen Procedures to complete installation Note If the CD does not automatically open use My Computer or Windows Explorer t...

Страница 39: ...RICTED USE ONLY Fargo Electronics Inc Persona C30e Card Printer User Guide Rev 1 1 3 13 Installing the Printer Driver continued Step Procedure 3 Click on the Next button to continue with the Setup pro...

Страница 40: ...Electronics Inc Persona C30e Card Printer User Guide Rev 1 1 3 14 Installing the Printer Driver continued Step Procedure 4 Read the License Agreement Select the I accept the license agreement option a...

Страница 41: ...ver continued Step Procedure 5 Select Local Connection USB if the printer is equipped with a USB port and click Next to continue with the installation OR Select Network Connection Ethernet if the prin...

Страница 42: ...RESTRICTED USE ONLY Fargo Electronics Inc Persona C30e Card Printer User Guide Rev 1 1 3 16 Installing the Printer Driver continued Step Procedure 6 Click Next to begin the installation...

Страница 43: ...ONLY Fargo Electronics Inc Persona C30e Card Printer User Guide Rev 1 1 3 17 Installing the Printer Driver continued Step Procedure 7 Wait while the C30e Card Printer is configuring your new software...

Страница 44: ...ser Guide Rev 1 1 3 18 Installing the Printer Driver continued Step Procedure 8 This step only applies to local connection installation USB a Connect the USB cable to the Printer b Turn ON the Printer...

Страница 45: ...RESTRICTED USE ONLY Fargo Electronics Inc Persona C30e Card Printer User Guide Rev 1 1 3 19 Installing the Printer Driver continued Step Procedure 9 Select the installed Ribbon Type...

Страница 46: ...RESTRICTED USE ONLY Fargo Electronics Inc Persona C30e Card Printer User Guide Rev 1 1 3 20 Installing the Printer Driver continued Step Procedure 10 Click on the Finish button to complete the Setup...

Страница 47: ...rsona C30e Card Printer User Guide Rev 1 1 3 21 Installing the Printer Driver continued Step Procedure 11 Click the Exit button to exit the installer as shown below OR Click on Install the Fargo Workb...

Страница 48: ...er the Printers window c Select Printing Preferences under the Printer drop down menu This will bring up the Persona C30e Printing Preferences window 2 a Select the Card tab and then click on the Test...

Страница 49: ...USE ONLY Fargo Electronics Inc Persona C30e Card Printer User Guide Rev 1 1 3 23 Printing a Test Print Image continued Step Procedure 3 This completes the Persona C30e Card Printer Encoder Installatio...

Страница 50: ...User Guide Rev 1 1 3 24 Printer Transport Moving the Printer to another location Step Procedure 1 The Printer can be transported by gripping it under the back lid as shown in the photo below 2 You ha...

Страница 51: ...y make sure only qualified personnel perform these procedures Caution This device is electrostatically sensitive It may be damaged if exposed to static electricity discharges Information that raises p...

Страница 52: ...installation of the Printer Driver a Close the software program and check the Printer Driver b Reboot the computer c Ensure the Printer Driver is installed correctly Note Especially if an obsolete Dr...

Страница 53: ...d select the Persona C30e Card Printer 3 Click OK and reset all four margins to zero Note The WordPad will automatically replace the values with its minimum margins 4 Open the program and type This is...

Страница 54: ...es are in use in the Printer Resolving a Card Not Fed Error Cards will not feed off the Hopper Step Procedure 1 Review the following information Symptom Cards will not feed at all Printer Error State...

Страница 55: ...o Step 3 3 Press the Cancel Print button on the Driver Monitor Error Display Message 4 Reboot the Printer by cycling the power 5 Check the Card Feed Motor a Remove all cards from the Hopper b Press th...

Страница 56: ...le is securely connected to J 20 on the Printers Main Board c Ensure that the Card Hopper Feed Motor power cable is securely connected to the Card Hopper Feed Motor d Use the Fargo Workbench Printer U...

Страница 57: ...authorized supplies are in use in the Printer Step Procedure 1 Review the following information Symptoms Two or more cards feed at the same time causing the cards to jam at the Card Hopper Roller Pri...

Страница 58: ...the Hopper with the print side down e Close the Card Hopper Cover to release the Card Tray f Press on the Resume button g If the cards do not feed continue to Step 3 3 Press the Cancel Print button on...

Страница 59: ...All Troubleshooting procedures assume that only factory authorized supplies are in use in the Printer Step Procedure 1 Review the following information Symptom Printer RFID Sensor does not detect a re...

Страница 60: ...0 Resolving a Ribbon RFID Error Ribbon RFID Antenna is Corrupted continued Step Procedure 2 Replace the Print Ribbon a Replace the Print Ribbon Cartridge b Press on the Resume button c If the error co...

Страница 61: ...n use in the Printer Step Procedure 1 Review the following information Symptom Printer RFID Sensor does not detect a recognizable signal from the Ribbon Printer Error State The Ribbon tag information...

Страница 62: ...ror All Troubleshooting procedures assume that only factory authorized supplies are in use in the Printer Step Procedure 1 Review the following information Symptom The Printer is unable to verify enco...

Страница 63: ...plugging the Printer and reapplying power b Remove the failed card c Use a Magnetic Stripe reader or magnetic developer spray to determine if data is being written to the Magnetic Stripe d If data is...

Страница 64: ...RESTRICTED USE ONLY Fargo Electronics Inc Persona C30e Card Printer User Guide Rev 1 1 4 14 Resolving the Mag Verify Error continued...

Страница 65: ...ing procedures assume that only factory authorized supplies are in use in the Printer Step Procedure 1 Review the following information Symptom There is not a Magnetic Encoder installed Printer Error...

Страница 66: ...etic Encoder installed a Open the front cover b Verify that the Printer has a Magnetic Module installed Note If the Printer is equipped with a Magnetic Encoder Module ensure that it is seated securely...

Страница 67: ...t only factory authorized supplies are in use in the Printer Note Using the printer in direct sunlight may adversely affect the ribbon sensor integrity Step Procedure 1 Review the following informatio...

Страница 68: ...e take up roll 4 color panels past the damaged area 3 Press on the Resume button If the issue persists continue to Step 4 4 Replace the Ribbon Cartridge a Press on the Resume button b If the issue per...

Страница 69: ...re in use in the Printer Note Using the printer in direct sunlight may adversely affect the ribbon sensor integrity Step Procedure 1 Review the following information Symptom The Print Ribbon has becom...

Страница 70: ...ls past the damaged area a Press on the Resume button b If the issue persists continue to Step 5 5 Use the Fargo Workbench Printer Utility to cycle the Printhead to ensure proper Printhead operation I...

Страница 71: ...zed supplies are in use in the Printer Note Using the printer in direct sunlight may adversely affect the ribbon sensor integrity Step Procedure 1 Review the following information Symptom Printer will...

Страница 72: ...eshooting procedures assume that only factory authorized supplies are in use in the Printer Step Procedure 1 Review the following information Symptom Printer errors out as soon as it receives data fro...

Страница 73: ...talled in the Printer a Press on the Resume button b If the issue persists continue to Step 3 3 Remove the rear cover and check that the Ribbon RFID cable is securely connected to the Main Board J 5 a...

Страница 74: ...oubleshooting procedures assume that only factory authorized supplies are in use in the Printer Step Procedure 1 Review the following information Symptom Printer errors out as soon as it receives data...

Страница 75: ...igned for the correct Printer model 3 Press on the Resume button If the issue persists continue to Step 4 4 Remove the rear cover and check that the Ribbon RFID cable is securely connected to the Main...

Страница 76: ...ng procedures assume that only factory authorized supplies are in use in the Printer Step Procedure 1 Review the following information Symptom Printer errors out as soon as it receives data from the P...

Страница 77: ...Printing Preferences b Click on the Device Option tab c Click on the auto select button d Check that the Ribbon type matches the Ribbon selected 3 Press on the Resume button If the issue persists cont...

Страница 78: ...ing a Card Jam Error All Troubleshooting procedures assume that only factory authorized supplies are in use in the Printer Step Procedure 1 Review the following information Symptom Card is jammed Prin...

Страница 79: ...ion continue to Step 4 3 Clearing a jammed card a If a card is jammed in the Printer use the Cancel button and the Pause button to move the Feed Rollers and free the card b The card can then be fed ou...

Страница 80: ...oubleshooting procedures assume that only factory authorized supplies are in use in the Printer Step Procedure 1 Review the following information Symptom The Printhead continuously cycles or does not...

Страница 81: ...cover c Verify that connection J20 is properly connected to the Main Board d If the Motor does not turn continue to Step 7 6 Test the Headlift Sensor a Remove the back cover b Attach the positive lea...

Страница 82: ...r Monitor Error Display None 2 Check for debris as follows a Open the front cover and check that no debris has accumulated in the Sensor opening Use compressed air to clean the opening as needed b If...

Страница 83: ...State None Driver Monitor Error Display None 2 Run a self test a Clear any card jams b Unplug power from the Printer c While holding down the Pause button reapply power Note A self test card will be...

Страница 84: ...adjusting the Image Placement if a white border appears on the card adjust the image placement back toward its original value in increments of 2 until the white edge is gone i If still having blank c...

Страница 85: ...e is being applied to the Printhead a Remove the back cover b Using a Digital Voltmeter connect the negative lead to ground c Probe Pins 1 to 5 of the Printhead power connection on J16 d Ensure that a...

Страница 86: ...at only factory authorized supplies are in use in the Printer Step Procedure 1 Review the following information Symptom An error message will be displayed when a rewriteable job is submitted to the Pr...

Страница 87: ...le Module problem All Troubleshooting procedures assume that only factory authorized supplies are in use in the Printer Step Procedure 1 Review the following information Symptom The Flipper Table Modu...

Страница 88: ...roubleshooting procedures assume that only factory authorized supplies are in use in the Printer Step Procedure 1 Review the following information Symptom The Flipper Table Module is jamming Printer E...

Страница 89: ...over a Clear any cards in the Flipper Table Module by using the Forward and or Reverse buttons located on the Printer s Top Cover b Ensure that the Flipper Table Module can rotate freely c Close the P...

Страница 90: ...use in the Printer Step Procedure 1 Review the following information Symptom A thin line or scratch travels the entire length of the card See sample image below Printer Error State None Driver Monitor...

Страница 91: ...view the following information Symptom Prints have spots white or colored voids and or dust on them See sample image below Printer Error State None Driver Monitor Error Display None 2 Ensure the cards...

Страница 92: ...zed supplies are in use in the Printer Step Procedure 1 Review the following information Symptom Printed cards are too dark or too light Printer Error State None Driver Monitor Error Display None 2 Ru...

Страница 93: ...rgo Electronics Inc Persona C30e Card Printer User Guide Rev 1 1 4 43 Resolving the Incorrect Image Darkness problems continued Step Procedure 4 Correct the Image Darkness See the Using the Image Dark...

Страница 94: ...in use in the Printer Step Procedure 1 Review the following information Symptom Printed cards have off colored lines or streaks on them Printer Error State None Driver Monitor Error Display None 2 Co...

Страница 95: ...ONLY Fargo Electronics Inc Persona C30e Card Printer User Guide Rev 1 1 4 45 Resolving Ribbon Wrinkle problems continued Step Procedure 4 Reduce the Image Darkness See the Using the Image Darkness Op...

Страница 96: ...es assume that only factory authorized supplies are in use in the Printer Step Procedure 1 Review the following information Symptom Black resin text and barcodes appear smeared or too thick Printer Er...

Страница 97: ...argo Electronics Inc Persona C30e Card Printer User Guide Rev 1 1 4 47 Resolving the Excessive Resin printing problems continued Step Procedure 3 Reduce the Image Darkness See the Using the Image Dark...

Страница 98: ...upplies are in use in the Printer Step Procedure 1 Review the following information Symptom Black resin text and barcodes appear faded or too light Printer Error State None Driver Monitor Error Displa...

Страница 99: ...sed to adjust the position of the card in the Print driver and does not change the internal settings of the Printer See Using the Printer Calibration Utility Persona C30e for instructions on changing...

Страница 100: ...erify if the Image Position option within the Calibrate tab is set correctly or incorrectly a Open the Printer Control Panel from the Computer Right click on the Persona C30e Card Printer and select P...

Страница 101: ...orizontal Image Position Setting is set correctly or incorrectly See the graphic below If the white border is on the leading edge of the card adjust the Horizontal value by 2 If the white border is on...

Страница 102: ...Position Setting is set correctly or incorrectly See the graphic below a Adjust the value as described below If the white border is on the top edge of the card adjust the Vertical value by 2 If the w...

Страница 103: ...Symptom Photos on the cards look pixilated or grainy as shown below Printer Error State None Driver Monitor Error Display None 2 Use high resolution 24 bit color images to always capture an image at...

Страница 104: ...s installed and that cards are properly loaded Caution If the power is ON disconnect the Power Cable from the Printer s rear panel 2 Press and hold the Pause Resume button 3 While holding down the Pau...

Страница 105: ...RESTRICTED USE ONLY Fargo Electronics Inc Persona C30e Card Printer User Guide Rev 1 1 4 55 Running the Standard Self Test Print Display A Full Color Test Print...

Страница 106: ...or c a part has been replaced to check for proper Printer operation Step Procedure 1 Remove Ribbon Cartridge from the Printer and close the front cover Caution If the power is ON disconnect the Power...

Страница 107: ...face Technical Specification Ethernet Option Here are the system requirements for Ethernet Caution For safety purposes Ethernet is not intended for a direct connection outside of the building Function...

Страница 108: ...r configuration with any web browser Log Messages Provides logging of usage and error events via e mail UDP or TCP IP Password Security Provides security with passwords and configurable User permissio...

Страница 109: ...int job has been successful Also the User knows what problems have been encountered while processing the print job Printing using Ethernet works in a manner similar to the USB connected PC printer Rev...

Страница 110: ...how to initiate a Telnet session from a PC in order to access the Telnet services provided by the Printer Follow these instructions to issue Telnet commands See the next section for related Ethernet...

Страница 111: ...of the Ethernet interface ping IPADDR all Display all information about this Printer list all diff Display all differences between current and stored network settings list diff uptime Display how long...

Страница 112: ...tion string set sysinfo location STRING label Set the label string set sysinfo label STRING sysinf o from Set all strings from default or current settings set sysinfo from default current nam e Change...

Страница 113: ...network interface settings set user type NAME root guest set user from Restore User setting from default or stored settings set user from default stored addr Store a new IP address store net addr ADDR...

Страница 114: ...auto 10half 10full 100half 1 00full ifc from Set the Ethernet mode settings from the default or current settings store ifc from default current save Save all current settings as the stored settings in...

Страница 115: ...e Printer Connection procedure See below 2 Follow the Verifying the Printer IP address procedure 3 Follow the Verifying that your PC can access the Printer using the ping command procedure 4 Verify th...

Страница 116: ...0 0 0 0 in not valid If the IP address is valid go to step 4 below If the IP address is not valid go to step 2 below 2 If your network is using DHCP then Use IP Tracer to verify that the Printer has...

Страница 117: ...mand to the Printer At a DOS prompt enter ping IP Address Example C ping 210 1 10 240 If the ping response is successful move on to the next troubleshooting procedure See Display A below If the ping r...

Страница 118: ...is part of the network specified by the subnet mask Printing a test page Step Procedure 1 Try printing a test page from the Printer Driver properties window a Open the Printer Driver properties windo...

Страница 119: ...Printer The Windows 2000 XP Server 2003 operating systems work with your Ethernet Printer How do I connect my Printer to my network You can connect from the RJ45 network connection on the back of you...

Страница 120: ...his may require adding a new Remote TCP IP Card Printer Port configured to communicate to the new printer at the proper IP address See the appropriate Windows documentation for additional help Can mul...

Страница 121: ...nected Printer The PC doing the upgrade must have a Driver installed for the Fargo Printer to be upgraded Follow this procedure 1 Run the Fargo Workbench Printer Utility from the start menu Go to the...

Страница 122: ...the Printer with Dipswitch 1 in the ON position and Dipswitch 2 in the OFF position Note This will reset all Print Server settings which includes static network settings user configurations and user p...

Страница 123: ...nfigured to communicate to the printer at the proper IP address See the appropriate Windows documentation for additional help How can I verify change what IP address my installed Printer Driver is exp...

Страница 124: ...o I choose a static IP address for my Ethernet Printer You can use the web pages if you know the current IP address OR You can use the IP Tracer tool which allows you to find Printers and specify thei...

Страница 125: ...m Windows to verify the Ethernet configuration of the Printer and Printer Driver Follow this procedure 1 Open the Printer Driver properties window 2 Select Start Settings Printers and Faxes your Print...

Страница 126: ...cols ICMP Internet Control Message Protocol The Basic message protocol for the internet DHCP Dynamic Host Configuration Protocol The protocol used by a network to automatically assign network settings...

Страница 127: ...Subnet mask Specifies a 32 bit value that routers use to send a message to the correct subnet Default gateway Specifies the address of the router in a network using subnets that forwards traffic to a...

Страница 128: ...vice is electrostatically sensitive It may be damaged if exposed to static electricity discharges Information that raises potential electrostatic safety issues is indicated by a warning symbol as show...

Страница 129: ...go Electronics Inc Persona C30e Card Printer User Guide Rev 1 1 6 2 C30e Print Driver Options Reviewing C30e Printer Drivers The window title reflects the specific Printer Driver in use as shown in th...

Страница 130: ...f measurement Note No 1 When designing a card format always set the card size or page size within the card design program to the exact dimensions of a CR 79 or CR 80 card Note No 2 The Card Size indic...

Страница 131: ...6 4 Adjusting the Orientation Option Step Description 1 Select Portrait to cause the card to print in a vertical orientation OR Select Landscape to cause the card to print in a horizontal orientation...

Страница 132: ...USE ONLY Fargo Electronics Inc Persona C30e Card Printer User Guide Rev 1 1 6 5 Selecting the number of copies Step Description 1 Select the number of copies by clicking on the UP or DOWN arrows as s...

Страница 133: ...ONLY Fargo Electronics Inc Persona C30e Card Printer User Guide Rev 1 1 6 6 Using the Diagnostics button under the Card tab Step Description 1 Click Diagnostics to bring up the Fargo Workbench Printer...

Страница 134: ...Step Description 1 Click Clean Printer to display the Clean Printer Utility window 2 Remove all cards from the Card Hopper and close the Hopper door 3 Open the Front Cover and remove the Ribbon Cartr...

Страница 135: ...Printer User Guide Rev 1 1 6 8 Using the Clean Printer Option continued Step Description 6 Click Clean Note The Printer will begin to feed the cleaning card through the card path 7 Reinsert the print...

Страница 136: ...Test Print to send a simple self test print to the Printer Ensure that a YMCKO Ribbon is installed Ensure that the computer is effectively communicating with the Printer and that the Printer is functi...

Страница 137: ...tronics Inc Persona C30e Card Printer User Guide Rev 1 1 6 10 Using the About button Step Description 1 Click About to open a dialog box containing the copyright and version date code information abou...

Страница 138: ...USE ONLY Fargo Electronics Inc Persona C30e Card Printer User Guide Rev 1 1 6 11 Using the Device Options tab C30e Reviewing the Device Options tab The C30e window with the Device Options tab is displ...

Страница 139: ...tion to select Print Ribbons Step Description 1 Select the appropriate Ribbon for the type of Print Ribbon in use YMCKO Full Color Resin Black Overlay YMCKO Full Color Half Panel YMCKOK Full Color 2 R...

Страница 140: ...ruin the card The default setup is for the printer to first erase the previously printed card then write the NEW information on the card Note If you are printing to a NEW card select WRITE ONLY This...

Страница 141: ...Ribbon is selected the C30e driver will show only relevant options when the Re Writeable Ribbon Type is displayed Step Description 1 The following options are removed from the Device Options tab when...

Страница 142: ...RESTRICTED USE ONLY Fargo Electronics Inc Persona C30e Card Printer User Guide Rev 1 1 6 15 Using the Workbench to erase the card Step Description 1 Open the Diagnostic Tool box...

Страница 143: ...RESTRICTED USE ONLY Fargo Electronics Inc Persona C30e Card Printer User Guide Rev 1 1 6 16 Using the Workbench to erase the card continued Step Description 2 Select the Re Writable Card Eraser option...

Страница 144: ...30e Card Printer User Guide Rev 1 1 6 17 Using the Workbench to erase the card continued Step Description 3 Select the number of cards to be erased Click on the Erase button Note This will erase the f...

Страница 145: ...type to the correct setting or validate It will also display a dialog that it has changed the current setting or that the current Ribbon type is correct 2 Click Test Print to send a simple self test p...

Страница 146: ...down menu Note This will bring up the C30e Card Printer Properties window as shown on the next page 2 Click the Color Management tab 3 Click Manual 4 Click C30eCLR_E for improved color matching Note...

Страница 147: ...RESTRICTED USE ONLY Fargo Electronics Inc Persona C30e Card Printer User Guide Rev 1 1 6 20 Changing the Color Profile Selection for the C30e continued Step Procedure 5 Click Set as Default...

Страница 148: ...yet fast color balance adjustments b for more natural looking images without actually utilizing any specific color matching or c for customized printed coloring of the cards through the Image Color ta...

Страница 149: ...e appropriate dither method according to the type of image to be printed This option affects objects printed with a resin only print Ribbon Step Procedure 1 Select Optimized for Photo when printing ph...

Страница 150: ...The program must be able to send down two or more separate pages to be printed within the same document 2 Page 1 will be transferred to the front side of the card Page 2 will be transferred to the bac...

Страница 151: ...on to automatically print full color on the front of a card and resin black on the back of a card using either of the Full color YMCKO or YMCKOK Print Ribbons If using the YMCKO Ribbon type the front...

Страница 152: ...rint Back Side First option Step Procedure 1 Select this option If you need to print the first page of a two page document on the backside of the card OR If you need to print the resin black on the ch...

Страница 153: ...this option to print only onto the back of a card Note Load the cards in the standard manner When this option is selected the Print Both Sides option is automatically disabled When attempting to prin...

Страница 154: ...Use this option to change the position of the printed image in relation to the location of a card s Magnetic Stripe or smart chip Step Procedure 1 Select Rotate Front 180 Degrees to rotate the image o...

Страница 155: ...ties of the Printer Note This option still allows the Printer to encode cards Step Description 1 Select Disable Printing to encode or re encode cards to save time and avoid the use of printing supplie...

Страница 156: ...agenta and Cyan Note In most cases the default settings of these options will suffice 2 Control the overall darkness and lightness of the printed image by adjusting the Dye Sub Intensity slider Move t...

Страница 157: ...ith a resin only Ribbon by adjusting the Resin Heat slide Step Procedure 1 Adjust the Resin Heat Front K or the Resin Head Back K as needed Move the slide to the left to cause less heat to be used in...

Страница 158: ...when printing with the overlay panel of a Ribbon Note This control can be helpful for fine tuning the transfer of overlay onto the card Step Procedure 1 Move the slide to the left to cause less heat t...

Страница 159: ...USE ONLY Fargo Electronics Inc Persona C30e Card Printer User Guide Rev 1 1 6 32 Using the Color Matching option and Default button Step Procedure 1 To return all options to their factory settings cli...

Страница 160: ...1 6 33 Using the Calibrate tab Persona C30e Use the Calibrate tab to a control the position of the printable area in relation to the card b calibrate Sensors and c adjust the internal Printer settings...

Страница 161: ...l and Horizontal adjustment arrows to adjust the Image Position values When adjusting these values keep in mind that the card always remain in the same position while moving through the Printer regard...

Страница 162: ...ear of the Printer if a positive number is entered Move toward the front of the Printer if a negative number is entered OR Use the Horizontal adjustment to move the image Move toward the card output s...

Страница 163: ...Persona C30e Card Printer User Guide Rev 1 1 6 36 Using the Sensors button Use the Sensors button to bring up a separate dialog box for calibrating the Printer s Ribbon Sensor see instructions in the...

Страница 164: ...RESTRICTED USE ONLY Fargo Electronics Inc Persona C30e Card Printer User Guide Rev 1 1 6 37 Using the Sensors button See the previous page for the related procedure...

Страница 165: ...ng the Settings button Use the Settings button to bring up a dialog for adjusting the internal Printer settings which are customized for every Printer at the factory and saved directly within the Prin...

Страница 166: ...oding tab Use these options only if the Printer has an optional Magnetic Stripe Encoding Module installed Step Procedure 1 Select the Magnetic Encoding tab to display options for controlling the Magne...

Страница 167: ...etic encoding standard to use Category Description Installation The C30e Card Printer can be installed with one of two types of factory installed Magnetic Stripe Encoding Modules Magnetic Encoding opt...

Страница 168: ...Encoding selection active and inactive functions If you select ISO Encoding you send down a formatted set of characters Note This selection activates the track tabs However all functions on the Track...

Страница 169: ...de dropdown list continued Category Description Custom Encoding selection active and inactive functions If you select Custom Encoding all options are active The Default is ISO Encoding Note The defaul...

Страница 170: ...Binary Encoding selection active and inactive functions If you select Raw Binary Encoding you send down a raw binary string rather than a formatted set of characters Note The Coercivity dropdown func...

Страница 171: ...r can select Raw Magnetic Encoding from the Driver Raw Coercivity The User can select options for either High or Low Coercivity from the Driver Raw Bit Density The User can select the Configurable Bit...

Страница 172: ...list Category Description JIS II Encoding selection active and inactive functions If you select JIS II Encoding specific standards are used Note This selection disables all the Magnetic Track Options...

Страница 173: ...Step Procedure 1 Select the Coercivity option Oersted to use the Magnetic Stripe type that matches the card type High Coercivity to Super Coercivity 2750 4000 Oersted Fargo s High Coercivity UltraCar...

Страница 174: ...e Shift Data Left option which applies to all tracks when selected Note When this option is unchecked it is the default Step Procedure 1 Select this option to shift the recorded magnetic data to the l...

Страница 175: ...ree tracks Note Click Default to reset the defaults for the current Magnetic Track Options tab only Step Procedure 1 Specify which of the three 3 tracks to customize by selecting one of the three trac...

Страница 176: ...RESTRICTED USE ONLY Fargo Electronics Inc Persona C30e Card Printer User Guide Rev 1 1 6 49 Reviewing the Magnetic Track Options...

Страница 177: ...ks Customize each track independently of the other two Specify which track to customize by selecting one of the three track options Click Default to reset the defaults for the current Magnetic Track O...

Страница 178: ...RESTRICTED USE ONLY Fargo Electronics Inc Persona C30e Card Printer User Guide Rev 1 1 6 51 Using the Magnetic Track Options See the previous page...

Страница 179: ...used to encode the magnetic data on the currently selected track Note This character size includes the parity bit if enabled Step Procedure 1 Select 5 Bits to change the bits per character to 5 BPC No...

Страница 180: ...on the currently selected track Note This character offset value is subtracted from the ASCII value of each Magnetic Stripe data character prior to encoding on the track Step Procedure 1 Select NULL...

Страница 181: ...cted track The default ISO Standard selections for this option are as follows Step Procedure 1 Select 75 BPI to change the bits per inch to 75 BPI Note This is the default for Track 2 OR Select 128 BP...

Страница 182: ...ion to customize the LRC Generation Mode used to encode the magnetic data on the currently selected track Step Procedure 1 Select No LRC to change the LRC Generation to none OR Select Even Parity to c...

Страница 183: ...n to customize the Encoding Mode used to encode the magnetic data on the currently selected track Step Procedure 1 Select No Parity to change the Character Parity to none OR Select Even Parity to chan...

Страница 184: ...ser Guide Rev 1 1 6 57 Reviewing the ISO Track Locations The magnetic Encoding Module encodes onto tracks in accordance with an ISO 7811 2 Magnetic Stripe For track locations review the display below...

Страница 185: ...Magnetic Track data If these characters are not added to the track data the text intended for the Magnetic Track will appear as printed text on the card To avoid this track information must be entere...

Страница 186: ...Track 1 1 JULIEANDERSON 1234567890 Track 2 2 1234567890987654321 Track 3 3 1234567890987654321 Track Start Sentinel End Sentinel Field Separator Valid Characters Maximum Number of Characters Track 1 A...

Страница 187: ...SCII Code Character ASCII Code Character ASCII Code Character 32 space 56 8 80 P 33 57 9 81 Q 34 58 82 R 35 59 83 S 36 60 84 T 37 61 85 U 38 and 62 86 V 39 63 87 W 40 64 88 X 41 65 A 89 Y 42 66 B 90 Z...

Страница 188: ...ED USE ONLY Fargo Electronics Inc Persona C30e Card Printer User Guide Rev 1 1 6 61 Using the Default button Step Procedure 1 Use the Default button to reset defaults for the current Track tab only Se...

Страница 189: ...e Overlay O Panel and or the print area appear on a card Note This option is helpful if for example you would like to omit or block out the overlay or printing around a card s smart chip or Magnetic S...

Страница 190: ...Card Printer User Guide Rev 1 1 6 63 Enabling the Back options Step Procedure 1 Select Print Both Sides under the Device Options tab to enable the Back option under the Overlay Print Area Note This s...

Страница 191: ...ONLY Fargo Electronics Inc Persona C30e Card Printer User Guide Rev 1 1 6 64 Using the Front option Overlay Print Area Step Procedure 1 Select Front to view the Overlay Print Area options for the fro...

Страница 192: ...a C30e Card Printer User Guide Rev 1 1 6 65 Using the Back option Overlay Print Area Step Procedure 1 Select Back to view the Overlay Print area options for the back of the card Note The Back option i...

Страница 193: ...nd or print only in the space outside the selected and defined area OR Select Omit Smart Chip Area for the Printer to overlay and or print only in the space outside the standard location of a smart ch...

Страница 194: ...RESTRICTED USE ONLY Fargo Electronics Inc Persona C30e Card Printer User Guide Rev 1 1 6 67 Using the Overlay Print Area dropdown menu continued See the previous page for the related procedure...

Страница 195: ...ct For Print and Overlay for the defined area to apply to both the printing and overlay process OR Select For Overlay Only for the defined area to apply only to the overlay process Note In this mode p...

Страница 196: ...RESTRICTED USE ONLY Fargo Electronics Inc Persona C30e Card Printer User Guide Rev 1 1 6 69 Using the Overlay Print Area continued See the previous page for the related procedure...

Страница 197: ...ea Option Step Procedure 1 a Determine whether to use the Front option via the Front radio button or the Back option via the Back radio button b Select the Defined Area s option to activate the card g...

Страница 198: ...e first defined area Determine the area of the card needed to define for a signature panel with a different size and location than the Driver s standard Omit Signature Area setting Note This area is i...

Страница 199: ...6 72 Using the Defined Area Option continued Step Procedure 4 Measure from the lower left corner of the card up and over to the lower left corner of for the defined area to begin and enter these valu...

Страница 200: ...e Printer Note The location of a defined area is based on the card orientation as it exits the Printer b Measure the defined area location based on the printed card Note If selecting the Rotate Front...

Страница 201: ...ighted with a dotted outline c Define another area by clicking on the Defined Area UP arrow Another 2 x 2 5mm x 5mm area will appear in the lower left hand corner Note This is the location in which al...

Страница 202: ...own menu list will be used to enable and select which type of visual security will be used The Visual Security dropdown list will be selectable only on the Front side see below Visual Security is not...

Страница 203: ...rsona C30e Card Printer User Guide Rev 1 1 6 76 Selecting Orientation Landscape under Card tab Step Procedure 1 Select Landscape below under Orientation under the Card Size tab to use the Visual Secur...

Страница 204: ...Card Printer User Guide Rev 1 1 6 77 Selecting the Visual Security Solutions dropdown menu A to D Step Procedure 1 Click the Visual Security Solutions dropdown menu below under the Landscape Orientat...

Страница 205: ...tronics Inc Persona C30e Card Printer User Guide Rev 1 1 6 78 Selecting Orientation Portrait under Card tab Step Procedure 1 Select Portrait on the Card Size tab to use the Visual Security Solutions E...

Страница 206: ...ona C30e Card Printer User Guide Rev 1 1 6 79 Selecting the Visual Security Solutions dropdown menu E to H Step Procedure 1 Click the Visual Security Solutions dropdown menu under the Portrait Orienta...

Страница 207: ...io button Frontside option only Step Procedure 1 Click either VeriMark or HoloMark as shown below The foil options are used to control the size of the exclusion area Note When VeriMark is selected a r...

Страница 208: ...RESTRICTED USE ONLY Fargo Electronics Inc Persona C30e Card Printer User Guide Rev 1 1 6 81 Selecting HoloMark Front option only Step Procedure 1 Click HoloMark below for the squared area size...

Страница 209: ...tom Graphic in a 2D foil The custom VeriMark image is stamped on blank standard sized cards You can select one of eight positions A to H as shown in the Portrait and Landscape samples below Sample 1 V...

Страница 210: ...tom Graphic in a 2D foil The custom HoloMark image is stamped on blank standard sized cards You can select one of eight positions A to H as shown in the Portrait and Landscape samples below Sample 1 H...

Страница 211: ...ption to control where the resin black K panel of a full color Ribbon is printed If printing with a resin only Ribbon type all K Panel Resin options will be grayed out Resin black text is desirable du...

Страница 212: ...User Guide Rev 1 1 6 85 Enabling the Frontside and Backside options Step Procedure 1 Select Print Both Sides under the Device Options tab to enable the Backside option under the K Panel Resin tab Not...

Страница 213: ...USE ONLY Fargo Electronics Inc Persona C30e Card Printer User Guide Rev 1 1 6 86 Enabling the Frontside option K Panel Resin Step Procedure 1 Select Front to view the K Panel options for the front of...

Страница 214: ...USE ONLY Fargo Electronics Inc Persona C30e Card Printer User Guide Rev 1 1 6 87 Enabling the Backside option K Panel Resin Step Procedure 1 Select Back to view the K Panel Resin options for the back...

Страница 215: ...ar codes are not TrueType fonts and or are not printing with the resin black panel Note The Printer Driver will print areas of the image where it finds black coloring with the print Ribbon s resin bla...

Страница 216: ...ersona C30e Card Printer User Guide Rev 1 1 6 89 Selecting the Full Card option Front and Back options Step Procedure 1 Select Full Card for the Printer Driver to print the resin black K panel for all...

Страница 217: ...Card Printer User Guide Rev 1 1 6 90 Selecting the Defined Area s option Front and Back options Step Procedure 1 Select Defined Area s for the Printer Driver to print the resin black K panel for all b...

Страница 218: ...Undefined Area s option Front and Back options Step Procedure 1 Select Undefined Area s for the Printer Driver to print the resin black K panel for all black found only in the space outside the defin...

Страница 219: ...e This will activate the card grid in the upper half of the window It is through this card grid that up to five areas can be defined When the card grid is first activated a small square will appear at...

Страница 220: ...efine In the sample below this area is indicated by the dashed outline b Determine the size of this area by actually printing a card and looking at it in the same orientation as when it exits the Prin...

Страница 221: ...Note The card grid lines are spaced at 2 inch 5mm intervals 5 a Print the card design and note how the image is oriented on the card as it ejects from the Printer Note The location of a defined area...

Страница 222: ...RESTRICTED USE ONLY Fargo Electronics Inc Persona C30e Card Printer User Guide Rev 1 1 6 95 Selecting the Defined Area s function continued See the previous page for the related procedure...

Страница 223: ...ONLY Fargo Electronics Inc Persona C30e Card Printer User Guide Rev 1 1 6 96 Selecting the Defined Area s function continued Refer to the previous procedure 172355 Karen Atkins Access Level 2 ID 12344...

Страница 224: ...RESTRICTED USE ONLY Fargo Electronics Inc Persona C30e Card Printer User Guide Rev 1 1 6 97 Selecting the Defined Area s function continued Refer to the previous procedure...

Страница 225: ...fined areas will first appear 7 a Use the Defined Area arrows to navigate back and forth from area to area Note The active area will always be highlighted with a dotted outline Up to 5 areas can be de...

Страница 226: ...gnated areas will print with the Yellow Y Magenta M and Cyan C Ribbon panels directly beneath the resin black K panel OR Select this option if printing resin black text or bar codes onto a colored bac...

Страница 227: ...USE ONLY Fargo Electronics Inc Persona C30e Card Printer User Guide Rev 1 1 6 100 Using the Printer Info tab Persona C30e Use the options on this tab to view information about the Ribbon installed in...

Страница 228: ...rgo Electronics Inc Persona C30e Card Printer User Guide Rev 1 1 6 101 Reviewing the Ribbon Information Step Procedure 1 Use the Ribbon information to determine which Ribbon is being used to print wit...

Страница 229: ...SE ONLY Fargo Electronics Inc Persona C30e Card Printer User Guide Rev 1 1 6 102 Reviewing the Ribbon Level Indicator Step Procedure 1 Use the Ribbon Level indicator to view approximately how much Rib...

Страница 230: ...b Use the adjustment mode to change the Printer s internal settings Note The Card Printer is equipped with an internal adjustment mode programmable through the Settings dialog box This dialog box is a...

Страница 231: ...easing or decreasing the amount of heat used by the Printhead when printing Step Procedure 1 Lighten the printed image by clicking the down arrow to enter a negative value and decrease the amount of P...

Страница 232: ...e will move in relation to the fixed card position as a positive or negative Image Placement value is entered Step Procedure 1 Enter a negative value to move the printed image toward the leading edge...

Страница 233: ...m below represents how the end of form will move in relation to the fixed card position as a positive or negative Print End of Form value is entered Step Procedure 1 Enter a negative value to reduce t...

Страница 234: ...nd that cards always remain in the same landscape orientation while moving through the Printer Step Procedure 1 Enter a negative value to move the image towards the bottom edge of the card See image b...

Страница 235: ...c for Hi Co Magnetic cards and 2 54vdc for Lo Co Magnetic cards Depending on the cards that are being used it may be necessary to adjust the Encoder voltage out of default See the next two procedures...

Страница 236: ...to properly set the Encoder Voltage Offset value This information should be available through the card manufacturer or reseller 2 Use the following equation to identify the proper Mag Hi Co Voltage O...

Страница 237: ...properly set the Encoder Voltage Offset value This information should be available through the card manufacturer or reseller 2 Use the following equation to identify the proper Mag Lo Co Voltage Offs...

Страница 238: ...Note For this diagram imagine that the card is transparent and the card s Magnetic stripe can be seen through the top or front side of the card Step Procedure 1 Enter a negative value to move the star...

Страница 239: ...RESTRICTED USE ONLY Fargo Electronics Inc Persona C30e Card Printer User Guide Rev 1 1 6 112 Using the Mag Top of Form Option continued...

Страница 240: ...Step Procedure 1 Use the Ribbon Tension option to increase the amount of tension drag on the Ribbon during printing Enter a negative value to decrease the amount of tension that is placed on the Ribb...

Страница 241: ...the Flipper Center Offset Option Use this option to change the card position on the Flipper Table relative to the center for flipping Note This is important to maintain the proper clearance with surr...

Страница 242: ...rder to adjust travel to and from the Flipper and the Smart Card Docking Module Step Procedure 1 Enter a negative value to decrease the amount of Flipper angular movement from the home position to the...

Страница 243: ...adjusting the Resin Heat slide Step Procedure 1 Adjust the Resin Heat Front K or the Resin Head Back K as needed Move the slider to the left to cause less heat to be used in the printing process causi...

Страница 244: ...g to cause more heat to be used in the printing process OR Decrease the Current Setting to cause less heat to be used in the printing process Note Print Temp Offset provides user ability to control Pr...

Страница 245: ...Increase the Current Setting to cause more heat to be used in the erasing process OR Decrease the Current Setting to cause less heat to be used in the erasing process Note Erase Temp Offset provides...

Страница 246: ...ter User Guide Rev 1 1 6 119 Using the Flipper Prox Offset Option Step Procedure 1 Normally the Prox encoder is installed into Bay1 and no adjustment is necessary This setting is factory set at 0 This...

Страница 247: ...d the Prox Docking Module Adjust the Flipper Offset as needed if the card is not feeding into the E card Docking Station properly Step Procedure 1 Enter a negative value to decrease the amount of Flip...

Страница 248: ...ke sure only qualified personnel perform these procedures Caution This device is electrostatically sensitive It may be damaged if exposed to static electricity discharges Information that raises poten...

Страница 249: ...Kit This Cleaning Kit provides you with the specialized cleaning supplies and the required cleaning procedures for you to maintain your Fargo Persona C30e Card Printer Encoders The following cleaning...

Страница 250: ...consistent print quality Step Procedure 1 Open the Printer s Front Cover 2 Remove the Print Ribbon 3 Squeeze the Printhead Cleaning Swab to saturate the tip of the swab with alcohol 4 Use the Printhe...

Страница 251: ...y every 1000 prints to maintain a consistent print quality Note The Card Feed Rollers move the card throughout the print process Rollers should be kept clean to prevent card jams and card contaminatio...

Страница 252: ...cards from the Printer s Input Hopper 3 Use the Cleaning Card from the Printer s Cleaning Kit and remove the adhesive backing from both sides of the card Note If your Printer has a Magnetic Encoder in...

Страница 253: ...and the Card Feed Rollers continued Step Procedure 4 Insert the Cleaning Card into the Single Feed Card Slot until the card stops Note If your Printer is equipped with a Magnetic Encoder you must ins...

Страница 254: ...dure This procedure is designed to thoroughly clean the Platen and the Card Feed Rollers inside the Printer Cleaning the Printer s Interior Periodically use a Cleaning Pad from the Printer s Cleaning...

Страница 255: ...ecific packing procedure for this Card Printer Follow this instruction to pack the Card Printer for transport Step Procedure 1 Clean the inside of the Printer with compressed air 2 Wipe it down with a...

Страница 256: ...Caution This device is electrostatically sensitive It may be damaged if exposed to static electricity discharges Information that raises potential electrostatic safety issues is indicated by a warning...

Страница 257: ...irmware Step Procedure 1 Download the current firmware from www fargosupport com Save this file to a folder to be retrieved later Note This is a zip file so unzip this to the same folder 2 Open the Fa...

Страница 258: ...Persona C30e Card Printer User Guide Rev 1 1 9 3 Upgrade the Printer Firmware Continued Step Procedure 3 a Open the Print Spooler b Select File to Print and browse to find the new Firmware file saved...

Страница 259: ...old down the Power and Pause buttons on the Printer while you plug in the power Note Both lights will blink slowly 5 From the Workbench screen select Send File To Printer Note Both lights will flash v...

Страница 260: ...er Contacting Fargo Technical Support Step Procedure 1 Refer to Section 3 General Troubleshooting Contact the Fargo Technical Support Group by phone at 952 941 0050 or by fax at 952 941 1852 for addit...

Страница 261: ...e built Reviewing Example No 1 Serial Number 80453289 1 80453289 The first two digits in the serial number indicate the year the Printer was built e g the digits 80 indicate the year 1998 2 80453289 T...

Страница 262: ...A type of color matching that takes the colors value of pixels and applies them to an algebraic equation to adjust the levels of hue saturation and brightness ANSI American National Standards Institu...

Страница 263: ...ip based non volatile memory Bit An abbreviation for binary digital Each bit is an element of information that can have two states off and on Bit map A graphic produced by an array of pixel elements w...

Страница 264: ...for dedicated high speed communication between the PC and the Printer port Centronics A parallel communications interface that has become the standard for connections to Printers designed by the Centr...

Страница 265: ...erial port interfaces DC Motor A Motor that works on DC with continuous motion DC Direct Current Electronic flow that is unidirectional flowing from the positive to negative of a power source Default...

Страница 266: ...evice and is connected in serial to the parallel cable Dot The smallest unit of an image that the Printer is able to produce The smaller the dot see dot pitch the sharper the image Dot pitch A measure...

Страница 267: ...with built in electronic devices such as smart cards or prox cards E card Docking Station The device in the Printer that accepts smart cards with an ISO smart card contact station This allows the use...

Страница 268: ...ncrease the port throughput EPROM Electronically Programmable Read Only Memory A microchip based non volatile memory storage device that cannot be rewritten in the field Firmware for many Fargo Printe...

Страница 269: ...stic curve relating optical density to relative log exposure Glossy Matte A smooth polished surface in comparison to a rougher matte surface Fargo matte cards have a surface index Ra of approximately...

Страница 270: ...atch Head Abbreviation for Printhead Heat sink A device used to dissipate heat into the ambient Heat Seal A resinous film transferred by the Printhead onto the back of an HDP intermediate transfer fil...

Страница 271: ...on by the Printhead The film is then transferred to the card surface by the hot lamination Roller ISO For the Greek iso meaning same Used to represent data from the International Organization for Stan...

Страница 272: ...o Low Coercivity The coercivity value of magnetic media between 250 600 Oe ISO 7811 2 Fargo s Low Coercivity encodes at 300 Oe LPT Port Line Printer Port The system abbreviation for a PC s parallel Pr...

Страница 273: ...he science of electromagnetism Offset The prescribed distance between a reference point and the target point The offset in card printing may refer to the position of the image relative to the leading...

Страница 274: ...r in which serial data is divided into sections and sent simultaneously down parallel wires to speed transfer rate Parallel port A communication socket on a device that allows for parallel data transf...

Страница 275: ...ster material that enhances card security and durability applied over the printed surface with a hot Roller Available as clear or with embedded holographic type security images Portrait A document lay...

Страница 276: ...reader mounted on the e card docking station inside the Printer encoder The ProxPoint is a read only device producing a Wiegand signal that is converted to RS 232 using a Cypress Computer Systems CVT...

Страница 277: ...del Ribbon The dye impregnated film that is used for color printing Ribbon cable Parallel wires held flat in a row by plastic insulation RibbonTraq A Fargo Electronics method of placing bar code like...

Страница 278: ...alls in a slot on the main board Simplex Single sided printing SmartGuard An application from Fargo Electronics that allows users to prevent access to the Printer through the use of a personally encod...

Страница 279: ...Surge Protector An electronic device placed in serial to the Printer s power supply that prevents damage to the Printer from electronic surges and electrical current that is outside of the normal para...

Страница 280: ...netic data string Troubleshooting The process of investigating and determining the cause of a problem TrueType TT A font format that produces each character using a mathematical equation rather than a...

Страница 281: ...order in which they are printed Yellow Y Magenta M Cyan C YMCK The designation of colored Ribbon by the panels of color in the order in which they are printed Yellow Y Magenta M Cyan C Black K YMCKH...

Страница 282: ...ace 2 11 cards look pixilated or grainy 4 53 card s Magnetic Stripe smart chip 6 27 CD Compact Disc 11 3 Centronics 11 3 Cleaning Inside Printer 4 41 Cleaning Roller 11 3 Cleaning the Printhead 4 40 C...

Страница 283: ...nt 11 8 For Overlay Only 6 68 For Print and Overlay 6 68 FPGA Field Programmable Gate Array 11 8 Front and Back radio buttons 2 12 Front Cover 2 6 Frontside and Backside options K Panel Resin 6 85 6 8...

Страница 284: ...t 11 12 Omit Signature Area setting 6 71 On LED 4 54 4 56 onscreen card design 6 94 Operating Temperature 2 3 O Ring 11 12 OS Operating System 11 12 Output 11 12 Output Hopper 11 12 Overlaminate 11 13...

Страница 285: ...second K Panel 6 24 Selecting Orientation Landscape under Card tab 6 76 Selecting Orientation Portfolio under Card tab 6 78 Selecting the number of copies 6 5 Selecting the Visual Security Solutions...

Страница 286: ...n Printer Option 6 7 Using the Image Color tab 4 48 V Verify data encoded 4 13 Vertical Horizontal adjustment arrows 6 34 Vertical Horizontal Image Position settings 4 50 Vertical adjustment 6 35 Virt...

Отзывы: