GB
TOPPING UP THE OIL-DYNAMIC CIRCUIT
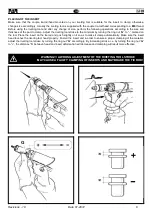
You need to top up the oil-dynamic circuit after a long period of work, when you note a power loss. Put the riveting tool
(
DWELL
AND NOT FED
) in a horizontal position and remove the plug (
A
), by means of a 5 mm Allen wrench (equipped
with the riveting
tool); during this operation, check the oil level in order to avoid any overflowing. Then, slowly pour the oil
PANOLIN HLP ISO 32
into the bellows container (
X
) which shall be screwed to its seat on the plug (
A
). While keeping
the riveting tool in a horizontal position and starting air feeding, push the tensile strength button and make the riveting
tool carry out some cycles until air bubbles inside the container (X) stop coming out. This condition indicates that the
topping up of the oil has fully been achieved. At this point
stop the air feeding
and, while keeping the riveting tool in a
horizontal position, unscrew and close up the container (
X
) and the plug (
A
).
WARNING:
it is very important to follow the about mentioned instructions and use gloves. If you need to empty fully the hydraulic
circuit, you must put the oil in a suitable container and contact a Company that is authorized to discharge any waste
WARNING! Before disconnecting the compressed air hose, make sure that it is not under pressure! We
recommend to use oil PANOLIN HLP ISO 32 DIN 51524-2/HLP or similars.
min. 5 Nm
max. 8 Nm
5 mm.
A
X
GB
WARNING:
Make sure that the oil filler cap
(
A
) is tightened at a torque corresponding
to
Min. 5 Nm ÷ Max. 8 Nm
.
DISPOSAL OF THE RIVETING TOOL
Follow the prescriptions of the national laws for disposing of the riveting tool.
After disconnecting the tool from the pneumatic system, disassemble and split all the components
according to the material: steel, aluminium, plastic material, etc.
Then proceed to scrap the materials in accordance with current laws.
Revisione - 18
Date 01-2012
1
Содержание KJ 60
Страница 3: ...RU 3 GB INSTRUCTIONS FOR USE 7 RU 12 GB SPARE PARTS 13 PL...
Страница 6: ...M8 G G G h G Revisione 18 Date 01 2012 5...
Страница 7: ...1 25 2 3 4 1 2 25 mm 3 4 25 6 Date 01 2012 Revisione 18...
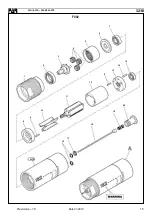
Страница 16: ...SPARE PARTS F002 7 6 5 4 3 15 2 14 13 9 1 12 11 20 10 19 9 8 18 17 16 KIT A Revisione 18 Date 01 2012 15...
Страница 17: ......
Страница 18: ......


