


User Manual
H
OW
T
O
… February
16,
2010
Xynergi Media Production Centre
Page 49
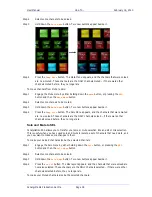
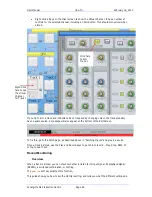
Set the Seedname
Select the track(s) whose seednames you wish to change.
[Since you’re on the
Arm Menu
, this will also attempt to arm the tracks, but this won’t work unless
they have
patched inputs
– see
How to Patch Inputs to Tracks
for details. If you want to set
seednames for unarmed tracks, see the section below called “Using the Name Menu”.]
Press the
seed
name
button to display the seed name dialog. Use the QWERTY keyboard to type
the name, then
Tab
or
click
the
Starting Seed Number
, and use the keyboard to set it.
Click
OK
to finish. You can do this
while in Record
.
If you give more than one track the same seed name
at the same time
, their clips increment as a
group, preventing repeated names.
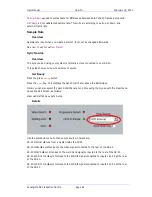
Using the Name Menu
Press the
name
button to display a selection of all tracks. Select the one(s) whose seednames you
want to change.
Press the
seedname
soft key to display the seed name dialog. Use the QWERTY keyboard to type
the name, then
Tab
or
click
the
Starting Seed Number
, and use the keyboard to set it.
Click
OK
to finish. Press
exit
to leave the
Name menu
.
Clip Naming
Each clip can be given a typed name.
For existing clips, you select them and issue the clip name command.
You can also name clips
while they are being recorded
.
These facilities are available in the Editor Megamode and the Record Megamode. We only show
the latter here, because it is more convenient, especially to name whilst in Record.
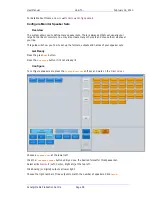
Get Ready
Press the green
Record
Megamode
button to access recording functions. This includes naming
clips.
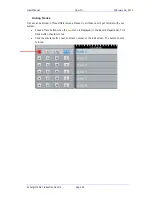
Name the Clips
Select the track(s) whose clips you wish to name.
[Since you’re on the
Arm Menu
, the system will also try to arm the tracks, but this won’t work
unless they have
patched inputs
– see
How to
Recording
Patch Inputs
for details. If you
want to name clips on unarmed tracks, use the
Edit Megamode
, or see below for “Using the Name
Menu”.]
For existing clips, they must be touching the cursor, or wholly inside the
range
. In either case
they will be coloured
Red
.
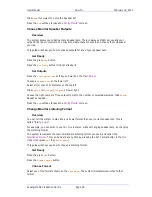
Press the
clip
name
button. If any clip is
red
, or if the transport is in
Record
, the clip name
dialog is displayed.
Use the QWERTY keyboard to type the name, then press
ENTER
or click
OK
to finish.
Note:
If you select more than one clip, or more than one track in record, the affected clips will all
get the same name.
Содержание Xynergi
Страница 1: ...Xynergi Media Production Centre User Manual 16 February 2010 Software Version 2 6 Issue 001...
Страница 8: ...Putting Machines Online 310 Editing with Machine Control 311...
Страница 192: ...User Manual SCREEN MIX CONTROLS February 16 2010 Xynergi Media Production Centre Page 194...
Страница 198: ...User Manual SCREEN MIX CONTROLS February 16 2010 Xynergi Media Production Centre Page 200 The Aux Panel...


