


95
CUIDADO DE LOS FILTROS
Retire el filtro, empujando el pestillo hacia
la parte posterior de la unidad mientras tira
hacia abajo.
Lave el filtro sin doblarlo. Déjelo secar com
-
pletamente antes de volver a instalarlo. Si la
superficie del filtro cambia de color con el
tiempo, la eficacia no se verá afectada.
Para reinstalar el filtro, empuje el filtro hacia
arriba mientras tira del pestillo hacia ade-
lante, y luego suelte el pestillo para que se
trabe en su lugar.
11
2
3
LIMPIEZA DE LOS FILTROS DE GRASA METÁLICOS
Los filtros de grasa metálicos pueden limpiarse con una solución de deter
-
gente caliente o lavarse en el lavavajillas.
Se deben limpiar cada 2 meses de uso, o más frecuentemente si el uso es
particularmente pesado.
NOTAS:
• La limpieza en el lavavajillas puede opacar el acabado de los filtros de
grasa metálicos.
• Asegúrese de que los filtros estén completamente secos antes de insta
-
larlos de nuevo en la campana extractora.
LIMPIEZA DE LAS SUPERFICIES EXTERIORES
Por favor, tenga en cuenta que los abrasivos y los desengrasantes pueden
rayar los acabados de la campana y no deben ser usados para limpiar las
superficies con acabado.
Instrucciones de limpieza del acabado de acero inoxidable:
Limpie las superficies exteriores con un limpiador de acero inoxidable dis
-
ponible en el mercado.
EN
77
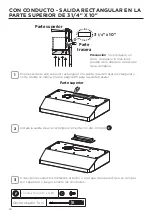
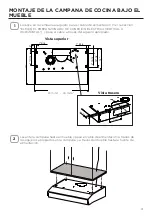
INSTALLATION
Fitting the Hood canopy
BEFORE FITTING THE HOOD TO THE WALL UNIT, PROCEED AS FOLLOWS:
• Disconnect the wires to the Commands at the connectors.
• Disconnect the wires to the Light at the con-
nectors.
• The Hood can be installed directly on the
underside of the wall unit (Minimum 650 mm
from the Cooker Hob).
• Create an opening in the bottom of the wall unit,
as shown.
• Insert the hood until the side supports snap into
place.
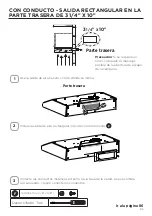
• Fasten using the 10 screws
12a
provided.
• Lock in position by tightening the screws
Vf
from
underneath the hood.
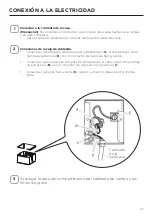
• Open the suction panel by turning the specific knob.
• Disconnect the panel from the hood canopy by sliding the
fixing pin lever.
• Remove grease filters.
• Screw the Frame into place
using the 6 screws
12f
, re-
connect the wires to the
Commands and Light, re-
place the metal grease filter
and the Panel.
260
13
495 - 675
EN
77
INSTALLATION
Fitting the Hood canopy
BEFORE FITTING THE HOOD TO THE WALL UNIT, PROCEED AS FOLLOWS:
• Disconnect the wires to the Commands at the connectors.
• Disconnect the wires to the Light at the con-
nectors.
• The Hood can be installed directly on the
underside of the wall unit (Minimum 650 mm
from the Cooker Hob).
• Create an opening in the bottom of the wall unit,
as shown.
• Insert the hood until the side supports snap into
place.
• Fasten using the 10 screws
12a
provided.
• Lock in position by tightening the screws
Vf
from
underneath the hood.
• Open the suction panel by turning the specific knob.
• Disconnect the panel from the hood canopy by sliding the
fixing pin lever.
• Remove grease filters.
• Screw the Frame into place
using the 6 screws
12f
, re-
connect the wires to the
Commands and Light, re-
place the metal grease filter
and the Panel.
260
13
495 - 675
Содержание LEVANTE G LEVG24SS300
Страница 6: ...6 RANGE HOOD DIMENSIONS 3 23 15 16 29 15 16 35 15 16 3 23 15 16 29 15 16 35 15 16 24 30 24 30...
Страница 7: ...7 MIN 24 OVER ELECTRIC MIN 30 OVER GAS INSTALLATION HEIGHT REQUIREMENTS Min 24 30...
Страница 39: ...39 DIMENSIONS DE LA HOTTE 3 23 15 16 29 15 16 35 15 16 3 23 15 16 29 15 16 35 15 16 24 po 30 po 24 po 30 po...
Страница 72: ...72 DIMENSIONES DE LA CAMPANA DE COCINA 3 23 15 16 29 15 16 35 15 16 3 23 15 16 29 15 16 35 15 16 24 30 24 30...
Страница 73: ...73 M N 24 SOBRE PLACA EL CTRICA M N 30 SOBRE PLACA DE GAS REQUISITOS DE ALTURA DE LA INSTALACI N M n 24 30...
Страница 100: ...991 0624 255_01 200825 D00007087_00...


